Hay Feeder Lid

It is all fun and games till someone has a tinkle in the hay bin.  The hay hopper I built for our new buns had an open top for filling.  Somebunny was taking advantage of this, and would sit in the hay bin while eating.  We were ok with this until the new babies started peeing in the hay pile.

DSC_0037

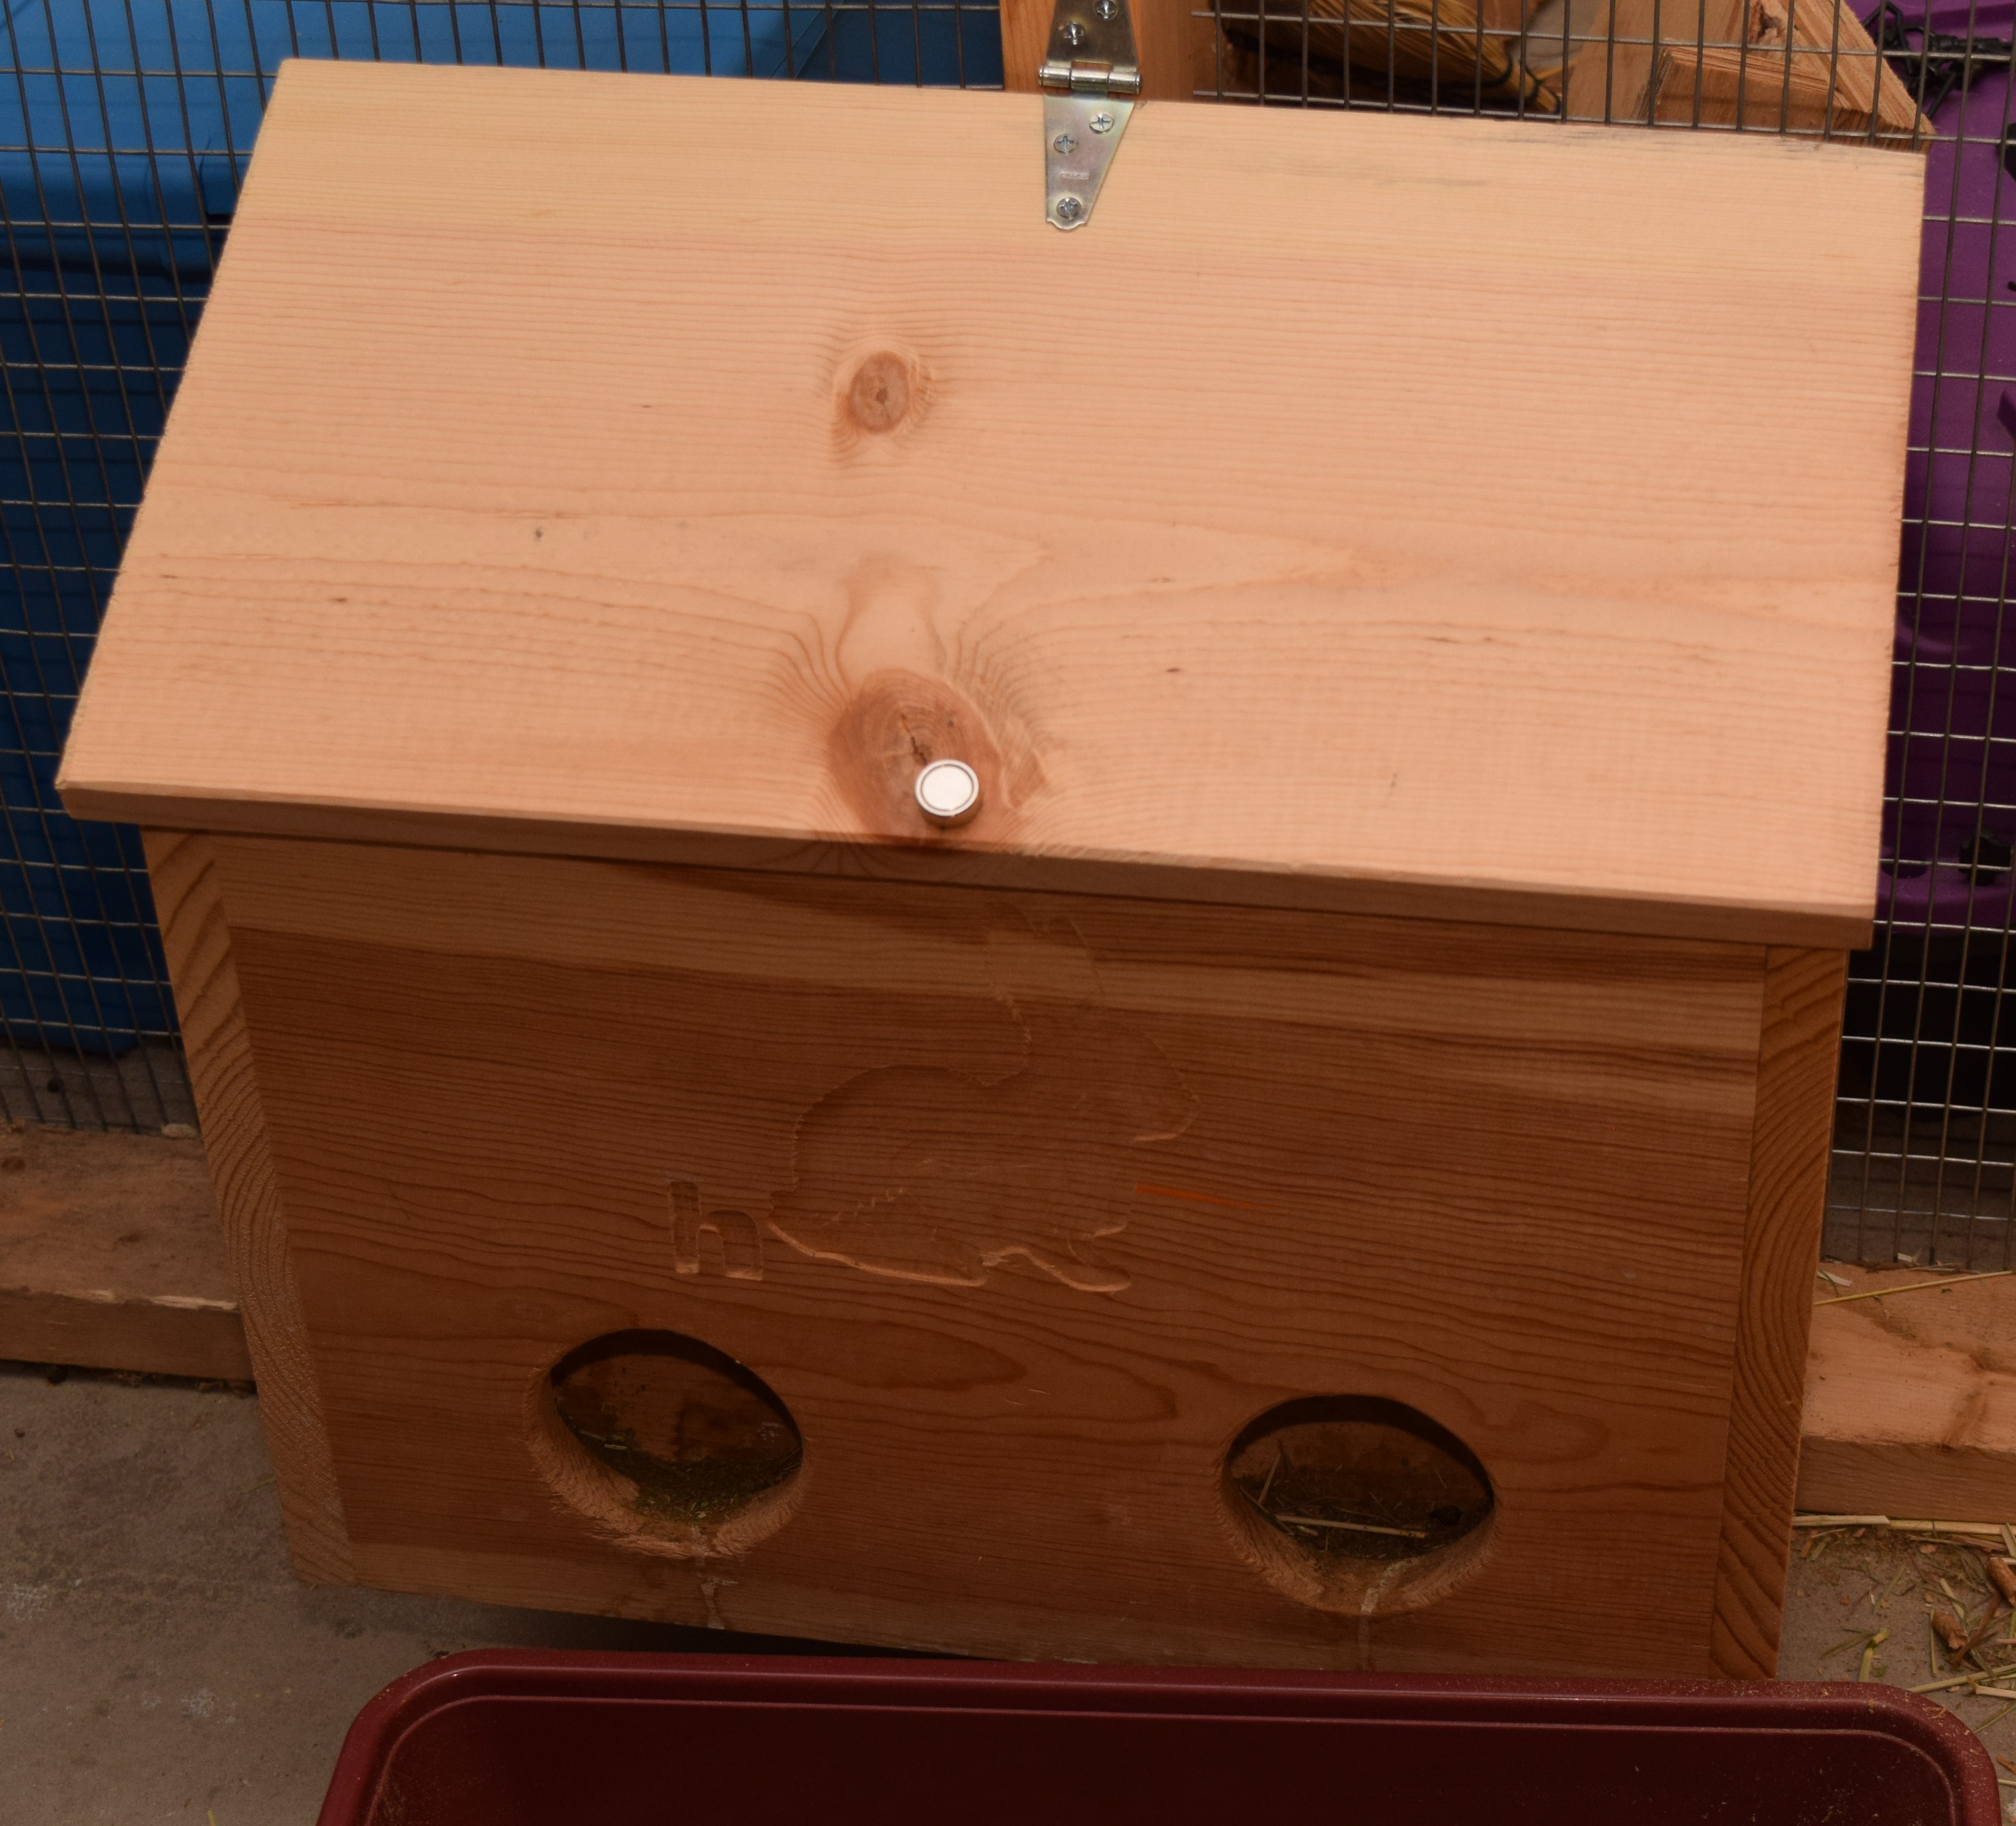
Fine, if you are going to be a bad bunny, then we have to add a lid.  I would make a simple flat top, but I don’t want them using it as a launching platform for going over the fence.  So, start with a piece of wood, and angle smartly with your great grandfather’s number 3 plane.

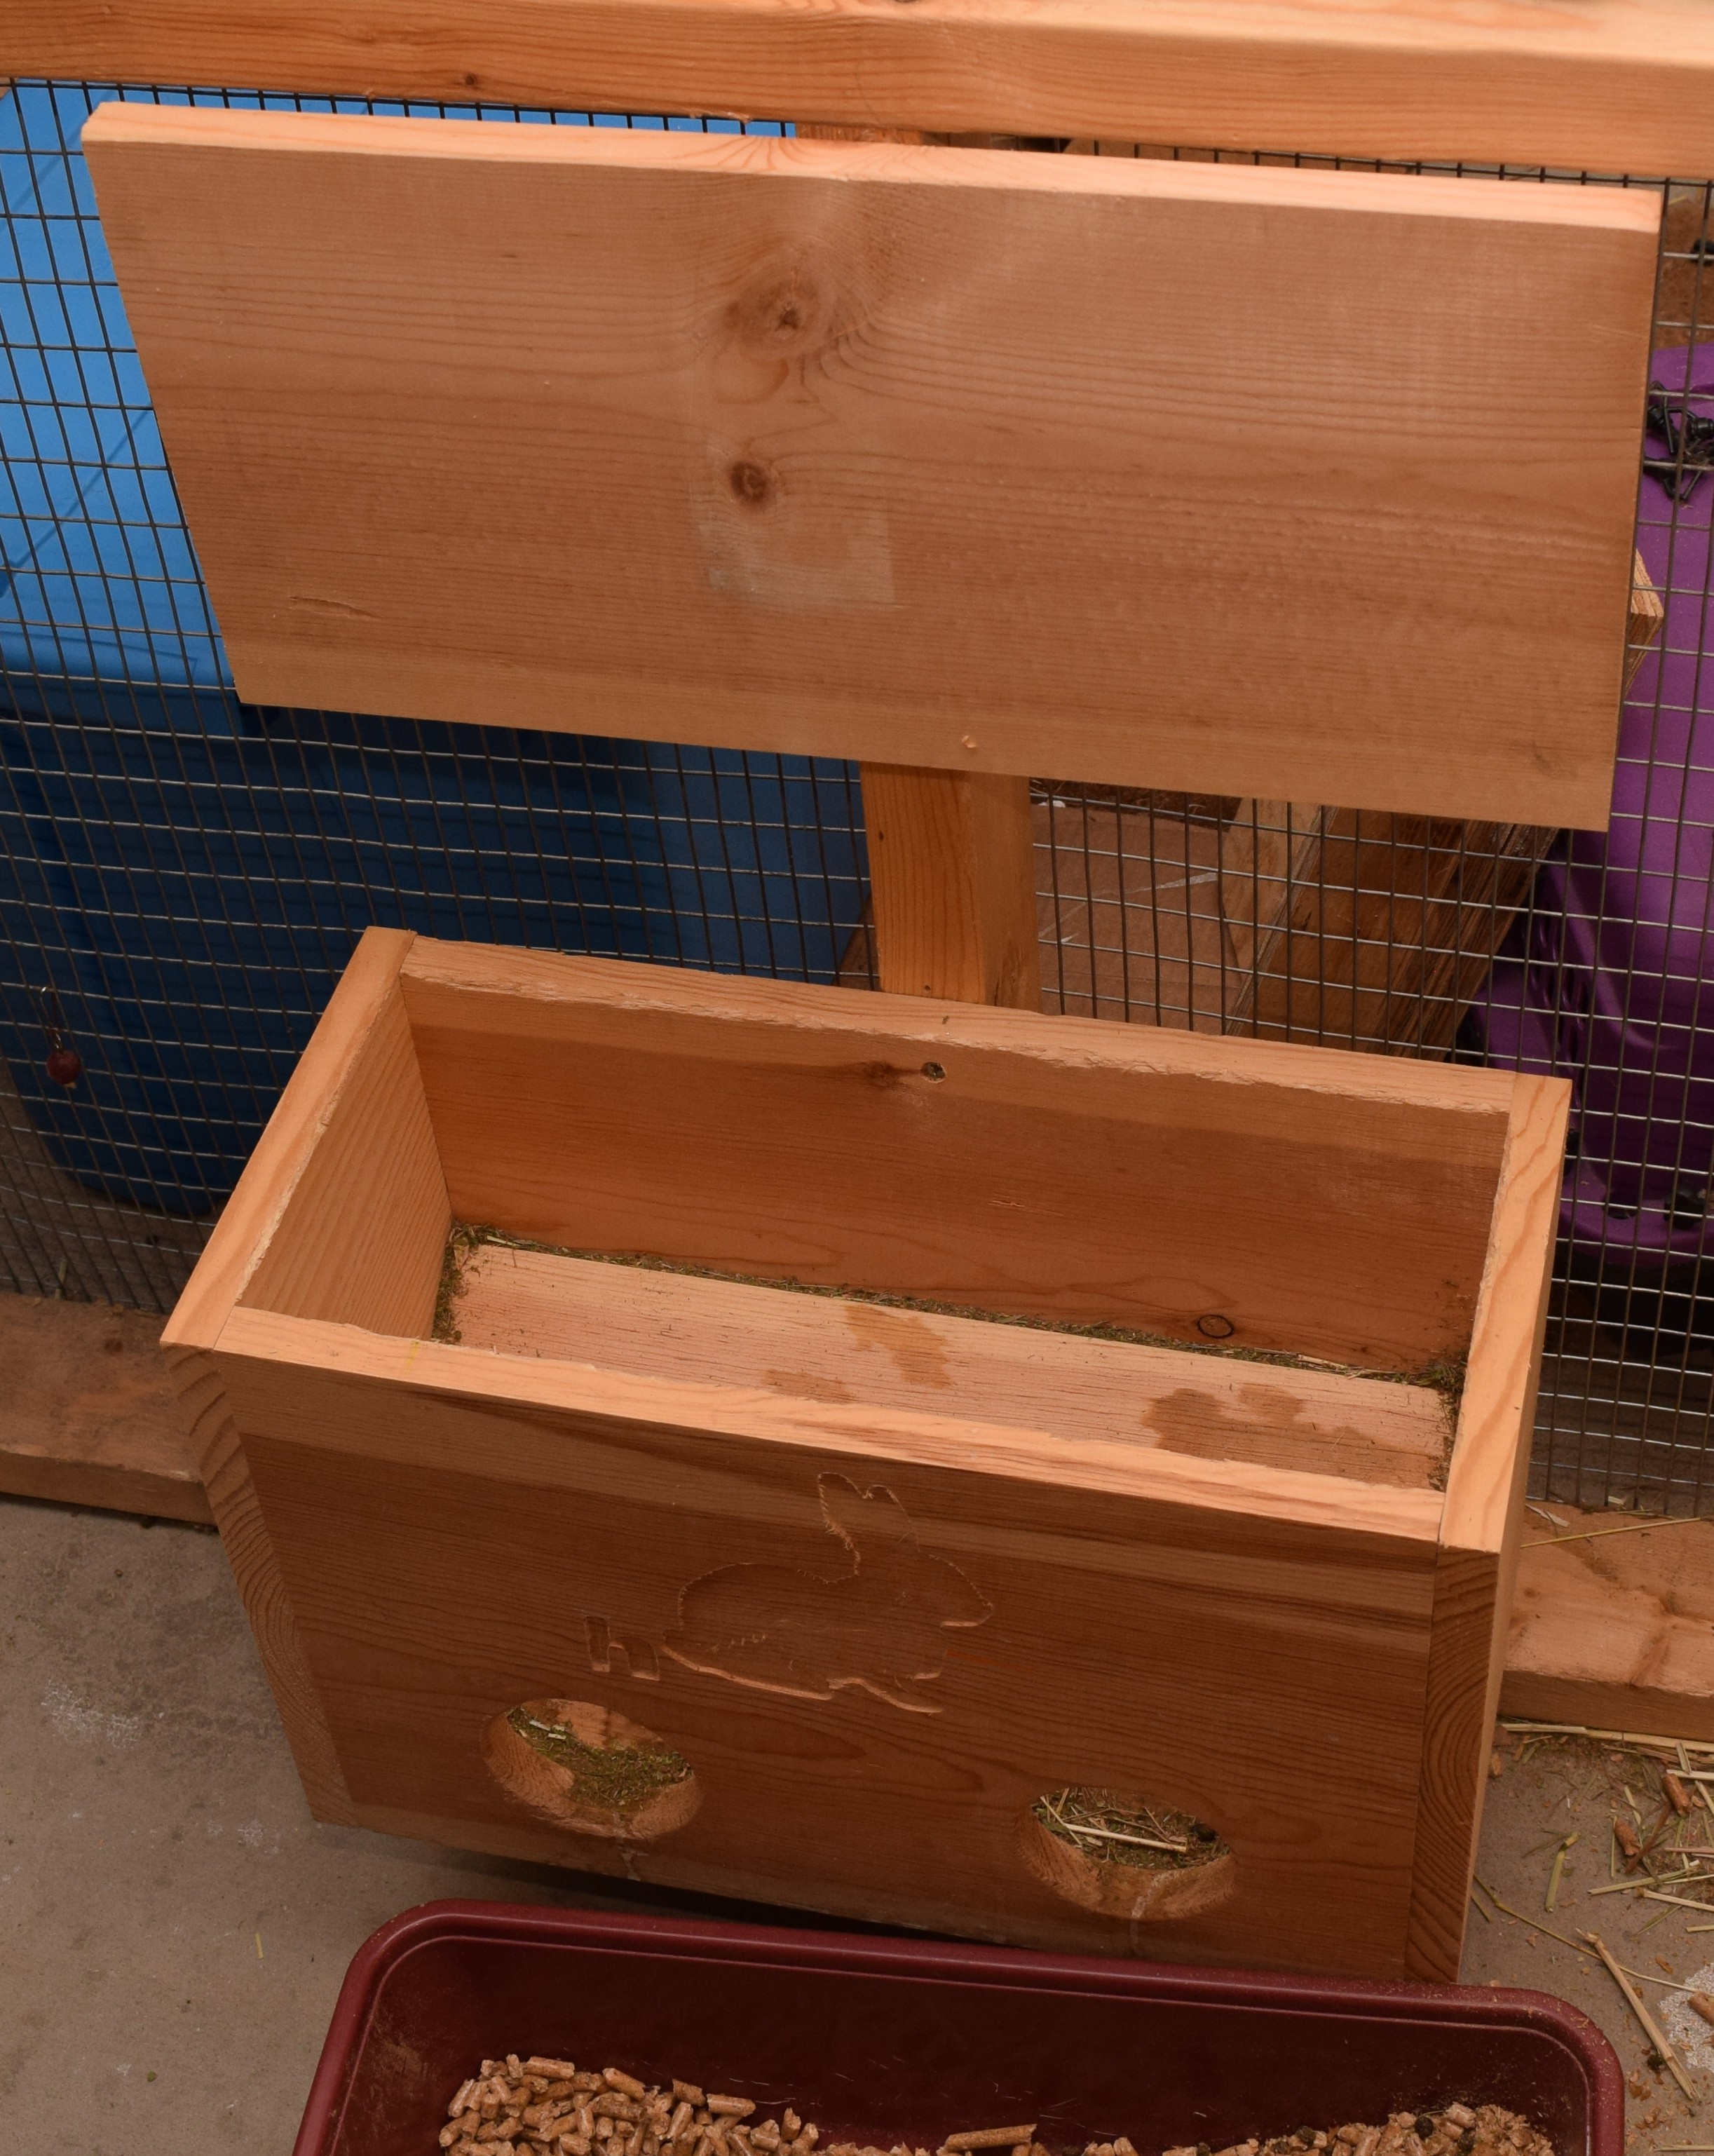
Now add a magnet and strap hinge.

DSC_0042

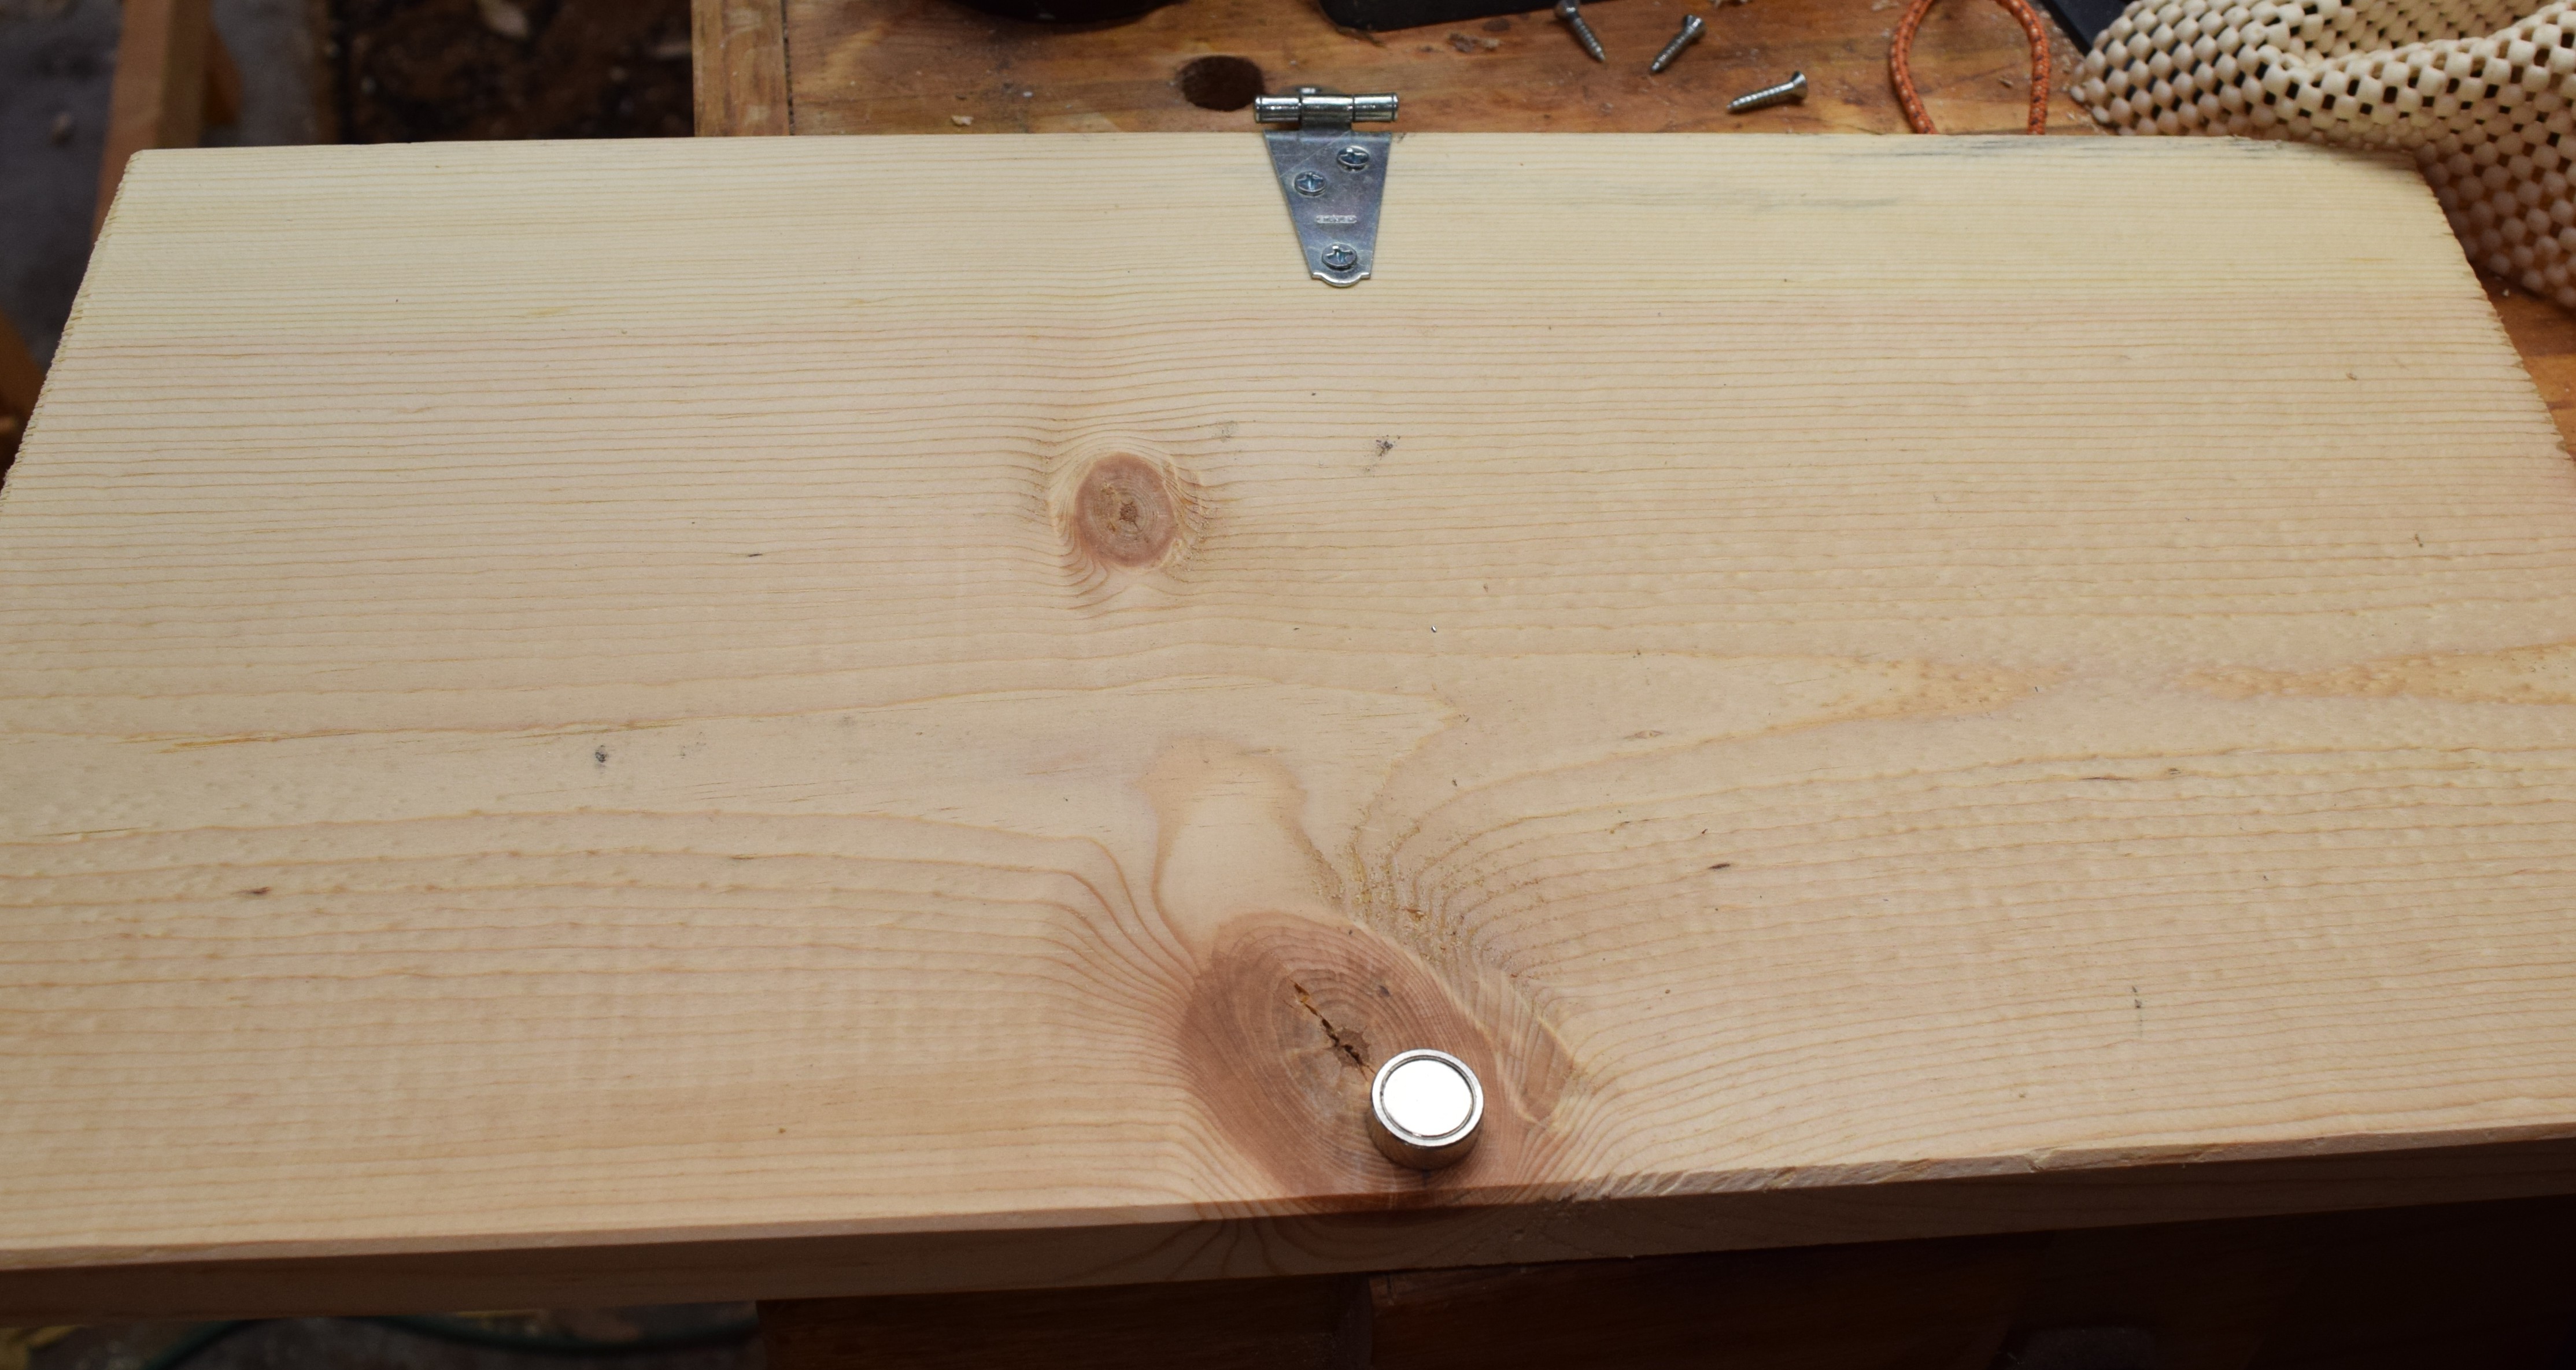
I screwed the hinge into the vertical fence support that the feeder is suspended on.  the magnet lets you open the lid and use both hands to load hay.  The sloped top seems to be keeping the buns at bay.  I have yet to see any of them try to get on top or into the bin.  Bad bunny behavior has been blocked!

DSC_0044

DSC_0045

Tampa Woodworking Show

I finally attended my first woodworking show this weekend.  I don’t know why I didn’t do this years ago, it was a blast.  I went for Friday and Saturday and had a non-stop run of seeing cool tools, attending demonstrations and classes, and talking to other woodworkers.

There were a ton of vendors selling everything electrical, mechanical and sharp.  I got to put hands on some really sweet vertias planes and rummage through endless piles of junk!

There was a ton of wood being sold there as well.  I should have brought my suburban.

People were demonstrating all sorts of carving and turning techniques and even giving attendees the chance to try out a skill for themselves.

I attended some really informative free classes while there.  I filled up pages of my field notes with different techniques and tips from the instructors.  One guy was a multi-generation housewright.  His shop still takes on apprentices and works on period houses using period tools.  I learned some things about finishing that will have to be included in my next big project, and walked away with some free varnish samples.  How cool is that?!

I spent way too much on “show special prices”, but managed to pick some some things I had been drooling over and actually did find some good deals.  Last but not least they had a monster of a log section for display, and a big portable wood mill.  Who doesn’t want one of these?


Clamp Bucket

Lots of people store clamps in large racks and in rows along their wall.  I don’t have much wall space with easy access, and a big clamp rack is a no go.  I do have some buckets though!

DSC_0046

Good, but it kind of tips over easily and could use higher sides.  Screwing the bottom of the bucket to a scrap of spare particle board keeps it from tipping.  I used small segments of pine to create risers for the second bucket.  Cutting out the bottom of the second bucket let the clamps go all the way to the bottom.

Better, now how does that happy little clamp sit in there?  Oh look, 20 friends decided to join.  Bessey and Jorgensen and Wood River Oh My!

DSC_0052

A clamp bucket for less than 10 bucks.  I had a pile of 12, 18 and 24 inch clamps lying around that really needed some organization, and this has fit the bill.  It could be a little tough to find the exact length of clamp I want in the bucket without some trial an error.  That having been said, space is at such a premium in my shop, I am willing to sacrifice a little speed for space.


Butcher Paper Holder

Butcher paper is an amazing thing to keep around the house.  It makes a temporary place-matt for messy projects on the nice dining room table, a large drawing surface, a good backdrop for small photography, a big clean surface for meat prep, holds cookies after baking, it wraps briskets for the Franklin Texas crutch, keeps wood finish and glue off your nice workbench, and about 1000 other uses.

Butcher paper is pretty reasonable if bought in a large roll.  The problem is that large rolls are heavy, tough to cut straight and just a pain to deal with.  In comes a butcher paper holder with fun features.

First, I took a few pieces of clean wide pine and cut some decorative sides.  I used to only make curves by tracing round objects like paint cans, but wanted to push myself outside of my comfort zone.  French curves let me get a little fancy and free form.  They could have been blended better, but at least I am learning.

I didn’t get fancy with the construction, just basic wood screws to hold it together and BLO to seal it.  Simple, but it looks right.

DSC_0005

This holds the roll and allows for easy removal of paper.  Next comes cutting.  I picked up a small strip of steel and started free-handing an edge on my grinder.  It is hard to get a consistent edge on something over 2 feet long.  I eventually went to an angled table on my little belt sander.  It performed well enough to produce an edge capable of cutting/tearing in a line.

Lastly I added felt pads to the bottom and left side of the holder so it can sit on its side for storage and not scratch the table when in use.  A handle at the center of gravity on the right side makes it easily portable.  Now I need a brisket to smoke and try out that butcher paper wrapped Texas crutch.

DSC_0032

New Ukulele Collection

I mentioned in the previous post about a small collection of ukes that came my way.  After a little cleanup and a restring, they were ready to be accepted into the collective.  First though they needed straps.  I have found a strap to be very beneficial to my playing.  Changing chords goes much faster and more reliably without having to worry about the head dropping.

DSC_0135

The button installation went quickly and smoothly when using the technique I laid out in my button install post.  I pulled together a hodge podge of straps.  They all work, but some are maybe not the best style for the instrument.  I will have to keep an eye out for fun and flashy straps to match each ukulele.

DSC_0136

On the left is an acoustic-electric Cordoba, the middle is an eight string Lanikai, and on the right is the Kala I restored.  They are all tenors which is a bit bigger than the concerts I typically play.  The size upgrade is nice, and I think this might be my new standard size.

Ukulele Restoration

I came into a few well loved and used ukuleles by chance.  This kala is my favorite by far.  It is very similar to one I had looked at new in a sam ash.  This kala is a slightly different style and is even more gorgeous!  It has obviously seen a lot of play time.

DSC_0120

DSC_0122

The fretboard looks almost black near the top frets, while you can actually see the rosewood at the lower frets.  Years of finger oils has given it a great color gradient.  Likewise on the back of the neck, the finish has been polished from satin to a high gloss near the top frets.

DSC_0118

Unfortunately there was a pretty heavy level of grunge built up around the fret wire, and the nut fell off when I tried to change the strings.  A few dabs of titebond type 3 and a small spring clamp had the nut back on the road to happiness.

DSC_0123

The cleaning was all done with a microfiber cloth.  I didn’t really want to clean off too much of the oils, and I don’t know what, if any, finishes were used on the fret board.  A good microfiber cloth is perfect for this.  Good at buffing, and non-abrasive.  All that green was from the frets being mildly corroded by salty body oil.

DSC_0126

Once the glue had all dried and the body had been buffed clean, I was able to restring.  It looks and sounds gorgeous.  More images of the collection and recordings to follow!

DSC_0129

Cheese Boards (Part 2)

Cheese board madness continues.  Continuing from Part 1, I chopped down the remaining over sized boards into a pile of nicely sized cheese boards.

DSC_0087

They got a good sanding, a round over on the router table, and yet more sanding.  Who doesn’t love sanding.

DSC_0088

DSC_0089

I love how everything changes as soon as you hit it with oil.  Some of the purple heart turns brown, but otherwise everything else deepens, darkens, and becomes more wonderful.

Cheese Board Mishaps

My latest round of cheese boards appeared very successful, but it wasn’t all perfect.  I bought a few cutting board templates from woodcraft and was some fun board.  For example this pepper below would have looked great red padauk.  DSC_0483

The idea is that you double sticky tape this MDF shape down to a piece of wood.  Use a saw to cut away most of the excess, then use a flush trim router bit to match the wood to the template.  That was the idea at least, it had issues.

DSC_0484

Everything was going ok until I got to this thicker area.  The bit dug in and shifted the pattern despite all the tape.  Ok, no big deal, I just need to go slow, and I can smooth that out on the sander.

DSC_0486

Nope.  It caught again on the other side and split off a big hunk of the board.  This one can’t be salvaged any more.


Things didn’t go well with the padauk, but it some odd grain in places and that shape had tight turns.  I decided to try a simpler fish design in walnut.  There were no tight spots or harsh curves, so I figured this would work better.  Plus I did a good job getting everything really close with the bandsaw.

DSC_0487

That looks good, let’s give it a go.

DSC_0488

Even with the edges tightly trimmed it still dug in hard and shifted the template.  I used a lot of carpet tape, and bought a decent template router bit.  No idea what the problem is, but I would issue some caution to anyone wanting to try this for themselves.

Cheese Boards (Part 1)

In the beginning of December I took a look at my wood pile and decided to kill two birds with one stone.  First, get rid of a lot of one off boards I have lying around, and two, make a ton of gifts.  I made a big pile of handles for pizza cutters, ice cream scoops and the like on my lathe.  Every once and a while I want a quick gift, and bam, there it is.  Lets start with my smattering of wood.

DSC_0481

DSC_0482

I later added my roasted hardwood to the pile.  Everything got planed down to an even thickness.  I started to take a picture of each board glueup, but I started going through them so quickly I forgot the pictures.  The plan was to run them through the thickness planer, so I didn’t need the top or bottom to be perfectly aligned.  This let me just use side clamps and ignore cawls.  It was quick and easy, and I had enough clamps to do 4 or 5 sets at a time.

I glued together everything I was going to make in three big waves.  Many of them I made long enough to cut into 2 or 3 cutting boards.  Much more efficient than doing each one individually.

After glue-up

After glue-up

Cleaned up from the power planer

Cleaned up from the power planer

I took about half the pile and moved forward.  I was running out of time before a big house renovation and wanted some to get finished before Christmas.  Everything got squared up on the table saw, and a nice round-over on the router table.

After a minimal sanding on the faces and round overs, they were ready to get oiled.  I like to use howard’s butcher block conditioner on these long grain cutting boards.  It has a little wax in it which works better for long grain in my opinion.  I love how the colors come out when you just start to hit them with oil.  Below is a shot of each one half oiled so you can see the before and after color.

DSC_0008

DSC_0009

I have already given most of these away, and will have to get started on the next batch soon.  I also plan on making a nice video to discuss the care and feeding of these cutting boards for anyone that has one.

Hardwood Roasting On An Open Oven

Tis the season for merriment, delight, and cooking wood.  No, I haven’t been hitting the egg nog too hard, but I did read a great article in popular woodworking recently.  It turns out you can roast some hardwoods in your oven and get a lot of great effects out of them.  I started with cherry (left) and maple (right).

DSC_0508

It turns out they couldn’t all fit in my oven.  I might have to get a rib rack or something to stand them all up next time.

DSC_0510

In they went for 4 hours at 360F.  There was an odd smell, and a mild smoke that was given off in the process.  Luckily the weather was good enough to have the doors open.  I wouldn’t attempt this if you don’t have some means of ventilation.

The results were quite striking.  Everything got darker, but it didn’t do so evenly.  Some boards have a really neat gradient across them.  The insides are a bit lighter than the surface, but not a lot.  The cherry is my favorite!

DSC_0512

Maple

DSC_0513

Cherry

One issue with using roasting wood is warpage.  I left them to re-stabilize in the shop for a few weeks before working with them.  Regardless, they were warped and twisted, and had a lot of internal stresses on the table saw.  Be really careful when cutting and make sure the splitter is properly in place.

I should be posting a project soon that used up some of these beauties.