Press Fitting 3D Prints

I have been expanding my 3D printer experience this past month and have done a number of press fit parts.  The general principle is to take a piece of hardware, measure it, and print a hole in that shape that ranges between that exact size, to less than 0.01″ smaller.  It depends on your printer performance.  Mine tends to undersize holes a touch, so printing the exact size of the hardware works well.

Once printed the hardware has to be pressed into place.  An arbor press would be perfect for this, but I don’t have one and am too cheap to buy one.  I used a C-clamp instead.  This video demonstrates a few uses of said clamp press.

Most of the parts were very specific to my needs and probably not worth uploading to thingiverse.  The only exception is the quick release plate for my tripod.  I didn’t see any online.  I need to come up with a version that captures a bolt while making it easy to use with your fingers.  That will take some thinking.

Owl Box Cut Out

I got tired of the owl box bees not descending down into the lovely medium super I provided them, so I forcefully evicted them.  The plan was simple, start by removing as many screws as possible from the owl box so I could pull the side off.

img_20160828_153543

Once the lid and side were off I could get to the whole segments of comb and remove them one at a time.

img_20160828_153752

I placed each piece on a large sheet of cutting board, used an empty frame to cut out segments of comb that would fit nicely in empty frames, and then rubber banded them in.  The wonderful wife shot some video of the process to better illustrate.

A few of the appropriately sized rubber bands did a great job of holding the pieces of comb in as long as you are careful and don’t tip the frames sideways.  Everything fit in a single super, so I made that the bottom box with their expansions super on top.  Time to wait.


Two Weeks Later

I let them sit for a while hoping that they would not leave in anger or stress, and that they would start melding their cut up comb into the new empty frames.  The entrance showed plenty of activity when we came to inspect.

20160918_125020

They really took to the wooden frames.  Every piece of comb we put in was expanding and was well anchored to the surrounding wood.

20160918_125831

20160918_125837

20160918_130103

They even added propolis and wax around the rubber bands in places.  I read that they would chew through them eventually, but for now they are making them a structural part of the hive!  I took a weight measurement on both boxes now that they are in regular boxes.  With a little luck they will gain weight and start expanding more into the additional super.

Chicken Sausage

The sausage maker strikes again.  This time with a smaller load of chicken thighs.

20160916_162720

I started with only 5 pounds of chicken thighs instead of 10+ pounds of meat like last time.  The pieces were chopped up smaller this time, and I didn’t add any pork fat.  This was just simple chicken, salt, pepper, and a little fresh rosemary from the garden.

Last time I was doing a lot of meat shoveling and stuffing, and ended up having to employ my lovely wife to help.  I didn’t get many pictures as a result.  This time my maker mom was in town.  I figured out how to guide with one hand while I pressed with the other.  Mom filled the hopper and took pictures.  

I don’t know if it was the consistency difference, the smaller hunk size or what, but this batch went really smoothly.  My diameter consistency needs help still, but I am improving.  When all was said and done, we had two piles of lumpy but delicious looking sausage.

img_0834

The batch with rosemary got grilled for dinner the same night as it was made.  I don’t know if it should sit in the fridge a few nights for the flavors to meld or not, but this worked well.  It was pretty tender and moist enough.  Not as much as the brats were, but the fat content of this was a lot lower.  A very delicious and cheap chicken sausage for the grill.

20160916_182613

The second batch got smoked a few days later.  It was also quite delicious.  I am glad I didn’t use any white meat, the sausage was good, but could probably easily be dry if it were any leaner.

20160918_170358

Fence Repair

I have a bit of a fence issue

20160910_092343

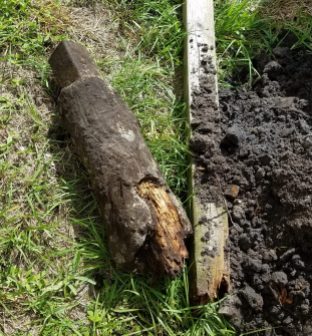
For no apparent reason other than age, one (maybe even two) of my fence posts has given up on life and is starting to lay down on the job.  How to affect repairs on something like this?  I started by sinking two 2x4s on either side of the main broken post to act as temporary supports.20160910_101205

I had a brainy idea and used a big marker to put lines at the 2ft depth on my post hole diggers.  Now I know exactly when to stop.

wp-1474161133268.jpg


I screwed the fence into the two 2x4s and was able to move on to removing the old post.  Getting the old post disconnected from the fence was easy, and it was, unsurprisingly, completely broken off at the ground.  Getting the old concrete out of the ground was another story.  It took a lot of prying, digging and grunting.

It might not look like much, but that sucker was heavy!  With it out I was able to put the new post in its place.  I thought about trying to dig out the other post that had a slight lean, but after wresting with this one for so long I punted.  Instead I sank another post right next to the leaning one.  I don’t think it was completely broken yet, and the horizontal 2x4s that hold the pickets didn’t end at that post.

20160910_113306

20160918_110559Fast forward a week later and the concrete was all set well.  I pushed everything back onto the new posts and screwed it down.  The 2×4 temporary supports came out, and I added a few right angle brackets to make sure it all held well.

While I was out working on the obviously damaged section I replaced a few bad pickets, and did some preventative screwing.  I sunk 3.5″ screws through all the 2x4s into the posts.  I have been buying only torx head screws recently, but had a lot of old exterior philips to get rid of.

20160916_084941

Lowe’s basic grade of 3.5″ exterior screw managed to break not one but two dewalt philips head impact drivers in about 20 minutes.  I had two screws left, but had to toss them and move on to torx.  After that I put a shorter screw through the center of every picket I could reach, and burned through most of a 5 pound box of screws in doing so.  My arms hurt by the way.  

A new fence will have to happen in the next year or two, but this should help keep it all together until then.

Printing For The Printer

It seems like when you get a fancy new tool you end up spending a lot of time building stuff for the tool.  Ideally it can build most of its own upgrades.  Most of my first projects on the CNC mill involved making better parts for it, and the 3D printer is no exception.  Printing for the printer.  Bootstrapping at its finest!


Tools

3D printers end up needing a few extra tools to succeed.  You can’t do everything with a printer, a computer, and your bare hands.  Printing a few small tools can make life a lot easier.

dsc_0516

Holes often come out under-sized and may have a little overhang issue, especially if printed horizontally.  A small set of drill bits is a good thing to keep around.  The red handle attaches to bits with a 1/4″ hex base and makes opening up holes a breeze.

dsc_0514

dsc_0515

You want prints to stick well to the bed during printing.  If they shift, the jig is up and the part is ruined.  The issue comes at the end when you want to pry the thing off a delicate print bed.  Careful work with a razor blade can coax them from the only home they have ever known.  The razor holder is not my design, but a popular choice on thingiverse.  The blade guard houses magnets and pops on easily to keep unwanted cuts to a minimum.  There are other designs available, but they needed magnets I didn’t have, so I made my own.  Thingiverse link.


Octoprint

Sneaker-netting a SD card between the computer and printer gets old, and all control of my printer has to come from the front knob.  Instead I grabbed a raspberry pi and installed the latest version of Octoprint.  It is amazing!  I can see what is going on and control things from any computer in my house, and even have it sending me updates via a messaging service.  I liked it so much I printed a little Octoprint statue in honor of the new service.

It was one of my first prints with support, and everything went really well.  The other fun thing it allows is a webcam to monitor the print visually.  You can even use it to take time lapse video of your prints.

Combine the fancy statue with a really nice pi cover and the print server has a proper home.

dsc_0517


Extruder Medallion

Last but not least, there has to be some decoration involved.  I saw that the extruder sits on top of my printer and spins slowly as the printer prints.  The extruder grabs the filament and slowly pushes it down into the hot end.  I figured it could use a little medallion.

dsc_0513

As you print the shaft spins and the rebel starbird goes round and round.  Enter another time lapse video.  Thingiverse Link to the medallion.


Vegetable Spiralizer

3D Printing isn’t all useless statues and funky alligator clips.  Those are fun, but you can actually make real world useful objects with even a small printer using PLA.  I use an OXO vegetable spiralizer to turn zucchini into spaghetti.  You can sauté it up with garlic, pesto, red sauce, or just eat it plain.  Very good, and an excellent alternative to pasta.  The only trick is, a manual spiralizer takes forever and leaves your wrist in pain afterwards.  Enter my first functional printer invention.

In the video looks a little awkward to use, but I found that if you cut them in half, everything goes smoothly, and 100 times faster than doing it by hand.

I had to go through a few iterations to get the plug shape right.  It turns out the kitchenaid mixer’s power take off is in a tapered housing.  A straight plug will not cut it!  The good thing about the printer is that all the parts below cost < 2 dollars, so iterating the design is cheap and easy.

DSC_0490

I started with a full run at it on the left.  The plug didn’t fit, and it had a lot of extra material.  The plug in the middle was my attempt at getting the shape right.  It worked, so I went with the final design on the right.  I uploaded it to thingiverse:

http://www.thingiverse.com/thing:1745222

Now that I know how to tie into the kitchenaid I can imagine a whole lineup of normally hand operated gizmos being plugged into my power mixer.  I wonder if it will chop onions?  The future is bright!

wp-1473298747459.jpg


Printer Cabinet

I am keeping with the printer theme, but this is the 2d paper chewing variety.  Our old printer was on the fritz, so I upgraded to a more professional model that does document scanning and yada yada.  It has been over a month and it prints well, scans fast, and is cheaper to operate than the last one.  It is quite big though, and the old location in the closet isn’t going to cut it anymore.  I need to be able to get to the top and have lots of room to flip up the scanner.  We are gonna need another cabinet.
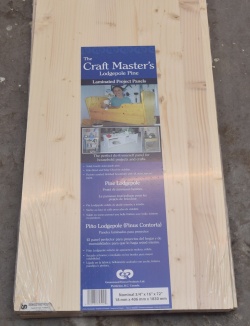
DSC_0441I wanted to build this quickly so I could clean up our office a bit.  Plywood is what I have used on many of my previous shop cabinets.  It looks decent out in the garage, but I wanted something nicer for inside the house.  Edge banding is a possibility, but I wanted to try something else.  This product is available at most home centers.  It is pre-made laminated pine boards.  The price is pretty reasonable and it has a nice rustic look while still looking better than plywood.  Never buy it.  The thickness varied from board to board, and once I cross cut it there was a lot of warpage.

Consider yourself warned.  I built a basic box using rabbeted edges, glue, and brad nails.  The thickness differences made doing a proper rabbet really tough, and the warping kept the joints from being tight.

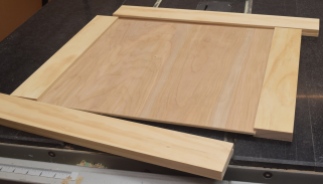
I did a basic framed panel door to go across the front opening.  My issues continued, I cut the panel right at the edge of too short.  It will work, but I have to be careful to prevent it from shifting and showing a gap.  I used some of the left over laminated material to build a pull out drawer.  Cutting at the angle relieved more stress and showed a lot of bad warping.


For a finish I decided to try out a home built shellac.  Fine woodworking had a decent article and video on making your own and application.  I like it!  This is kind of a big project for wiping, but it was easy to mix, went on really fast, and didn’t alter the color too much.  I used a very blonde shellac.  Next time I will do something darker and see how it works with soft woods like pine.

DSC_0450

The screw-ups keep on coming.  I cut the panel groove all the way through the side board.  I should have stopped it.  Not only does it look bad, but it compromises the strength of the pocket hole screws.  They don’t have as much to bite into.

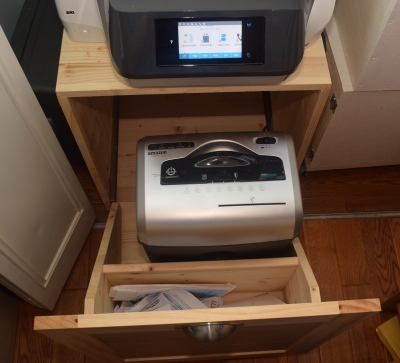
The drawer went in on a set of full extension metal drawer slides. This will house my paper shredder and paper storage.

The warping of everything showed up in the front door.  Tight on one side, slightly open on the other.  Oh well, it is going in a closet.

Speaking of closet, here is the final resting place.  It slides under the existing shelf nicely, and is short enough front to back so that you can close the closet door and conceal the printer.  If you just need to make a few prints, the front area is accessible enough to do so.  If you need to scan, the whole cabinet is on wheels, so you can just pull it out, do your work, then shove it back in.

DSC_0459

The best part is what is housed inside.  I put my shredder on the back side of the drawer, and used the front as paper storage.  Now instead of a pile growing around the shredder it collects neatly here until I can get to it.  My implementation and the materials leave a lot to be desired, but it still looks decent, and is super functional.  I learned, didn’t get hurt, and got a useful piece of furniture.  I’ll call that a win.
DSC_0460


This Is Only A Print Test

To use a printer you must think like a printer!  Or at least know some of the limits.  The supposed resolution of my new mini printer is 0.1mm.  It doesn’t necessairly mean you can print something that size, just that the stepper motors and gearing are able to potentially displace 0.1mm in X Y and Z.  The nozzle diameter is 0.4mm, which would likely mean you can’t make features smaller than 0.4mm, and making anything between 0.8 and 0.4mm might turn out funky because of diameter overlap.  Well lets find out.


Pins and Holes

I made a pin a hole test pattern.  They started at 0.25″, went down by 0.05 till it hit 0.1″, then went down by hundredths till it got to 0.01″.  I then measured the actual results to see what happens.  The pins were quite accurate until it got below 0.05 inches.  Everything below there just came out at the same diameter.  My 0.8mm prediction wasn’t far off, 0.8mm = 0.031in.

The holes had an undersizing problem.  It is consistently 0.01″ narrower until it gives up around 0.02.  I don’t quite know why this happens, but the fancy professional printer we have at work does the same thing below about 0.1″.  I think everything over 0.25″ ought to be ok.


Text

I moved on to raised and lowered text.  Being able to label parts with information is quite useful.  Engraving or having raised text is essentially all the same as far as the printer is concerned.  I suspect the raised text might be faster because of how the walls and support are built and calculated.

Both sets turned out pretty well.  The text is very readable and looks decent down to 0.2″ high text.  The 0.15″ is readable but the inside features of the recessed text is starting to merge with the side walls, and the raised text is starting to mush together.  The 0.1 recess is readable, but looks bad, while the raised text is pretty blobby.  Finally, neither did much for the 0.075″ text.  All text was done with Arial Black text set on Bold.  Different fonts and settings might yield better results, but I doubt they will be much better.


Overhang Test

The printer’s ability to print overhanging structures is amazing.  You can bridge small gaps without too many issues, but that is something that shouldn’t be used much.  Angles on the other hand can be quite common.  How far can it go?  45 degrees?  Further?

A lot further it turns out.  The top surfaces look great, but by the time the printer gets there the surface below is already quite solid.  It is the bottom surface you have to look at.  The 30 and 45 look great.  60 and 70 are a little zitty and wavy, but quite serviceable with a bit of sanding.  Really fine model making might suffer, but when making basic structures, even 70 degree overhangs are not unattainable.