Nailed It

This is kind of a puzzle in multiple ways.  It is supposed to be presented to people as an impossible puzzle.  How did the nail get there, how do you get it out?  In reality, it was kind of a puzzle figuring out how to make it properly.

DSC_0244

I have seen it described a number of times.  Cut the shape out of a block of wood, boil the one end for a while, clamp it down in a vise till it dries, put the nail in, and reboil to (mostly) return the wood to its original form.  The finished product pictured above is my 3rd attempt.  The first two times had an issue

DSC_0228

Something that isn’t stated, at least not in the articles I read, is that grain orientation matters a lot.  The first two blocks of wood were flat sawn, and rolled badly under compression.  See the picture below.  The successful piece is a core cut and compressed evenly during the clamp.  I don’t know if core woods work better than stuff near the edge, but my guess is you want something that is mostly quarter sawn for this trick.

DSC_0230

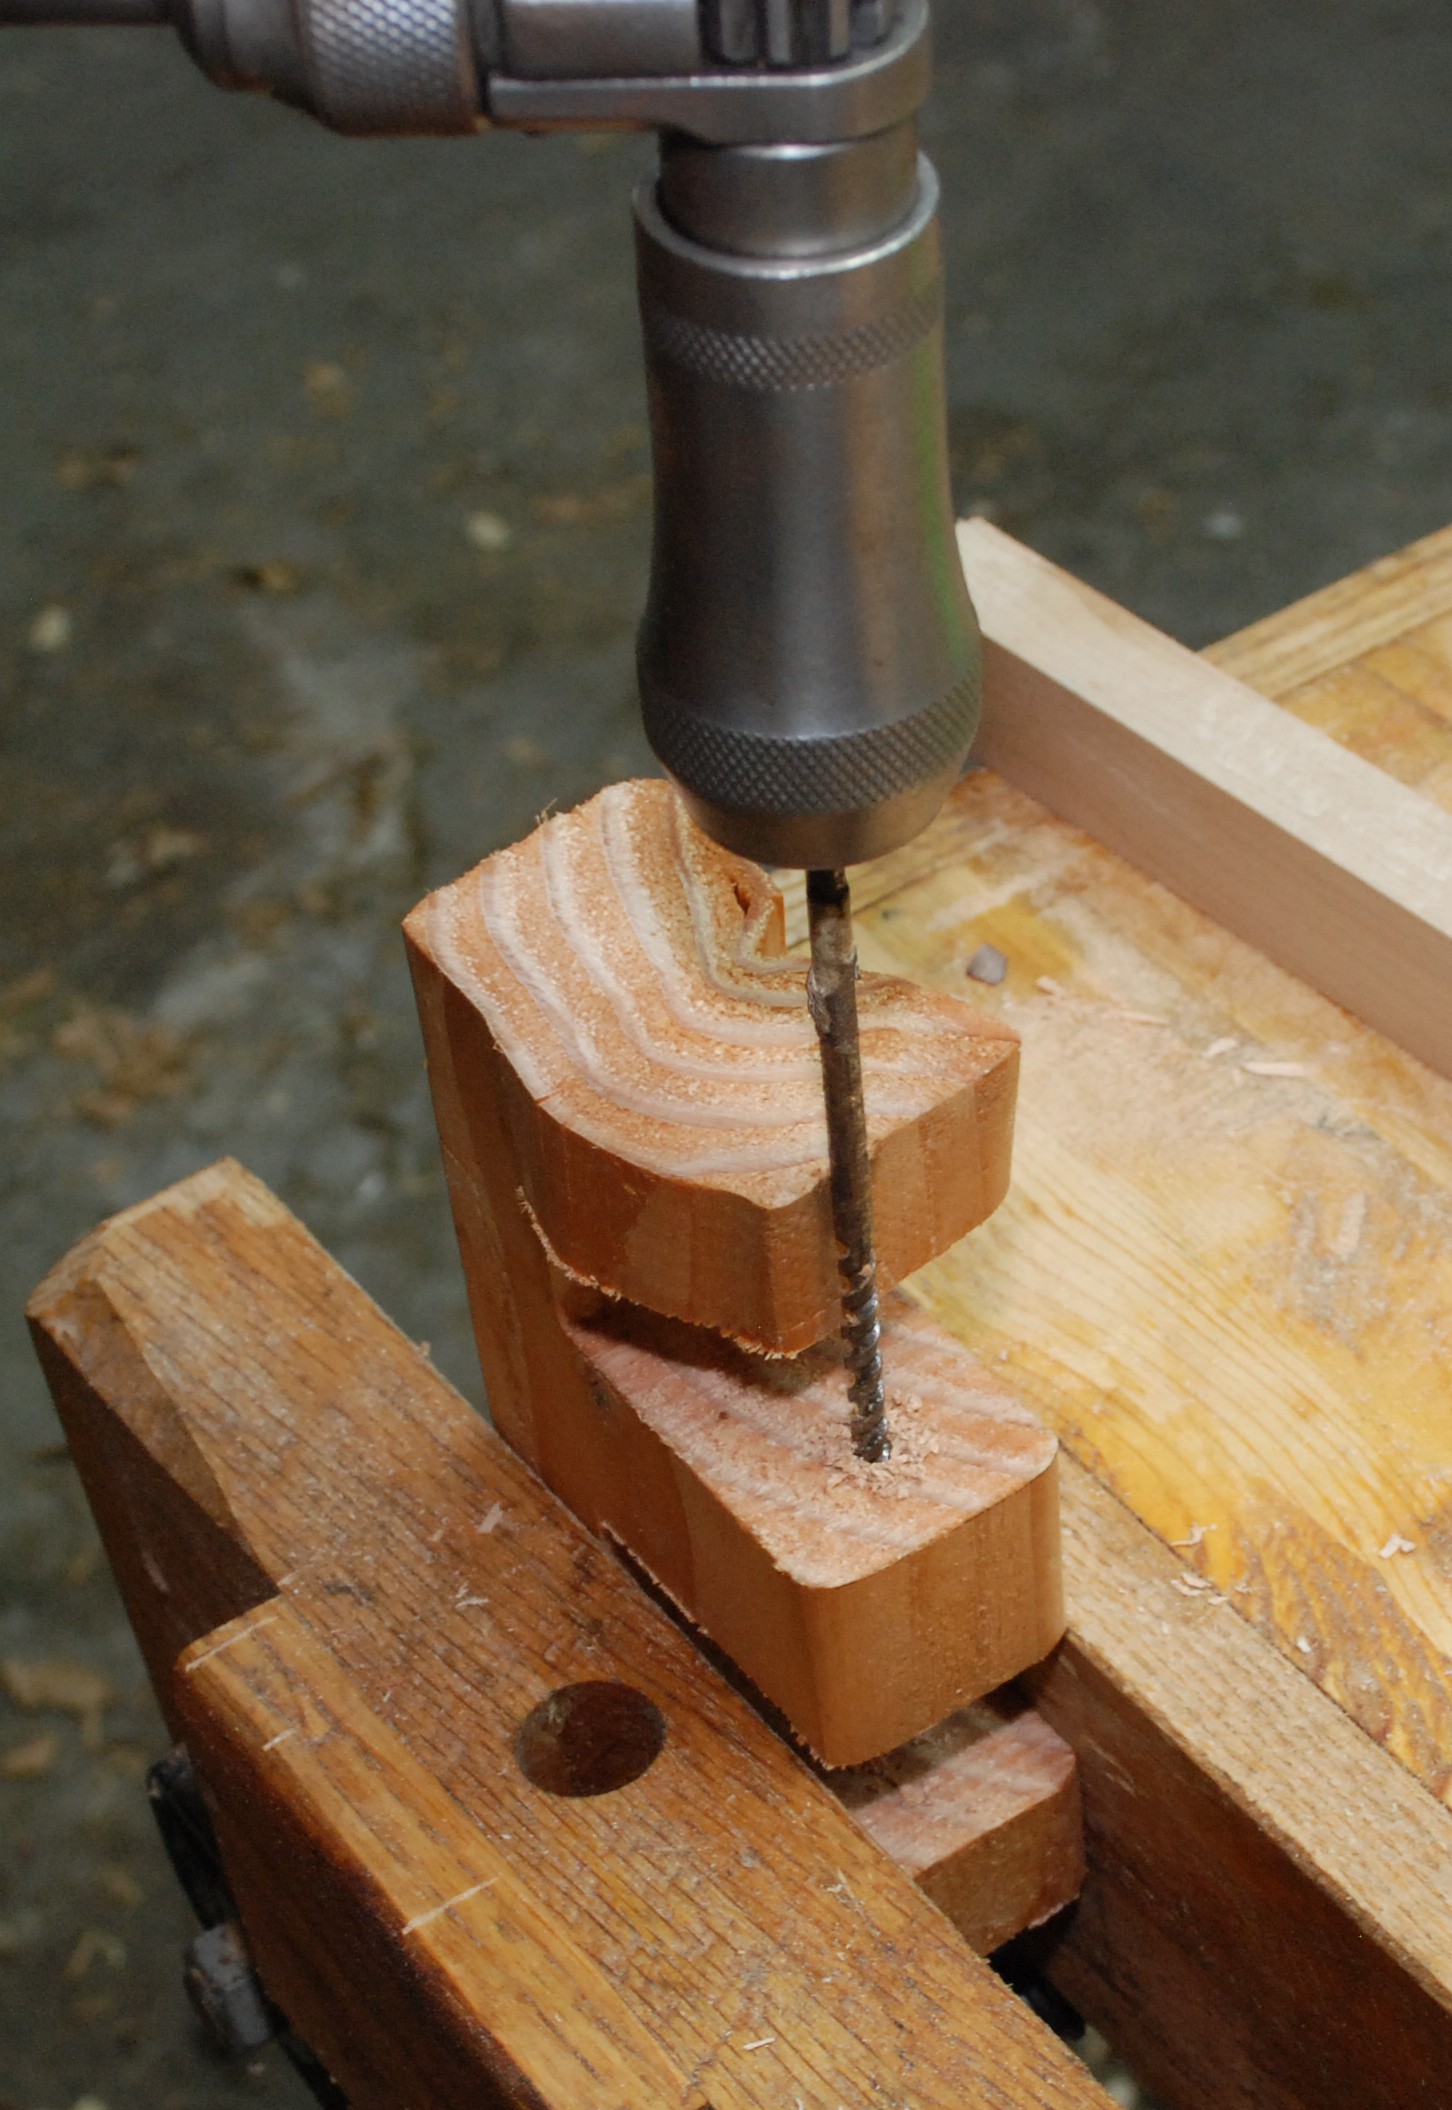
See how it keeps rolling over in the vice.  I couldn’t stop it, and reboiling the wood never straightened out very well.  Another lesson was to use a brace and long bit instead of a power drill.  The chuck kept getting in the way till I switched to the trusty old family heirloom.

DSC_0231

To summarize a few lessons in case anyone else wants to do this:

  • Be sure to get a really good boil, my first attempt wasn’t boiled enough and didn’t compress well
  • Use quarter sawn wood, or a core piece, flat cuts roll with the grain
  • Make sure you have a long enough bit
  • Try doing two at once.  It shouldn’t be any harder and gives better odds of success
  • Be careful when sanding everything flush later, I broke one tab clean off trying to rescue it with heavy sanding the second block

Brisket!!!

I have been on a BBQ media bender.  I recently read the Franklin Barbecue Meat Smoking Manifesto, and have watched all available episodes of BBQ with Franklin.  The result is that I want to make a brisket so bad!  Traditionally I have done mostly pork, some chicken, and sausage on my smoker.  All of those are awesome, but after so many years of smoking, it is time to branch out.

I traded my beloved hickory for oak, my complex sugar heavy rubs for coarse salt and pepper, and my pork for a big hunk of brisket.

DSC_0234

I got up at 6am to get this beast started.  I don’t like waking up early on the weekends, but this was totally worth it!  It went on about 6:30 and sat soaking up smokey goodness till about lunch time.

I started spraying it down occasionally with apple cider and checking for the level of bark.  I had some problems controlling the temperature on my smoker.  The base traeger I got has only 3 settings of temperature, low medium and high.  Low is lower than I want, and medium is higher.  Upgrading to a temperature controlled unit is high on my priority list.  I was getting through the stall and had the level of bark I wanted.  Next comes the wrap.  I went with the franklin method of paper wrapping instead of foil wrapping.

DSC_0236

Once wrapped it went back to the smoker for the remainder of the afternoon.  I started poking and temp probing, and by 4:30 or so things looked done.  I pulled it and let it sit for a while still wrapped in paper.  I might unwrap next time, It took a long time to cool.  Finally, the cut.  I am no expert carver, and a really long knife would be helpful.  Still, I was able to identify the right side and carve properly.  This smells so good.

DSC_0238

DSC_0239

It was goooooooooood.  The temperature swings caused a few edges to be a little on the burned and dry sides, but otherwise it was a really good moist tender brisket.  Using only salt and pepper as a rub turned out great, why would you need anything more?  Not only does it provide some amazing dinners, we had brisket and eggs for breakfast.  Now that is a breakfast of champs!

Sriracha Ketchup

I bought some empty squeeze bottles for making custom home sauces.  An easy starter was Sriracha ketchup.  I began with small quantities and used a scale to set my ratios.

DSC_0227

4:1(ketchup to Sriracha) was a pretty good blend.  You could taste the chilli sauce with every bite, but wasn’t left in flames after eating a few tablespoons of the stuff.  Hot heads might want to try a 3:1 or a 2:1 ratio.  Only filling the squeeze bottle up a little means you can tweak your mix ratio after sampling.

A pile of Wendy’s fries provided an excellent test medium for my new sauce.

DSC_0233


Tree Revenge Kit

I love trees!  The whole oxygen-necessary-to-life thing is neat and all, but their dead dried carcasses are where it is really at!  Aged cherry, bright maple, dark smooth walnut.  Every once and a while these trees get their revenge.  Splinters don’t happen often, but when they do… OUCH!  Thus, my Tree Revenge Kit was born.

The kit sits right next to the entry to my shop and contains a single set of tweezers.  I like the ridiculous idea of a monster kit that has all kinds of fancy locks, and when you open it up there is only a small simple thing inside.  This isn’t that extreme, but the box certainly could be a lot smaller.  Or I could just put the tweezers in a drawer.


The Build

This is another mix of woodworking and CNC milling.  The lid is walnut and the base is poplar.  I started by making the top, and milling out the text and tree all in one go.  Each color got masked off and hit with spray paint.  I think this might be my new preferred method of inlaying color into wood.  It is quick and easy, and goes down well over a quick coat of spray lacquer.  Having done a number of color inlay projects at this point, nothing is faster or cleaner than hand planing off the excess paint on top.

Once the lid was cut out and finished I could cut the poplar base to match.  Nothing special was done to it aside from milling out a slot for the tweezers to go in, and some relief cuts for a set of big fingers to pull the tweezers out.

A really funny project would have been to cut the slit, but not the finger relief.  Then, make a tool (with magnets?) to extract the tweezers.  Maybe that tool would get its own box.  It should have a lock to keep people from stealing it.  I digress.

DSC_0214

A set of simple hinges hold the two halves together, and that about wraps it up.

Building Beekeeper Community

I have had the bee madness for about 6 months now.  Our hive is going well, the honey is flowing and the girls appear to be relatively healthy.  What more could someone ask for?  Well community would be nice.  Why not start one!

Space Coast Beekeepers

I have no idea how many people keep bees in the area, or if they are worth talking to.  Time for a social adventure!  If anyone reading this happens to live in Brevard county Florida, come on down.

Custom USB Stick With Bonus Disaster

I have a media computer hooked up to a TV that had been running windows 8.  After no end of having system updates failing and reformats I finally replaced it with Ubuntu.  I like the operating system.  It was easy to install, does everything I need on that computer, is fast, and appears stable.  Best of all it is free and can be installed with a USB stick.  I am going to be keeping a copy around from now on.  Might as well have a proper storage stick.

DSC_0200

That is the Ubuntu symbol in case you aren’t familiar.  So my spray painting job isn’t exactly perfect, but I am happy with how this one turned out.  I took a standard USB stick, painted it orange (Ubuntu’s color), then carved the logo into the paint to reveal the white plastic beneath.  It may seem like tons of work just to identify a jump drive, but when you have a mill, things like this MUST be done!

It wasn’t without issue though.  I bought two incase I messed up one.  Good thing too, because I forgot to reset the zero (starting position) in my mill software and plunged an engraving bit straight through the poor thing.

DSC_0197

Yes, that hole goes clean through.  Might as well try again.  The symbol milled into this drive was my second attempt.  It needed minor cleanup, but looks pretty good.  My attempt on the backup USB drive and was the finished product I showed first.

I think this speared usb stick can serve as a good example of what not to do.  Why not keep the engraving going and make myself a reminder sign?  I engraved some outline text into a bit of plywood, and sprayed it with black paint to highlight the lettering.

I went a little overboard with the paint, but after sufficient sanding I got through and had a decent looking set of letters.  I attached the USB stick and placed the new sign on the wall behind my mill.  Hopefully this will help keep me from making future mistakes… Yeah, probably not.

DSC_0199

Hive Update

Lots of new things are happening with the hive, and they aren’t all good.  I will start with the great news.  The girls have been packing away around 10 pounds a week lately.  WOW!

Screen Shot 2015-07-12 at 12.04.01 PM

Look at that honey super pack on the pounds.  It has been going so quickly in fact that I didn’t have any supers ready to go.  Luckily I had some time to build them up properly and even do a little extra decorating.

I broke out the mill and carved up a little cartoon bee spray paint stencil.  I kind of want to try something different with the head next time, but for now it looks really good.

DSC_0180

A full honey super weighs about 50 pounds.  I subtract the weight of the box and empty frames, which is why mine appear to top out at 40 pounds in the above graph.  The height of my hive was causing problems, so I ended up chopping down the legs a bit.  It puts the heavy supers at a more comfortable lifting height.  Before and after shots show what I mean.

With the new lowrider setup, the 3rd super is now lower than the 2nd was previously.  It was tons of fun out there sawing away with power tools while a bazillion bees flew around angry that their home was being disturbed.  No stings while doing it, so booya!


Varroa Mites

The bad news is I put another sticky trap under the hive and came back with a pile of varroa mites.  I estimated 12 per day, but it is hard when there are that many.  Previously I had about 1 mite per day.  One big difference was that I had the mite trap in place while we did our inspection.  Between smoking, moving boxes and frames around, and taking everything off to chop down the legs, I probably knocked a lot of mites off.  That is my hope at least.  I will wait a day or two, then reset the trap and try again for only 24 hours.  Doing it for 4-5 days at a time produces way too much debris on the trap.  If the next test again shows a lot of mites, then we will probably institute powdered sugar treatments.  Poor girls.


Sous Vide Chuck Roast

I am still riding high on my sous vide cooker.  I have done piles of pork chicken and steaks.  All of these were cooked in a few hours.  It is time to try an overnight cook.  Behold the chuck roast!

It is cheap and kind of tough which makes it a perfect candidate for a long cook.  I started with a kosher salt and fresh cracked pepper coating.  I then bagged the two together and chucked (haha) them into the sous vide.  My instructions came from Baldwin’s website.  That place has seriously good info on sous vide.

DSC_0190

After around 27 hours at 135F it was dinner time, and the roast was ready to rock!  I pulled it out and dumped the liquids in a measuring glass.  The dark color on the roast was natural from the cooking, no searing needed.  A really nice dark brown on the outside, and a consistent red throughout.  Searing might be a good idea, but I sliced it up without.

DSC_0193

The poured off liquids went into making a really kick butt gravy.  All that pepper that was on the outside of the roast got into the liquid and really carries through the brown gravy.  Mix that nice peppery bite with some honey Sriracha brussel sprouts and you have a seriously good dinner.  Tender and juicy, this is hands down the best roast I have ever made.

DSC_0194

GoPro Time Lapse Endurance

I love time lapse videos.  They can show progress and life in a way that we couldn’t normally comprehend at our human pace.  I have started a few time lapse shots only to have them go sour part of the way through.  Changing lighting conditions are one culprit, but so are dead batteries.  When they only give you 3 little bars to show battery life, it can be hard to tell how much time is available.  I decided to do some time trials with various batteries and capture rates.

All tests performed with a GoPro Hero 3 White, WiFi off


Storage Space

A simple one to test is storage space, or so I thought.  Everything was pretty straight forward until I paid attention to the file sizes.  It turns out the image size varies quite a bit depending on lighting conditions and capture speed.  At 1 second and below, the file size cut way down.  Similarly low lighting conditions will produce smaller files.  Even with a 10 second delay.

  • 0.5 – 1 second delay: 250kb – 750kb
  • 2+ second delay: 1.3mb – 2mb

This mean that mileage may vary by quite a bit.  1 second delay in low light vs bright conditions can be a factor of 3 difference.  This is all a little academic.  Memory is cheap, and often more available than battery life.  The worst case would be a 2 second capture delay in full lighting.  That could theoretically be 3.6gb/hr.  A few of the actual numbers I got are below.  Most were taken in fairly low lighting.

  • 1 second delay, 2 gb/hr
  • 5 second delay, 1 gb/hr
  • 10 second delay, 0.5 gb/hr

In theory 5 seconds could go from 1 to 1.5gb/hr.  Again, probably not going to break the SD card bank.  Take my above file size numbers, multiply by your acquisition rate and figure out how much space you will need.


Internal Battery Endurance

This is what I originally set out to do before I got really side tracked with file size.  I had a hypothesis that the higher acquisition rates would yield shorter battery life.  The idea being that the GoPro would consume less power in the delay cycle vs when capturing.  100% wrong!

It turns out there is no measurable battery life difference.  I tried 1s, 5s and 10s delay.  They all turned out the same on a given battery.  I compared a stock GoPro battery and a Wasabi power battery both with a 5s capture delay.  They came out really close.  That is surprising considering the stated mAh rating is higher on the Wasabi.

  • Wasabi Power Battery (1200mAh): 3hr 45min
  • GoPro Stock Battery (1050mAh): 4 hours

DSC_0142

4 hours isn’t bad, but when you consider there will be setup time, that drops.  An extra battery source is whats needed.  GoPro sells a backpack, but I wanted something cheaper to rig.  How about one of these portable batteries used to charge a phone?


External Battery Endurance

I have an Anker portable battery (3200mAh) and an EasyAcc (10,000 mAh).  Often the stated ratings are not correct.  See Wasabi example above.  Still, they ought to last longer.

  • Anker battery: 8 hours
  • EasyAcc Power Bank: 29+ hours

The power bank was crazy.  I eventually gave up and just stopped it.  There are 4 indicator lights on it, and one was still lit up when I called it quits.  I have no idea exactly how long it would run, but obviously well over a day.  I can’t imagine I will want to do time lapse for that long.

DSC_0182Using a portable pack, you will not be able to seal up the GoPro.  Time lapses done in a rough environment will require an official backpac with new case.  Still, I can think of a lot of places where having all day time lapse without water resistance would be useful.

Wooden Comb

My goatee is getting pretty long and is need of some combing.  I could buy a regular comb for a few bucks, or I could spend hours making my own.  Is it even really a choice?!

Looking at what others have done, the table saw seems to be a popular choice for making the tines.  I figured a 1/8″ mill bit would do a pretty decent job, so lets mill this puppy.

I created a basic low profile pick that fit on some thinner scrap walnut I had available.  I really like how it looks with the lighter sapwood on the one edge.  A relief of half the thickness let me easily inlay some maple.  The grain runs counter to the walnut for strength and is proud a bit to help with holding.  It took a pile of sanding to point the ends of the tines.  A power sander made it pretty quick, but manual sanding is completely possible.  After glue-up and sanding I gave it all a coating of spray lacquer.

So far my goatee is happy with it.  A little oil and a comb post-shower seems to make it lot more manageable.  After all, there is nothing worse than a bad beard day!

DSC_0148