Wireless Backup Camera

I stuck an empire logo on my suburban and jokingly named it the stormtrooper.  It has the right color scheme, and I hoped the name would mean it couldn’t hit anything.  That didn’t work, and it backed into a neighbor’s car.  Nothing serious, but a backup camera would have been useful.  Here is one now!

20171230_153433

Finding a spot on the suburban that would let me see well, but not get broken off the first time I loaded up lumber was a little tricky.  This spot doesn’t give the best view but should be out of the way.

The unit I got was wireless.  I just needed power for the in-cab unit, and to tie into the reverse lights for the camera assembly.  I pulled the tail light off and found a lot of wires.  The green is positive for the backup light, the black wires are all common grounds, and that brown wire looks a lot like a black wire if you are too excited and cut before you should.  I used heat shrink solder connectors.  They self seal and make a nice slim connection.  I added tape to each as an extra layer of protection.

I snaked my own wire down into the bumper area before the kit arrived and it turns out they gave you 10 miles of wire to deal with.  I wrapped up the transmitter and extra wires with a lot of zip ties and stuck it in the cleanest secure spot I could find.

20171230_153413

I don’t know how long it will take for water to get into these electronics and ruin the whole setup, but considering the vehicle is 17 years old, a lot of other things will break down first.


Back in the cab you just need to plug the screen in to 12V power.  It will come on when you go into reverse.  Hey presto, it works!

20171230_150328

Now I need to find a spot to stick it and hide the 12 miles of power cable.  The kit came with a suction cup bracket that was supposed to go on your dash.  Mine is so high that anything on it would obstruct vision.  Instead I printed a wedge shape to go between this blank spot next to the environmental controls.  It angles the screen towards the driver by 10 degrees.

3M’s VHB tape will make anything attach to just about anything else.  It is expensive, but good stuff.  A layer on either side of my PETG (should survive the high heat of Florida’s summer) wedge fixed the screen in place.

20171231_094800

I was able to stuff most of the extra cables in a pull out ash tray below the screen.  Everything looks tidy if decidedly out of place.

Jerky Chemistry

Those food scientists and chemists jerky companies employ might actually be worth their salt.  I learned that salt is important to jerky, but it isn’t the only factor.  Something in the laundry list of unpronounceable ingredients really seals the deal flavor-wise, and makes ground beef jerky’s texture ideal.  I tried another few experiments with greater amounts of seasoning.  They turned out all right, but still nowhere near as good as some of the seasoning packs I have used before.  On the bright side, I am getting pretty good with my extrusion spiral.

DSC_0985

These last batches happened a week or so before Christmas.  I was really hoping to make something good, and replicate it once or twice for everyone as gifts.  It was a flop.  Probably going to start up again in the new year with a basic batch from one of the jerky companies.  Once I get my confidence back with a few rounds of decent jerky I can try adding to their seasonings, or maybe attempt to pick out which of their magic ingredients make such a big difference.  Until then, as Yoda says, failure can be the best teacher.

Cookie Monster Box

Nothing says cookie cutter storage like a box with cookie monster emblazoned on the front.

DSC_0993

I ended up making a lot more cookie cutters themed after various marvel movie heroes and eventually figured a storage container was warranted.  This design features a snazzy ogee at the bottom to help strengthen the box and make it look a lot less boring.  A flare near the top helps add strength for the lid to slide in and out and adds another decorative bit of flair.  For typical storage it is much easier to buy a plastic shoebox, but when you need personalization, 3d printing small boxes is an option.  Now I just need to wait for all those sweet pressed cookie experiments to roll my way.  Link to the box on thingiverse.

DSC_0995

Prusa Spool Upgrade

When I got my current 3D printer, I quickly upgraded the spool holder.  The original worked ok, but was a pain to load and adjust in width.  Every spool manufacturer has different widths to their spool.  The spool support I found on thingiverse was easy to adjust and load.  Eventually it had issues though.  The black threaded shafts that held the bearings in place started breaking off.  I installed 5/16″ bolts as a replacement.  Left photo was the original installation, right photo shows my bolt mod.

As those shafts failed they caused a lot of rolling resistance on the spool, and it ended up failing a few prints before I diagnosed the issue.  The bolts help, but there is a fundamental issue.  They hold the spool at the outer edge.  Any force imparted is a long distance from the axis of rotation.  If it were held in the center, then it would take a lot more resistance to induce the same torque.  That is how the original supports worked, so maybe they were on to something.  A diagram might help.

Spools.001

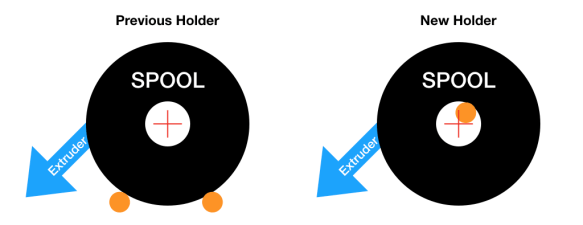
The extruder will pull at roughly the same angle and with the same force in either setup.  A full spool will be heavier and require more force to spin, but the filament will be at the outside edge, far away from the axis of rotation (red cross hairs).  This produces higher torque.  Think of putting a pipe on a wrench, you can push further away from the axis of rotation, which makes more torque.  My old setup (left) held the spool at the outside edge (orange dots), far from the axis of rotation.  My newly devised holder (right) runs through the middle.  Even if it doesn’t spin well, it can’t impart that much torque on the spool.


I heard Adam Savage give a good talk about how everything you try involves a lot of failure and trying again.  He was suggesting maker spaces nail to the wall (literally) the progression of projects to show that it takes effort and that nobody gets it right the first time.  I wanted to show some of my work on this one.

DSC_0964

First I needed a way to hold the spools.  I decided a center hub (for reasons explained above) was best.  After measuring all my spools I set the outer lip just small enough to pass through the hubs, then made the center area a little smaller so the spool can’t walk off the hub.  Pressed in bearings mean it spins really effortlessly.  I had a bunch of red filament, so I started with that.  It was simple and worked right the first time.  So much for showing progression!  The next task took an extra try or 4.  I used jam nuts to hold the two spool halves (they are identical) together.  Don’t tighten the nuts against the hub, the bearings spin better without side loading.  To make handling easier I printed a handle with internal 5/16″ threads.  The first one was too short for my hand, so I cooked up a longer one.  The threaded rod goes 2.5″ into the handle.

This hub system will need some kind of support to keep it up high on the printer.  I took some measurements of the printer frame and started with a thick test piece to make sure it would clip on and be secure (far left).  I thought it was good enough and went forward with a full spool support (second from left).

DSC_0967

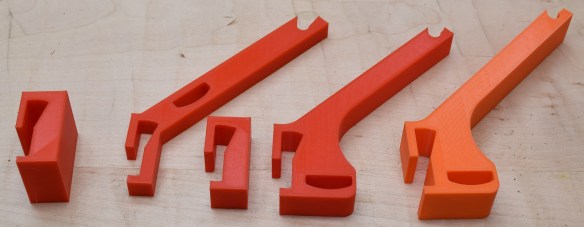
This worked but was a little too thin and wobbly.  The odd rounded rectangle cutout is for my LED strip.  It was too close to where the spool will be.  I couldn’t have the light and spool installed at the same time.  Next I made a few minor adjustments to the frame clip and printed another test (middle).  That was more snug.  I moved the LED strip to a reasonable location and tried again (second from right).  I ran with this one for a week or two and liked the results.  The only changes to the last version was to increase the thickness for slightly less wobble, and an extension of the hub shaft holder.  My current spools fit, but a future spool might be larger in diameter.  The final design was printed in Prusa orange (right).

DSC_0969

Everything fits together nicely.  The large flange on the handle keeps it from sliding up your hand, and aids in alignment.  My LED strip slides in its slot with a little wiggle room.  The uprights can move if need be, but are in a good place.  The center hub is wide enough to accommodate a large range of spools.  I think this will be a great holder for a long while (until 5 minutes after this post when I run into an issue with it!).

This should be compatible with any of the Prusa i3s.  I think the MK1, 2, and 3s all have the same size and shape frame.  If I am wrong on that, then this only works for the MK2.  I uploaded it all to thingiverse.


As a bonus, it is holiday time, and that calls for cookies.  Cookies that come in fancy shapes taste better than normal ones.  True fact!  Add some pizzazz to your holiday gathering.

DSC_0973

Wooden Gift Tags

I was getting ready for a birthday party for this 1 year old I know.  Our conversations are one sided, he is a little short, and fails to reciprocate on high fives.  Still, he has more hair than I do, and a pretty cool set of parents.  So we got him a gift.  I was bagging up said gift when I thought of a cool way to add a little personal touch to the tag.

I dug around my scrap bin and came up with some thin maple I had from a resaw project.  Some quick hand hand planing and I had a really thin sheet of wood to make a tag out of.  I think it was about 1/16″ to start with and was a pretty consistent 1/32″ when I was done.  Still heavier than card stock, but a pretty impressive thickness

DSC_0984

I cut it out and gave it those beveled tag edges along with a whole in the center.  I wrote out the message in sharpie and gave it a quick spray lacquer coat.  That was an error in order of operations.  The solvent in the spray lacquer lifted the sharpie and let it bleed out.  It isn’t horrible, but is noticeable.  Next time, spray first, let dry, then write the message.

My miserable handwriting is probably the worst offense.  Do they teach handwriting classes for adults?  I might have to plan out some resawing and make a stack of these tags.  Buying a small section of veneer would yield a lot of cards for a little cost, but I would rather start with some 3/4″ stock and do the milling myself.  Yet another project for the woodworking pile.  I need to craft more time so I can get out in the shop regularly.  I have been terrible this year.

Beef Bone Broth Plus Bonus Soup

I have been wanting to try making my own bone broth for a bit, and it seems winter was scheduled for this weekend here in Florida.  Happy winter everyone!  Winter calls for soup. Green Chicken Enchilada Soup from I Breathe I’m Hungry to be exact.  Well not exact, I can never follow see a recipe and not do at least some modifications.  Her recipe calls for shredded chicken and suggests you can use a rotisserie chicken.  Enter one of publix’s finest products.

DSC_0951

I cut up and divided the chicken into meat and bones.  Most of the skin got snacked on with some set aside for the soup.  Does mojo chicken skin belong in soup?  It belongs in my soup!  You are supposed to roast the beef bones for a bit in the oven, and I figured why not do the chicken bones as well?!

DSC_0952

For the beef broth you will need to acquire some bones.  As much as I love publix, here is where a local butcher can be really helpful.  Mine got me two pounds of cut up pipe bones (industry term, think long bones like femurs and such), and two pounds of cut up knuckles for cheap.  Sounds a little gross, but the connective tissue in those knuckles is part of the magic.  Everything got roasted for about 40 minutes in the oven with salt and pepper.

DSC_0953

On second thought, including the chicken may not have been my best plan.  They look pretty burnt.  I guess that size difference matters.  I normally like the pan leftovers, but a lot of it was chicken fat, so instead of scraping it all into the crock pot I dumped it.  Once again, trying to get fancy has bit me in the bum.

DSC_0954

The beef bones got dumped into the crock pot with a few splashes of apple cider vinegar and salt and set on high for an hour or two to get it bubbling.  Doesn’t look like much now, but hopefully in a day it will.  Patience.

DSC_0955

The next day it was looking cloudier and smelling a bit more like something good.

DSC_0968

I pulled the bones and strained the rest through a very coarse mesh strainer.  It has a silky kind of feel to it, but not tons of flavor.  I wonder if that is right?  Maybe I needed more knuckles and less pipe bone.  Maybe more salt?

DSC_0972

At any rate it made a really freaking good soup.  I used 4 cups along with the shredded chicken to make a double batch.  The only minor addition I did was to add some small portabella mushrooms while it simmered for a while.  The recipe was good on its own, but the mushrooms really made it.  Next time I will cut up and add more mushrooms.

DSC_0975

Exploring Salt In Jerky

I was pretty despondent after my miserable failure with my own recipe.  I got cocky and flew too close to the sun.  What does that get ya?  Ruined jerky, that’s what!  I mentioned in my previous post that research seemed to indicate that salt content was very important.  While lean ground beef was still on sale I wanted to experiment with a very simple recipe and alter only the salt content.  I measured out carefully four 1 pound batches of meat.  Each got 1/4 tsp of cure, 1 tsp of garlic powder, 1oz water, a different amount of salt.  No flying high here, we are staying well grounded with this recipe.

DSC_0957

Of the previous two recipes, the simpler one had roughly 1/2tsp of salt per pound.  It also had a ton of other ingredients which may have mucked up the results.  I started with a 1tsp of salt version and moved up in increments of a whole teaspoon.  The 4 tsp/lb version might be way too salty, but I would know the upper limit in that case.  I noticed when mixing the 1tsp batch that my gloves came back very clean (left picture), but the 2tsp version (right) started getting rather sticky.  Progress!

I continued mixing up batches going slowly and carefully so as not to miss anything.  I don’t currently time how long I mix up the meat, but a voice activated smart phone timer might have to be in order.  These 4 batches will go in the fridge for an overnight rest just like all my previous versions have.

DSC_0959


The dehydrator load showed the difference again.  The lowest salt batch wouldn’t hold together (left), while the 2tsp (right) and above stayed continuous and made great spirals.

They all got the same trip through the dehydrator.  The results were quite different.  It is hard to see in the image below, but the 1tsp jerky is dry and crumbly like my previous batches.  The 2-4 tsp versions all came out pretty chewy and with a proper texture.  It seems 1-2 tsp per pound of meat is the required threshold.

DSC_0974

I cut up each batch and bagged them with a number, leaving out batch 1.  I gave all my coworkers an opportunity to try them without comment and gathered feedback.  Most considered 4 too salty, though one guy really liked it.  It was kind of a toss up between 2 and 3 as to which one was more favorable.  2 was maybe a touch blander.  The 1tsp of garlic powder was very subtle, most didn’t detect it.

Final Conclusions:

  • You need more than 1tsp of salt per pound of ground beef, 2 is safer
  • 4tsp per pound is excessive for most people
  • more than 1tsp of garlic powder per pound is needed to have it taste like garlic

Home Jerky Recipe Failure

Why buy a spice packet when you can just gin up your own flavors for a lot less?  Failed jerky apparently!  I thought I was going to be cute, and make my own seasoned jerky from now on.  I may still, but I hit a huge setback.  Everything started nice, I looked at a few recipes online and came up with two ideas to try on my own.  A basic traditional style, and a taco seasoning style.

dsc_0948.jpg

I mixed them both and ran into my first difference.  Normally, the meat is really sticky.  Even wearing nitrile gloves it sticks like crazy.  These didn’t seem to leave much of anything on my gloves.

I left them overnight for the flavors to mingle, then fired up the jerky cannon.  Another odd feature, they don’t hold together well at all.  Normally I can get long continuous strands, but these fall apart immediately.

DSC_0949

One thing I remembered after firing up the dehydrator was that I forgot the curing salt on the taco version.  That was going to hurt the shelf life, but no reason to stop.  The final results were garbage.

DSC_0950

Instead of being chewy this stuff was dry and crumbly.  I did some reading and found a few possible explanations that could apply to my batches.

Don’t use acids: I didn’t use any in the traditional recipe, but my taco version had a few tablespoons of hot sauce.  Lots of vinegar in that sauce. That one was worse than the traditional.

Low salt: This is possible with both batches, I didn’t want it to be too salty.  Checking around, salting ground beef can do important things.  Serious Eats has an article on the subject.

My next experiment will be with a simple recipe of just ground beef, salt, and maybe a single seasoning like garlic powder.  I will increase the salt content and see how that goes.  An early indication of stickiness while mixing might help bound the lower end of salt.  Too salty won’t be clear until I have cooked and eaten some.

Continued Jerky Lessons

This is my 4th round of jerky and I feel like I am still learning a lot every time.  My co-worker uses a 3/8″ nozzle, where as my jerky gun came with only a 1/2″ nozzle.  Thankfully the sell these little road cone looking things that you can cut to size.  DSC_0937
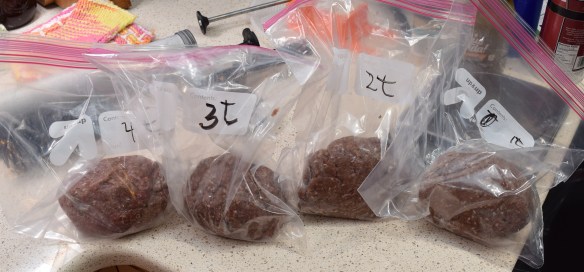
I switched jerky seasoning brands because I had run out of the original stuff and wanted to try something different.  They recommended mixing their seasoning with water first, then mixing with meat.  This is a great idea, it helps ensure that the seasoning and cure are well mixed and distributed throughout.  I am feeling confident enough to wager 5 pounds of extra lean to make this happen.  In retrospect the seasoning should have been mixed in the big metal bowl before adding meat.  It saves a bowl.

Loading can be tricky.  One clean hand, one dirty.  You ball up a small wad with the dirty hand and load while holding the barrel with the clean hand.  They make a tool that helps tamp it all down.  Which hand holds that?  My new 3D printed hand of course!  I came up with this clip to hold the barrel while my clean hand tamps.  The overnight print came complete with a really good game of filament chicken.  About 2 wraps left before I would have been in trouble.


The mix and extrusion went well.  I used every tray I had and in 5 hours was able to dry a pretty good looking batch of jerky.

I weighed the final product and came up with about 2.5lb.  That is probably at the low end of dry enough, but it shouldn’t go bad in the 4 days it will take for me and everyone around to eat it.  It occurs to me that I could monitor the progress of my jerky simply by taking the initial weight and weights throughout the process.

DSC_0947