NASA Worm Logo

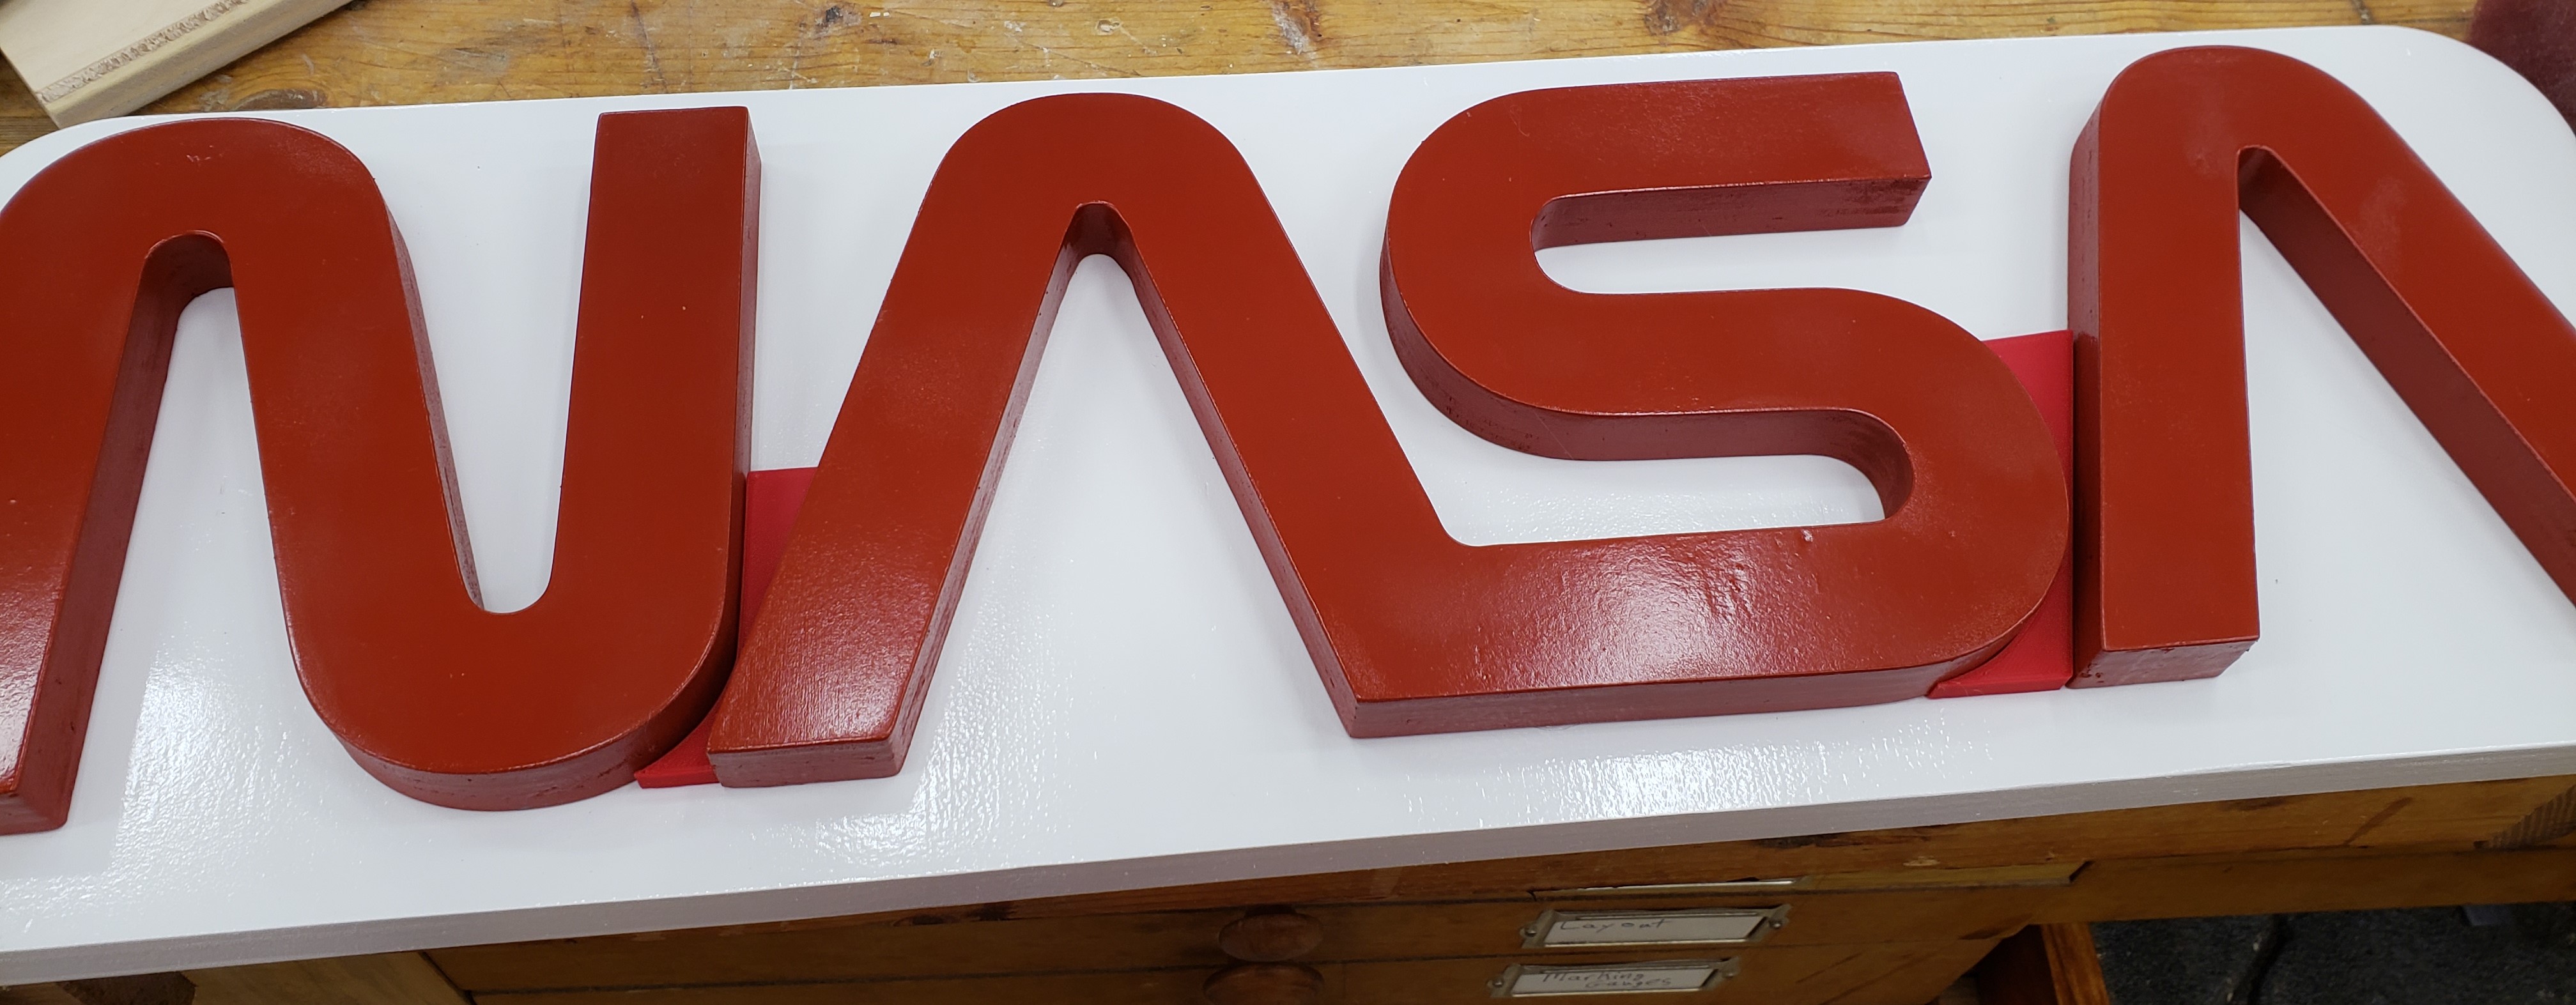
I have been watching this guy on youtube recently called Jigsaw Nation. He makes a lot of cool big signs out of plywood. Mostly car stuff, video games, and whatnot. I got inspired and decided to make a pair of NASA logos for my dad and I for Father’s day.

The jigsaw dude I follow projects onto the plywood and traces his designs out. I wanted to produce two of the same thing, so I opted to print a template and route instead. The AS was too big to print, so I cut it up into two parts with an alignment stitch between them. I doubled up the plywood and used my bandsaw to remove most of the waste. These letters are around 6 inches tall.

I went to the router table and ran into an issue. My pattern bit only has about an inch of cutting depth. Oops. I’ll have to split these up and do one set at a time.

I wanted these to look really clean and crisp, so I proceeded to use filler to make the edges solid and smooth. I tried mixing up goodfillas, plasticwood, and bondo spot filler. They each are kind of OK I guess. I didn’t end up taking pictures of that process because… can I still use the dad brain excuse? Same excuse for the background. It is a 2ft wide piece of plywood with the edges rounded and filled. For paint I did a number of coats of primer/filler to get it all as smooth as possible with sanding in between where needed.

I still need to work on my spray painting skills. I think I get going too thick and it leaves little puckers and attracts dust. When I go super light though I don’t see the gloss I want. Practice I suppose. To get the kerning right I printed the space between the N and A, and another between the S and A.

Once the glue was try I was all set. Dad was visiting at mother’s day and already has his hung up outside his rocket building control room. Mine is up high in my shop where the paint imperfections are hard to see!

Side Table Organization

My side table is a mess. It kind of always has been, but now I have a small one crawling around and yanking on every cable he finds. I can see a job as an electrician in his future. He loves wires! Here is the horror.

I can’t even bare to show the top side, it is not safe for the internet. In order to cleanup and keep my little guy safe from random power cords I started moving things to the underside of the table. The first step would be to anchor the power strip. Everything else would revolve around that. I measured the mounting hole spacing and made a drill template on the 3D printer.

Now I could start putting down wire anchors. Some of these are closed loops you can use with zip ties or velcro, others are open, and you can slip loops of wire into them. I designed my own, but lots of printed options are available online. I made a set of brackets to strap down my USB power brick. I will leave it under the table, and run the needed free lines around to the top.

As I was going, I realized I didn’t have anything for my laptop’s power brick. I found that velcro straps can make a quick flexible hold down if need be. Much faster and cheaper than printing something custom.


With the underside of the table taken care of I moved on to the top. General cleanup was in order. I wanted to consolidate as many things as possible into a single unit. This block will hold my weather station screen, has space for pens, roku remote, fan remote and echo dot. I printed it with 5% gyroid infill, filled everything with sand, and capped it with epoxy. Hot glue makes for thin grippy feet. Just squirt on the hot glue once it has gotten fully up to temp, smash the block down on a silicone glue mat. After a few when it is all cold the glue mat should peel off easily.


To help with all the speaker cables I made a box that slides around the backside of the sub-woofer. I screwed the speakers to the sides so they couldn’t be pulled out. The rear left and right speakers sit on the far side of our couches. Their wires are getting covers to keep them safe from small hands.

I screwed down some wire cover to the legs of the table. This gave me a place to run up and down the various power and connection cables I needed. The only free thing now is the audio cable between the echo dot and the speaker controller. I might either get a longer cable, or mount that to the underside of the table at some point in the future. The top looks pretty good now, and I have managed to keep it tidy for the last month. On to the next baby-proofing project!