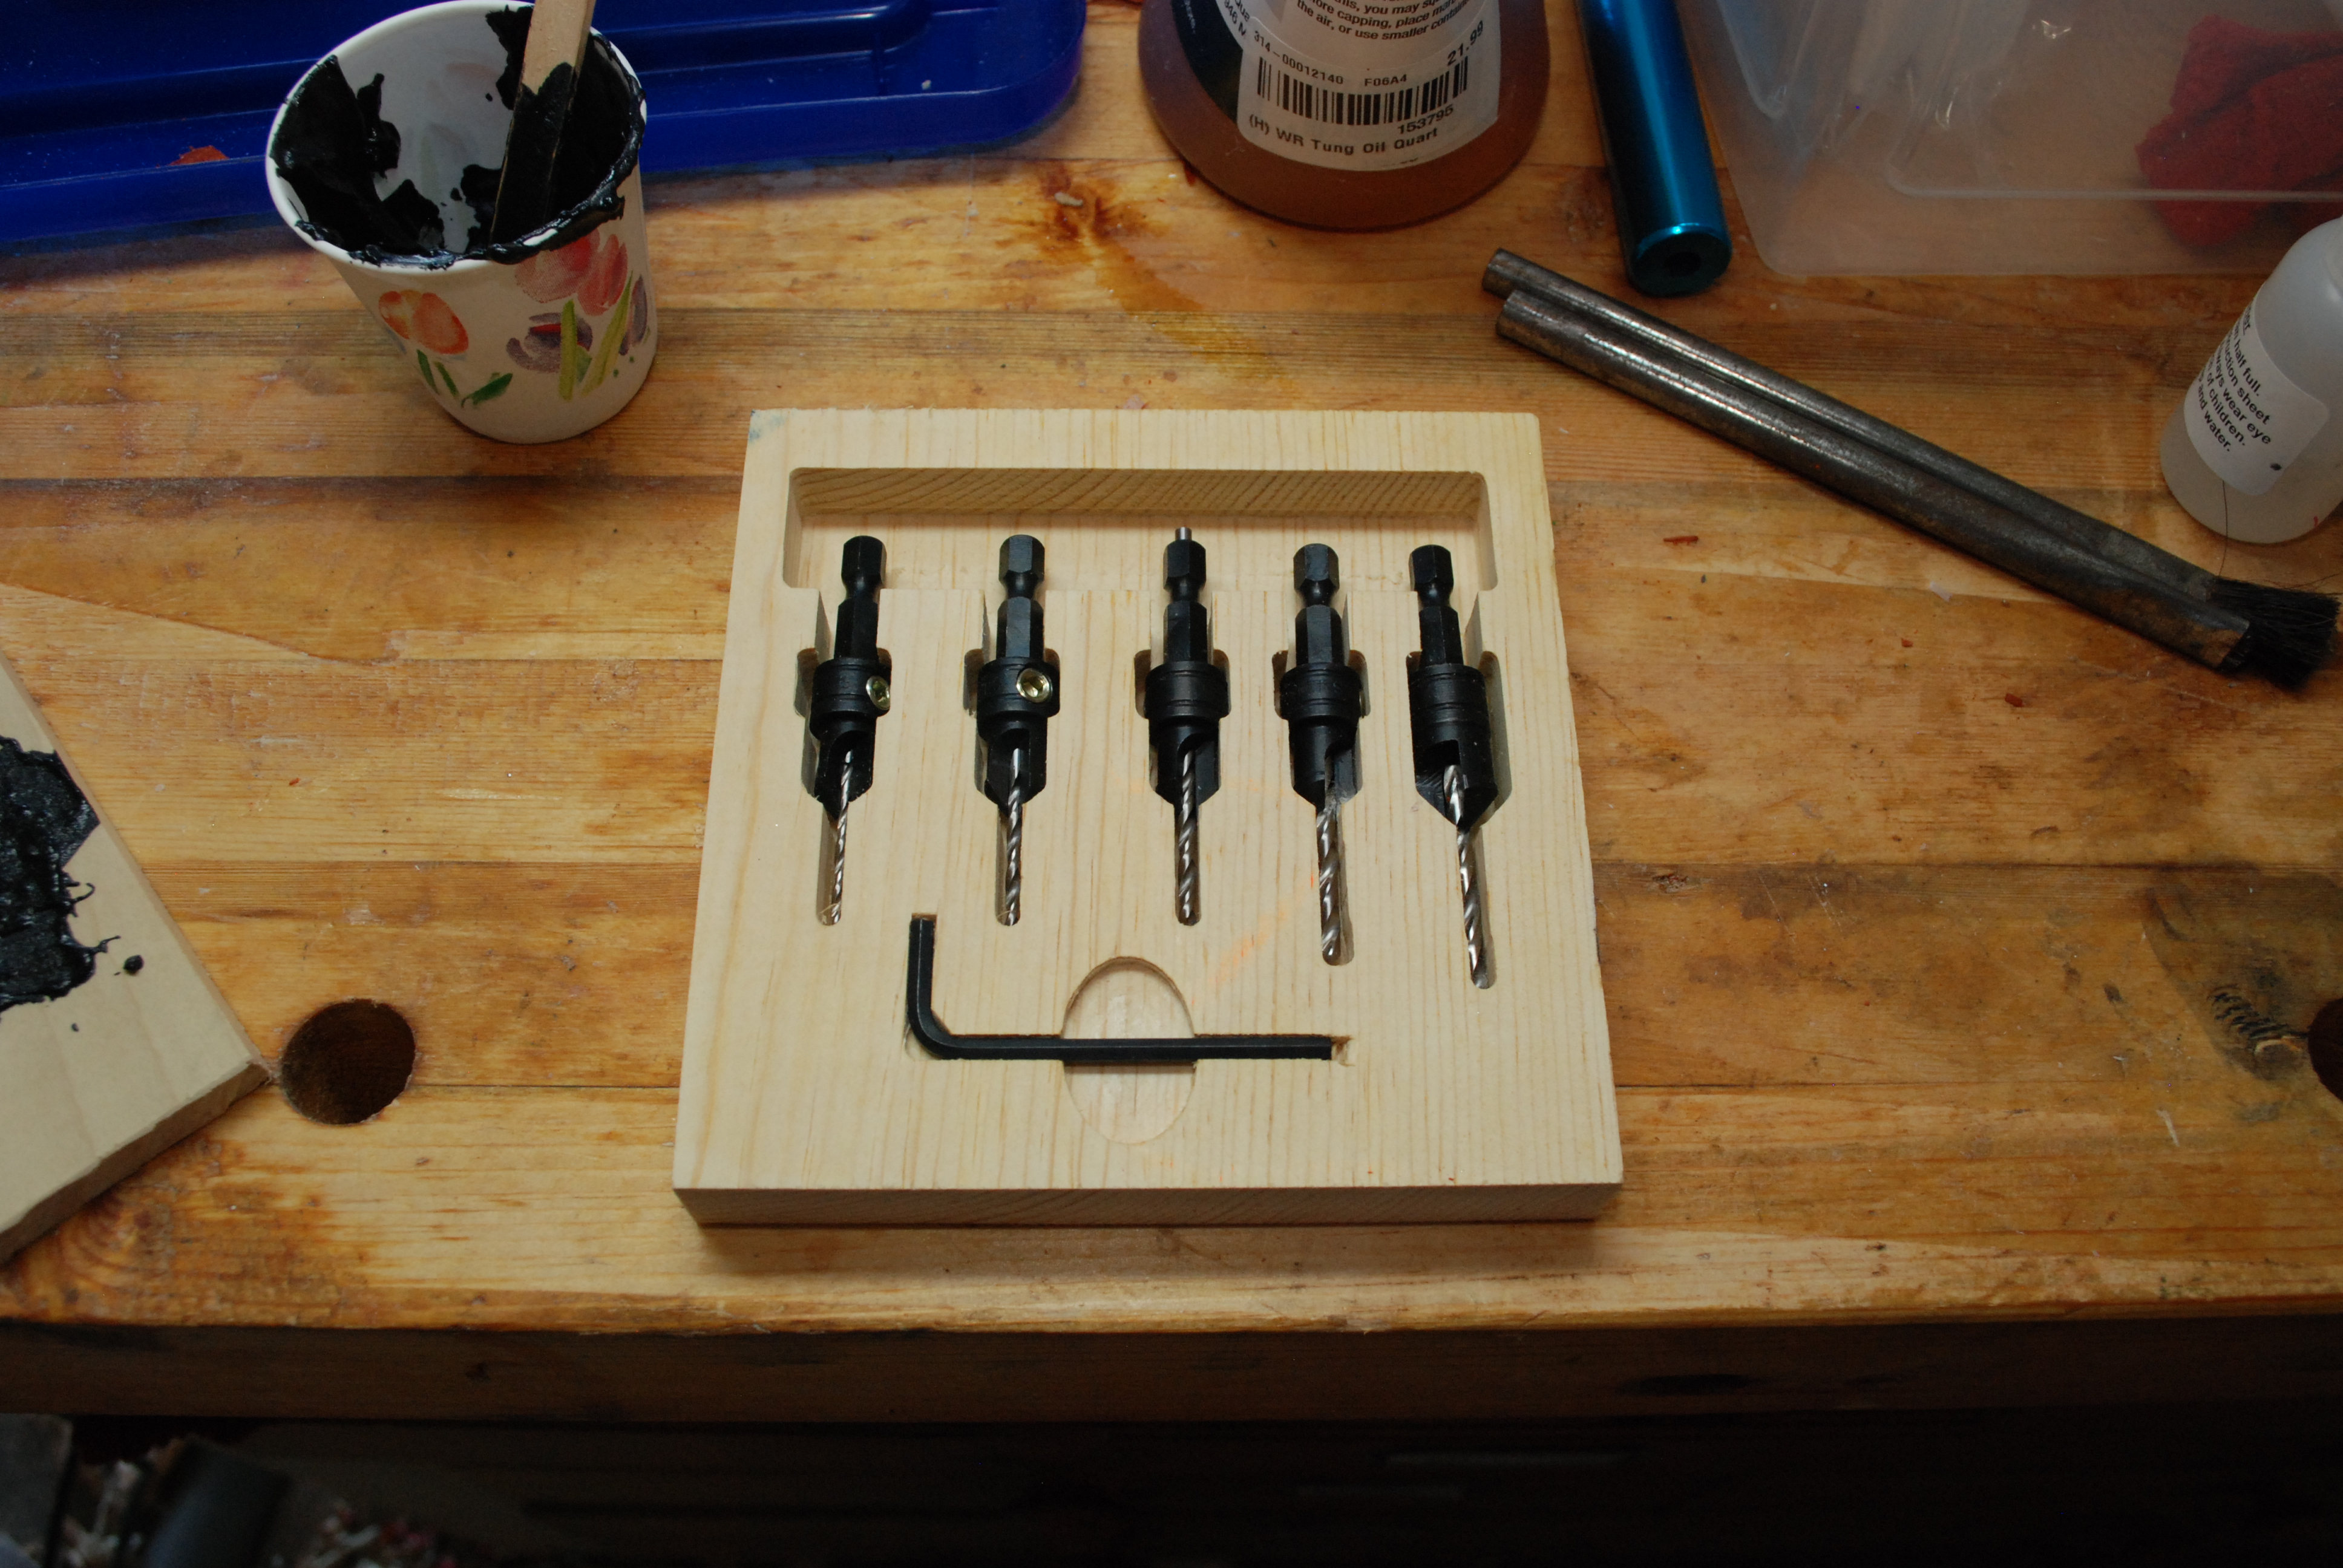
Countersink bits are supremely useful. Screws that are run flush look nicer, they are easier to install with the pilot hole, and are much less likely to split wood. The set is from woodcraft and came in a plastic package. It wasn’t useful for long term storage, and the simpler older set I had kind of rattles around in a drawer somewhere. I wanted a better fate for this set, so I got to making a nice box for myself.
I started with a piece of pine in my mill. I milled everything in the bit area to the same depth that would accommodate the thick ring with the set screw. In retrospect I would mill multiple depths so the chuck posts don’t rattle around as much. Nothing is going to fall out with the lid on, but it would have been nicer and rattled less.
I was thinking about milling some numbering in but It would have required a lot of cam work and careful milling to individually make each number. Instead I used my punch set to put in corresponding numbers. A fine black sharpie really makes them pop. I did the sharpie before I spray lacquered the wood. The marker bled a bit on the soft pine, doing it the other way around next time would be better.
Next I milled a label into the lid and used some acrylic infill to make it really pop.
Everything got a coating of spray lacquer as a protectant. A simple set of brass hinges made it an official lid, and some magnets keep it closed. In retrospect, having magnets below each bit would have made this a really snappy cool set. I guess its not too late!
Bonus Coaster
A co-worker I know is getting a tesla soon, so I figured he needed a nice coaster to go with it. I was milling the day away, so why not?! Also I am hoping this will get me a ride or two to lunch.
A month or two back I saw where someone had smoked a chuck roast and turned it into pulled beef. It looked awesome, so I thought I would try. This gave me a great chance to use my bag of pecan smoker pellets.
I cut two roasts in half to give extra bark and to make the process go faster. 6 hours later they had quite the mahogany finish. I waited for them to get to a good 200-210 depending on the size.
I wrapped them in foil and stuck them in a cooler for a few hours till dinner. I was going for pulled beef but ended up a little dry. Next time I will wrap when I get the color I want. It holds true for pork butts, and it seems to hold true for chuck roast.
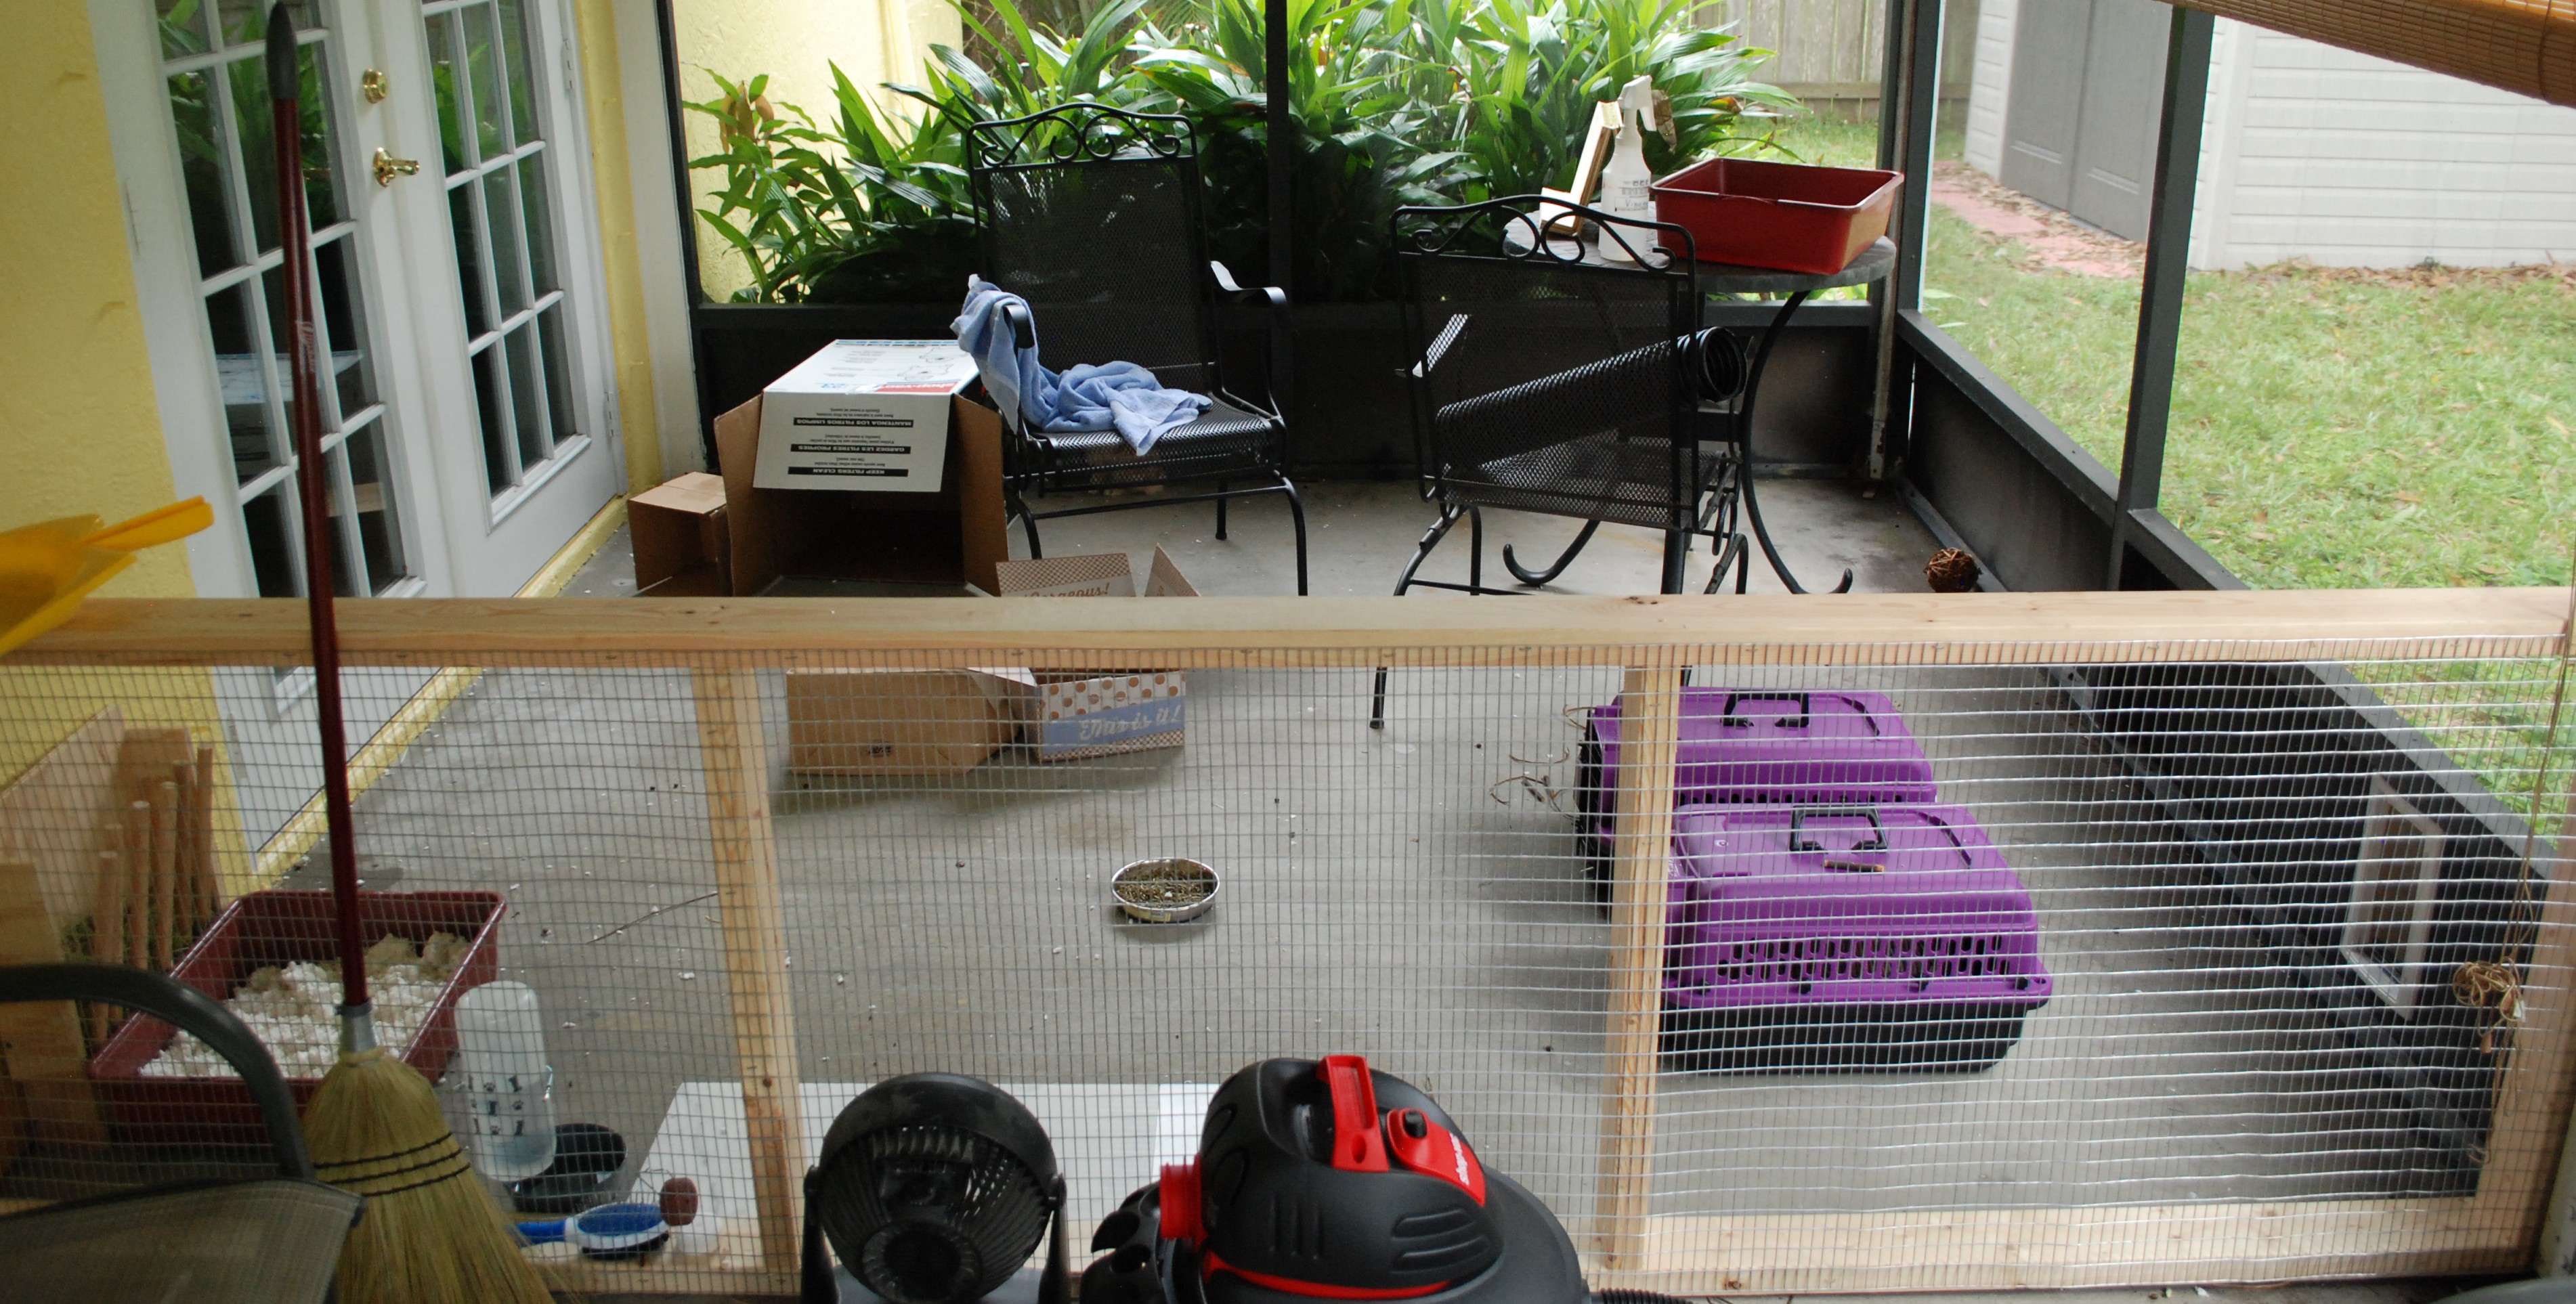
There have been a lot of changes happening on our back porch. Some furniture was removed and arranged to allow for a Jurassic Park style raptor fence.
Hmmm deadly raptors need a litter box and hay? What kind of monsters are these?
Beware the two terrors of Melbourne!
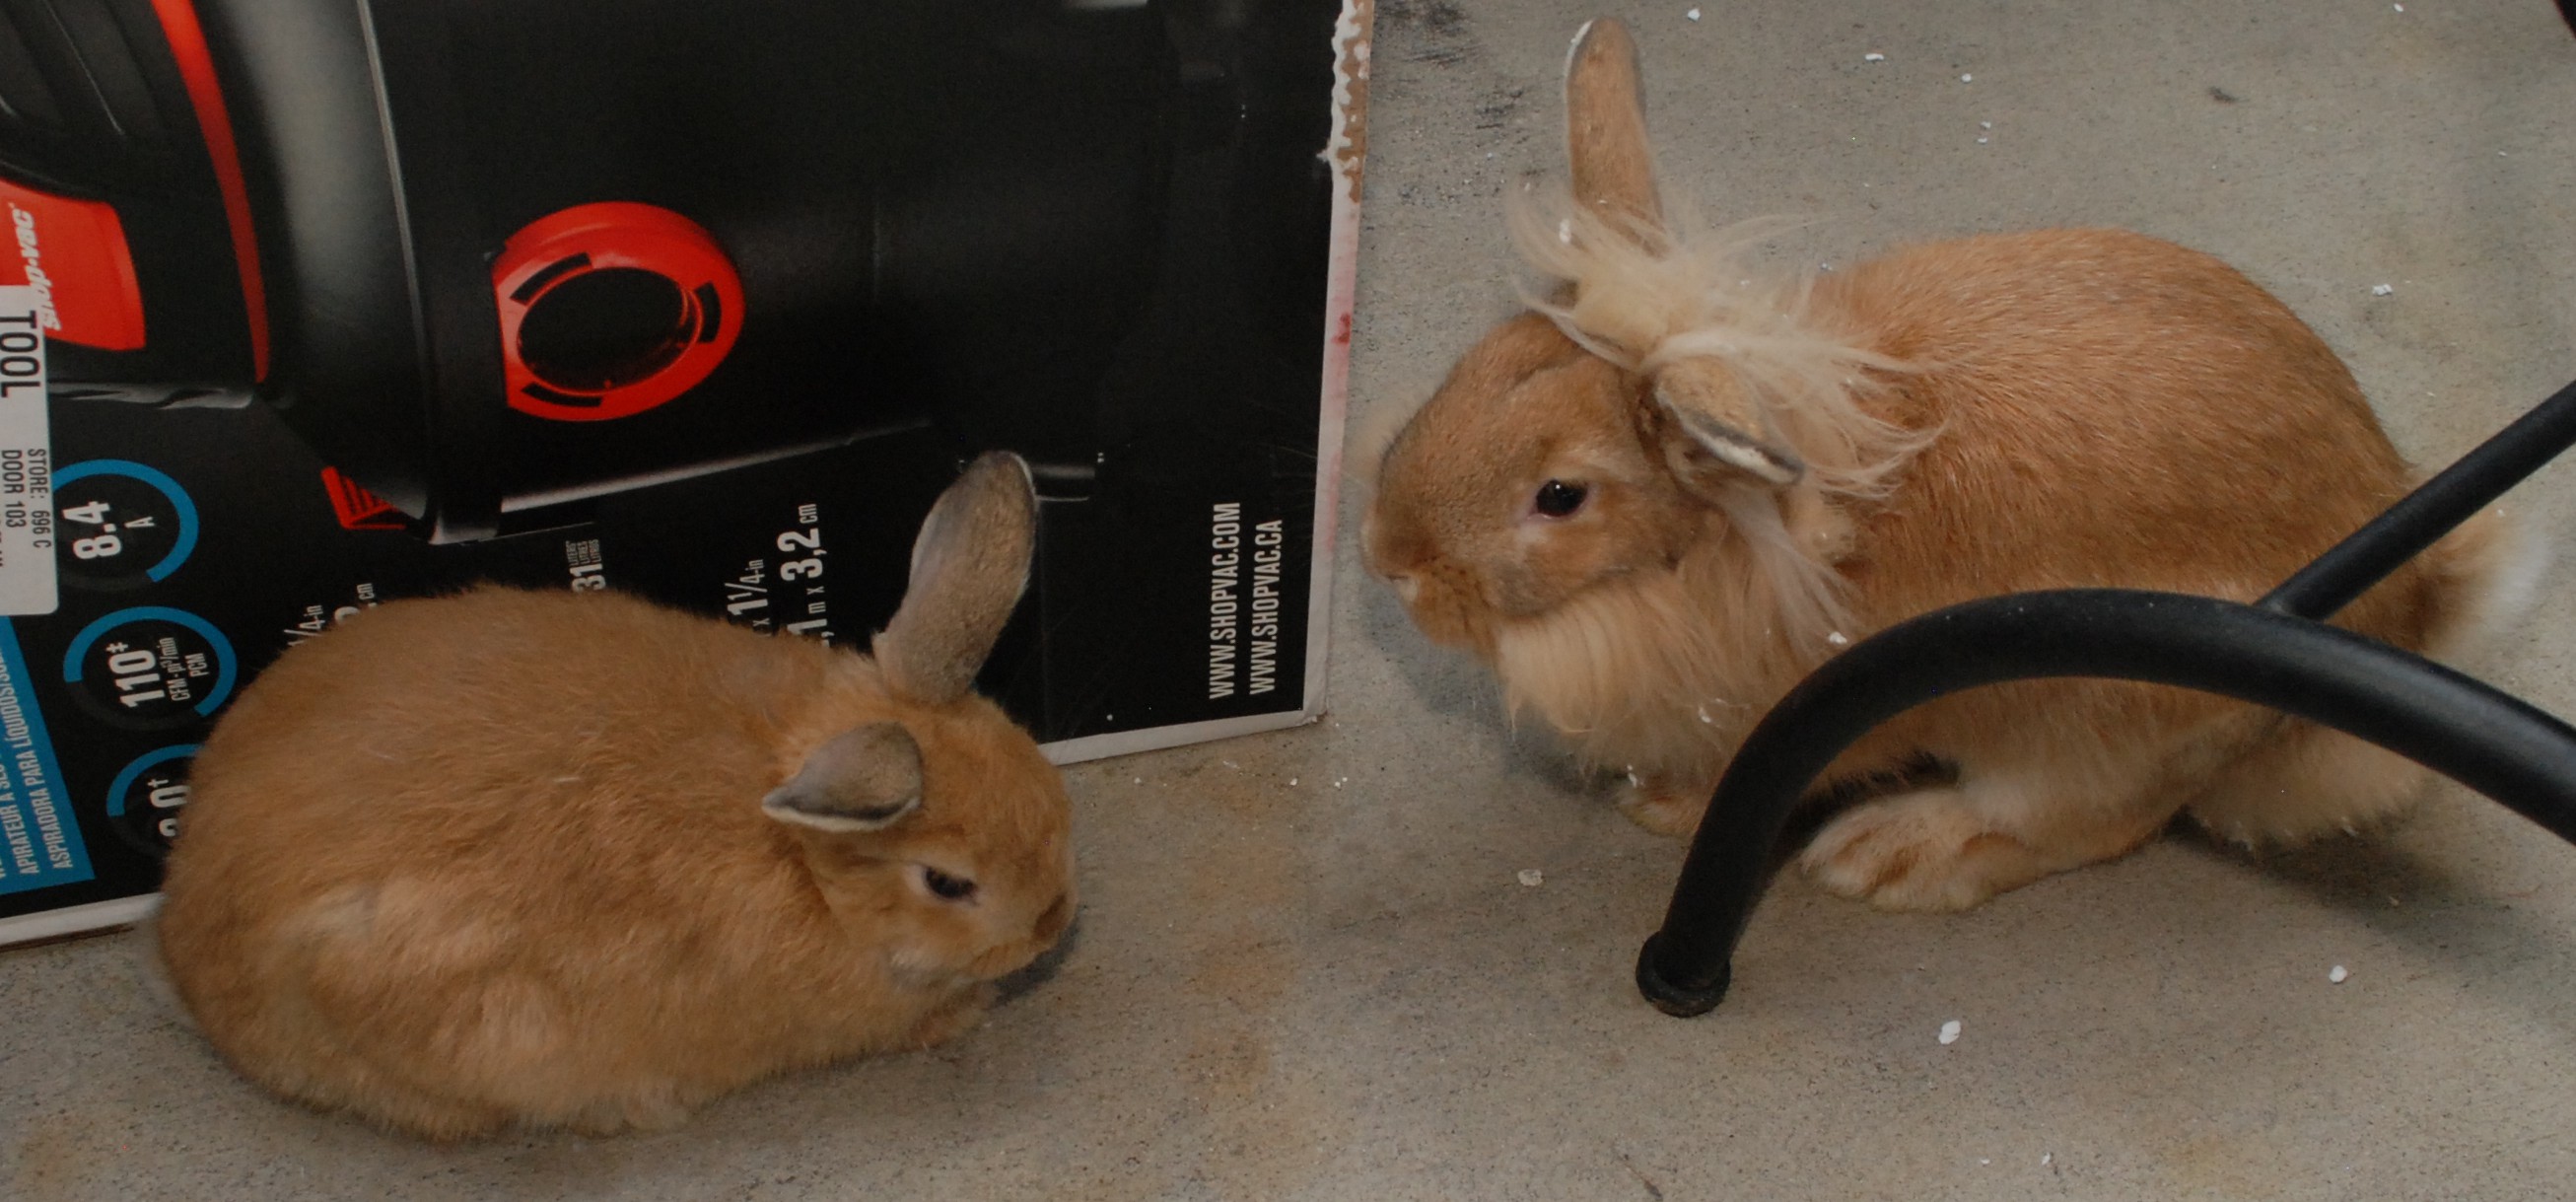
Yup, we got rabbits. They are adorable vicious killer poop machines. Seriously how can something so small produce so many poops!? The bun loaf on the left is Honey. She is sweet, soft and super curious. The lion head on the right is Tyrion (aka Mr. T, and Sir Buns-alot). He is always chasing Honey around, and is probably about ripe for getting fixed. Now on to gratuitous cute shots.
This slideshow requires JavaScript.
They are a hand full, and we are working to get them accommodated to the porch before we open up the escape hatch and start working on the backyard. Until then, we can rest assured that they have 100% fluffy cottontail butts.
It is official, we lost our first hive. I had hopes that maybe we could do something to revive them, but no. Our friends at Trevena Fee Farm were able to provide us with a nuc of russian honeybees. The original idea was to combine the new nuc with the old hive by separating them with newspaper. They would chew through the newspaper slowly and eventually the new queen would be bonded onto the old bees. I went in to inspect before opening the new nuc. There were no old bees… well that makes the combining easy!
I was getting slimed however. When there is nobody home to watch the house lots of nasty critters descend. Specifically small hive beetles (SHB) had started to setup residence. About half the frames in the deep had small but noticeable levels of SHB larva. I think the new hive could take care of them, but decided to pull those frames. I will reintroduce them after a day or two in the freezer. No beetle larva problems then!
The great news is that the new nuc was absolutely packed with bees.
We gave him our #4 box with 5 of our drawn, but empty frames. He have us back a box that must have been completely packed with bees. If you think that is a lot, there were tons more inside. I am floored. We might have been having problems for a long time, I don’t remember the last time I saw that many bees. At any rate we are very happy to be solidly back in the beekeeping business and can’t wait for them to settle in. Ester 2, long may you reign.
We had our first full harvest of hive Ester. 20 frames went by really quickly and easily with our home built honey spinner. It was a bitter sweet harvest though. I am pretty sure our queen is dead. The hive population is very low, there is no capped brood, no signs of new brood, and we found a wax moth larva. We had 6 weeks straight of rainy days, and near the end a serious brood problem showed up. I couldn’t find any straight answer as to what it was. It must have been some serious problem with the hive/queen. Luckily some new friends from the beekeeping group might have a nuc for us. Hopefully they come through before I have to freeze all the frames and give up for the year.
Back to the harvest, look at all these gorgeous frames!
There are 10 more like this
After spinning
All our equipment performed really well, and we ended up with about 37 pounds of honey. That looks pretty serious when it is all in one 5 gallon bucket.
We bottled everything into 12 ounce bears to have enough small quantities to give away to friends and family. That worked out to 50 bears, each with their own smart little label.
Now time to enjoy some honey. Thanks bees!
Wax Refining
I used a plastic tub to catch all the decapping debris. There is a lot of honey mixed in, so a session sitting in the strainer is warranted. Once drained of honey, it went back to the tub, and through multiple soak and drain cycles before the water ran clear and free of honey.
I was able to pack the wax into a single jelly strainer. The strainer sat in an old pot and slowly melted away. Once completely melted the nasty jelly bag gets tossed, and the wax can go into old containers.
The finished product was 9.5 ounces of wax. It looks decent, but might need another strain. Next time I might break it up into multiple runs to see if that helps the cleanliness of the finished product. Still, it is perfectly good wax for use in all sorts of projects.
There comes a time in every beekeeper’s life where he or she will want to harvest some honey. This is usually done with a centrifuge extractor. These start at a few hundred dollars for a very cheap unit, and the price goes astronomical from there. I spent quite a bit of time and money building test articles and doing mini test extractions, but ended up with a really good design that can be had for 50 dollars and a minimal set of tools.
VIDEO UPDATE
Due to the attention on this post I felt a video was needed to help with some of the questions. Enjoy and thank you for watching.
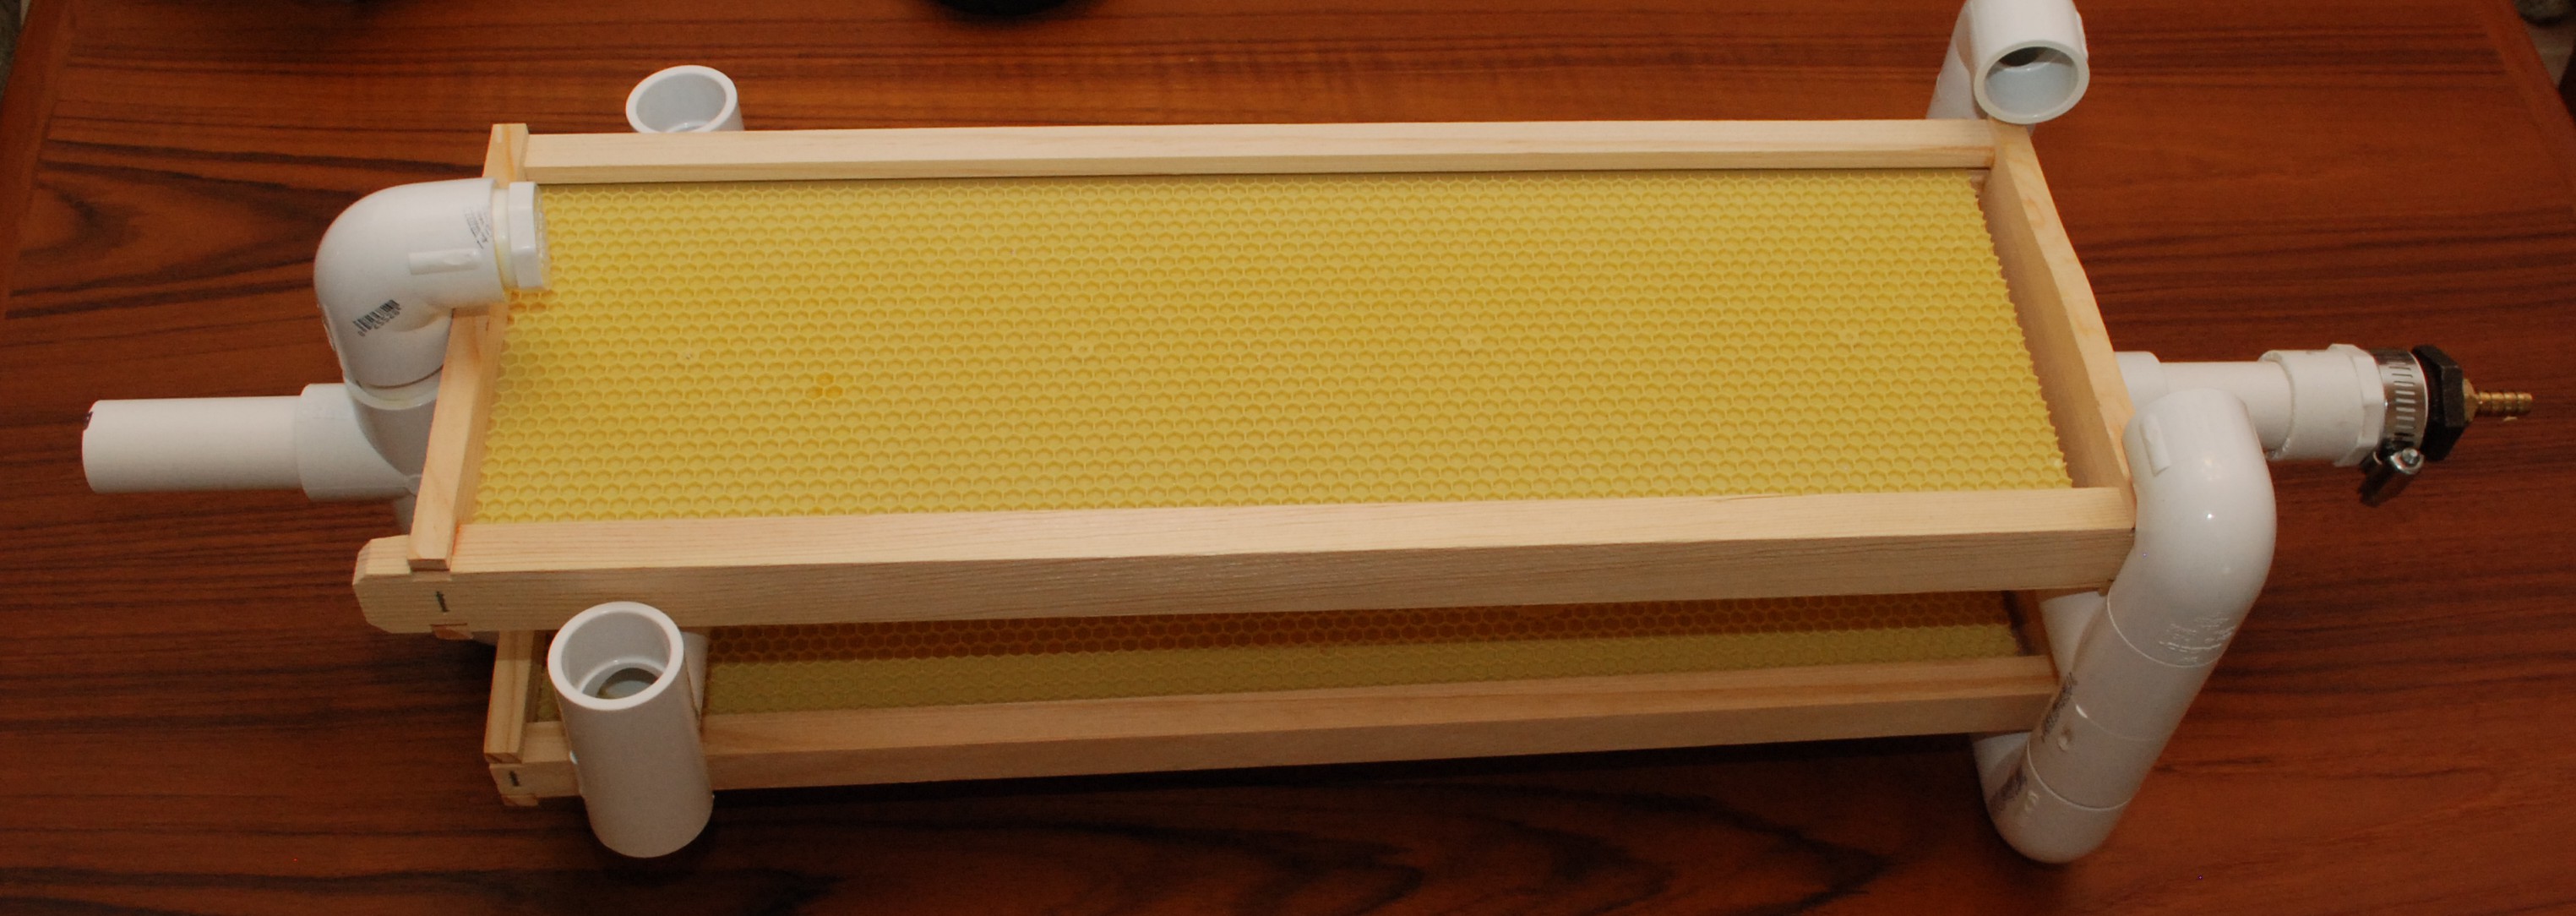
This spinner is specifically designed to hold medium super frames. Slight adjustments will be needed to make this work for shallow super frames. Does NOT work for large frames. The 5 gallon buckets are too small. Maybe find a larger trash can if that is your preferred frame size.
The above images show what a loaded out spinner looks like. The spinner now needs a container to catch all the honey. I really wanted to use 5 gallon buckets for their price and size. One bucket isn’t deep enough, so I cut the bottoms out to use them as height extenders.
I used a mix of firehouse pickle buckets and white food grade buckets I bought at the hardware store. I cut the bottoms off of two buckets to stack them inside each other to increase the height and allow for a good spin without messing up your kitchen.
The bucket with all the holes in the bottom holds the bottom shaft from the spinner and keeps it stable during a spin. The center hole is just big enough for the 3/4″ PVC pipe. The others are there to help the honey drip down into the white bucket with the honey gate.
The stack up is: White bucket with honey gate, red bucket with holes, and two bottomless buckets for height. It is a very small setup that will quickly process two frames at a time. I just did 20 frames with this tool and had a really good time with it. Best of all it doesn’t take up much space in the house.
The Spinner Build
You will need the following items for the spinner. I included the prices I paid for everything, though your prices may vary. Not included in the list below is the buckets and the honey gate. The white food buckets can be had for 4-5 dollars each at lowes. The firehouse pickle buckets can be had for 2 bucks each! They do require a bit of soaking to get rid of the vinegar smell though. Honey gates can be had for 5-10 dollars.
In total you will spend about 50 dollars on the whole setup. Filters, a capping knife, honey bears, and others will cost you more, but a whole extraction and bottling setup for under 100 dollars is very attainable.
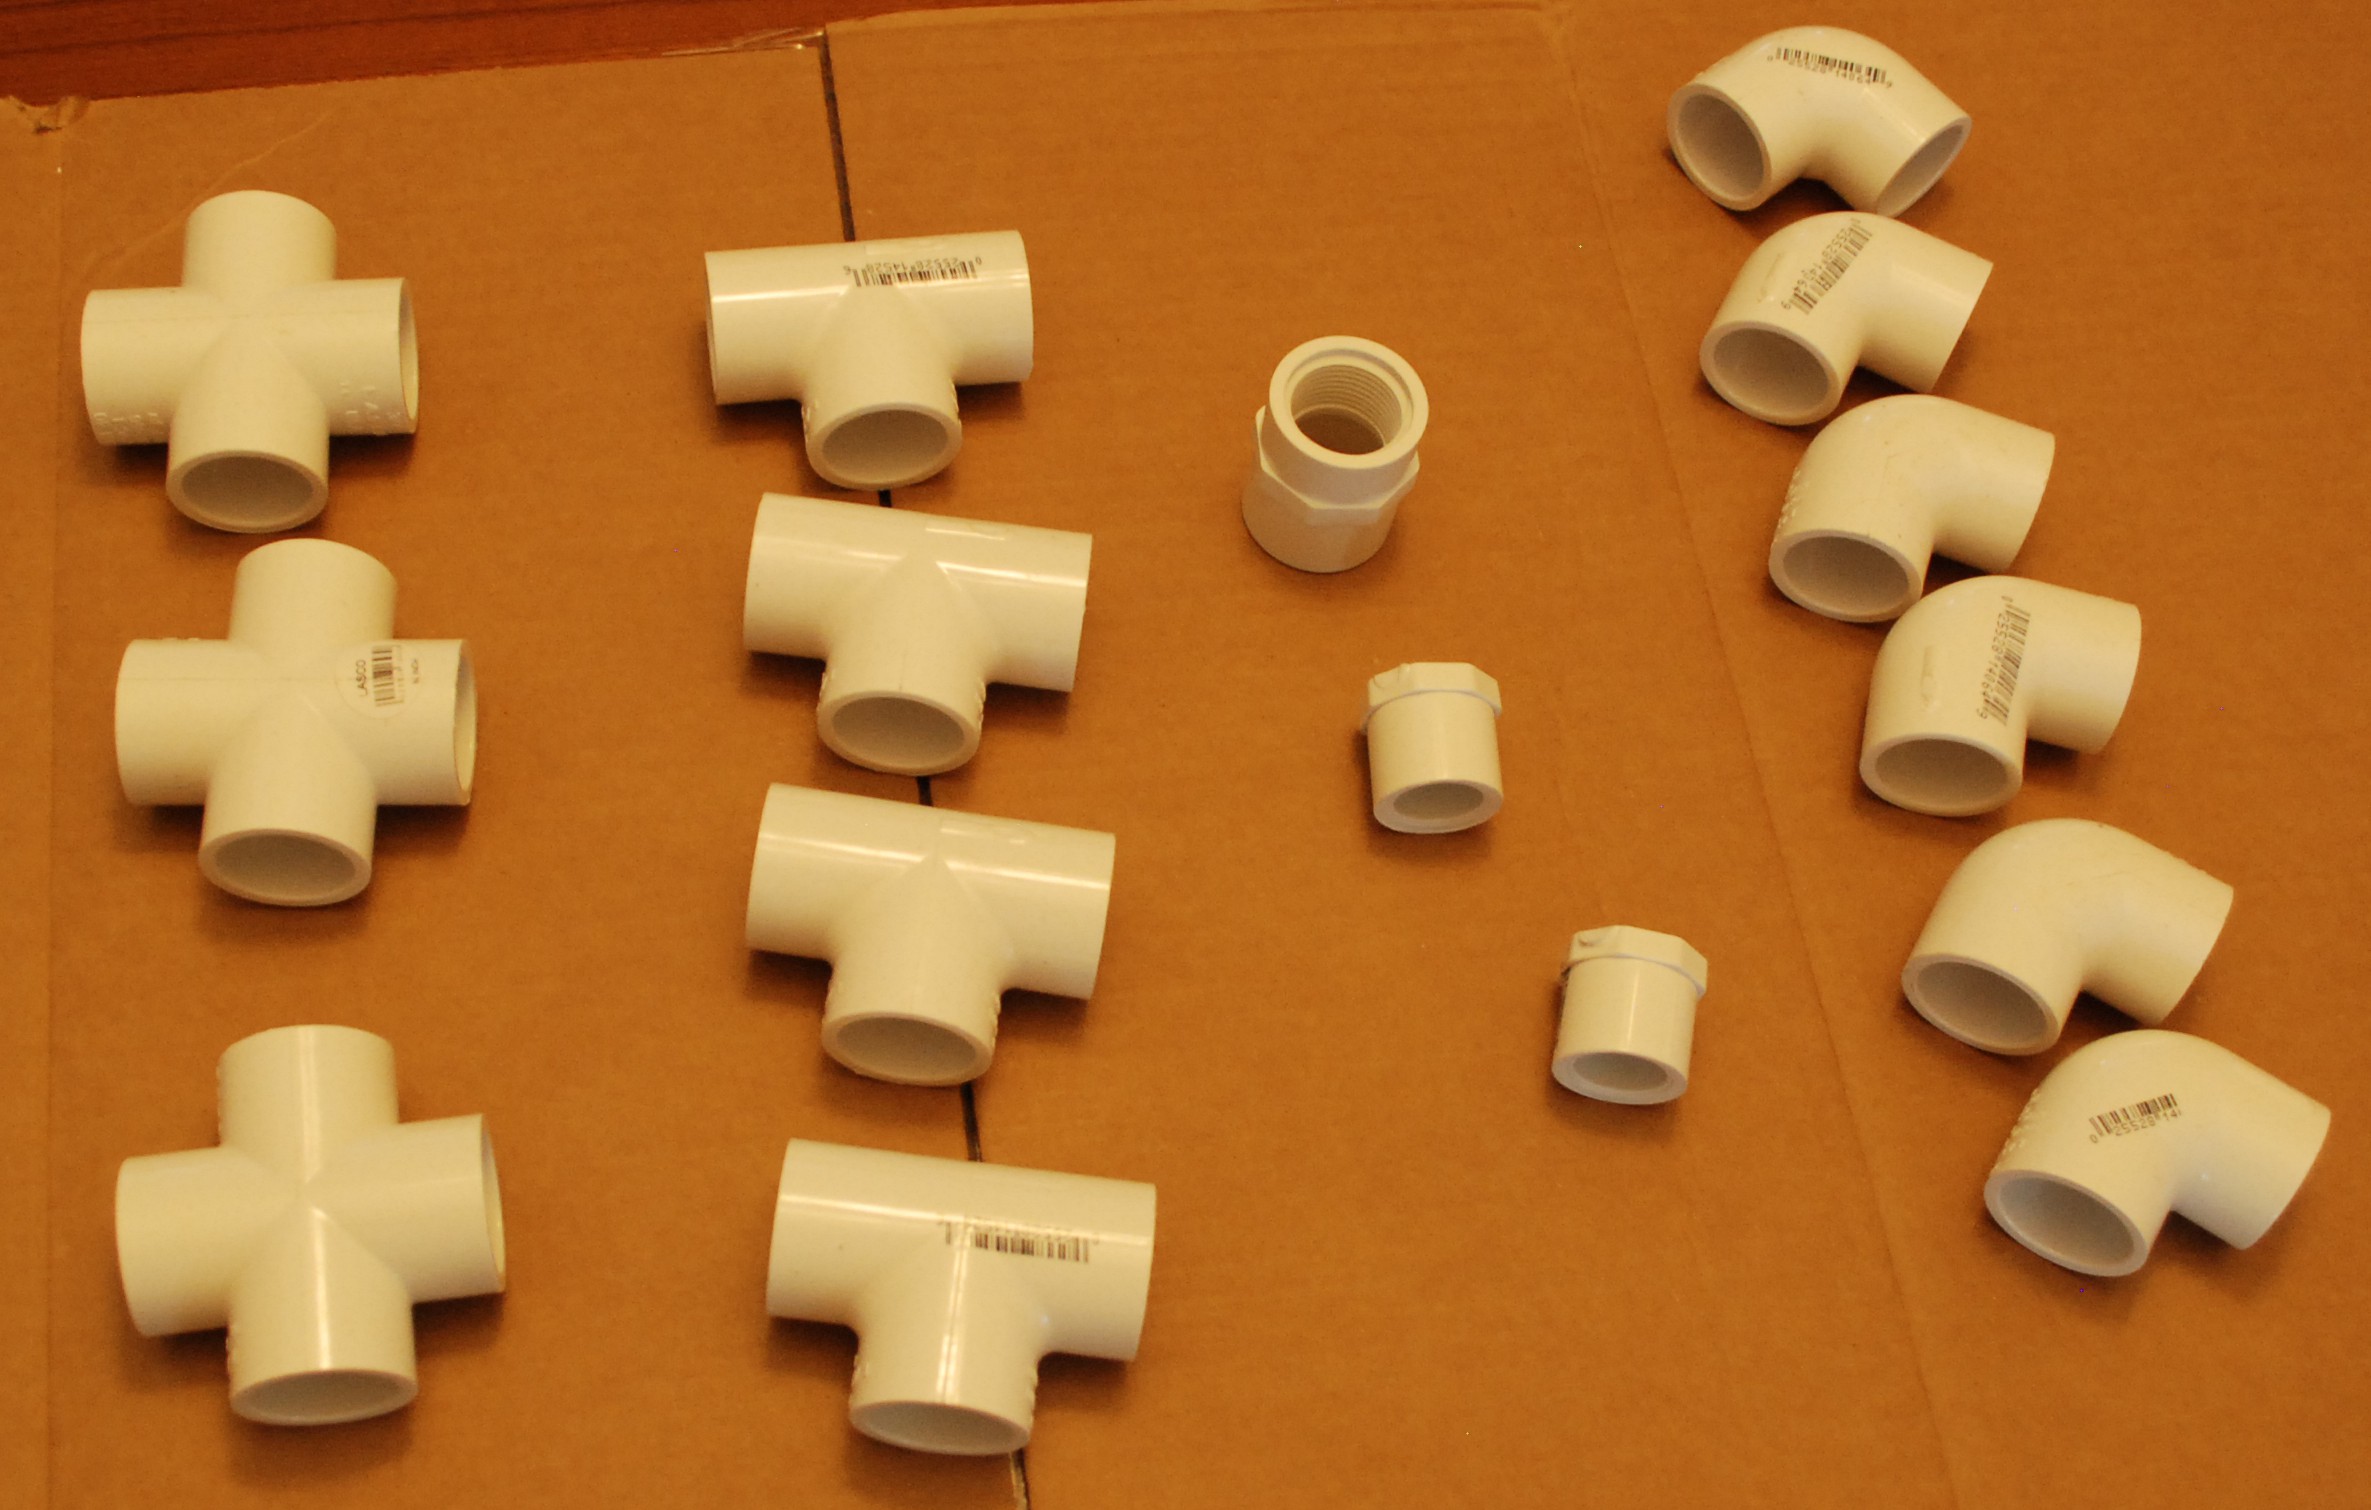
From a tools standpoint you will need PVC pipe cement, a saw or PVC pipe cutter, tape measure, and a marker. The pipe parts should look like those shown below.
UPDATE: Fresh PVC cement can be helpful. Fresh glue allows longer open working time than old glue. You only have a few seconds to get it right, so if your glue is old, get a new one.
While assembling the sections be mindful of how much cement you use. Too much will drip on your work surface, and will drip down inside to the sections you want to glue in the future. Work slowly and purposefully. Once you put two segments together, they are permanent in just a few seconds. Dry fit everything beforehand to make sure it all fits with your frame hardware.
UPDATE: Dry fitting is really important! Some stores may sell fittings with different sizes and depths. Dry fit every stage and check it often with your frames and bucket. Use multiple frames, as there can be variation in their construction as well.
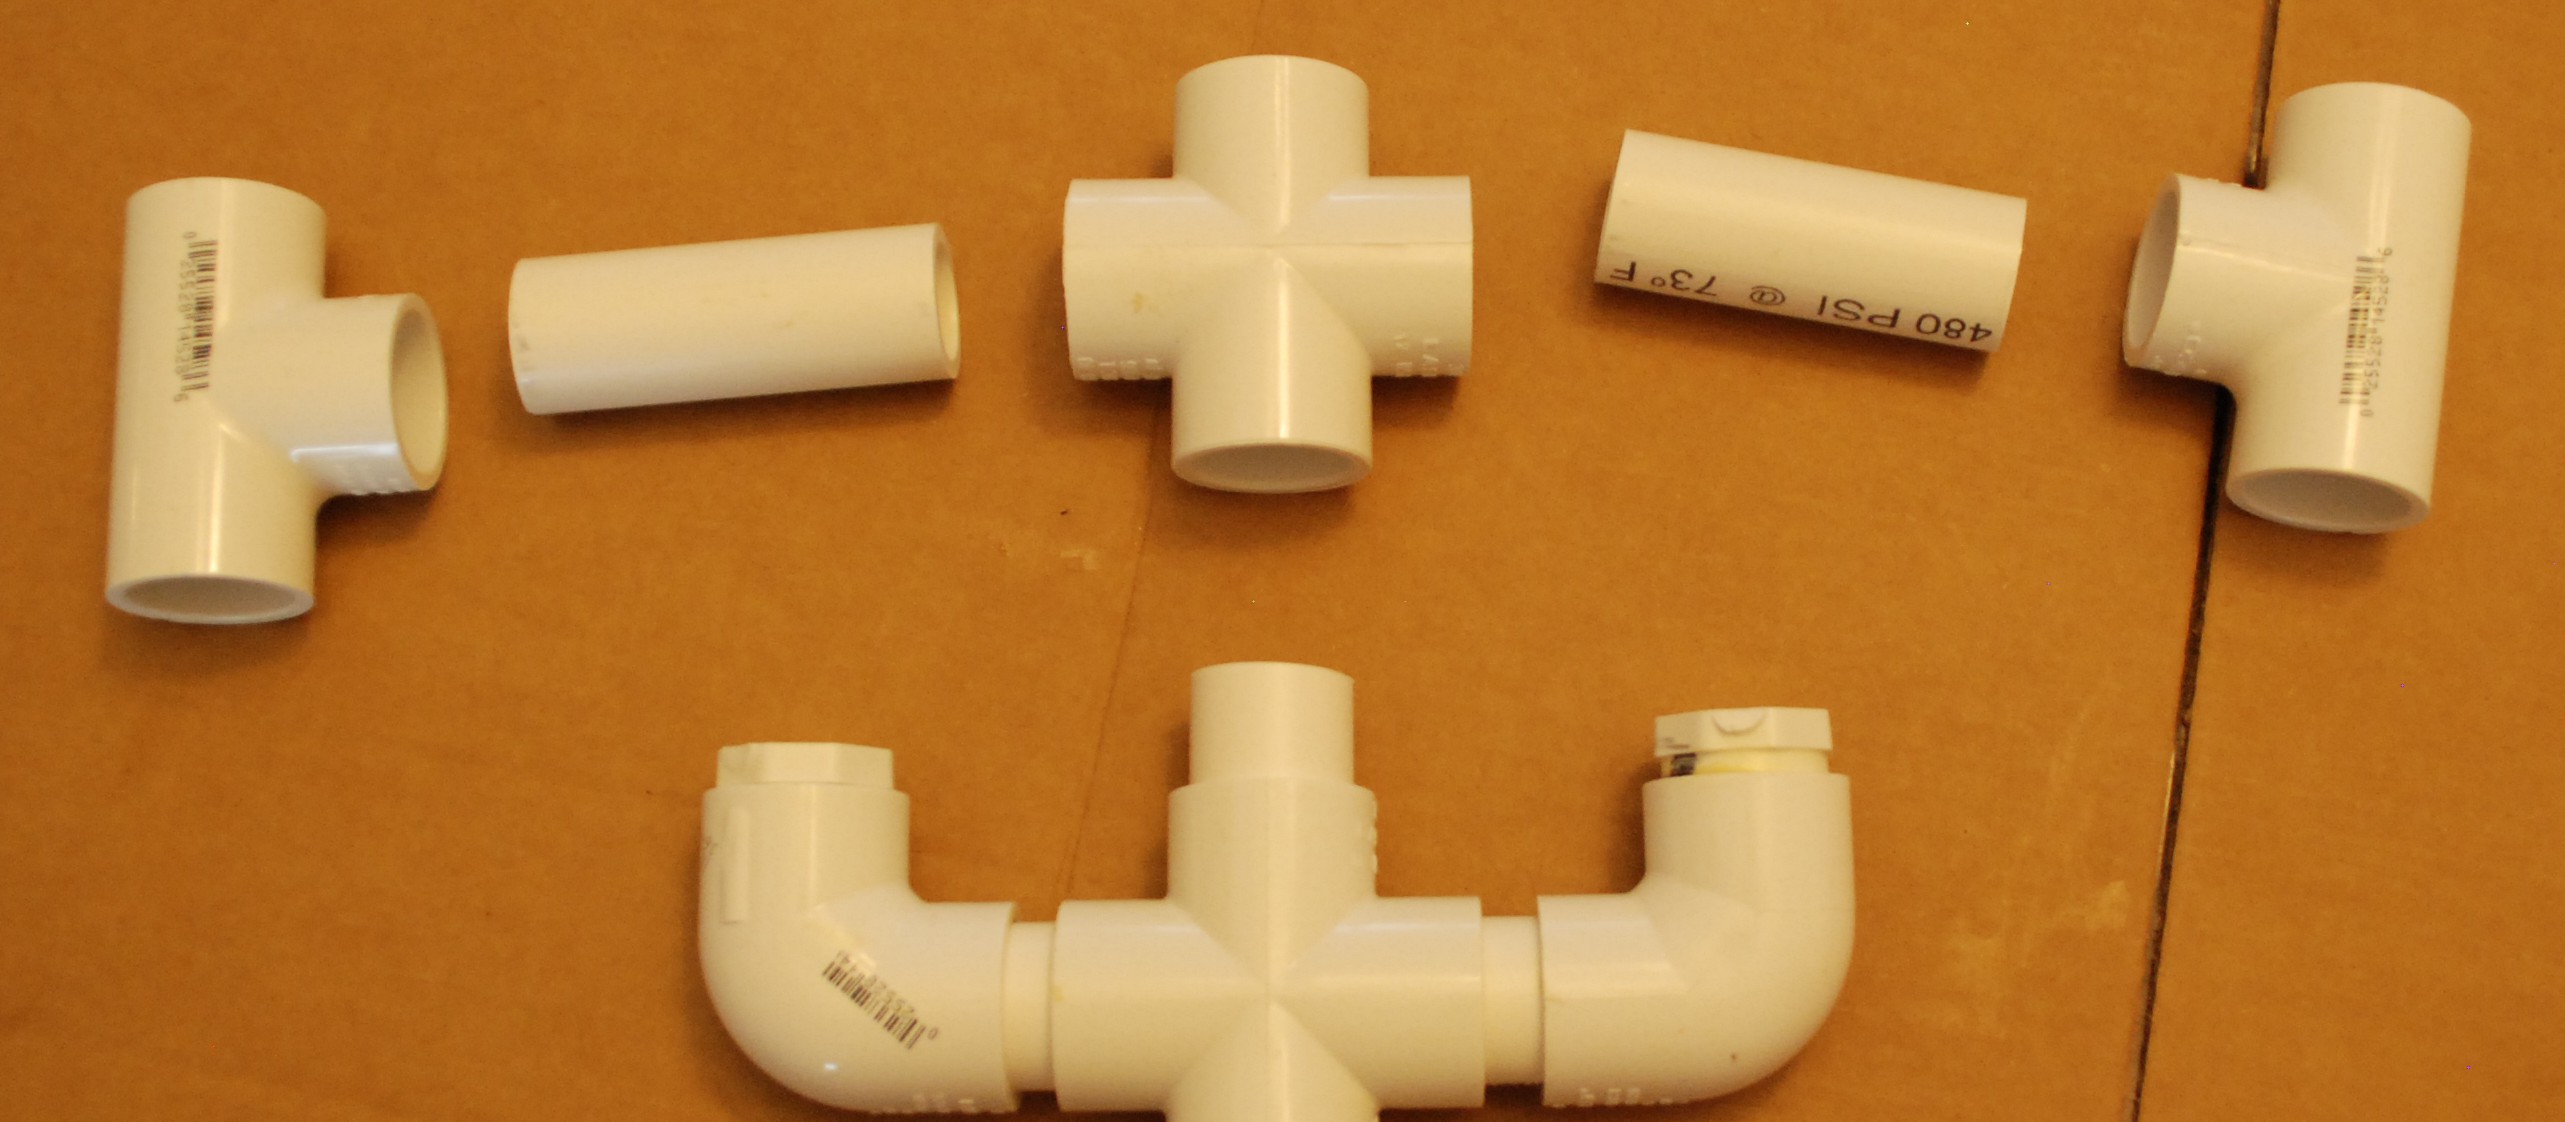
Bottom Hooks
These features are the depth stops for the frames. Gather a cross, two elbows, two plugs, and cut 2x 1.75″, 1x 1.5″, and 1x 3″ sections of pipe.
The 1.5″ section of pipe will connect to the bottom guide, the two 1.75″ pieces will hold in the bottom hooks that keep the frames from sliding down any further. I used plugs to keep honey out of the lower section of the spinner. This is what the finished part should look like
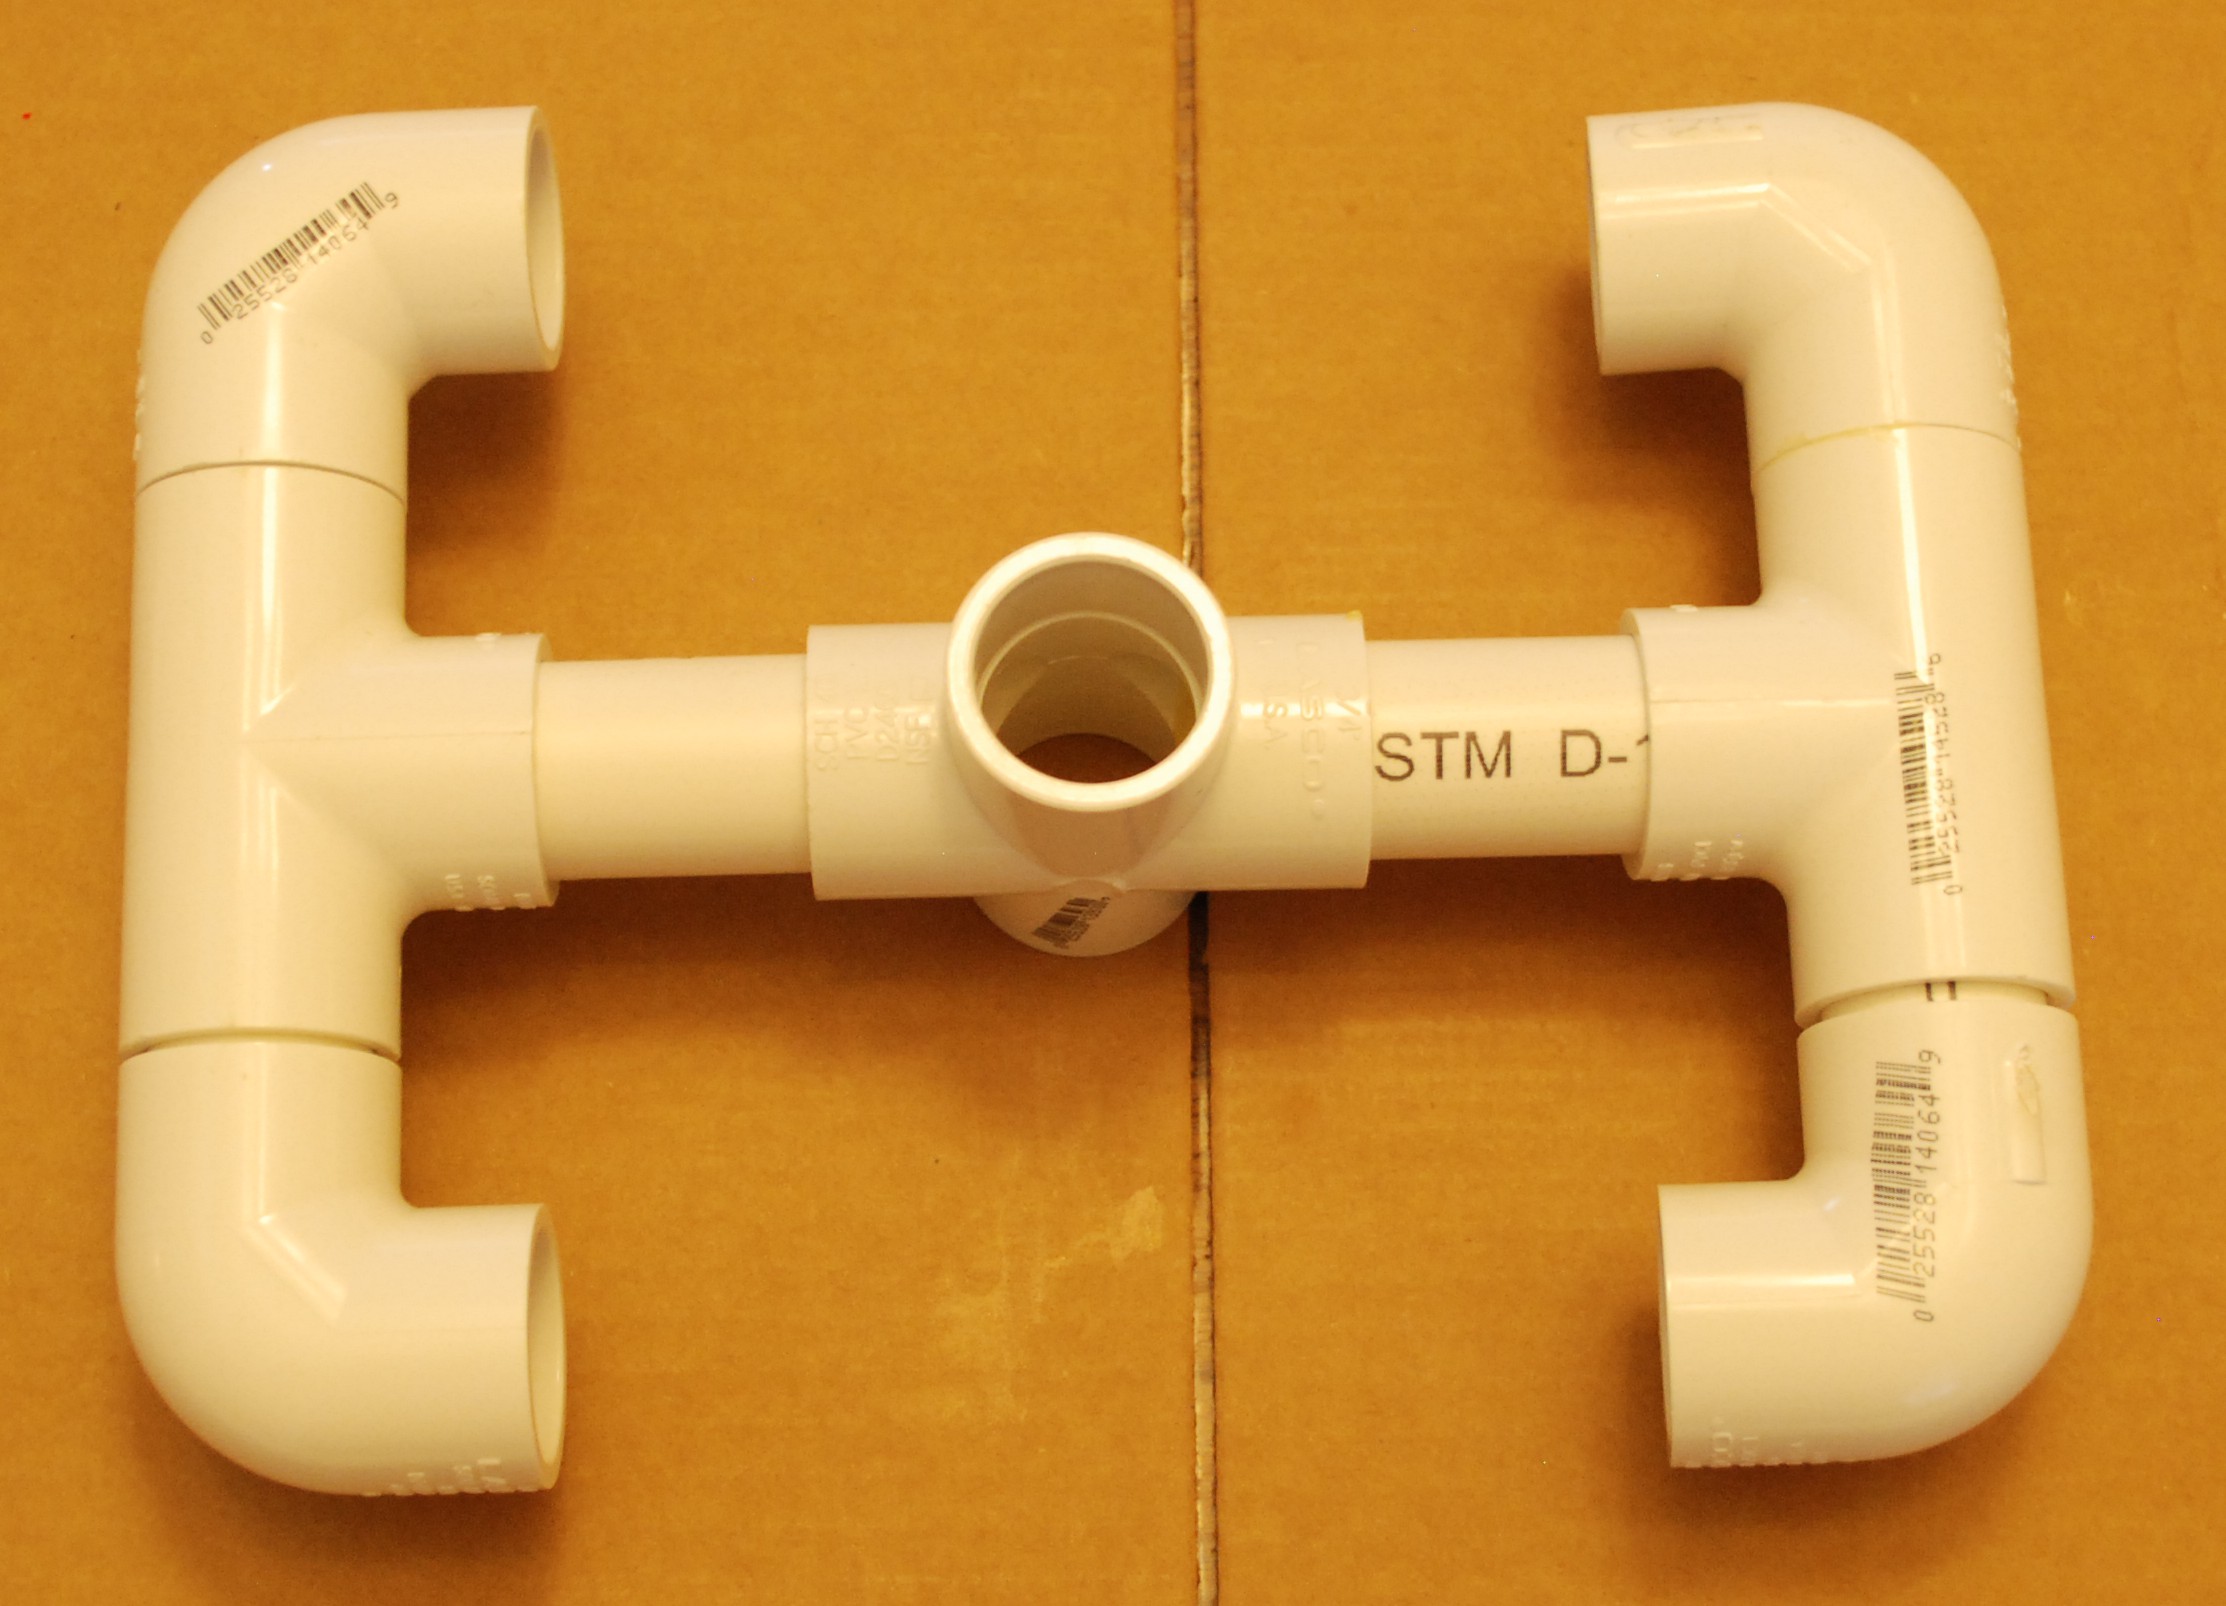
Bottom Guide
Next comes a bottom guide to keep the frames from sliding left and right. This step requires a cross, two tees, and two 2.75″ pipe sections. Be careful with this step. Too narrow and your frame will not fit, too wide and it will not fit in the bucket.
Assemble the sections and attach it to the bottom hook as shown below. Now the frame will come down into the hook and be held from sliding left and right.
Top Guide
The top guide will hold the top end of the frame and prevent it from going out during the spin, and from going left or right. Gather a cross, two tees, four elbows, 2x 2.75″ pipes and 4x 1.5″ pipes.
It is probably best to assemble the two outer arms first, then attach them to the central cross.
Drill Post
A short 3 inch section of pipe and the threaded pipe fitting goes on top to allow for the drill to be attached. I chose 3inches for that length, but it could honestly be longer or shorter.
Central Post
A single 14.5″ piece of PVC attaches the top and bottom half. Dry fit this piece to make sure it holds your frames correctly. The two sets of guides should line up so that a frame can be slid down through the top guides into the bottom hook.
Drill Barb
A threaded coupling was installed at the top of the spinner earlier. Now comes the final piece of the puzzle. An iron pipe threaded adapter takes the size from 3/4″ to, I think, a 3/8″ female thread. That allows a brass barbed fitting to thread in. The brass fitting is small enough to fit into my drill. Most drills can chuck onto anything smaller than 3/8″ in outer diameter. I used a hose clamp around the PVC threaded fitting to help reinforce it. My dewalt drill runs it pretty well on the lower speed setting. Just accelerate slowly, and stop slowly and everything will be ok!
Update: A good alternative is to cut the barb off and use the remaining brass hex portion as a nut. Get an adapter for your drill and put the appropriate socket on there. Now you don’t have to tighten your chuck every time, just slip on the socket and drive!