Miter Saw Dust Collection

Miter saws are incredibly useful and one of the first power tools I bought that wasn’t a hand tool. As useful as they are, they produce a lot of bad dust. The high speed cutter makes a fine dust that gets kicked back and up out of the tool. The little catch bag that comes with them helps, but much of the dust still escapes and becomes airborne.

I tried attaching a vacuum to the dust port in the back, but that only catches about half the dust. The rest just blows right by. Instead a big funnel would guide all the high speed dust into a vacuum port. That was the thought at least. It works a little better than just using the saw’s dust port, but not much better.

I had some plywood rings left over from my dust collector upgrade and thought this one would make a nice base to start with. I attached a 2×4 with holes in it for dowels to elevate the dust catch.

The big gulp dust catcher attaches to a similar piece of 2×4 with some plywood in between to help spread out the load. The upper 2×4 had the holes reamed out so it would slide easily. A set of screws goes through the 2×4 into the dowels to keep everything at the right height. I didn’t know exactly what height would be ideal, so I made it adjustable.

To adapt from the big 4″ port to my mobile shop vac I printed some adapters with a 3″ PVC elbow. Once again, 3D printer to the rescue when it comes to adapting dust collection fittings.

I am still getting a lot of dust blown all over the place, even with this large catch. Using a large dust collector instead of my shop vac might help, but I feel like dust is deflected in too many directions by the time it gets to this big gulp. I have used this for a few weeks and haven’t come up with a good solution yet. It may require a better catch on the pivoting saw bracket. I will include any updates made.

Early 2019 Prints

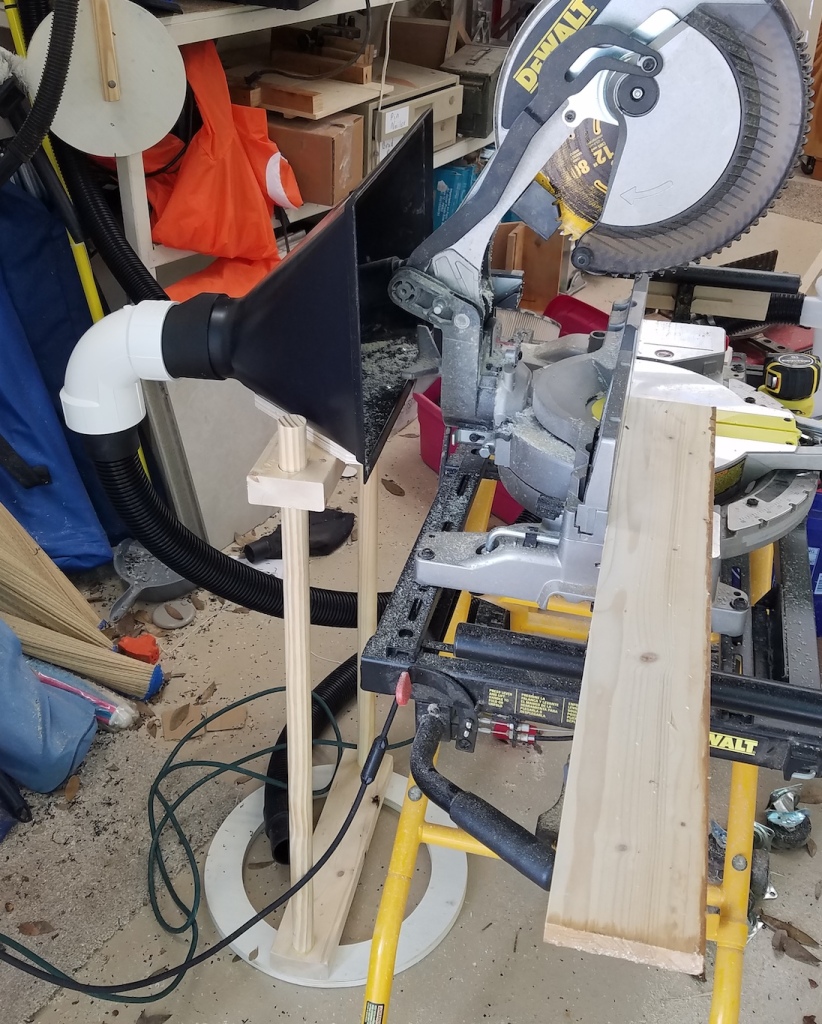
I used to track my random prints closely and publish a monthly update on them. More recently a lot of my printing has been integrating with dust collection upgrades and other organizing efforts in my shop, so there hasn’t been a dedicated post. This is all still very workshop focused as that is where I have been directing my time this new year. The shop is becoming a very magical place to work.

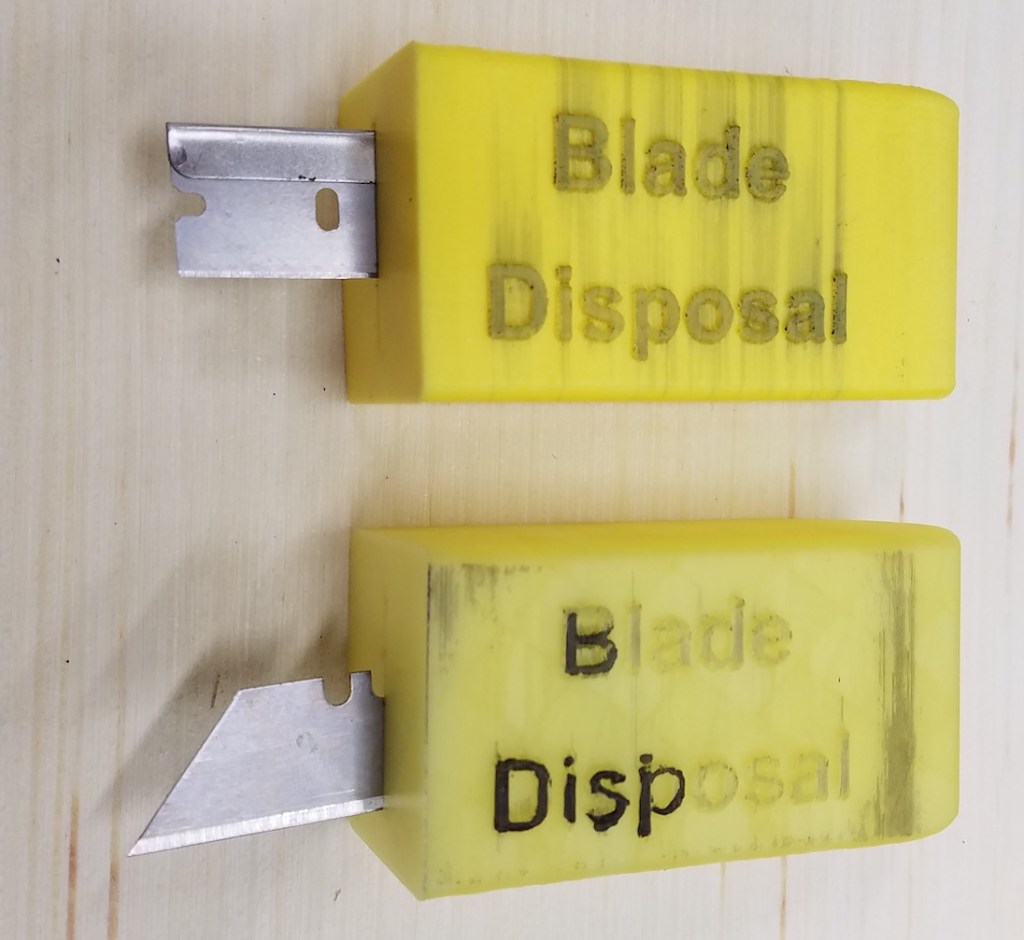
First up is a used blade storage box. A sharps container. I was brought up using traptezoidal utility blades. The two sided retractable blade is a standard and is widely available. I lose them a lot, so I have like 10 of them around. They are cheap, and all of them have cruddy blade because I am too lazy to grab a screwdriver to open them up and flip the blade. Enter a new contender, the snap blade.

I always thought of snap blade knives as cheap box cutters. I bought one to try out after some online recommendations, and have become increasingly impressed. I think they are sharper, can be extended longer, and if you need a new edge, you just snap a segment off and get back to cutting.

Both methods leave sharp rusty around, so I printed a small box that helps you break the blades off and keeps them trapped inside for safe storage. Inside, the entrance has a ramp so blades would have a really hard time rattling out. It is like a lobster or crab trap. The entrance slit is just big enough for the blades to slip in.

I designed it to accept the 18mm snap knife blades, standard utility knife blades, and single edge razor blades.

I made a few and tried colorizing the raised text. I started with a paint marker, but the text was small enough it was getting smeared. I moved on to an ink stamp, but the ink is too thin. It soaked into the print layers and ran everywhere. You need something thick like paint, but easy to apply to a whole surface like an ink stamp. They look ugly but work perfectly. Thingiverse Link


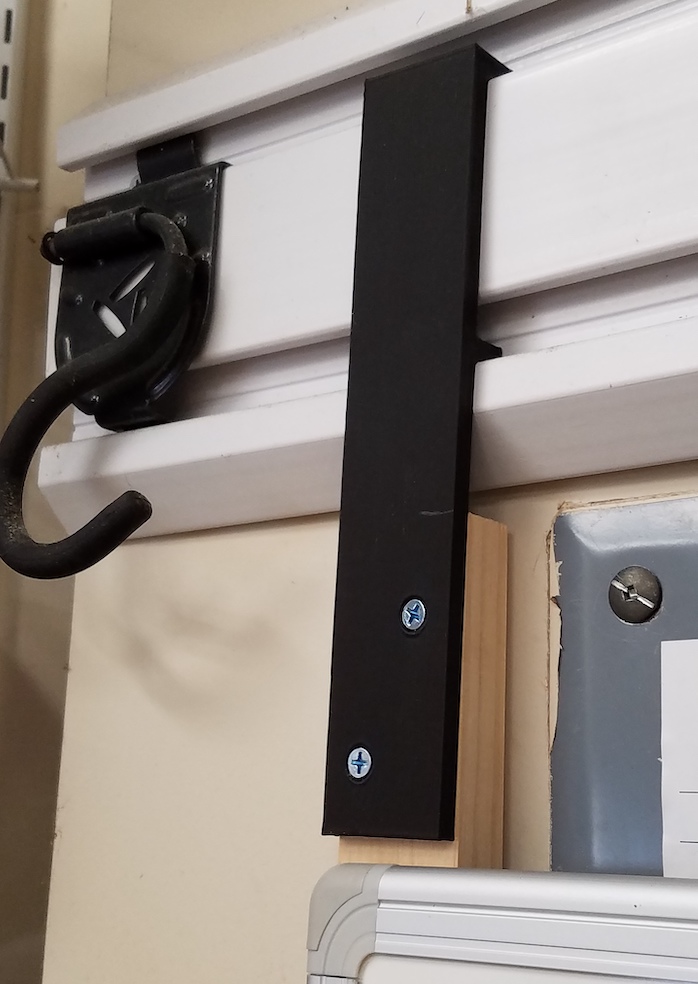
I really wanted to spring for a nice whiteboard for the shop. One that doesn’t have marker stains 6 months after you first get it. I did a little research and found an enamel coated board that looked good. Where to put it though? My new shop is big, but lacking in wall space. time to get creative.

The circuit breakers are in the right real estate. I need access to them, but only occasionally. I noticed the gear track above the panes and decided to take advantage of them. I did a few test prints and came up with a double hook that snaps in nicely. Those supported two strips of wood that the whiteboard mounts to. The whiteboard is very stable and can be removed quickly when I require circuit breaker access.


I picked up a dremel around Christmas and have been finding it really useful for small odd jobs. I ditched the organizers that came with it and have put everything into a clear organizer box. To keep the cut off blades separated, organized, and from getting broken I printed a simple wheel holder.


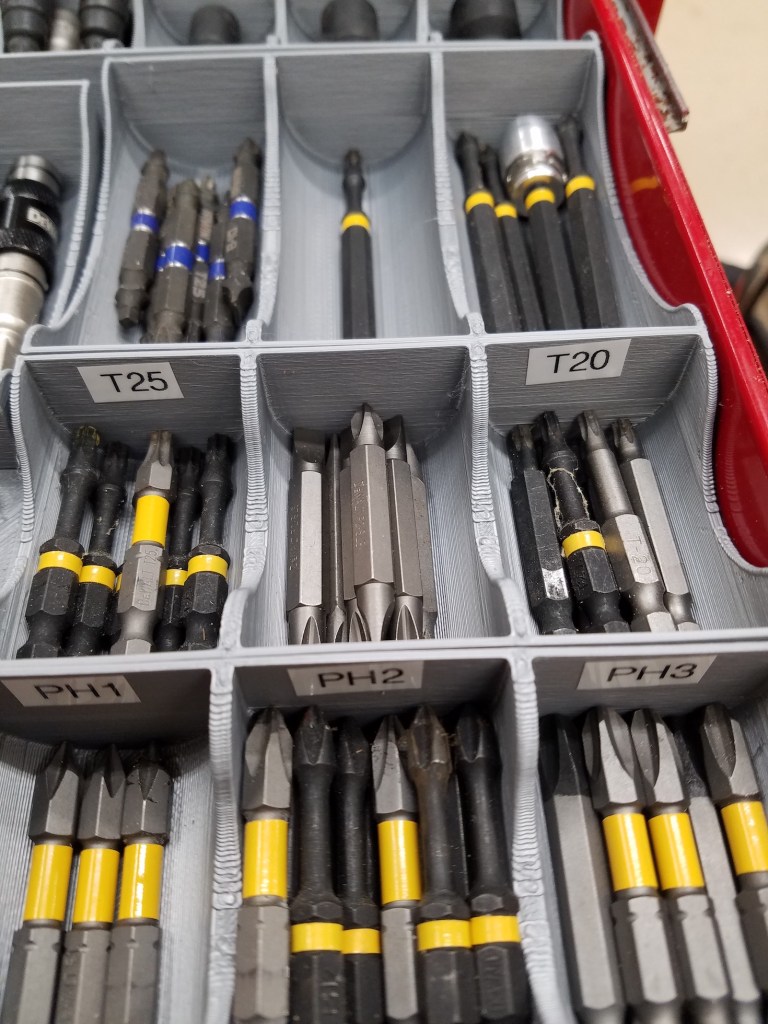
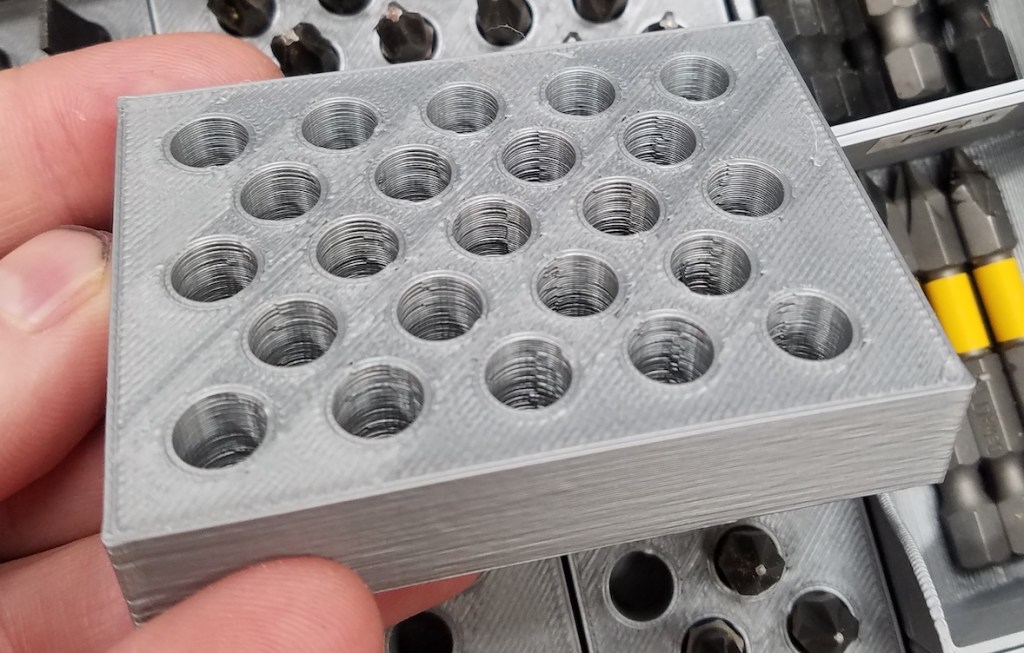
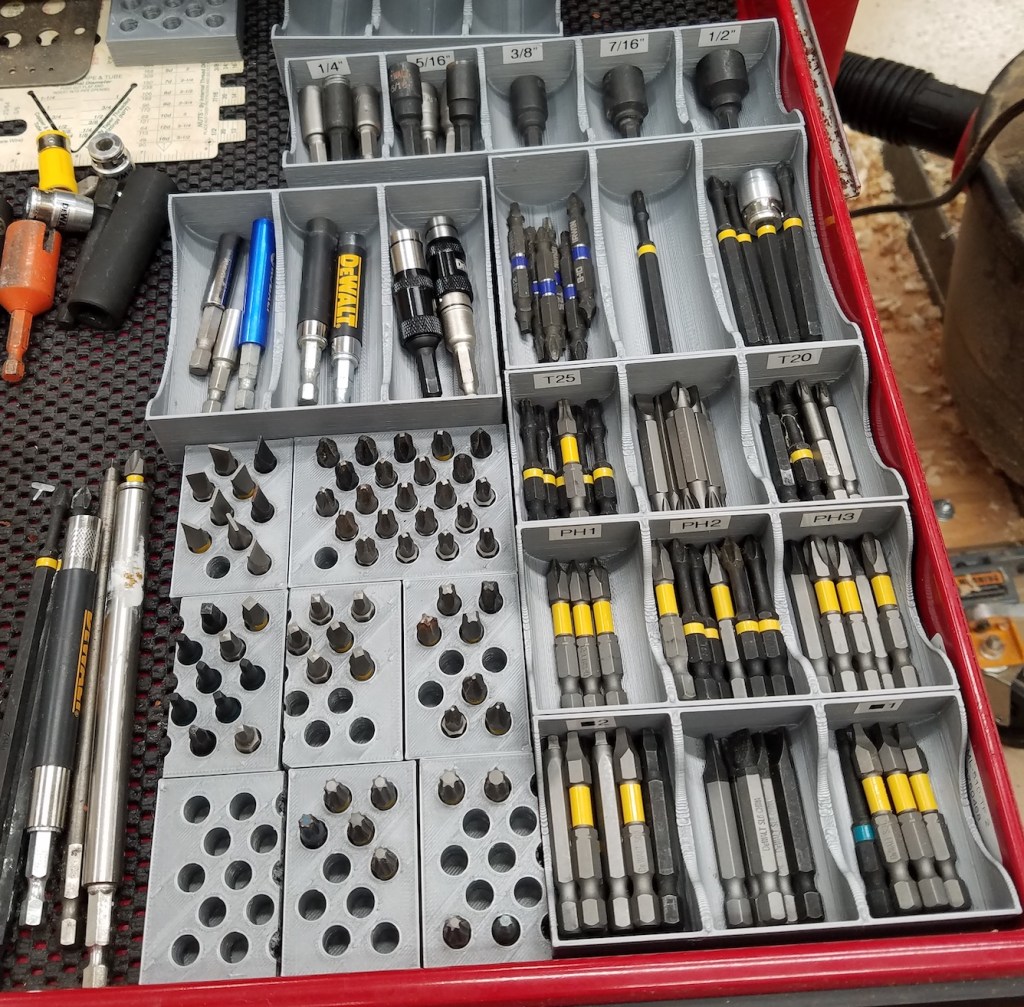
After working on the old and new house for months my driver bits were scattered to the winds. Over time I kind of piled them up in one place, but never managed to get them back into the right organizer box. Instead I decided to revamp the top drawer of the toolbox that holds all my drill press stuff to act as a driver bit organizer space. I printed blocks with well spaced round holes to hold the short bits, and longer trays to hold the various 2″ long bits.

I ended up making smaller versions of the holed blocks. I have a lot of #2 philips and #2 square drives, and only a small smattering of everything else. Now everything is really easy to access and find. I definitely don’t need to buy bits any time this century. Stash beyond life expectancy.

Bench Grinder Stand

My workbench has seen heavy use with lots of projects coming and going. I wouldn’t change a thing about it. My one complaint is that the bench grinder gets used so much it is always attached. Bench space is consumed, grinding grit and junk is often covering the work surface and vibrations tend to shake things off the table. Time for a dedicated stand. I had a pretty good idea of what to build in my head, but took this as an opportunity to practice drawing. I drew a few versions, a full assembly process (I found a better and worse order of operations when doing that), and finally tried to do a few perspective drawings. My ability isn’t great, but practice makes perfect and the process highlighted some minor issues with my original idea.

I picked up an 8 foot 2×8 and started cutting out a basic stand. The very bottom is a 2×12 bit of scrap I had that was about the right size. I screwed it all together and placed a long section of 2×8 on top to hold the grinder and an adjustable tool rest. I found some rubber pads to put on the bottom to keep the stand from walking around and cut down on vibrations.

To keep this thing in place I wanted to add a lot of weight. Sand is about the best thing I can think of that is dense, cheap, obtainable, and easy to store. It is about 100lb per cubic foot in density, and costs <$5 for a 50lb bag. Screws and silicone calking hold plywood to the uprights, making an open topped box shape. The space accepted a full bag of sand. A piece of 2×8 and just sits on top of the sand in case I want to empty it out at a later date.

I bolted down the grinder and attached a veritas tool rest that was previously on a small hand operated grinder. I think it will serve me better here on this highly used tool. The stand is a good height, access is easy, and the weight keeps the vibrations down.

Drill Organizer

The organization bonanza continues. My workbench has been the collector of all things used, but without a proper place to call home. In my last shop I had a place to store my dewalt drills in a hanging organizer above the toolbox. Bits were stored in a little shelf setup nearby. Neither of those made it through the move.

My previous drill hanger was a piece of plywood with some rough cutouts that hung, via zip ties, from wire shelving. It worked pretty well, so I will make a nicer version of that. I measured the drills and tried to make a careful slot for each.

The hammer drill (far right) was a little wider in spots than I thought, so it took a little freehand work to get right. The rest fit beautifully the first time. Everything got a chamfer inlet and a router roundover top and bottom. The back edge is cut at a 5 degree angle to tilt the whole board upward. It makes them want to slide to the front of the slot a little. No vibration or jostling will cause them to fall.

Everything hangs from the french cleat system I already had going. The drill holder was supported with some blocks underneath cut to the similar 5 degree upward angle. Underneath it all I put a box with pilaster rails. They accept shelf clips and are really easy to work with. I have used them in other shop applications like my hardware rack. 1/2 plywood serves as shelves for batteries, and drill accessories.

Instead of routing a groove for the pilaster rails I left them proud. This was easier to manage in the 1/2 plywood sides, and it meant cutting a notch in the shelves would lock them into place, front to back, between the pilaster rails. Everything fits with room to spare and adjustability to accommodate.