Cutting Board Wedding Gift

I am about 6 months late on this wedding gift, but better late than never! I wouldn’t normally add yet another post to the internet about making a butcher block cutting board, but this one had a few noteworthy mistakes I thought I would share along with a juice groove, which is a novel endeavor for me. Isn’t it funny how cutting boards call for half the clamps in your shop?

Lesson 1: Melamine Does Not Resist Glue

I had some spare plywood with melamine face that I thought would make a good glue up surface. It is flat and strong and the wood glue will not stick to it. Imagine my surprise when the board wouldn’t come off. I employed numerous wedges and was eventually able to break it free. I don’t know what they use to hold the face down, but my glue is better. I guess you need to wax it to prevent adhesion. I will go back to using wax paper like I did before.

Lesson 2: Helical Cutters Work Wonders

On a more positive note after scraping off the glue ridges I tried to send the board through the planer. Normally using a planer on end grain like this yields poor results. I had it shoot the board out of my last planer in pieces. My new helical cutter works wonders, the top looks gorgeous now.

Lesson 3: Watch Your Glue Up

I thought I was being really careful with this build. I measured and planned everything out so there was a 1:2:3 pattern to the size of the blocks in the board. That worked out, but I failed to flip the last piece properly when gluing. The pattern repeats on that last row.

Lesson 4: Juice Groove

I cut the last row off and re-sanded the end. Despite some minor road bumps this was going well. Time to press my luck even further and add a whole new feature! There are a lot of ways of doing a juice groove. Setting up stop blocks on the router table seemed to be quick, safe, and reliable.

I used that row that was cut off to experiment. You have to use a lot of pressure up against the fence or else the bit will wonder. Ok, now on to the real thing.

It was quick, it was safe, and it is certainly a groove. Not 100% reliable though. It looks straight everywhere, but overshoot exists at some corners. I don’t know if the stops shifted, or if my measurements were just off. Maybe I won’t be using this technique any more.

The Finish

Over all I would call the board a success. It came out slightly smaller than intended and the juice groove has a little wonder to it. Otherwise the oiling process made me very happy I with my efforts.

I kept pooling mineral oil on the top surface and let it soak in. That juice groove kept the oil from spilling over the edges. Eventually it saturated through all the way to the bottom side.

Bandsaw Outfeed Table

I have a project coming up that will require a long resaw cut on my band saw. Resawing is where you sit a board up on its skinny side and cut down the length. I love my bandsaw, but when it comes to doing long work the small table has left me in the lurch. The bandsaw is a tall tool so that most roller type outfeed supports don’t come close to high enough. I am going to add a removable outfeed table to the back end to help with these kinds of scenarios.

I have some phonelic resin covered plywood that makes good slick surfaces for things like this. The resin surface can chip off if hit on the edges though. I made a frame to hold the plywood, protect the edges, and give me a place to bolt too. This could have been done in pine, but I am trying to increase the quality of my infrastructure work, so I went with maple instead. I routed a groove on the router table and used my roundover templates to make the corners match on the plywood insert.

After gluing and pinning it through the side I did a careful trim with a block plane to get the outside frame and inside surface to be perfectly flush. This made fun little corkscrew shaped shavings. Now anything sliding across wouldn’t get caught on a lip or edge, and the sides of the plywood will remain protected. This is another place where hand tools make the job a lot safer and less likely to induce disasters than something with a motor would do.

With the table top complete I needed a support leg to help keep the back end from sagging. Making it screw together let me turn two short pieces of plywood into a longer one, and helped with fine tuning the outfeed level.

A hinge attaches the support leg to the under side of the table top. There was a good place for the bottom of the foot where the bandsaw base meets the cabinet it sits on. This will let the table support a decent amount of weight without sagging.

The bandsaw’s table top has two bolt holes in the back that accept M6 screws. I got some socket head cap screws and bolted the front of the outfeed into the back of the cast iron top. The back support leg keeps the rest of the table top up under load. I finished everything with boiled lineseed oil and wax.

The table is almost exactly the same width as the iron top, but doubles the total length. Now I can resaw a 3ft board without worry about it dropping off the back end. As a bonus, the outfeed table doesn’t interfere with anything behind it when pushed into its resting place. Nor does it interfere with the fence. Basically I will probably never take this off.

Maple Closet Shelves

I am starting to mix in house projects and longer term goals along with my shop infrastructure work. We pulled all the built in organizers out of the master closet when we were renovating. It was basic white particleboard and appeared to be rather old. We cleaned up all the walls and installed brackets that supported a continuous closet rod for hanging clothes. This gave both of us ample hanging storage space. The bracket is designed to have a shelf above it. I wanted something nice, and waited until now to build it.

Actually like a lot of my projects I started this a few months back and got side tracked by other house issues. I got the only 10 foot maple boards they had at the local lumber place and went to town planing them.

Buying rough cut wood is a bit like Forrest Gump’s box of chocolates. You never know what you are going to get. In this case, some cool mineral darkening and nice figure.

This is an interesting transition project. I started it with my old Hitachi planer and ended it with my new Dewalt planer. The old planer has been donated to a co-worker that is starting to fill out his shop and could put it to good use.

Goodbye old friend

With the boards cleaned and flattened I needed to work on the edges so I could joint them together in a panel glue up. I preserved the length as long as I could knowing that the ends would eventually get cut down some. Planing a 10 foot board by hand is hard work. I had to employ a helper to keep the board propped up. I haven’t had a power jointer in years, and I don’t see how it would have helped me in this situation.

After much time spent with my #7 jointer I glued the two shelves together and was ready to continue the flattening. This time with the new planer. The main reason I bought this one was because it was reviewed well, and there was an available helical cutter head for it. The two are a match made in heaven. No matter what, the thing produces a clean surface, no tearouts, and the carbide inserts will last a long time.

There is some really pretty figure in the wood. Another advantage of the new cutter head is that it makes really short shavings. You can see them wizzing around in the first stage of my dust collector window.

After a very minimal amount of sanding and clean up of the ends, I routed a round over on all the exposed edges.

With the boards in their correct shape I applied a coat of boiled linseed oil to protect the wood and give character. These will not see heavy use, so a tougher film finish shouldn’t be needed. The oil really pops out some of the birds eyes and other grain variation.

Unfinished above, oiled below

Once the oil soaked in and dried I installed the shelves. They don’t hold a lot now, but probably will as we collect junk in the future. With all the clothes in place you can barely see them. I almost wish I had used pine instead of this gorgeous wood. Oh well, it should be a good shelf for generations. The next owners certainly can’t say it was made of particle board and falling apart.

Nailer Cabinet

Air nailers are a pretty wonderful invention.  They can provide low visibility fastening in a lot of different applications.  I have had a brad nailer for ages, and picked up a good pin nailer when I redid the kitchen.  The cordless electric nailers are a lot heavier than their air counterparts, but for just a few quick hits, they are awesome.  I recently built up a full inventory of air and electric brad and pin nailers.  Time to put those nailers to work building a little home for all these gadgets.

I planned out a cavity to hold all the nailers up top, and a set of drawers below to keep the nails and other accessories.  1/2″ maple made up all the components except the drawer bottoms.

Once assembled I cut more plywood with a 45 degree angle on it to act as a french cleat across the back.  The electric nailers sit nicely on their own, but the air ones will need hangers.  Plus, this lets me rearrange things, or add dividers if I feel the need later down the line.

I played with the arrangements, and there are lots of spacing options that work.  Big enough to be flexible, but not so big as to waste space.

DSC_1298

This is a decent looking cabinet on its own, and is about where I would stop in my previous builds.  I wanted to add a little something, so I made my own maple edge banding.

The pin nailer came in handy for securing it all, and hand planing really lets you sneak those parts into a good fit.  With the body of the cabinet in shape I turned to the drawers.  I thought drawer fronts with chamfers might be a neat flare, and I had a new router bit to try out.  I cut all the end grain chamfer while it was still a solid long block, then cut the two fronts out and routed the long grain.  It completely mitigated any tear-out issues.  I finally feel like all those minor screw ups of the past are congealing into wisdom.

Everything got multiple coats of danish oil.  Not a bad finish, I like the wipe on aspect and how it looks.  Honestly though, it is just some kind of thinned linseed oil.  At probably 4x the price of basic linseed oil, I might just figure out how to thin that stuff myself.

I 3D printed organizers to keep each set of nails contained and labeled.  The drawer I had these in was a mess with different nail lengths all mixed up.  Mishaps have occurred from pulling the wrong length nail ream.  If I ditched the manuals I could have probably combined everything in one drawer.  Oh well, this provides ample expansion for new nail lengths, or other jigs/accessories I might acquire.

The final design looks pretty nice.  I will see how much dust it collects and consider adding doors later, but for now it is perfect.

DSC_1311

Father’s Day Flippers

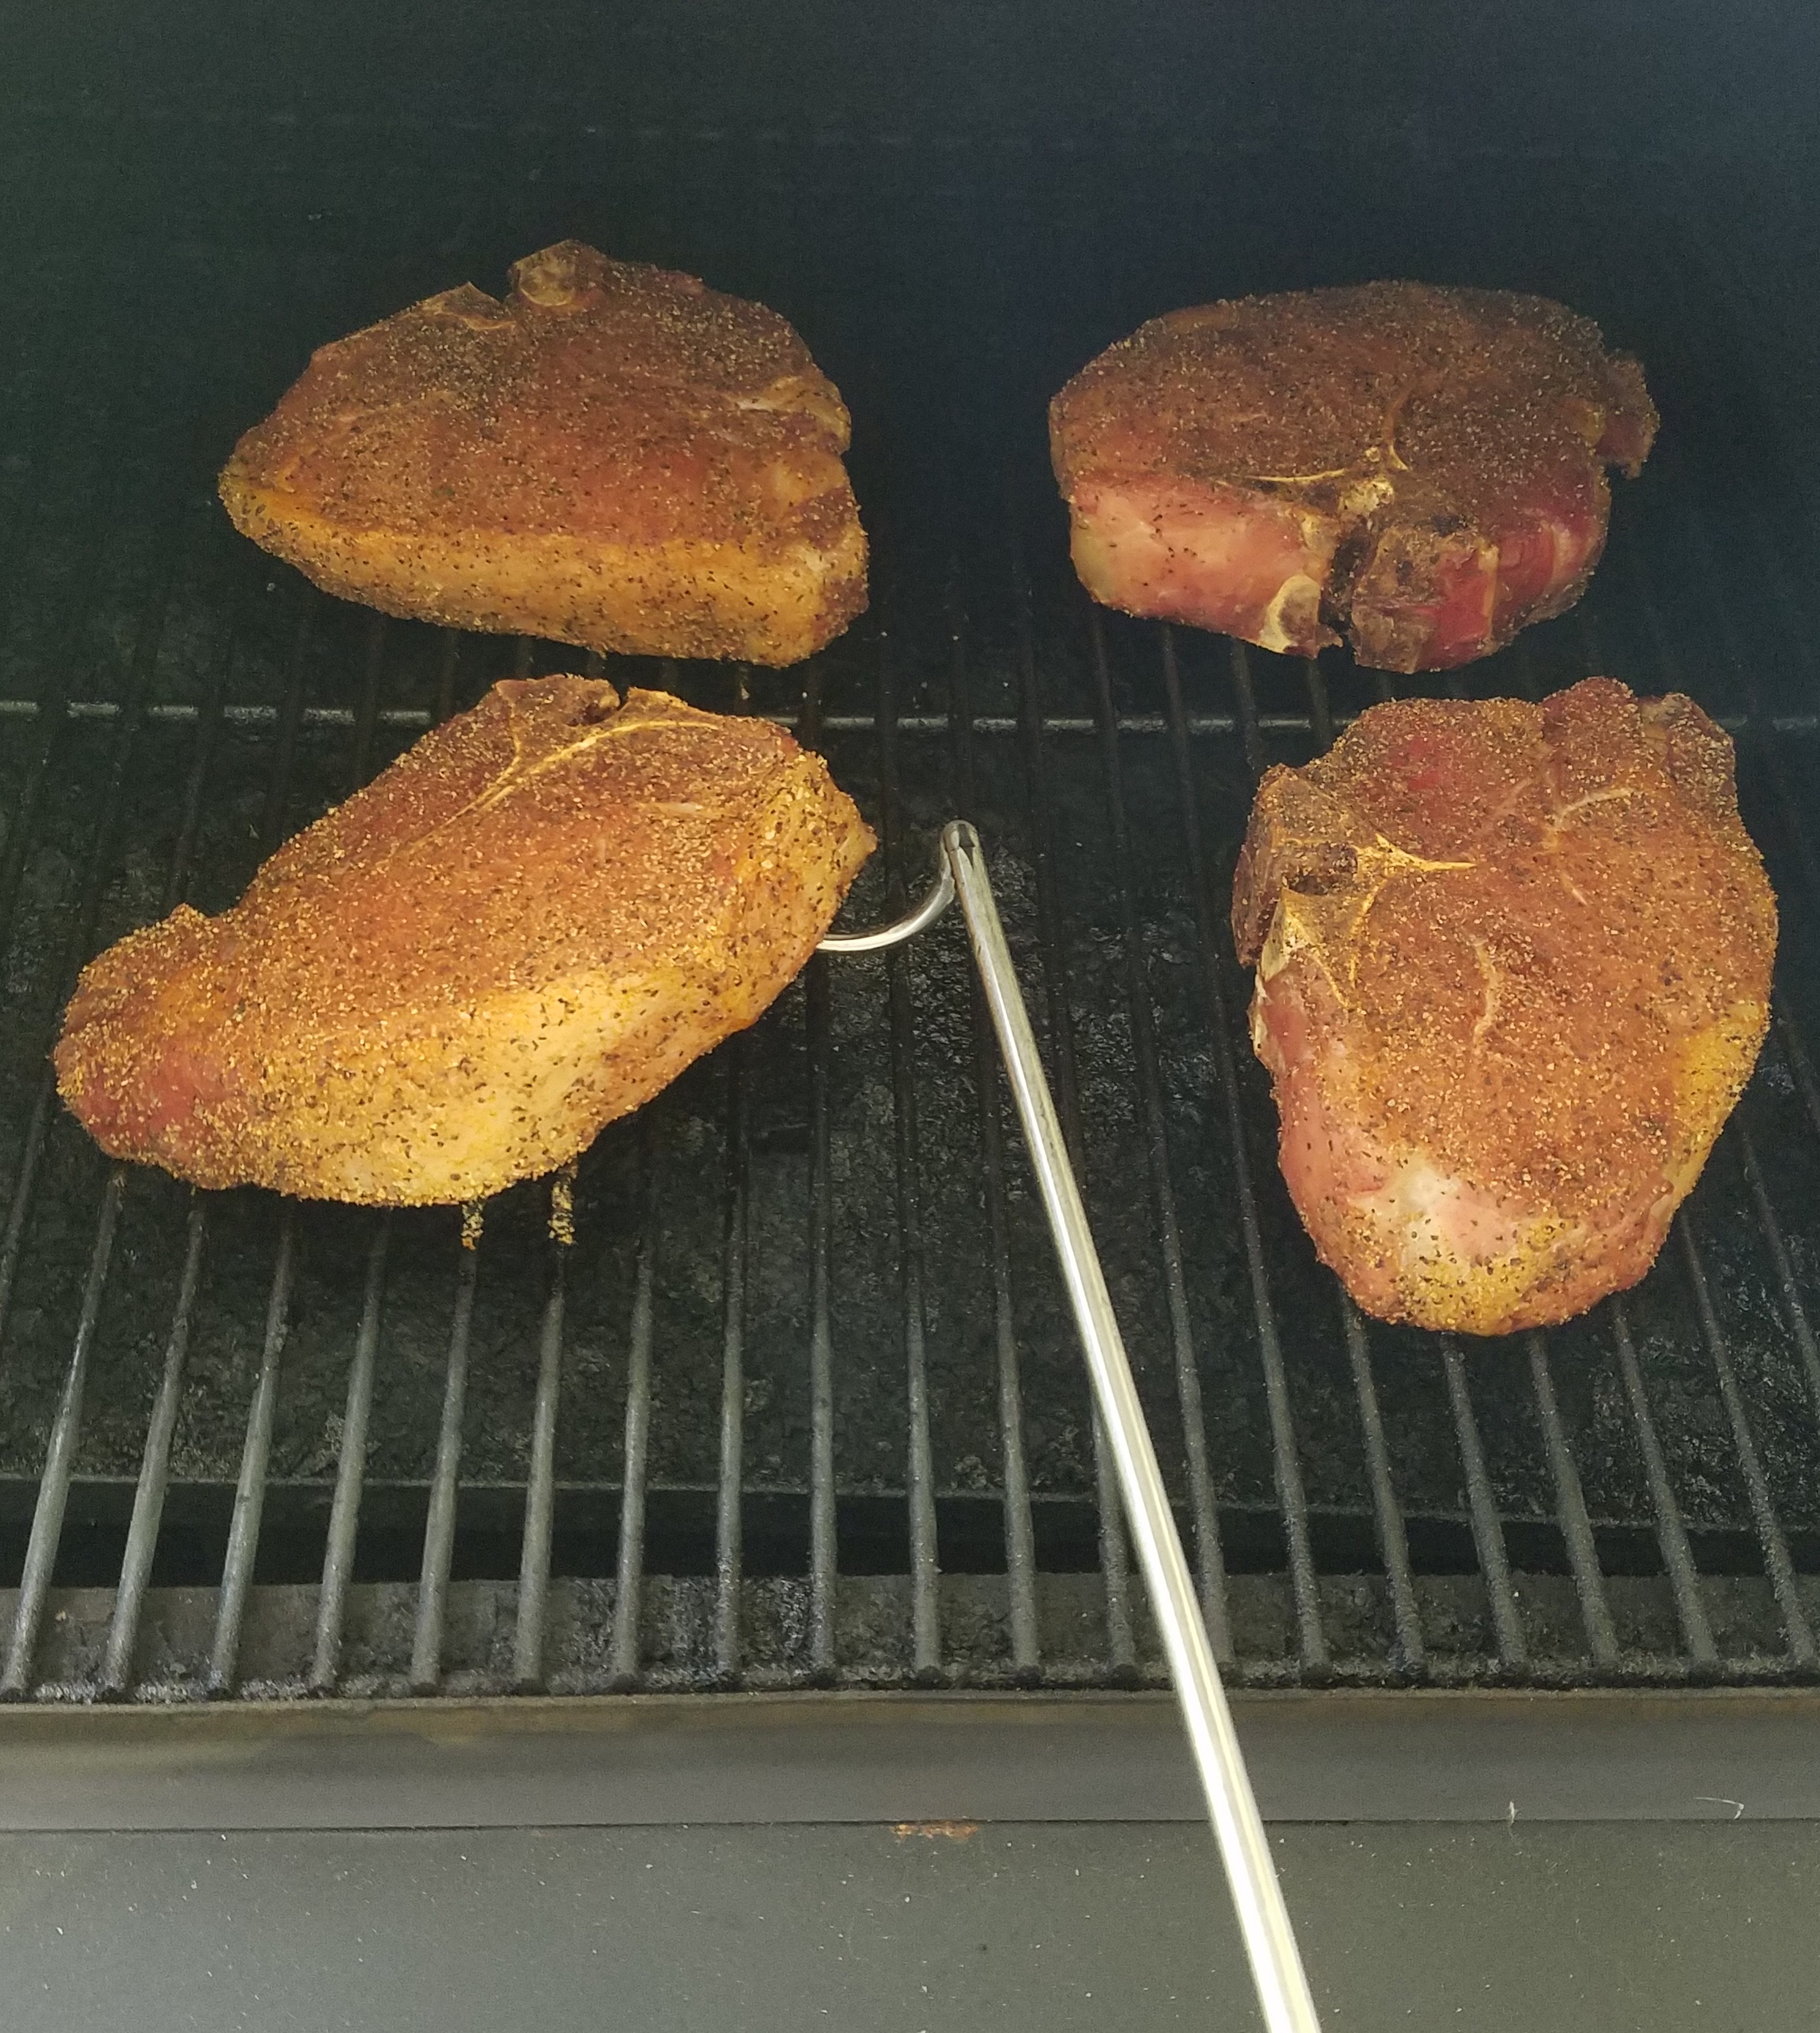
These are called pigtail flippers, bbq turners, or I have also heard Texas toothpicks.  Whatever you call them, they are cool tools for the grill.  Here is me demonstrating their use on a set of serious pork chops for my father in law.

20180616_120333I wanted to try one of these tools, and my localish woodcraft had these new kits on sale.  Why not make one for myself and the dads in my life?  I picked up some thick maple dowel to make these handles.  I was building the handles for my mom’s bookbinding press at the same time, so it all worked out.


The first step is to drill out a hole for the threaded insert, and carefully thread it in.  I had an issue.  Most kits use 1/4-20 or 5/16-18 threaded inserts.  This one had an M6 insert for the metal turner rod.  I don’t have an M6 mandrel, and I couldn’t find one online.  Time to make one!  I played around, but ultimately a nut and bolt with the head cut off did the trick.

DSC_1251

That let me thread the brass insert into the handle, but I would normally flip the part around and chuck the mandrel up so I could spin with no tail stock.  No such luck here, the bolt is too small for all of my chuck jaws (right picture).  I could try to chuck up the nut, but it has 6 sides and the jaws all have 4.  If I did a lot of these, I would have to figure out how to make my own mandrel.


Instead of holding it by the threaded insert I turned down a shoulder to accept a brass bushing, then chucked up that shouldered section.  It marred the surface, but that will get covered anyways.

With 4 different variations turned I remembered I was supposed to drill a hole in them for their hanging cable.  This would have been a lot easier when they were simple cylinders still.  Order of operations on the lathe is super critical.  I put the whole lot of them on little sticks and went to town with the spray polyurethane.

I pressed on the brass bushing with epoxy and threaded on the turner.  The wire cable as a hanging strap adds a nice touch.  I hadn’t broken out the lathe in quite a while, so this was quite satisfying to get these done with minimal screw ups.

DSC_1284

DSC_1285


One other minor experiment that happened when I had my lathe out was to try and smooth out my 3D printed can koozie.  It turns out that you can really shine that stuff up if you go through the grits.  There are minor voids that show through upon close inspection.  Still, that is a nice shiny looking part.  You could polish up most of a chess set this way!

Bookbinding Press

During a visit to my crafty mother, I came across a good build to support her habits.  She showed me a series of bookbinding finishing presses.  I am not super familiar with how they work, but they looked a lot like a moxon vise.  I am planning out a moxon vise build of my own, so this would be a good learning experience and make a great gift.

DSC_1280

DSC_1281

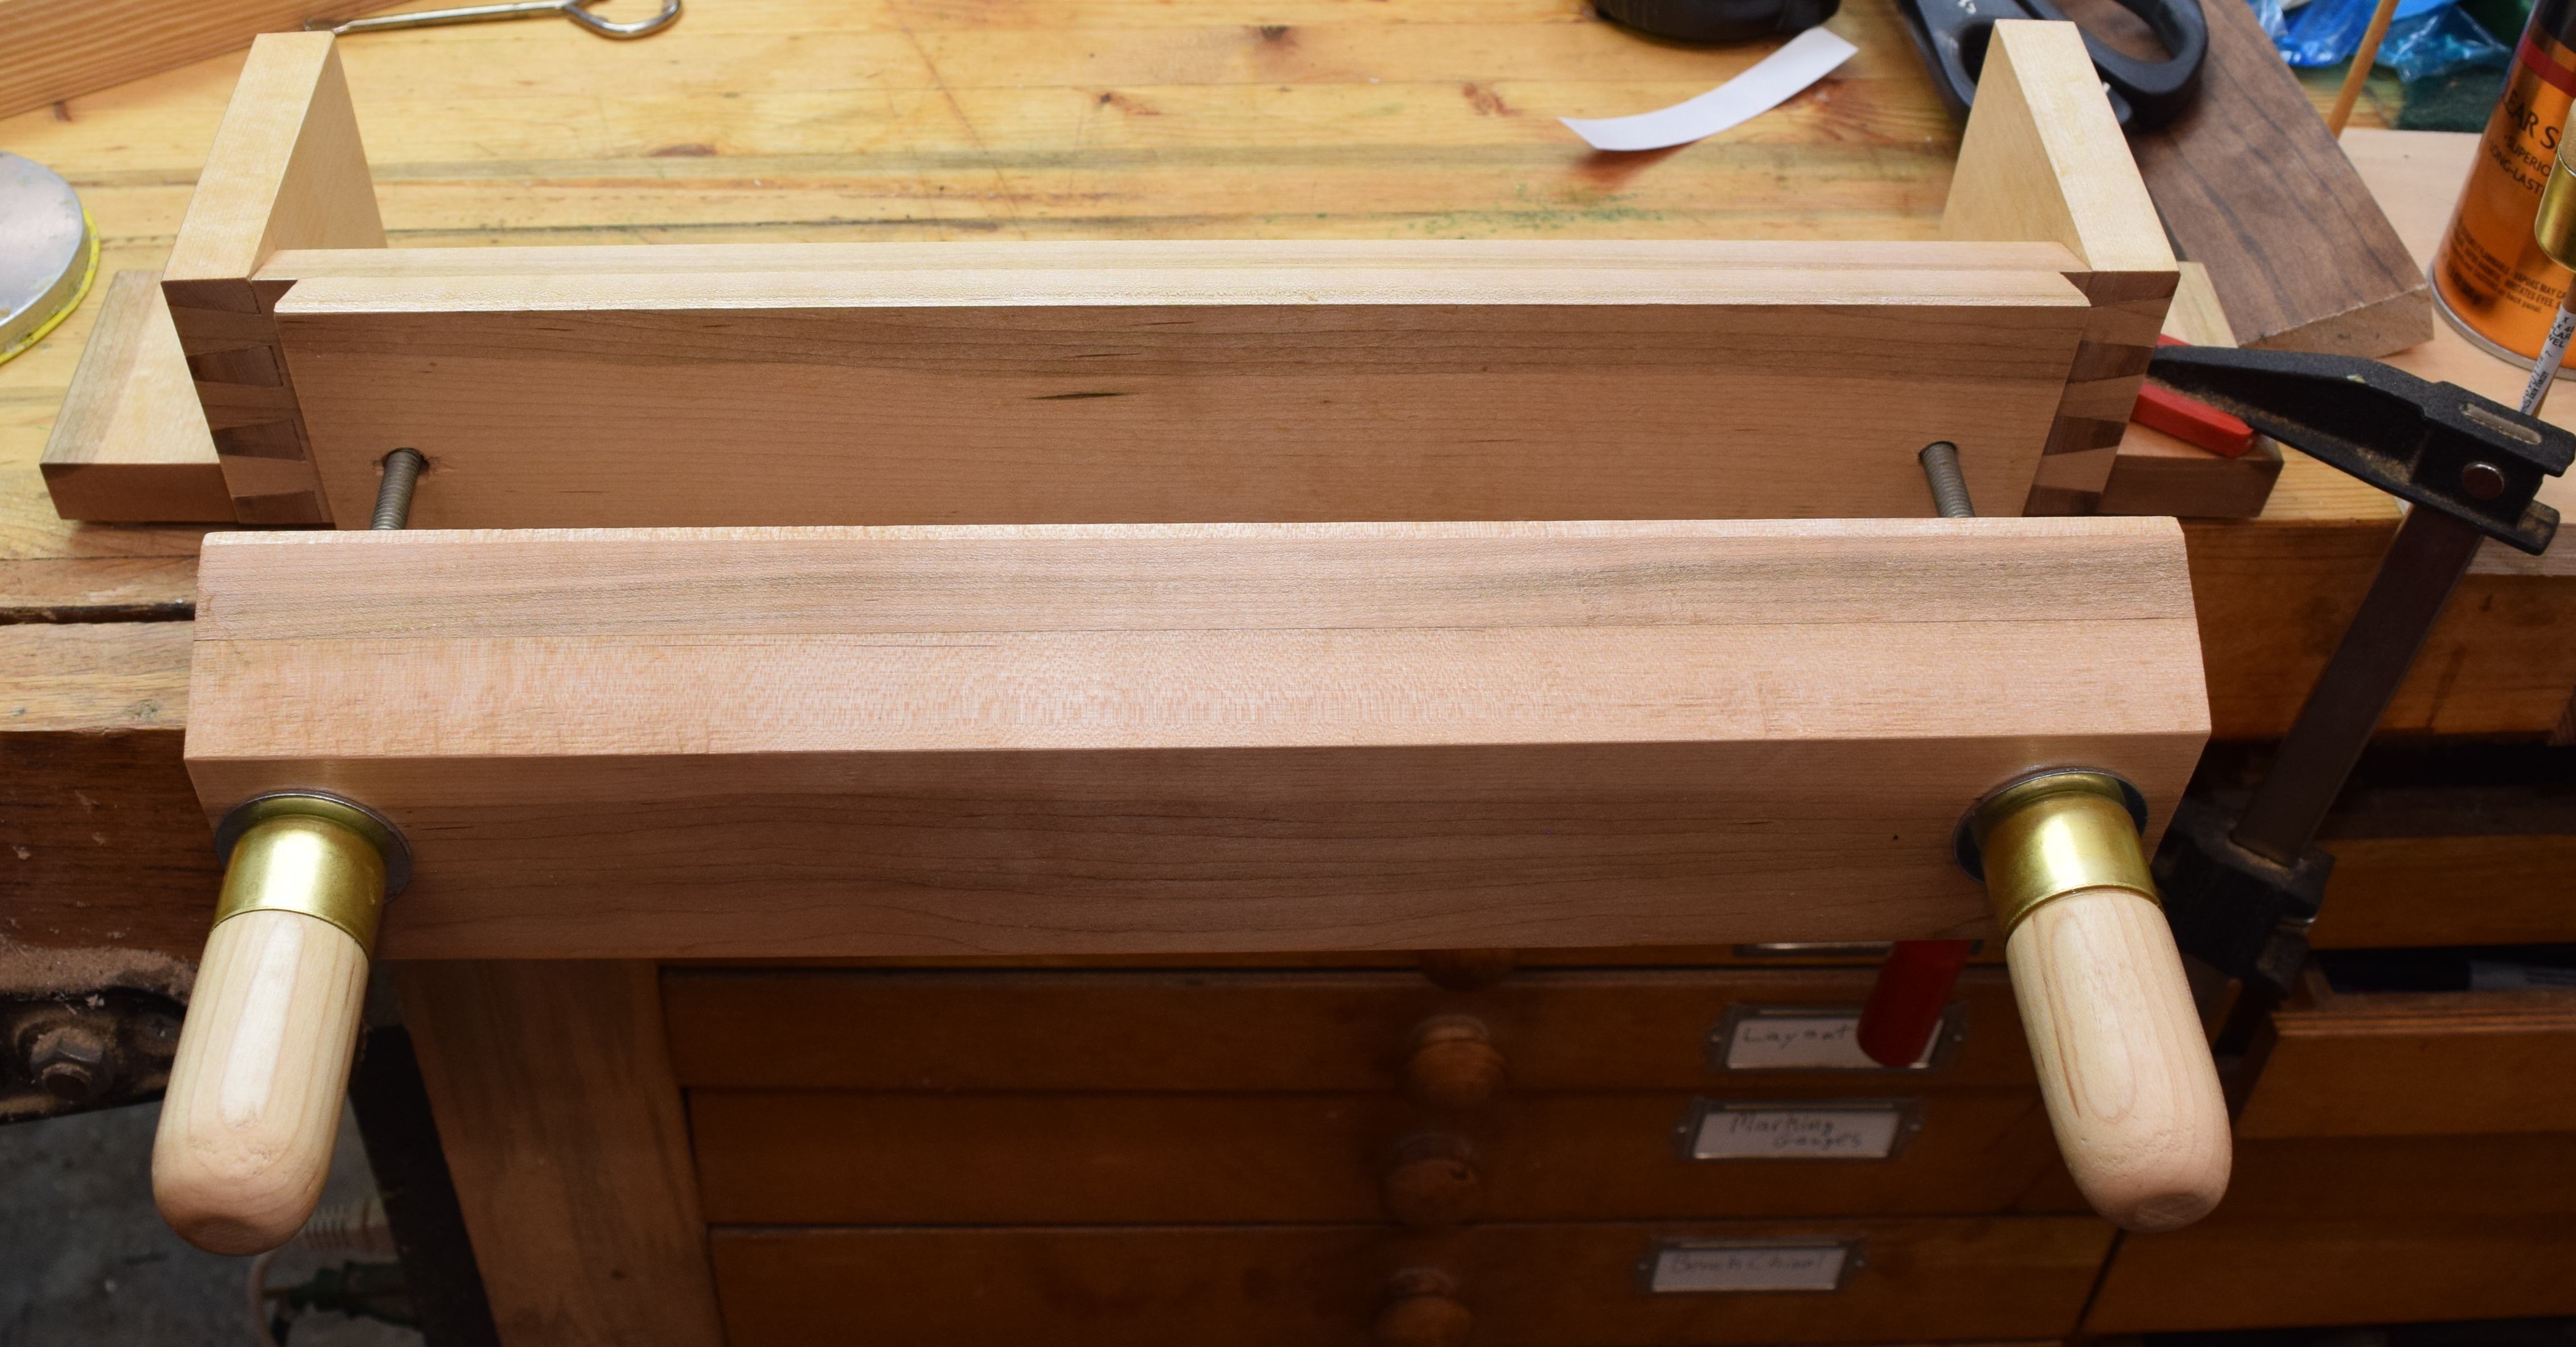
Traditional books have a lot of layers of material that need gluing together.  This helps keep it all clamped for various operations.  The side wings let you clamp it to a table, and with it hanging over the edge, any length book can be held.  The jaws will open to accept a 3″ thick book, and there are 13 inches between the screws, allowing for a very tall book.  5/16″-18 hand screws should provide plenty of clamping force.  The hand screws come out, so it can be disassembled and packed into a smaller space.


I started with the backbone and dovetails.  If something was going to get screwed up, it was the dovetails.  I need to cut a lot for an upcoming project and I am beyond rusty.  Mark, saw edges, fret away waste and pare the rest.

My dovetail transfer jig has already come in handy.  The pins look pretty rotten, but they should be very structurally sound.  Sorry mom!


With that taken care of I glued up two pieces for the front, and added another to the backbone.  One piece was taller than the other which eventually got planed to an angle.  That gives your fingers easier access to the book spine.

DSC_1236

DSC_1237

DSC_1238

I assembled the dovetails and put on side wings that let you clamp this jig to any table or workbench.

DSC_1240

DSC_1242

When all the glue was well cured I put on a few coats of polyurethane in the hopes that bookbinding glue wouldn’t stick to it.  Felt pads on the bottom should keep it from scuffing any tables.  I pounded in some threaded inserts meant for wood.  They should hold just fine, but to be sure I sank a few screws beside them.


To run the threaded rods in and out you are going to need a stout handle.  I chopped some maple dowels down to size, drilled out for a 5/16 threaded insert, reduced the entry shoulder for a brass sleeve, then flipped it around, threaded it onto a 5/16 mandril, and smoothed out the back side.

The bare wood got multiple coats of spray polyurethane, then when cured, I epoxied the brass sleeve on the handles, and the threaded rod in place.  DSC_1276.JPG

Bed Project Phase 2

I started my storage bed project a short while ago.  Ok, it was nearly 2 years ago.  Still, I got another bit done.  The mattress sits on a plywood platform.  Wood strips form a lip around the edges and keep the box springs in place.  Those had been a set of short pine parts, but would now be full maple pieces.  The bottom face of the bed frame was plywood and an open hole.  That got covered with an easily removable maple cover.

I started this phase right after I finished the frame, but got side tracked.  I lost a lot of the photos.  The earliest thing I have is of the bottom cover getting ripped down to rough width.  I did that by hand.  No small amount of work!  Table saws are real time savers these days.

After that I went about flattening the massive board with a scrub plane which, according to my heart rate monitor, easily qualifies as cardio.  Scrubbed on the left half, untouched on the right in the picture below.

DSC_1008

After a bit of time with my jack plane it was becoming flatter.  The maple always gives me tear out grain issues though.  A smoothing plane and card scraper fix most of up.

The bottom cover was the largest board I had ever worked by hand.  It was daunting, but starting to look good.

dsc_1009.jpg

With the dimensions and finish all about right I could move on to adding a hand cutout feature.  I roughed with my chisel, then used a rasp and spoke shave to smooth it all out.

DSC_1032

DSC_1033

Glued washers to the back of the board held it firmly against magnets in the bed frame.  The issue is that this kind of board doesn’t like to be flat.  That gap is a little unsightly.

DSC_1034

No need to panic, I can fix this and make it even better.  A piece of molding attached with pocket holes will stabilize the board a bit, cover up that gap, add a feature to keep the covered centered on the frame, and add some nice flair.  Below is that molding cut to size and fit checked on the bottom cover.  It would ultimately get some rounding on the router, but I forgot to capture that process.

DSC_1089

Similarly, I didn’t get anything of my work on the side rails.  They got a groove to help alignment with the bed platform and some rounding on the router to ease contact with shins and knees.  I used the same waterlox varnish finish technique as on the rest of the bed.  I am really liking how that finish works!

DSC_1090

I assembled the bottom cover once all the finish work was done.  It takes and ugly hole and makes it look like a great maple masterpiece.

DSC_1100

DSC_1101

The old pine temporary rails were removed and new maple ones installed.  I clipped the bottom two corners of the bed platform before installing the rails.  No real load is held there at the very edge, and my shins catch that.  Now the railing and platform are all more leg friendly.

DSC_1102

Phase 3 is going to be making all the drawers that go underneath the bed.  I want them to be largely hand worked as well.  For this project I used a miter saw to cut things to length and a router to perform round overs.  Otherwise everything was done with hand tools.  Not necessary, but something I want to spend more time on.

Maple Trim and Half Wall

There is a half wall in the foyer that was topped with a dark stained bit of pine.  I sanded it and panted it white to match the rest of the trim when I renovated that part of the house.  It sees enough use that interior house paint didn’t last long before scratches and stains got to it.  I wanted to install counter top material when the kitchen got re-done, but there was not enough quartz left over.

After nearly a year of the kitchen being finished I decided to tackle this project.  Instead of quartz countertop I went with maple.  I started by removing the old top and trim and cleaning up any issues around with the wall paint.

This job called for a 7.5 inch wide board that was 6 feet long.  The length wasn’t an issue but that width left me with few options at the yard.  This one is gorgeous with a lot of cathedral, some tiger striping and other character.  That makes planing it really tough.  After getting a lot of tear out in places I fell back to sanding.  It took forever, but I got the top very smooth.

DSC_0996

I needed trim for under this part and under a window between the dining room and kitchen.  I got a nice beading bit and went to town.  Thankfully before doing everything I experimented.  Having the bit start with just a little nick, then going for full depth on a second pass produced a lot less tear outs at the sharp corner.  Notice how crisp the line is in the top example, while the bottom one is jagged.

DSC_0997

With all the stock prepared I moved on to finishing.  I wanted to use a water based urethane from General Finishes.  It has sprayed well in the past and doesn’t yellow the maple, so it should match the kitchen cabinets.  The trick is we were due for days of cold, wind, and rain.  I moved everything inside and tried to pad the finish on.

DSC_0999

Having finished many pieces with oil based wipe on polyurethane, I can say that this stuff is no substitute.  It isn’t thin enough, but then dries too quickly and leave streaks.  I eventually switched to applying it with a foam brush.  That worked out the best overall, but still left a lot to be desired.

The two trim parts that go under the kitchen window had interference issues.  They used a lot of calking to hold down the quartz, and left a fillet underneath.  Instead of trying to cut it all out, I rather relived the back hidden edge with a chamfer bit.  The finish was indeed a good match with the cabinets.

DSC_1003

DSC_1002

After that success I installed the half wall and its trim.  Once again drywall’s tendency to be out of square made the miter joints a little off.  I fall for that every time.  They still look really good unless you get up close.  I used a combination of loctite power grab (fantastic stuff for installing molding), and my pin nailer to fix everything.  Pin nailers are perfect for these kinds of installations.

Wooden Gift Tags

I was getting ready for a birthday party for this 1 year old I know.  Our conversations are one sided, he is a little short, and fails to reciprocate on high fives.  Still, he has more hair than I do, and a pretty cool set of parents.  So we got him a gift.  I was bagging up said gift when I thought of a cool way to add a little personal touch to the tag.

I dug around my scrap bin and came up with some thin maple I had from a resaw project.  Some quick hand hand planing and I had a really thin sheet of wood to make a tag out of.  I think it was about 1/16″ to start with and was a pretty consistent 1/32″ when I was done.  Still heavier than card stock, but a pretty impressive thickness

DSC_0984

I cut it out and gave it those beveled tag edges along with a whole in the center.  I wrote out the message in sharpie and gave it a quick spray lacquer coat.  That was an error in order of operations.  The solvent in the spray lacquer lifted the sharpie and let it bleed out.  It isn’t horrible, but is noticeable.  Next time, spray first, let dry, then write the message.

My miserable handwriting is probably the worst offense.  Do they teach handwriting classes for adults?  I might have to plan out some resawing and make a stack of these tags.  Buying a small section of veneer would yield a lot of cards for a little cost, but I would rather start with some 3/4″ stock and do the milling myself.  Yet another project for the woodworking pile.  I need to craft more time so I can get out in the shop regularly.  I have been terrible this year.

iPad Stand

I recently bought an iPad for use during travel and for things around the house.  One such thing is for use as a recipe holder while I cook.  I have slowly been collecting my various scraps of paper and bookmarks into an organized google drive collection.  Most fit nicely on a single page in portrait mode.  I needed a way to prop it upright and started with a nice swoopy 3D printed part.  I liked the shape, but it was a little too light and the color clashed with my kitchen.

20171013_113039

Unusual for me, I built a test piece first.  Typically I just launch into this sort of thing head first and start making mistakes.  The pine shape was made using the green 3D print as a tracing template.  I liked how it came out and proceeded with maple.

As I was cutting the groove on my router I made a huge mistake.  I wanted to rout the groove a little wider, and moved the fence closer to the bit to make a second pass.  CHOMP!

20171013_120158

I forgot, when I moved the fence closer I used the wrong side of the bit.  When pinched between the fence and bit, the bit bites in and drags everything forward.  I made a little graphic below to show the issue.  The bit rotates counter-clockwise.  Keep out of the red zone and use the green side.

I recovered by starting over and moving on to a new piece of wood.  This time without any issues.  20171013_121914

Once I got the groove completed I tapered the back a little.  It doesn’t need to be 3/4″ thick all the way across, so I thinned the back end down.  I like the effect a lot, but in retrospect I could have gotten a lot more aggressive.

20171013_123053

With the tapering done I used the green printed part as a template to lay out the two curved cutouts of this part.  I made the center cut wide enough to help lighten the look, and provide a cutout around the speaker ports at the bottom edge of the iPad.  I was able to orient the front to show off some lovely rays (little speckles in right hand picture) in the maple.

I am really happy with this, a past version of me would have cut the groove and called it good.  The block would have been functional, but chunky and brutal.  This is lighter and more elegant.  Truth be told I could have done more lightening and still had a functional part, but as always it is a learning-by-doing experience.  A spray coat of lacquer sealed the deal.