New 3D Printing

I broke down and finally bought a 3D printer.  The monoprice mini at only 200 dollars is basically the best value buy there is.  And here it is sitting on a messy desk full of printed parts and printer tools.  This thing is going to need a custom table soon.DSC_0489

I was so excited when I first fired it up that I shot a little video of its first print.

It worked really well out of the box, though I have been doing my best to monkey with settings and make everything go faster and smoother.  The major learning point has been that buildtak is a great surface to print on, and turning the bed heat down from 60°C to 45 really helped the prints come off without a jackhammer.


Printing for the Printer

The front knob on the tool is really annoying.  It is flush with the surface, and yet you have to spin it a lot.  It gives you bonus moves sometimes, which only makes things more frustrating.  Luckily, there is a print for that!  Some kind soul figured out how to pull the knob off and print an extension.

Getting a spool cracked open is fun, but dealing with an unwinding spool isn’t.  Luckily there are a number of great choices on Thingiverse for filament holding clips.  Why not print a few?  The loose filament goes through the small hole.

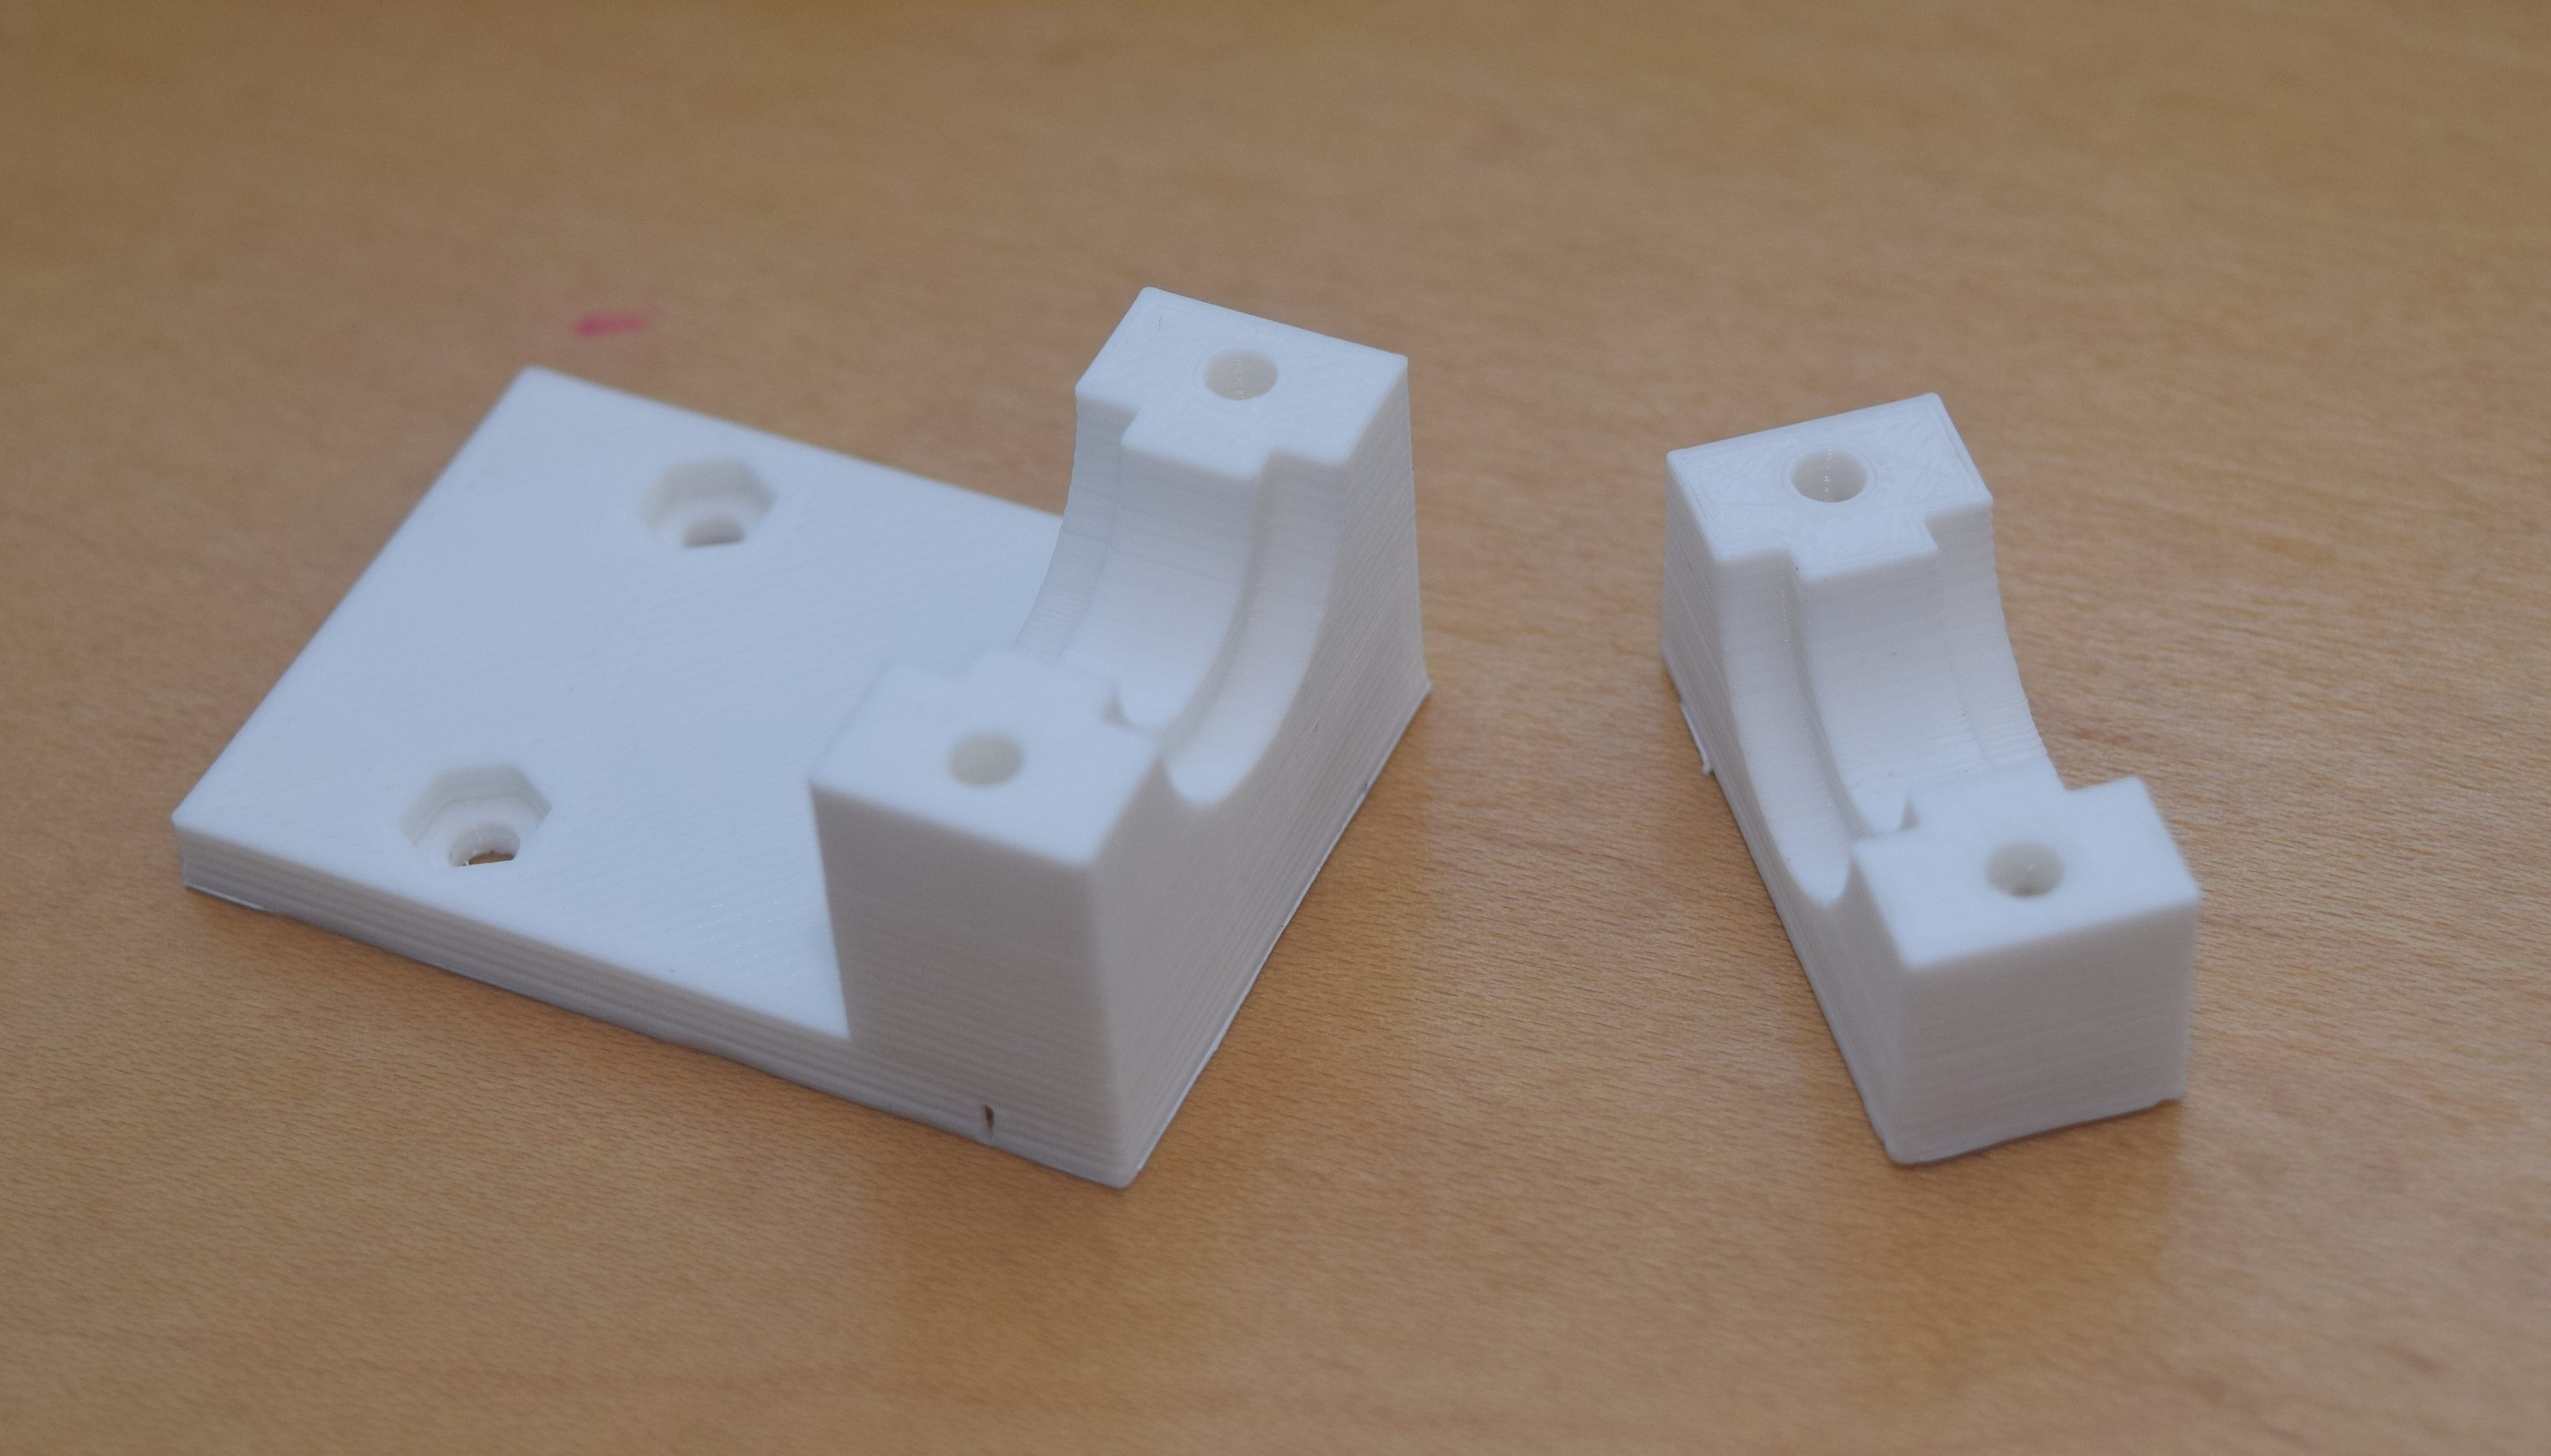
The downside to this printer is that it isn’t exactly open source, and they don’t sell replacement parts.  Luckily the 3D printing community is amazing, and they have a bracket you can use to put a COTS replacement on this puppy for the day when the hot end dies.  Better to print that now than be sorry later!

DSC_0488


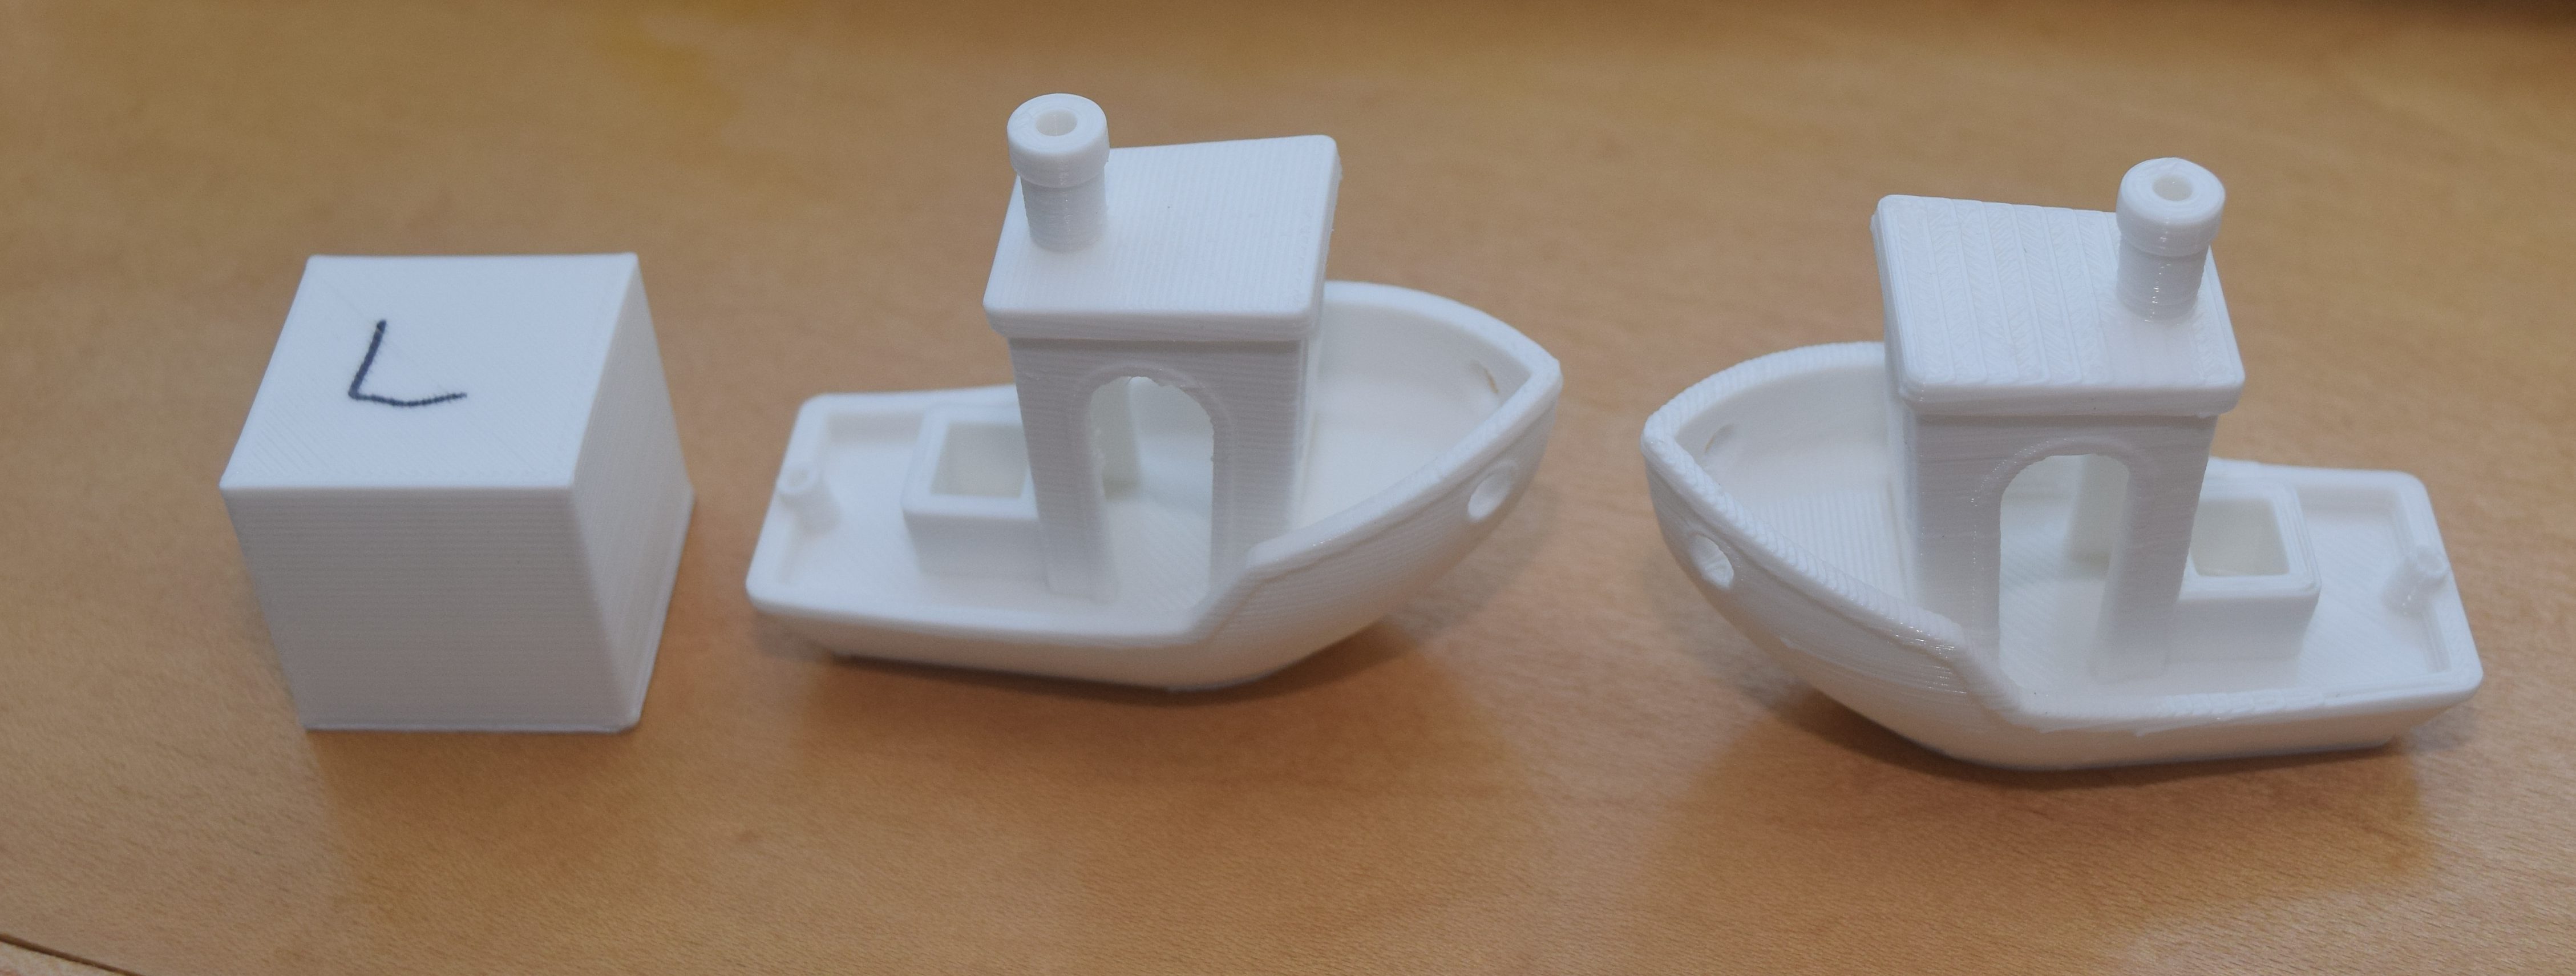
Once I got the basics down it was time to tackle some of the settings.  I printed a 1 inch cube to check dimensional accuracy, and some benchy models that stress overhang, bridging and other fun 3D printing features.  The course setting did really well, but is kind of rough in places.  No surprise there.  The high quality setting looks awesome on most surfaces, but had some fuzzies on thin surfaces and didn’t handle the bridging as well.  So many settings, so little time.

DSC_0487

Lots more wacky prints to come in the very near future!

Homemade Bratwurst

I just had some of the best sausage I have ever tasted, and it came from my own kitchen!  Follow me on a pork filled journey of discovery and mistakes as we watch sausage being made.

Ok, not quite, this was a two person ordeal and when your hands are covered in pork, you don’t get to do much camera work.  How does one make sausage?  It is quite easy, take 10lb of boston butt, and add a bit more pork fat.

DSC_0462

Chop all this up into small cubes to go into the meat grinder.  It takes a while to chop up 11 pounds of meat, and I got a little impatient and didn’t make all the pieces as small as I should.  You are supposed to do one inch cubes, but I got lazy and did a lot bigger.  This laziness bit me later on.  Mix the meat and fat together with seasoning (bratwurst pack in my case) and put in the freezer for a short while to really firm up.

DSC_0463

Next comes the fun and messy part.  I got a meat grinder attachment for my kitchen-aid.  Not sure if it is the ideal meat grinder, but it was super cheap.  Put on a sausage stuffer tube, slide the hog casings on, and let her rip!

DSC_0465

This is where all the trouble came in.  The chucks went down the hopper fine, but the auger had problems with them.  I think it was the cut size, but until I repeat this with a smaller average chunk size that is just a guess.  At any rate it required a lot of force pushing down the throat to get anything to come out.  Filling and pushing became a full time job.  The other person had one hand supporting the sausage and another on the tube regulating the casings coming out.  If you don’t do that part you get a lot of air and irregular filling.  It took forever, but we found a good pace and made a ton of sausage.  Seriously, 11lb is a lot!

DSC_0464

DSC_0467

DSC_0466

Some we successfully twisted off into links, most of it was just in a huge coil.  It was lumpy, inconsistent and involved a lot of swearing, but it grilled up real nice.  Flipping this monster wasn’t too hard once the bottom side firmed up a bit.

DSC_0468


The final results were well worth it.  This stuff is amazing!  Tender, juicy, and it holds together pretty well in the casing.  The seasonings have sunk in a little more with time and leftovers area  treat.  The picture below was only the first bit that we grilled, and probably represents less than 1/3rd of the total haul.  Hopefully it freezes well once vacuum packed!

DSC_0469


Bandsaw Lighting

My drill press lighting scheme worked out really well and I have other tools that could use a helping light.  Enter a few useful items.  1.  Is a pair of car accent headlight strips (7 bucks for the pair and super bright)  2.  Inline switch  3.  12v power supply.  All told, about 20 bucks of stuff.  DSC_0433

I started by zip tying the power brick to the back side of the bandsaw housing.  Make sure all the cables and zip ties are in places that won’t get snagged by wood passing through the bandsaw.

DSC_0434

I used some 3M VHB tape to stick the switch to the front of the machine within easy reach of the tool’s power switch.  VHB tape is a bit pricy, but really good stuff if you need something to stick and stay stuck.

DSC_0435The light strips fit nicely under the top section of the cast band saw structure.  The strips came with some basic double stick foam tape.  For now they are sticking ok, but the cast housing is rather rough, so I expect they will need additional shoring up after a bit of Florida summer gets to them.

DSC_0436

All the lighting wiring comes to this point behind the switch.  I tied the two lights together and connectorized them to the switch.  I used a lot of zip ties to keep all the wires out of the wood aperture, and I think it was pretty successful.

DSC_0437

I had a goose necklight already installed from a while back.  It does an ok job, but with the new lighting strips everything is really nice and bright when working on the bandsaw.


Lighting Test

DSC_0438

No Lights

DSC_0439

LED Strips

DSC_0440

LED Strip with Spot Light


Sander Cabinet

DSC_0350

This is my new beast.  I posted about it a few weeks back and have been really happy with it since.  Happy with the machine, but not the stand.  It is too low, and my little shop vac doesn’t really fit under it.  Time for a new cabinet.

I designed this to work with a single sheet of 3/4″ plywood.  The doors, drawer, and back could have easily been made with 1/2″ plywood, but I didn’t have any, and buying one sheet of each didn’t make sense to me considering I can’t really store half sheets.  Besides, the price difference is minimal.

Started with an open box that would house the dust collection, and raise the tool up high enough when castors are installed.

With a shelf added I had room for a drawer in the bottom, and was able to cut holes for the intake and exhaust hose.

DSC_0356

The drawer is a simple box like I have been making for other cabinets and drawer organizers recently.  No handle on the front, just a finger cutout.  This is big and deep enough to hold all the sander’s spare belts and disks as well as some random miter saw parts that needed a good home.

At this point it was assembled enough to apply the boiled linseed oil finish and castors.


Accessory Holders

The sander has two different allen keys to make adjustments and remove guide plates.  Additionally it has a small miter guide for use on the disk sander.  I milled two pine blocks to make custom holders for the keys and guide.  Both sets of tool holders screwed to the inside of the doors.


The BestDSC_0364

Speaking of my CNC mill, I employed it a bit more for this job.  I think calling this thing a beast is really fitting.  I took some two color HPDE and milled out a BEAST Rikon logo.


Dust Switch

It won’t do to fumble around inside the box every time I need the vacuum on.  I found safety tool switches online that come with a split up power cord.  You can plug it into the wall, and plug your tool into the cord.  It took some trimming of the flange to make it sit flush on the cabinet side.  Once trimmed and screwed in place though, it looks and works wonderfully.

DSC_0406


Storage, integral dust collection with an easy switch, and a perfect working height.  What more could you ask for in a beast?

20160820_183040.jpg

Drill Press Lighting

I love my drill press.  It is a 1980s era craftsman floor standing drill press.  The table I made for it is honestly not my best idea, but that isn’t the drill press’ fault.  The lighting scheme is a little lacking.  It has a single bulb tucked behind the spindle, and it does ok, but LEDs will make it better!

DSC_0417

I found these things called “angel eyes” for cars.  They are used to make cars look like they have fancy rings around their headlights.  You can get a two pack of different diameters for around 10 bucks.  They are perfectly suited for ring lights.

DSC_0416

I took the ring and bonded it down to a bit of plywood cut with an inner diameter that just presses onto the un-moving part of my drill press.  To add additional lighting I found these patches of packaged LEDs used to replace in-car dome lights.  They can be found in 4 packs for around 10 bucks.  All of these parts already have resistors built in because they are designed to be hooked up to a car’s 12V line.

The plywood square will go over the area that previously had the drill’s light bulb.  I used recessed magnets to hold them in place.  The wires got wrapped around to the back, and soldered together along with the ring light.  Hot glue helped with all the cable management.


I connectorized the lighting half and the power supply so I could separate the two if need be.  Speaking of power supply, the ring light and each light patch take a few hundred mili-amps each.  Get a 12V supply with at least an amp output.  I used an adapter that screws into a regular bulb socket and gives a plug outlet.

DSC_0424

The power supply is screwed into where the bulb used to be, wires are routed, and lights installed.  Lets see how it looks with no light, with the old bulb, and with my new lighting system.

DSC_0427

No Lights

DSC_0428

Old Bulb

DSC_0429

New LEDs

Very bright!  I guess for the 30-40 bucks I spent on parts I could have bought an off the shelf drill press ring light.  Maybe it would provide more light, but I kind of doubt it.  I know it wouldn’t be as compact or fit as snugly as this thing does.  The last thing to keep in mind when doing this is free slack on the ring light.  The section I attached the light to moves when the drill press comes down.  Provide enough slack to allow free movement.

New Business Card Holder

After a lot of sketching and scratching my head, I have come up with a new symbol for myself and the website.

SquareLogo

It is a multi-quadrant circle.  Each quadrant symbolizes something about myself and the work I do.  The top left is for my beekeeping and running of the local Space Coast Beekeepers.  The bottom left is part of a gear and symbolizes my background in mechanical engineering, and the invention work I do.  The bottom right is my attempt at a log segment for all my woodworking adventures.  The top right is kind of a mixed bag.  It is a divider laying out a 3-4-5 triangle.  It involves mathematics and measurement, which are at the core of a lot of what I do professionally and in my hobbies.

A 3-4-5 triangle is relatively easy to make if you have anything like a divider to set as a starting unit.  The initial length is arbitrary, but once picked if you make segments of the prescribed lengths, you can form a right angle of any size.  I like working to the thousandth of an inch on my CNC mill, and with ratios and body part lengths in my woodworking.


My art skills are pretty poor, so I went with a vector graphic program what would provide cartoony results that look good small or large.  They also look good on a business card.

DSC_0389

It has my symbol, basic contact information, and a small list of things I do.  The back has two of my favorite sayings that really describe how I operate.  It also has 3 lines to help aid in writing notes.  Business cards are super useful things to have on hand.  Beyond basic contact information you often need to give someone other information.  Websites, product info, funny youtube videos to watch, you know the stuff!  My field notes always have the last 10 pages ripped out to pass off information to people.  It would be nice if everyone carried a pen and paper with them.

Carrying the cards around every day is the obvious goal, but the corners get bent up in my wallet over time.  I want to turn the back cover of my field notes into a business card holder.  I started by wrapping up a small stack of cards in packing tape to prevent glue sticking.  Card stock got folded up into a kind of pouch, and all overlapping areas were trimmed.

I glued all the tabs down to the back my field notes with the cards inside to help keep the shape right.  Wax paper keeps the glue from bonding the last page down to the inner cover.  Stone coasters make handy clamps.

DSC_0394

I cut a notch in the center of the holder so that fishing them out would be easier. The card stock and business cards make a small bulge that could interfere with writing on the last few pages.  Time will tell.

DSC_0399


Resonator Uke Upgrade

My resonator ukulele sounds really neat, but has horrible tuning pegs.  They are friction posts and get whacked out of tune every time I put them in the case.  After a lot of months of regular playing and re-tuning I decided to upgrade to geared tuners.  The old tuners are shown below and only required very small holes.

DSC_0368

DSC_0371

The holes on the top side are large enough for my new tuner to go in, but the bottom side is way too small.  The new tuner (below) has a large shoulder that must be accommodated.

DSC_0375

I carefully drilled out the backside and made sure not to break through to the front.  There was a little chip-out of the back paint.  Maybe not paint, I don’t know what it is.

DSC_0373

The chips and hole edges are easily covered by the tuner flange.  I didn’t have a drill bit small enough to pre-drill the screws included.  Instead I used an awl to push a good starting hole, and employed some screw wax to help them go in.  Everything went in smoothly with no damage to the screw heads.  After a few days the strings relaxed and everything stays nicely tuned.  Thinking about upgrading from friction to geared tuners?  Do it!

DSC_0377

DSC_0378

Bee Vacuum Box

It is time to kick up our bee rescues to another level.  We typically use a shop vac to suck up as many bees as we can.  Sometimes it works out well, sometimes we end up with a canister of pulverized bees.  I think the swirling action of most of those vacuums breaks the bees up eventually.  Enter, the bee vacuum box.

DSC_0366

DSC_0365

This tool goes in-between the vacuum and the hose sucking up the bees.  It catches them in a screened section that should hold them and prevent damage.


The Build

I started with an assembled medium super.  It is a good size to hold bees, and I built a lot of them a while back.  A thin scrap of plywood forms a sealed bottom of the box.  I made a small frame out of 1×2 and stapled on some 1/8th inch metal screening.  I used a lot of staples because I figured the force of thousands of bees pushing on the screen could be high.

I wanted to be able to see how many bees we had and how healthy they were.  A piece of clear acrylic sheeting across the top will be strong and allow viewing.

DSC_0341

I used a 2-1/2″ dust collection gate on the front entrance.  This should accept a standard shop vacuum hose, and can be shut once full to keep the bees from escaping.  I attached it with a lot of silicon caulking.  A standard port was screwed to the other end.  This side will go towards the vacuum.  It doesn’t need to be shut because the screen will keep the bees from getting out this way.

Once you have the bees captured you will need to let them out in their new hive.  I used more thin plywood to make a small trap door.  Tape will keep it from popping open in transport.  Once at the hive, you can just pull the tape off and let it open as you put the vacuum box down on top of the hive.  You could even completely seal the hive entrance with this method and leave the vacuum box on top for a day or two.  This will encourage them to stay and setup shop before opening the hive entrance.

All of this sounds great in theory, but has yet to be put to practice.  There is supposedly a tree that needs some bees removed from it, so we might be able to put this to the test soon.