Car Phone Charger Dock

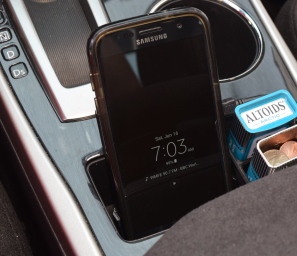
My phone has wireless charging built in, and it is a wonderful feature.  Very futuristic.  I wanted this ability in my car when doing road trips or errands.  I started with a flat lipped bed that would keep the phone in place.  There is a spot behind the gear select knob that was just big enough for it to sit.

I took apart a small puck wireless charger and pulled the internals out.  It was all one piece with 4 holes for me to mount to.  Very convenient.  Below are the first 3 PLA iterations of my design.

20180525_141934

The first one on the left was too wide, and din’t have enough space cut out for fingers.  The cover (below) didn’t sit well in the cavity either.  The next one was better, and had more rounding.  The last one had a tapered bottom to lighten the look, and a simple disk to cover up the electronics.

I put it in the car and test drove it for a few days.  It was an awkward fit.  the rubber pads underneath kept it from sliding around, but it was tight navigating it between the shifter and console.  I sat it upright in the change well and found that orientation a lot easier to use.

This sticks up a lot higher than was really needed, but The principle is sound.  I switched to PETG because the other car parts I printed in that material have held up well.  I thought I had a slam dunk with the left one, but the angle of the cable was too low, and the circuit card needed a little fit adjustment.  PLA and PETG shrink differently.  If you prototype something in one material, then switch to another, tight fights might need adjustment.

20180608_085402.jpg

I have run around with this version for a week now and love it.  My phone falls right in and is picked up easily.  The cable is well controlled and doesn’t get in the way.  It took a few iterations to get here, but was worth it.


The only issue with using that space for my phone is that I typically put trash there.  It was easy to see and clean out at the end of the day.  Time for another print!  I can fit a little trash can in the side pocket of my door.  Measuring down inside the pocket calls for something like a pair of inside dividers.  I didn’t have any, but I do now!

With tool created I measured the pocket width in a few spots and came up with a profile.  It took some adjustments, but the second version clicked into place.  That area of the car has a ton of curves.  This didn’t match them perfectly, but it sits well and doesn’t stress the door mold too much.  I gave this design a week as well.

It worked out like a charm, but could stand to be wider.  I printed it 50% wider out of PETG to survive the heat, and called my car project done.

DSC_1271

Spring 3D Prints 2018

I haven’t done a “Prints Of The Month” post in a while, but that doesn’t mean I haven’t had a pile of stuff popping off the printer.  Here is a smattering of prints I completed in the last 2 months or so.


I needed extra retainer cases for some orthodontics equipment I have (bummer).  I could buy them, but where is the fun in that?  Fusion 360 has a half decent thread database, so I dug into it and made a screw together case.  I started with the default settings and couldn’t get the top to screw down all the way.  It turns out I was using a Class 3 thread.  Class 1 is the loosest, while Class 3 is high precision.

I eventually oiled the threads and worked the Class 3 one back and forth a number of times and it closes now.  The Class 1 set I printed worked itself into fully closing a lot faster.  If you are worried about your prints coming together, pay attention to the thread class.


Continuing with the gaudy yellow color, I added a magnifying light to my shop.  They sell screw on bases you can plug the light post into, but they charge 20 bucks each.  I can print as many as I want for less than a dollar a piece.


A co-worker builds guitars with a CNC mill, but occasionally needs chisels to help clean up segments.  I took his flunky grade D chisels and put a nice shine on them.  3D prints and a magnet means nobody gets stabbed by accident when transporting them back to the owner.

20180512_114215


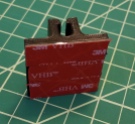
I printed a small cable guide for my car a year ago.  It lasted a while, but fell off recently.  The tape failed to hold the printed part.  Time for an upgrade.  I increased the width by 50% and made it three times taller.  Before attaching the tape I scuffed up the back to help it grip well.  The PETG didn’t melt or deform in the summer heat, so I am sticking with that material.


Not my own invention, but rather a Thingiverse submission by user iamjonlawrence.  They are a set of printable radius gauges.  They have inside radius, outside radius, and a set of circles.  The hole of the circle has the radius marked on the gauge, the outside has twice the radius.  The metric versions have that fact labeled better.  They pack a lot of function in a few small prints.  They are available every 1/16″ up to 1″.  I might have to make a set that goes over 1″.

An example of how to use them is on the right.  A pair of calipers wouldn’t really tell you the proper radius, but this gauge has it pegged.


Last but not least, we have a beloved octopus stained glass in our kitchen window named Eddy.  He guards over the cooking and cleaning activities and always lends a limb.  He is too heavy to hang on a suction cup for more than a few weeks, so we always just sit him on the window edge.  He has fallen before, and that will not do.  I printed this basic profile to clip into the window frame and provide a little spot for Eddy to stay firmly in place.

Printer Upgrade Part 2

Last we left our printer saga, everything was quite broken, and I was waiting on parts.  The 625z bearings came in and I put the extruder motor back together.  When I could easily turn it by hand, I knew my extruder problems were solved.  Sure enough, I can extrude PETG at high speeds and no jams.  The hot end was not to blame.  I did develop a new problem though.

20180430_202617

That is the status of my end stops.  The printer thinks the inductive sensor is touching the bed even though it is nowhere close.  I had an occasional issue with the inductive sensor reading poorly.  That has become constant now, all my messing with the cables finished off my probe.  I can’t start a print without that probe.  I massaged the cable and found a spot that flipped the 1 to a 0.  Time to troubleshoot.

Ok, so the cable is pretty well shot.  I opened the jacket where the issues was, but couldn’t figure out the exact problem.  They used very thin wire, it could be a break within the jacket.  I just cut most of the cable and redid the wiring.  That got me back up and running.  I printed everything I needed for the upgrade plus spares in both PETG and PLA.


I double checked all the instructions to make sure I wasn’t missing anything and started with the tear down.  On the plus side I am really good at disassembling the whole hot end/extruder!  It looks so naked.

DSC_1210

I only ran into one small snag.  The part that holds the x-belt wasn’t accepting the belt on the right hand side.  I printed 3 different versions, and they all had the same issue.  I took that part off and worked around the groove with a hobby knife.  It eventually relented and let the belt seat fully.

After that, the extruder assembly was pretty straight forward.

The bed assembly was a breeze.  I like most of the changes they made to the cable management, and think this will be more robust.  How the rats nest gets handled in the controller box could be a little better though.  Maybe just a bigger box.

I went through the calibration wizard, did some nozzle height testing, then printed a smart looking benchy.  Dimensionally it is great, but course settings mean it isn’t cosmetically the best.

I am thrilled to be over the failures, and proud of myself for solving all the issues.  Given that is almost exactly the 1 year anniversary of getting this printer, I decided to share a few stats.

Printer Stats:

  • 380 successful prints (more than a few failures, especially these last 2 weeks)
  • 44.7 days spent printing (12% of its life)
  • 6.3km of filament


Printer Upgrade Part 1

While out on our euro-trip the MK2.5 upgrade for my beloved Prusa printer came in.  I had finally plowed through enough chores to get started on the upgrade when I realized you need to print everything first.  I ordered this 6 months ago and could have easily lined up all the replacement parts by now.  Oh well, shame on me for not reading ahead.  They did include a 1/2kg spool of PETG to print everything with, so lets get that started.

DSC_1206

Now I know my bed is shot, thats why I wanted this upgrade.  It gives you a double sided spring steel printing bed.  Still, I couldn’t get the first layer of Prusa supplied PETG to stick to save my life.  This was my best attempt, and this was pretty bad.

I switched to some Push Plastic brand PETG that I had around and it initially looked golden.  Soon though I ran into issues.  There were z-layer striations in many of the prints like the nozzle was partially jamming.  I thought some of the odd and difficult to print features were to blame and broke up the prints into smaller batches.  These batches had problems too.  I spent 2 days printing with different settings, cleaning out the nozzle, replacing the nozzle, taking everything apart, switching to PLA, and doing about 10 other things.  All I did was get more frustrated and produce a pile of garbage.

DSC_1208

I was incapable of producing small parts without error and big parts would completely jam before finishing.  These were the most horrible frustrating times I have ever had with a printer.  Even worse than my monoprice, and that is saying a lot!

I thought the hot end section was damaged, and on one of the tear downs to look for issues, I decided to give the extruder a rotate.  I had checked its pin out with a multimeter, and inspected the wires for frays, but a single rotation by hand gave me the clue I needed.  It was nearly impossible to turn.

DSC_1207

Here is what the inside of a Prusa MK2 extruder motor looks like in case you ever wondered.  The bearing on the left is fine, the one on the right is frozen solid.  They are a smaller size than the 608 bearings I have around, and that most people use for projects.  I ordered some to repair this unit, and contacted Prusa about getting a whole new extruder.  If it isn’t too expensive I will eventually swap my repair job for a new unit.

The bearings will be in shortly, but I am dead in the water till then.  Once repaired I will, hopefully, be able to finish printing all the upgrade parts, then I can have a whole new extruder setup and print surface.  Until then, this is what my poor printer looks like.  Never a good site.  Nice use of my printed organizer tray.  It keeps screws and bits separated and organized when you take something apart.

DSC_1209

Wireless Backup Camera

I stuck an empire logo on my suburban and jokingly named it the stormtrooper.  It has the right color scheme, and I hoped the name would mean it couldn’t hit anything.  That didn’t work, and it backed into a neighbor’s car.  Nothing serious, but a backup camera would have been useful.  Here is one now!

20171230_153433

Finding a spot on the suburban that would let me see well, but not get broken off the first time I loaded up lumber was a little tricky.  This spot doesn’t give the best view but should be out of the way.

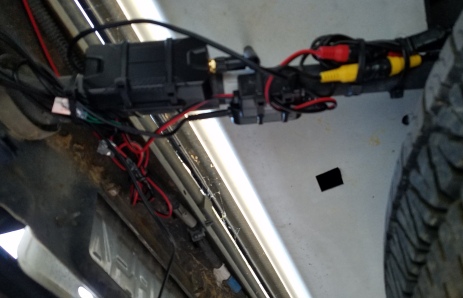
The unit I got was wireless.  I just needed power for the in-cab unit, and to tie into the reverse lights for the camera assembly.  I pulled the tail light off and found a lot of wires.  The green is positive for the backup light, the black wires are all common grounds, and that brown wire looks a lot like a black wire if you are too excited and cut before you should.  I used heat shrink solder connectors.  They self seal and make a nice slim connection.  I added tape to each as an extra layer of protection.

I snaked my own wire down into the bumper area before the kit arrived and it turns out they gave you 10 miles of wire to deal with.  I wrapped up the transmitter and extra wires with a lot of zip ties and stuck it in the cleanest secure spot I could find.

20171230_153413

I don’t know how long it will take for water to get into these electronics and ruin the whole setup, but considering the vehicle is 17 years old, a lot of other things will break down first.


Back in the cab you just need to plug the screen in to 12V power.  It will come on when you go into reverse.  Hey presto, it works!

20171230_150328

Now I need to find a spot to stick it and hide the 12 miles of power cable.  The kit came with a suction cup bracket that was supposed to go on your dash.  Mine is so high that anything on it would obstruct vision.  Instead I printed a wedge shape to go between this blank spot next to the environmental controls.  It angles the screen towards the driver by 10 degrees.

3M’s VHB tape will make anything attach to just about anything else.  It is expensive, but good stuff.  A layer on either side of my PETG (should survive the high heat of Florida’s summer) wedge fixed the screen in place.

20171231_094800

I was able to stuff most of the extra cables in a pull out ash tray below the screen.  Everything looks tidy if decidedly out of place.

June 2017 3D Prints

Lots of good prints this month.  I have got the new printer pretty well figured out and have ventured out into new materials and longer prints.  First up is a cool blade guard I made.  I picked up this nice boning knife for bbq goodness.  It is crazy sharp but came with no guard.  I printed a two piece guard with magnets set into the one half.  The two bits glue together.  It keeps the edge and my fingers safe and fits snuggly.

DSC_0858

DSC_0859


Porch Cup Holder

I have some Adirondack chairs on the back porch.  They are reasonably comfortable, but have a distinct lack of cup holders.  I fashioned some a while back out of wood, but the sizing was all wrong.  These are perfect.  They hold coffee cups, large tumblers and small glasses alike.  The RTIC’s blue handle was printed back in September and is still alive after daily use.  Thingiverse Link


Thermocouple Kickstand

I got a cheap thermocouple reader for reasons beyond my obsession with measurements… I swear.  It works well, but didn’t come with a kickstand.  I am used to all my multimeters having some way to sit themselves upright.  This one clips together, then slides on snugly.  It doesn’t add too much bulk and stands steady.


PETG

I have a few high temperature projects, so it is time to venture beyond the safety of PLA.  It is a great material to print with, but loses strength quickly when things get hot.  Enter PETG.  It is higher temp and strength like ABS, but less toxic, and lower warping.  One of my firsts was the Franken-Cooler.  Not without issue, but largely a success.

Next I made a small clip to keep the USB cables in my car in order.  They always get pinched in the lid when I close my center console.  This will keep them in the pass through.  Simple but effective.  I needed the higher temp material because cars get hot in Florida.

I made some mods to the camera setup on my prusa.  Someone made a decent set of parts to attach a common webcam to the Y stage.  The only problem is their main bracket was a bit loose.  I started with PLA because that was all I had.  It sits up against the underside of the heated bed.  If I need higher bed temps the part could fail.  I designed a lighter tighter fitting version with speed holes to help cord wrangling.  The PETG part will not fail due to excessive bed heating.

DSC_0874

While I was at it I found a lens adapter that could replace the original webcam lens with a very wide angle one.

The new lens give a much better view of the print bed.  I can see the whole thing instead of just the middle third.

Screen Shot 2017-07-05 at 7.54.08 PM

Finally I can take time lapse videos that don’t look terrible.  Behold the birth of a baby groot.