Little Bushy South

This project was completed in July at the old house, but I had to keep it under wraps so it could be a surprise to someone.  My wife’s grandmother was a British war bride.  She met her American husband at Bushey Park outside of London where he taught air sea survival for the 8th Army Air Force.  When the war was over they moved to Michigan (his home) and eventually had a farm called “Little Bushey”, after the place they met.  We had talked about calling our new place “Little Bushey South” as a tribute to that.  I thought a sign was in order, and no wood could be better than the family wood.

These walnut beams were picked up by my mother’s parents when she was very young.  They spent a lot of time around boats and they were used as ballast by someone.  No clue how old they were then, but our family has had them for 50+ years.

One of the beams had been cut down a few times, so I cross cut it to about 42″, and then re-sawed it to make a 1 inch thick slab.  I left some of the worm eaten edging because it is so good looking.  A little work with my jack plane had it smooth and revealed a gorgeous piece of walnut.


In order to make the text for this project I am using my plunge router and custom printed 3D letter templates.  I wrote up all the text, then broke each segment up into a size that could be printed.  They are keyed to fit together to keep alignment and kerning proper.  Letters like “e” and “B” have to be done in multiple segments.  The “B” below shows how I tackled this.

The plunge routing went reasonably well, but something shifted part of the way through.  My cuts were shallower when I went back and redid certain segments.  Not sure what happened, but next time I will make everything double tight.  I went back with a chisel and cleaned up the issue areas.  The bottoms are still not smooth, but aren’t as uneven as before.  That left me with a few accidental chipout segments.  See near the top of the “O”.  Also, the “h” was in part of a knot.  My colorant will want to bleed into those cavities, so I have to fill them.

I used some dark woodworking epoxy to fill these problem areas.  First I went carefully with painters tape and dammed up all the problem areas.  Next I mixed the epoxy and used a syringe to put just the right amount into the voids.  A little light buffing and the epoxy filled the voids but is really hard to see.

DSC_1396

dsc_1400.jpg

I was going to spray paint this, then just plane off the top layer to reveal colored letters.  The bottoms are still uneven, so I opted to try epoxy.  I bought a big batch of system three epoxy with white color resin.  It worked really well.  No progress pictures because you have very limited time once the mixing begins.

The places I blocked the chipouts didn’t bleed, and only a little snuck in under the knot around the lower case “h”.  A syringe helped me pipe it into each letter, and manipulate the results.  The epoxy clung up at the sides and dipped a little in the center.  The result is a really awesome shiny 3D lettering effect.  It looks quite good on our new mantle.  I don’t really understand fireplaces in Florida, but this one looks picturesque.

20180813_141454

New House, First Meal

We successfully bought our next house.  The renovations have begun amid work and a million other things.  I was digging through pictures and found the first meal I ever had at my current house.  The first meal at our new house is a lot better, and the surroundings are nicer too.  What a difference 9 years makes.

IMG_0876

20180807_113903

Sawhorse Sheet Goods Table

UPDATE: This setup served me well for about 6 months, but died this weekend.  When assembled it is a really sturdy platform.  Disassembled, the brackets are weak and prone to bending.  During the assembly process they are easily damaged as well.  I don’t regret having built it, but will be doing sheet goods differently in the future.

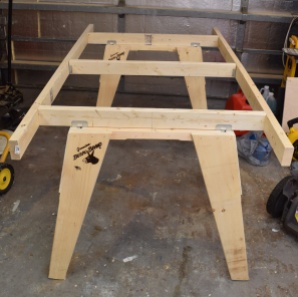
I will need a temporary work surface when renovating the new house, and have a lot of sheet goods and drywall to cut up.  I thought about building some sawhorses and adding on to them, but I don’t have much time.  Instead I started with two of these Burro branded horses.  Honestly, for 20 bucks a piece, these things are pretty good.  Made in USA, stackable, stable, and strong.  Just make sure you are choosy, not all were created equal.  Explaining the build will be easier with a before and after shot.

I want to put a full sheet of plywood or drywall on these and have the cuts be well supported.  That would require a structure almost a full 4×8 feet.  I used metal brackets to help it be a quick assemble and break down job.  Two 42″ 2x4s go across the saw horses.  The saddle brackets keep them upright and a right angle bracket on the edge holds a long support to tie the two horses together.

DSC_1411

Every time I use these as a cutting surface I am going to cut into the 2x4s a little.  I will adjust blade depth to minimize the damage, but I don’t want metal anywhere near the top surface.  The brackets that hold my middle support were too tall, so I cut them down.

DSC_1416

The table breaks down into 2 stackable horses, 2 supports that go on top of the horses, 2 long ones that go from horse to horse, and a center one to help prevent sag.  The only extra screws needed for assembly are at the four corners where the long stretchers meet the supports on top of the horses.  I made sure to install the screws low so the saw won’t catch them.  The horses still stack, even with those saddle brackets installed.

When I assembled this I didn’t screw any of the 2x4s down to the horse’s saddle brackets.  It all still felt stable.  A half inch sheet of plywood and a few screws should turn it into a sturdy temporary work bench.  All the drywall cutting I need to do will be aided by this big stable platform as well.   The assembled dimensions of the top are 44×84″.  Enough to support a 4×8′ sheet, but leave some room at the edges.

When the house work is done I will probably keep it as a way to break down sheet goods.  This will be a big upgrade over my current method of hanging them out of the back of the suburban.

July 2018 3D Prints

Monitor Lift

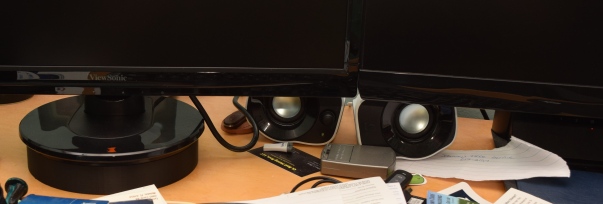
One of my office monitors started making odd noises and showing crazy artifacts.  It got to the point of being un-usable, so I replaced it.  The pair was 5 years old and they don’t sell that model any more.  The cheap replacement I bought didn’t come in the same height and neither monitor had height adjustability.  A black circular disk printed at the right thickness matched the two screens up well.  A copious sprinkling of office desk clutter helps camouflage the printed lifter.

DSC_1420


Electrical Cutouts

There is going to be a lot of power and low voltage routing going on at the new house.  I have been practicing with my oscillating multi tool to get the cutouts just right.  A set of tracing templates would help.  It turns out low voltage and high voltage boxes are slightly different sizes.  Who knew?

They are pretty simple.  Color coded and labeled for their intended use, and thick enough to balance a bullet level on top.  Mark where you want the box to go, trace out the square, cut and install.


Laser Case

I picked up a laser range finder to help out with all the flooring and other work at the new house.  It is really amazingly accurate, but leaves something lacking.  There is no case.  The delicate output window for the laser is unprotected, and so is the screen.  A sock or super basic nylon case would have been helpful.  No worries, I printed my own, and shared it on Thingiverse.


Cup Holder

Our new place has a bigger yard and that requires a bigger mower.  I found a riding mower to act as my trusty yard steed.  It fulfills all of my boyhood fantasies of owning a riding mower except one.  The cup holder.  Basically it doesn’t hold my RTIC cup.  I fixed that with a little Husqy orange liner.  Can’t go losing your drink every time you hit a bump.