Continued Jerky Lessons

This is my 4th round of jerky and I feel like I am still learning a lot every time.  My co-worker uses a 3/8″ nozzle, where as my jerky gun came with only a 1/2″ nozzle.  Thankfully the sell these little road cone looking things that you can cut to size.  DSC_0937I switched jerky seasoning brands because I had run out of the original stuff and wanted to try something different.  They recommended mixing their seasoning with water first, then mixing with meat.  This is a great idea, it helps ensure that the seasoning and cure are well mixed and distributed throughout.  I am feeling confident enough to wager 5 pounds of extra lean to make this happen.  In retrospect the seasoning should have been mixed in the big metal bowl before adding meat.  It saves a bowl.

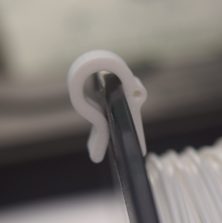
Loading can be tricky.  One clean hand, one dirty.  You ball up a small wad with the dirty hand and load while holding the barrel with the clean hand.  They make a tool that helps tamp it all down.  Which hand holds that?  My new 3D printed hand of course!  I came up with this clip to hold the barrel while my clean hand tamps.  The overnight print came complete with a really good game of filament chicken.  About 2 wraps left before I would have been in trouble.


The mix and extrusion went well.  I used every tray I had and in 5 hours was able to dry a pretty good looking batch of jerky.

I weighed the final product and came up with about 2.5lb.  That is probably at the low end of dry enough, but it shouldn’t go bad in the 4 days it will take for me and everyone around to eat it.  It occurs to me that I could monitor the progress of my jerky simply by taking the initial weight and weights throughout the process.

DSC_0947

June 2017 3D Prints

Lots of good prints this month.  I have got the new printer pretty well figured out and have ventured out into new materials and longer prints.  First up is a cool blade guard I made.  I picked up this nice boning knife for bbq goodness.  It is crazy sharp but came with no guard.  I printed a two piece guard with magnets set into the one half.  The two bits glue together.  It keeps the edge and my fingers safe and fits snuggly.

DSC_0858

DSC_0859


Porch Cup Holder

I have some Adirondack chairs on the back porch.  They are reasonably comfortable, but have a distinct lack of cup holders.  I fashioned some a while back out of wood, but the sizing was all wrong.  These are perfect.  They hold coffee cups, large tumblers and small glasses alike.  The RTIC’s blue handle was printed back in September and is still alive after daily use.  Thingiverse Link


Thermocouple Kickstand

I got a cheap thermocouple reader for reasons beyond my obsession with measurements… I swear.  It works well, but didn’t come with a kickstand.  I am used to all my multimeters having some way to sit themselves upright.  This one clips together, then slides on snugly.  It doesn’t add too much bulk and stands steady.


PETG

I have a few high temperature projects, so it is time to venture beyond the safety of PLA.  It is a great material to print with, but loses strength quickly when things get hot.  Enter PETG.  It is higher temp and strength like ABS, but less toxic, and lower warping.  One of my firsts was the Franken-Cooler.  Not without issue, but largely a success.

Next I made a small clip to keep the USB cables in my car in order.  They always get pinched in the lid when I close my center console.  This will keep them in the pass through.  Simple but effective.  I needed the higher temp material because cars get hot in Florida.

I made some mods to the camera setup on my prusa.  Someone made a decent set of parts to attach a common webcam to the Y stage.  The only problem is their main bracket was a bit loose.  I started with PLA because that was all I had.  It sits up against the underside of the heated bed.  If I need higher bed temps the part could fail.  I designed a lighter tighter fitting version with speed holes to help cord wrangling.  The PETG part will not fail due to excessive bed heating.

DSC_0874

While I was at it I found a lens adapter that could replace the original webcam lens with a very wide angle one.

The new lens give a much better view of the print bed.  I can see the whole thing instead of just the middle third.

Screen Shot 2017-07-05 at 7.54.08 PM

Finally I can take time lapse videos that don’t look terrible.  Behold the birth of a baby groot.

April-May Prints

April was a pretty quiet month for printing because I knew the new printer was coming.  May turned crazy once I got the prusa up and running.  I already posted on my battery storage and drawer divers in another post.


Salt Grinder

A co-worker had a cool salt grinder that kept breaking.  He wasn’t able to get refurbs anymore, so off to printing we go.  The body is heavy stainless, but that center window is very thin plastic.  It falls over easily and snaps off the threaded area.  I printed a tapered part that threads and glues into the spot where the plastic window was.  In addition I made a little stand for it to sit in so you can’t knock it over as easily.


Tape Measure Pocket

I typically use a tape measure at the table saw to set the rip width.  It works, but I think a wooden ruler would be more reliable.  I printed a pocket for it to attach to my table saw side so it is always close at hand.


Wonderful Wooden Filament

Not exactly the same as woodworking, but fun none the less.  They make wood dust filled filament.  It prints well and has a neat texture to it.  This stuff was made for printing baby groot!  I tried a set of benchy boats; one stained, one not.  It doesn’t appear to stain well, but made a great looking fidget spinner.


Desk Trophies

One of the criticisms of 3d printers is that they are only good for printing desktop trophies.  They are good for lots of other things, but yeah, they make awesome desk trophies!

DSC_0846


Bit Holders

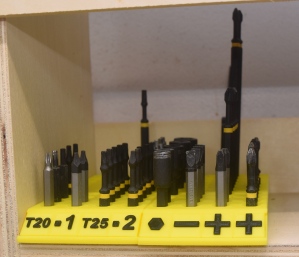
Ok, back to useful prints.  I wanted to better organize my various driver bits, so I made these organizers with nice spacing for you to get fingers in and pick out the bit you need.  The markers are made using prusa’s multi-color print.  The one where you switch spools at a set Z height, not the one that changes color mid-stream.  I couldn’t do that on my last printer, but I am very happy it works on this one!  Too bad they don’t sell filament in dewalt yellow.


Mom Stuff

Don’t look mom, this is all going to be a surprise for you!  My mom wanted some altioid tin organizers and paint holders.  I figured she could also use pen/knitting needle/cable storage stuff as well as some funky knick knacks.

DSC_0853


Arbor Press

I picked up a cheap arbor press for pressing bearings, pressing printed parts, etc.  I made a number of arbor press fittings sized just for skate bearings and bolts.  They have a square hole that gives a perfect friction fit onto the arbor press end.  The printer also provided a nice glue on storage rack for my press ends.  I couldn’t help myself with the two color printing, and made a crush hazard sign.  Watch your fingers.  I should print some pirate flare and turn this thing into an ARRRRRRRRbor press.

Random

Last but not least I found a cool box on thingiverse for holding spare printer nozzles, a handle for turning reciprocating saw blades into short hack saws, and a penny powered fidget spinner.

DSC_0854

I probably forgot something, but that is enough for now.  Since getting the new printer I have printed for 136 hours, and pushed out over 800 meters of filament.  That is kind of impressive.  I can stop any time I want.

September 2016 Printer Wrap-Up

I have had my printer for a little over a month now, and boy have I been busy.  Something has come off the assembly line almost every day.  I got octoprint up and running within about a week of getting the printer, and it keeps a log.  I clocked in 325 hours of print time and over 450m of extruded filament.  Considering there were 720 hours last month, that is a lot of printing!

There was so much cool printing going on, that all I can do is hit the highlights.


Water Bottle Clips

I tend to carry water bottles around a lot at work and while doing stuff outside.  These clips help me keep water close at hand at all time.  Pretty blue custom clips.  Thingiverse link.


Flashlight Tail Stand

I have lots of cool tactical flashlights for warding off the darkness when our power decides to go out for the 2nd or 3rd time this month.  They have flat backs, but often don’t stand well on their tails.  Tail standing a good flashlight can provide great lighting to a whole room.  This print keeps them from being easily knocked over.  I will have to get glow in the dark material for next time.  Thingiverse link

20161001_085148


Watch Ya Fingers20161001_090131

I felt this needed to be in my shop somewhere.  While it isn’t my design, the painting was my idea.  I painted the raised surfaces with a foam brush and some acrylic paints.  Two coats made it look really snazzy.


Name Tag

I am going to be volunteering at the upcoming orlando maker fair for a co-worker.  She has a lot of great activities for younger kids, and I thought such an event warranted a custom name tag.  The letters were pressed in using my c-clamp method as demonstrated in a previous post.  Magnets keep it safely secured to my shirt.


RTIC/YETI Mug Handle

I got a RTIC mug for cheap on a daily deal, and have been using it a lot.  It keeps ice for ages, and doesn’t sweat a drop.  The handles are expensive, so why not print one.  I had to make a two part version because the others available didn’t fit on my little bed.  A single 1/4-20 bolt of 1″ length along with a nut is needed to combine the two parts.  Thingiverse link


Brackets

I was in the process of building an enclosure for my printer to add lighting and reduce the noise.  It was kind of a disaster for reasons I won’t get into.  A few things got designed specifically for that project.  I am not using them at the moment, but will find something for them later.  Thingiverse link to flat bracket and right angle bracket

20161001_201715

I did a stress test on the right angle brackets by printing some at 20 and 80% and loading until failure.  Turns out, it was 66% stronger with the greater infill percentage.


Badge Holder

Last but not least I printed a nice pretty blue badge holder for work.  I wanted everyone to know how crafty I am as soon as they see me.  Thingiverse link

20161001_201919


Everything Else

Honestly there are a ton of other things I printed.  Some designed by me, lots downloaded from others.  I can’t write up everything, so this is a pile of stuff I made this month that isn’t living elsewhere in the house, or hasn’t been given to someone yet.

20161001_205720

My name is Chase, and I have a serious printer problem.

Press Fitting 3D Prints

I have been expanding my 3D printer experience this past month and have done a number of press fit parts.  The general principle is to take a piece of hardware, measure it, and print a hole in that shape that ranges between that exact size, to less than 0.01″ smaller.  It depends on your printer performance.  Mine tends to undersize holes a touch, so printing the exact size of the hardware works well.

Once printed the hardware has to be pressed into place.  An arbor press would be perfect for this, but I don’t have one and am too cheap to buy one.  I used a C-clamp instead.  This video demonstrates a few uses of said clamp press.

Most of the parts were very specific to my needs and probably not worth uploading to thingiverse.  The only exception is the quick release plate for my tripod.  I didn’t see any online.  I need to come up with a version that captures a bolt while making it easy to use with your fingers.  That will take some thinking.

Printing For The Printer

It seems like when you get a fancy new tool you end up spending a lot of time building stuff for the tool.  Ideally it can build most of its own upgrades.  Most of my first projects on the CNC mill involved making better parts for it, and the 3D printer is no exception.  Printing for the printer.  Bootstrapping at its finest!


Tools

3D printers end up needing a few extra tools to succeed.  You can’t do everything with a printer, a computer, and your bare hands.  Printing a few small tools can make life a lot easier.

dsc_0516

Holes often come out under-sized and may have a little overhang issue, especially if printed horizontally.  A small set of drill bits is a good thing to keep around.  The red handle attaches to bits with a 1/4″ hex base and makes opening up holes a breeze.

dsc_0514

dsc_0515

You want prints to stick well to the bed during printing.  If they shift, the jig is up and the part is ruined.  The issue comes at the end when you want to pry the thing off a delicate print bed.  Careful work with a razor blade can coax them from the only home they have ever known.  The razor holder is not my design, but a popular choice on thingiverse.  The blade guard houses magnets and pops on easily to keep unwanted cuts to a minimum.  There are other designs available, but they needed magnets I didn’t have, so I made my own.  Thingiverse link.


Octoprint

Sneaker-netting a SD card between the computer and printer gets old, and all control of my printer has to come from the front knob.  Instead I grabbed a raspberry pi and installed the latest version of Octoprint.  It is amazing!  I can see what is going on and control things from any computer in my house, and even have it sending me updates via a messaging service.  I liked it so much I printed a little Octoprint statue in honor of the new service.

It was one of my first prints with support, and everything went really well.  The other fun thing it allows is a webcam to monitor the print visually.  You can even use it to take time lapse video of your prints.

Combine the fancy statue with a really nice pi cover and the print server has a proper home.

dsc_0517


Extruder Medallion

Last but not least, there has to be some decoration involved.  I saw that the extruder sits on top of my printer and spins slowly as the printer prints.  The extruder grabs the filament and slowly pushes it down into the hot end.  I figured it could use a little medallion.

dsc_0513

As you print the shaft spins and the rebel starbird goes round and round.  Enter another time lapse video.  Thingiverse Link to the medallion.


Vegetable Spiralizer

3D Printing isn’t all useless statues and funky alligator clips.  Those are fun, but you can actually make real world useful objects with even a small printer using PLA.  I use an OXO vegetable spiralizer to turn zucchini into spaghetti.  You can sauté it up with garlic, pesto, red sauce, or just eat it plain.  Very good, and an excellent alternative to pasta.  The only trick is, a manual spiralizer takes forever and leaves your wrist in pain afterwards.  Enter my first functional printer invention.

In the video looks a little awkward to use, but I found that if you cut them in half, everything goes smoothly, and 100 times faster than doing it by hand.

I had to go through a few iterations to get the plug shape right.  It turns out the kitchenaid mixer’s power take off is in a tapered housing.  A straight plug will not cut it!  The good thing about the printer is that all the parts below cost < 2 dollars, so iterating the design is cheap and easy.

DSC_0490

I started with a full run at it on the left.  The plug didn’t fit, and it had a lot of extra material.  The plug in the middle was my attempt at getting the shape right.  It worked, so I went with the final design on the right.  I uploaded it to thingiverse:

http://www.thingiverse.com/thing:1745222

Now that I know how to tie into the kitchenaid I can imagine a whole lineup of normally hand operated gizmos being plugged into my power mixer.  I wonder if it will chop onions?  The future is bright!

wp-1473298747459.jpg


New 3D Printing

I broke down and finally bought a 3D printer.  The monoprice mini at only 200 dollars is basically the best value buy there is.  And here it is sitting on a messy desk full of printed parts and printer tools.  This thing is going to need a custom table soon.DSC_0489

I was so excited when I first fired it up that I shot a little video of its first print.

It worked really well out of the box, though I have been doing my best to monkey with settings and make everything go faster and smoother.  The major learning point has been that buildtak is a great surface to print on, and turning the bed heat down from 60°C to 45 really helped the prints come off without a jackhammer.


Printing for the Printer

The front knob on the tool is really annoying.  It is flush with the surface, and yet you have to spin it a lot.  It gives you bonus moves sometimes, which only makes things more frustrating.  Luckily, there is a print for that!  Some kind soul figured out how to pull the knob off and print an extension.

Getting a spool cracked open is fun, but dealing with an unwinding spool isn’t.  Luckily there are a number of great choices on Thingiverse for filament holding clips.  Why not print a few?  The loose filament goes through the small hole.

The downside to this printer is that it isn’t exactly open source, and they don’t sell replacement parts.  Luckily the 3D printing community is amazing, and they have a bracket you can use to put a COTS replacement on this puppy for the day when the hot end dies.  Better to print that now than be sorry later!

DSC_0488


Once I got the basics down it was time to tackle some of the settings.  I printed a 1 inch cube to check dimensional accuracy, and some benchy models that stress overhang, bridging and other fun 3D printing features.  The course setting did really well, but is kind of rough in places.  No surprise there.  The high quality setting looks awesome on most surfaces, but had some fuzzies on thin surfaces and didn’t handle the bridging as well.  So many settings, so little time.

DSC_0487

Lots more wacky prints to come in the very near future!