Sharpening: Flat Back Jigs

I don’t always build sharpening equipment, but when I do I go overboard.  With a more stable work station I can get deeper down the sharpening rabbit hole and focus on doing better work.  I am trying to take sharpening from an afterthought to an everyday part of my woodworking.  This post’s focus is going to be on flat backs.

It is important to have flat chisel backs and for the last inch or two of your plane irons to be flat.  Pushing down on a small area gives me hand cramps after a while.  I always want to cut corners in this area, but need to get better.  Ideally when human frailty becomes a process issue I would advocate for robotics.  I am not that rich, so a helper jig will have to do.

I started with the idea of embedding some magnets in a block of wood sized right to fit in your hand.  Instead I found this magjig switchable magnet.  It has a lot of force when you rotate the knob and align the magnets.  I thought about woodworking a handle of some sort, but printing turned out to be a lot easier.

The magnet is be better than hands even without the printed parts, but they help spread the force over a larger area of the chisel, and makes for a better handle.

DSC_1060

I made a gif of it in action.  It holds really well and lets me put downward pressure across the chisel while controlling the back and forth motion.  This works well on wider chisels, narrow ones don’t take long to flatten.  Added to thingiverse.

Flatening Gif


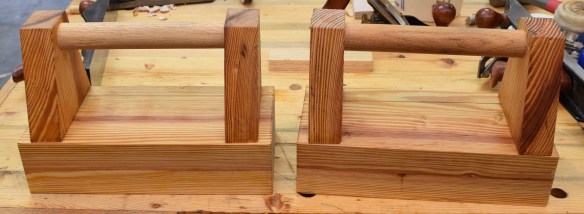
Plane blades are a lot wider and thinner.  That makes the magnet option harder.  This jig I found in a popular woodworking article won’t have that issue.  I started with a quite lovely short piece of maple.

DSC_1064

I used to never make a jig out of anything but the cheapest material I could find.  Now I am starting to get the idea of the jigs being tough and good looking themselves.  That having been said, I made a complete hack job of this slot.  It was an odd size so none of my chisels quite worked.  I drilled out a little pocket so my handle bolt wouldn’t spin.

A big mushroom handle on top lets me grip with the whole hand and have a lot of control and force.  The slot allows for a wide range of plane blades to be clamped.

It probably isn’t the best mirror polish the back of a plane blade has ever seen, but it is hands down the best I have ever done.  Plus, it is a jack plane, so perfection isn’t exactly required.

DSC_1071

DSC_1084

I played around with the jig for a while before applying a finish.  I made a second hole on the other side to move the handle closer to the edge.  That seemed to control a little better.  Adjustment there might be nice in the next version.  The bolt that clamps down the blade was an issue too.  I could only tighten so far before the head would spin.  Sometimes the blade would want to rotate.  I thinned a scrap of maple and cut another pocket.  Now there is wood on metal instead of metal on metal (no chance of damaging the blade), and I can tighten to my hearts content.

Lastly a touch of tung oil made everything look gorgeous.  This thing will probably be black with grinding good in a month, but for now it is gorgeous.

DSC_1085

DSC_1086

Sous Vide Ribs

You can sous vide just about anything, but should you?  I typically smoke ribs a few times a year, and mostly get pretty good results.  Exact texture can be tricky, but honestly as long as you don’t dry it out or have it be way under cooked, they are always good.  A foodie friend of my highly encouraged me to try sous vide ribs, so I took the jump.

This will be a good chance to finally field test my franken-cooler.  I have had it for over 6 months and haven’t actually used it for real until now.  By my friends suggestion I read over this serious eats article on sous vide ribs.  It is comprehensive and potentially more than you want to know about ribs.  I wen’t with some st louis cut spare ribs because that was the sale of the week.

20180127_154731

I went with a rub I had on hand, but did take the article’s note on salt to heart.  I had an idea to help speed up the heatup time of the franken-cooler.  That is a lot of water to bring up, and often the whole cavity isn’t full.  I filled a new paint can with just enough sand so that it wouldn’t float.  Pound for pound, water has 5 times the heat capacity of sand.  It still took forever to come to temperature.  Maybe some styrofoam weighed down with bricks would be even better.  Maybe I will just not bother to worry about it next time, once up to temp the outside barely gets warm, so it has to be pretty efficient.

20180127_161213

In they went at 152 for 24 hours.  They looked and smelled good a day later, but there is one final step.

The instructions had an oven or grill finish.  I opted to grill them for just a bit and throw a little bbq sauce on.  This is kind of a lot of work for ribs, but smoking them isn’t exactly simple either with the wrapping and unwrapping.

The texture was amazing of course.  There was a very consistent moisture level, rendering of fat, and soft pull apart amazingness.  The flavor was good, because it is ribs.  Still, I missed the smoke.  I think in retrospect this might be a better method for baby backs.  They are leaner and more susceptible to drying out.

Conclusion: yeah, these are really good.  It took a lot of time, but if you are around isn’t too big of a deal.  Maybe not my default method, but I am gonna have to try again with baby backs.

Sharpening Station Stability

I built a sharpening station last year and like it a lot.  It has one issue though.  The whole thing wobbles badly during use.  The casters and small base don’t make a good combination.  I came up with a solution in this video:

It took a bit of messing around with feet material, but felt will work just fine for now.  I might find some kind of heavy duty rubber feet for longer term use.  Until then, stay sharp my friends!

Bunny Defense Network

Our two renegades rabbits are always looking for exploration and adventure.  Often they try to find it beyond the barriers we put up to keep them out of certain areas.  At first, opening up their exercise pen and placing the edges against the wall corralled them enough.  Now, they realize they can shove and move the fencing enough to get beyond.  I need a way to anchor the fence so they stop venturing beyond designated borders.

I started with sort of a three way corner thing to sit on the other side of the fence.  I wanted to add weight so the brace would be harder to move.  Boxing in the one leg segment and filling it with sand made the whole thing quite heavy.  I glued on a lid to keep from spilling sand all over the house.  I left off finish because I figured the little devils darlings would figure out how to chew on it through the fence.

This 20180114_162217
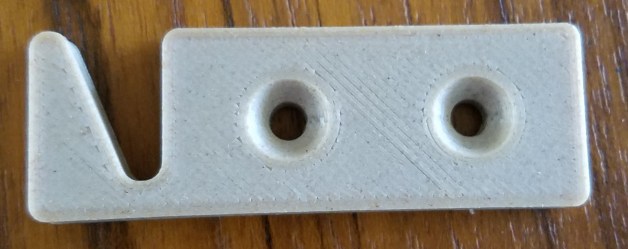
all started when I had an idea for a simple 3D print that would hold the fence segments if you screwed them to something sturdy.  It seemed like a good idea, but eventually needed another iteration.

DSC_1037The brackets looked pretty good in wood filled PLA and held the fence well.  The issue I ran into was when it came to actually holding the little beasties beauties back.  On the first night they rattled it enough to knock two of the rungs off their hooks.  It only took them a few hours to figure out how to chew on my new creation as well.  Good thing I left off the finish.  I was going to need a deeper hook to keep them from breaking the fence section loose.

DSC_1039


In thinking about the design, it became apparent that the right half of that hook wasn’t needed.  The wooden upright would act as one side of the hook, I just needed to provide the other side.  I increased the hook size and stripped the part down till it was the bare minimum of what was needed.

DSC_1041

A few clear grippy bumpers on the bottom along with the sand mean it is impossible to shift this thing.  The new hooks ought to make it very difficult to disconnect the fence unless you are a human.  The whole thing tucks neatly next to a piece of well protected heirloom furniture.  Tyrion has been heavily inspecting and disapproving of my work since its installation.  Their hunger for items you value knows no bounds.


Jacked Up PushUp Bars

I built a set of pushup bars to go with my pullup bar from early last.  You grip them while doing a push up and it lets you dip down further than when using your hands on the ground.  That stretches your chest and gives a harder workout.  The only problem with them is that now I am flexible enough that my chest can touch the ground.  Time to jack them up a bit!  I started with the same 2×12 that they came from.

DSC_1017

It turns out old ratty 2x12s can be quite beautiful if you just give them a bit of planing.  Hand planing construction grade pine to make a piece of exercise equipment is probably some kind of sacrilege, but I like using hand tools when I can.  Besides, sanding is just the worst!

DSC_1018

I chopped this piece up to give two layers of material beneath each bar and glued.

All the load will be pushing down on these, so only a minimal joint is needed.  1/2″ dowels will be more than enough.  You drill in one side, insert these metal plugs with a sharp point in the center, align the other part and give it a wack.  The sharp points all transfer over the exact center of where you should drill to the mating part.

Some drilling, gluing, drying, and a fresh coat of boiled linseed oil later they looked smart.  Well not really smart, kind of chunky really.  If it were architecture I would call it brutalism.  Probably fitting for a room full of kettlebells.

DSC_1026

My beard touches easily, but my chest still has inches.  This is hopefully the last raise these will need for a long while.

DSC_1027

Jerky Cannon Baller

After a bit of a letdown trying to make my own jerky recipes I backed up to using commercially available seasoning packs.  My favorite to date had been the Backwoods brand Original flavor.  I picked up some hickory flavor, mixed up a batch, and loaded my cannon!

I have been using a Number 30 Disher for the last few jerky runs.  The recipes haven’t always been the best, but loading and shooting the jerky has gone super smoothly.  The hickory isn’t my favorite flavor, but the batch did turn out well.  For now I am back in the jerky saddle, but not as gung-ho as I was before.  I am going to focus on testing different seasoning packs and fine tuning my drying technique for better consistency.

20180105_170839

Maple Trim and Half Wall

There is a half wall in the foyer that was topped with a dark stained bit of pine.  I sanded it and panted it white to match the rest of the trim when I renovated that part of the house.  It sees enough use that interior house paint didn’t last long before scratches and stains got to it.  I wanted to install counter top material when the kitchen got re-done, but there was not enough quartz left over.

After nearly a year of the kitchen being finished I decided to tackle this project.  Instead of quartz countertop I went with maple.  I started by removing the old top and trim and cleaning up any issues around with the wall paint.

This job called for a 7.5 inch wide board that was 6 feet long.  The length wasn’t an issue but that width left me with few options at the yard.  This one is gorgeous with a lot of cathedral, some tiger striping and other character.  That makes planing it really tough.  After getting a lot of tear out in places I fell back to sanding.  It took forever, but I got the top very smooth.

DSC_0996

I needed trim for under this part and under a window between the dining room and kitchen.  I got a nice beading bit and went to town.  Thankfully before doing everything I experimented.  Having the bit start with just a little nick, then going for full depth on a second pass produced a lot less tear outs at the sharp corner.  Notice how crisp the line is in the top example, while the bottom one is jagged.

DSC_0997

With all the stock prepared I moved on to finishing.  I wanted to use a water based urethane from General Finishes.  It has sprayed well in the past and doesn’t yellow the maple, so it should match the kitchen cabinets.  The trick is we were due for days of cold, wind, and rain.  I moved everything inside and tried to pad the finish on.

DSC_0999

Having finished many pieces with oil based wipe on polyurethane, I can say that this stuff is no substitute.  It isn’t thin enough, but then dries too quickly and leave streaks.  I eventually switched to applying it with a foam brush.  That worked out the best overall, but still left a lot to be desired.

The two trim parts that go under the kitchen window had interference issues.  They used a lot of calking to hold down the quartz, and left a fillet underneath.  Instead of trying to cut it all out, I rather relived the back hidden edge with a chamfer bit.  The finish was indeed a good match with the cabinets.

DSC_1003

DSC_1002

After that success I installed the half wall and its trim.  Once again drywall’s tendency to be out of square made the miter joints a little off.  I fall for that every time.  They still look really good unless you get up close.  I used a combination of loctite power grab (fantastic stuff for installing molding), and my pin nailer to fix everything.  Pin nailers are perfect for these kinds of installations.

Rotten Fascia

Entropy and rot are a constant enemy to the homeowner.  There is no perfect prevention, only a delay of the inevitable, and dealing with it when it strikes.  I noticed the corner fascia on my porch  looked a little funny.  A bit of probing revealed a lot of water damage.

This is one of those few situations where an oscillating multitool comes in a lot of handy.  I made plunge cuts far away from the corner to give myself space to install new boards.  Chopping that out with a chisel would have been a chore.

Not great, but only the ends of those boards are rotted.  There is a bit of cross bracing behind those beams to give support for the motion light below, so it should be fine structurally.  I noticed the way the drip flashing was folded allowed for a big hole.  I bet water runs back under via that entry point.  I soaked all the surrounding wood in a few rounds of wood preservative to stop the rot and prevent further damage.

A few custom cut boards made a nice looking miter.  I filled the drip flashing hole with white caulk.  It looks funny, but it should act as a noticeable reminder to pay attention to that area in case the hole opens up again.  Multiple rounds of primer and paint later, and it is back together.  You can definitely tell something happened.  Just the texture of the wood alone is drastically different.  It beats a creeping decay of the roof line though!

20171231_135730


While on the subject of things needing painting, the number sign on our mail box was in poor shape.  All the finish was coming off the numbers and the fasteners were getting really rusty.

20171229_145426

I wanted to get new ones but the PVC board they were on had faded where the sun was exposed.  Even with a bit of sanding I couldn’t get past it.  They don’t sell this particular style any more, so I wire brushed the old finish off the numbers and gave them a new coat of black paint.

I found stainless steel screws that were close enough to the originals to fit in the numbers.  It ended up being a cheap fix if somewhat time consuming.  Can’t have the mail person judging our letters to be in disrepair!  Oh the joys of homeownership.

20171230_142058

Hurricane Shutters

As a wise hurricane guide once said, winter is a great time to think about hurricane season.  Two major issues were highlighted during our last Irma encounter.  Not being able to see out back was maddening, and I had no shutter plans for my garage window.

The window to my garage has a big honking AC unit in it for the summer.  The thing is too big and heavy to move when hurricanes come, so I need a custom shutter.  I wanted it to be made out of a single sheet of plywood, but the threaded studs are 4 feet apart at the outside edge.  I could have shifted the whole thing over, but instead I cut the sheet in half and did it in pieces.  It makes for an easier installation.

I used 3/4″ plywood which ended up being too thick, I couldn’t get enough purchase with the wing nuts.  I used a forstner bit to relieve the area enough for the nuts to hold.  Two cleats above the AC help stiffen the part and give a resting point for a center patch that ties the two halves together.

Everything got a coat of primer to make sure they stay in good shape while waiting out in the garage.  I reassembled everything to make 100% sure it all fit, and marked up some basic instructions.


20171231_114218On to the back porch.  I found polycarbonate panels that are similar to the metal ones we already have.  They don’t come in the right sizes, but with careful sawing they can be made shorter.  A center punch and 1/2″ drill bit put holes where you need them.  They aren’t as easy to see through as normal windows, but at least some light can get in and you could tell if the shed is still there or not.  Our back kitchen window has a full complement of clear shutters, and each back set of french doors has a single clear panel.