I Got Published!

The May/June 2018 edition of Fine Woodworking magazine has arrived and I got published in it!  I was starting to wonder if that would ever come out, I submitted it in January 2017.  I just submitted another tip a few weeks ago but got rejected.  Who knows, maybe I can get one or two publications ever decade.

20180329_174755

Smoker Rehab 2018

Two years ago I pulled my old smoker out and gave it a complete overhaul.  It needs a little help again.  Nothing dramatic, but the paint is chipping up with rust blisters in places.  Best to get to that before they become dramatic.

A heavy grit flap sander pad on my angle grinder did a good job of cleaning off the paint and exposing fresh metal.  I think I used a wire brush last time, but this works a lot better.  So much better in fact that it revealed a lot more bad paint than I had originally thought.  I had sites all over the smoker that needed grinding and repainting.

Out came the high temp primer and paint.  I basically ended up repainting 75% of the smoker.  That was a lot more dramatic that I set out to do, but I figure it is a lot cheaper than having a rusted out smoker.

With it safe from the elements for a few more years I had one trick to install.  I wanted to customize the front fold out table.  I figured some kind of Florida BBQ sign was in order.  I was going to make it look like a caution road sign, but then thought that would reflect poorly on my cooking.  Watch out for this guy’s food!

I would historically use my mill to cut a stencil from thin plywood or hardboard.  I haven’t used it in ages and need to spend a day on repairs and re-learning how to use it.  Instead I tried to 3D print a stencil.  It can make finer curves and lines anyways.

DSC_1177

I sprayed the back with some light hold adhesive hoping that would keep spray paint from seeping under while letting me pick the stencil back up.  I masked around it and sprayed away.

DSC_1178

The edges weren’t as clear as I had hoped, so for the BBQ letters I sprayed more adhesive and make sure to rub it onto the grill table really hard.  That probably would have gone ok, but I sprayed too much paint and it seeped under.  Multiple lighter passes would have worked better.  I used too much adhesive and it left residue on the table.  I will wait a few days for the paint to really cure well before hitting it with a solvent.  I also didn’t mask enough and got a little over spray on the grill.

DSC_1181

Up close it has a lot of issues, but from afar it isn’t bad.  All lessons learned for next time.  Maybe in 2 more years when it needs another paint touch up I will have a better plan for branding it.  The smoker will be 11 years old at that point!

Belt Sander Grinding Table

*Update* I got this thing published!

I have been wanting to move my hand tool grinding to a belt sander.  My hand grinder works, but is really tough to get an accurate angle.  Also despite the slow speed I have still managed to burn blades on it.  Belt sanders remove material more slowly, but don’t get nearly as hot.  The build is hard to explain, so I will start with the finished product.

DSC_1140

It is essentially a small flat surface that sits on the same plane as the moving sanding belt.  Because the table isn’t moving you can use your favorite honing guide jig to keep a really accurate angle.

The table is held in place with an “L” shaped piece of wood.  I cut the groove on the table saw wide enough to catch the top of the sander surface, but not so wide it interferes with the moving belt.

DSC_1136

I attached a piece of plywood to the inside of that L so that the top of the plywood would be co-planar with the top of the sander.

DSC_1137

DSC_1138

I took the table surface to the belt sander to cut that angled shape.  It needs to conform as closely as possible to the flat top of the sander so you don’t end up grinding on the rounded section of the belt sander.  I had issues with the pine sliding on the painted sander sides so I threw a few pieces of PSA backed sand paper on it to prevent the jig from sliding around.  Finally a clamp keeps it all in place and very stable.

DSC_1139

I reground a plane blade and a few chisels that needed resetting or bevel changes.  The little table worked like a charm.  I can go from the belt grinder to my honing stones without even taking the tool out of the honing guide!

Sander Dust Collection Fittings

This falls into yet another “project I started over a year ago” category.  Not sure how it fell off the radar, but it did.  Dust collection is a wonderful thing to have, but there appear to be no standards.  Every piece of equipment has a different hose size.  I wanted to plumb my two main bench-top sanders together in a clean and easy way.

I started by adapting the back of my spindle sander to a PVC elbow, and then to a ribbed segment that would accept some flexible hosing.  5 minute epoxy is all you need to join the plastic pieces.

I cut a small length of hose and attached another hose coupler.  One side is ribbed to keep the hose from coming off, the other is smooth.  The hose slides on and off easily, but seals well enough to be a good vacuum.  I printed some mounting blocks that have a path through them to pass zip ties through.  This holds the coupling down without any complex clamp mechanisms.

DSC_1133

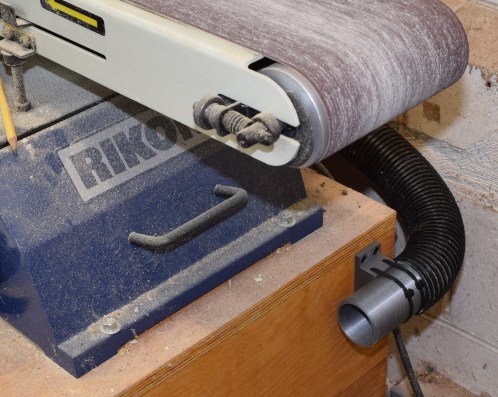
Similarly I went to the stand that has my disk/belt sander and attached hosing so I could get to it on the side of the machine.

DSC_1132

Now the vacuum built into the disk/belt sander can service both it and the spindle sander with just a quick re-plumb.  Cheers to less dust in my lungs!


Work Sharp Freehand Sharpening

I printed a freehand sharpening guide for my Ken Onion Work Sharp, and found it works a lot better than the guides that come with it for odd knife and handle shapes.  Honestly at this point, it is the only way I sharpen with this tool.

Don’t own a 3D printer, no problem.  Just cut a block of wood with the desired angles and sight down the edge of the wood.