Prusa I3 MK2s Build

I finally got my new printer.  Nearly 2 months after purchasing it shows up the day after my birthday!  That is one serious adventure in a cardboard box.

20170510_174042.jpg

I rolled out some paper onto the dinner table and got rocking.  I couldn’t help but setup my gopro and get a time-lapse of the assembly.

The total build time was between 5 and 6 hours plus some tweak and tune time.  The first print had to be the prusa logo in honor of the great maker.

With it up and running I got to bootstrapping.  The kit comes very complete, and really is a wonderful printer.  That having been said, the little knob they included to run the interface isn’t great.  It rubs and is awkward to use.  Print a new one!

DSC_0830

A lot of my filament is from when I first bought the monoprice back last summer.  It spent a lot of time sitting out collecting dust.  Someone made a nice clip in dust filter that goes right on top of the extruder.

Next came a replacement for the spool holder.  The one included works, but you have to sort of bend it out of the way to get a new spool on.  Plus something with bearings would DSC_0832roll a lot smoother.  Any catches or resistance in the spool rolling could cause Z banding as the extruder fights to pull in filament.  Thingiverse had a great assembly that sits on top.  It included a printable threaded nut and bolt that turned out gorgeous!  Skate bearings pressed into the rollers so the spool rolls with little resistance.  A filament guide keeps it running true.

Speaking of spool holders, my one major disaster so far has been this print job.  Sometime over night the extruder actually pulled the spool off the holder.  Nothing broke except the filament guide (just print another).  It turns out the spool was wrapped poorly and kind of synched itself off.  Poor spool wrapping perhaps.

I monitor all my prints with a webcam and octoprint.  This works out well while on the other side of the house, or on the go.  The only trick is that I have to leave a light on after dark.  Instead of leaving the room lights on constantly I designed and printed some brackets for holding thin under-cabinet LED lights.  Serendipitously one light will fit in a slot the spool holder had.  Only a small printed wedge was needed to keep it secure.  The other two went on my bracket.  It clears the extruder at full height.

It is turning into a proper looking monster!  Let the print games begin.


Major Hive Weight Increase

I don’t normally post about the usual inspections of the hive, but today’s was worthy.  We went out to check on the girls and oh boy had they been busy.  Despite having had very little rain since the new year they are finding nectar somewhere.  We had a 40 pound increase in the last 3 weeks.

Screen Shot 2017-05-20 at 1.16.47 PM

Seriously busy as a bee.  The previous time we checked they increased about 25 pounds in the same time.  Not sure where they are finding it all, everything is brown in the area, but glad they are.  We aren’t going to be able to harvest for a few weeks and everything was slammed full.  Had to stick on another super.  At this rate they will fill it too before we get to harvest.

20170520_131912.jpg

Battery Charging Station

I am mildly obsessed with flashlights.  These flashlights take fancy 18650 lithium ion batteries that can be recharged.  I have a lot of light accessories, spare batteries from laptops, and other things that need storage and organization.  Similarly cameras tend to have their own specialized batteries that need storage and charging.  I built a flexible station to hold all my chargers in one place.  Later I added an extras organizer from a repurposed storage box.

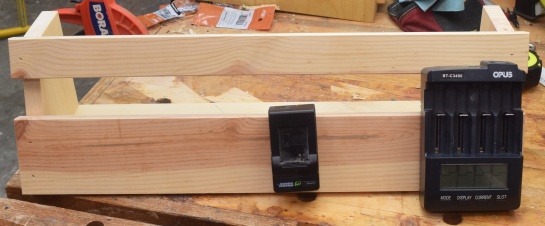
I started with all the specialized chargers I could find.  Two for flashlight batteries and two for cameras.  I decided to go for the pedal board route.  Guitarists can have a lot of effects pedals for their instruments.  Instead of having them all splayed across the floor they tend to put them on a thin box using velcro.  The box has slits that allow cables to pass inside the box out of the way.

DSC_0813

I built it to fit a shelf in my office closet and made it wide enough to expand with new charger capacity if need be.  Nothing special, just some pine I had hanging out.  The chargers are held at about a 60 degree angle, and there is space in the back to strap down a power strip.

DSC_0814

I wanted it dark to help hide the dark cables and velcro.  I never have good luck staining pine, but mixed up a water based dye blend.  It turned out great!

DSC_0816

With velcro and power strip in place I could start attaching chargers.

DSC_0817

DSC_0818

A 4×1 outlet extender lets you plug in chargers that are supposed to go directly into a wall outlet.  I added a device called a blackout buddy.  Eaton makes them and they are red cross branded.  It plugs in and charges itself.  When the power goes out it turn on the light so can see.  Now when our power goes out I can find my way to the flashlight stash in the dark.  It fit like a charm on the shelf in my closet.

DSC_0819


Next up I pulled an old drawer storage box thing out of the trash.  It used to have board games in it, but was destined for the dump.  I thought the all-wood construction it was worth saving.  After re-gluing a few bad joints it was in good shape.

20170512_191052

The bottom drawer houses all the extra batteries I had from laptop pulls and random purchases.  I printed a number of organizers to keep them from touching.  Every organizer positively holds the battery in place so they can’t come out and can’t touch each other.  Keeping them from touching is an important part of preventing battery damage and fires.  Plenty of room left to store more batteries.

The middle drawer has random flashlight stuff.  O-rings, manuals, cases, etc.  I printed some dividers to hot glue down to keep the drawer from being a mess every time you open and close the drawer.

DSC_0823

Lastly I threw some of my DSLR gear in the top drawer because I never really had a good place for it.  3D printing and woodworking come together to help organize and support my camera and flashlight fixations.  What a gorgeous synergy!

DSC_0824