Rotted Back Door

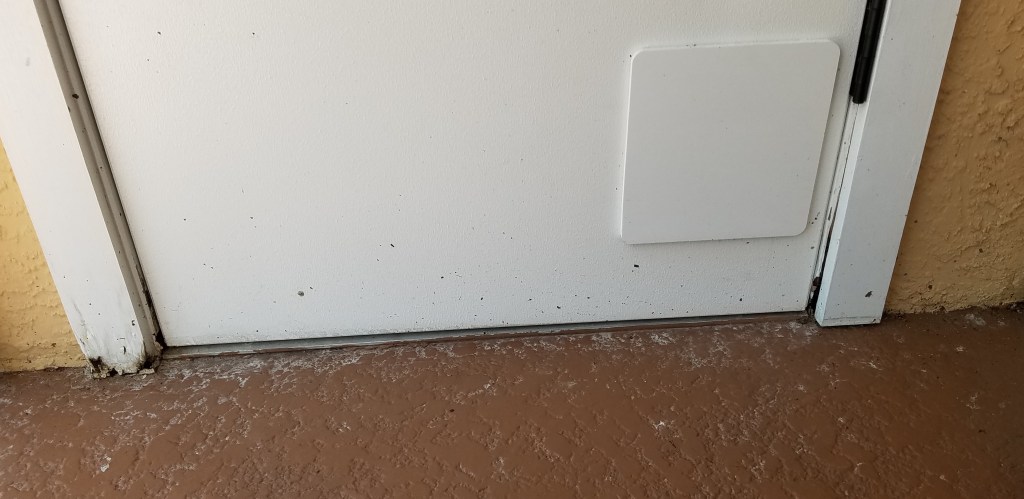
One of the lingering repair issues on our new house was a rotted back door jamb. It is on the porch well under the roof line. A thing I noticed though is that when it rains really hard the gutters over flow and water backs up to this door on the pool deck.

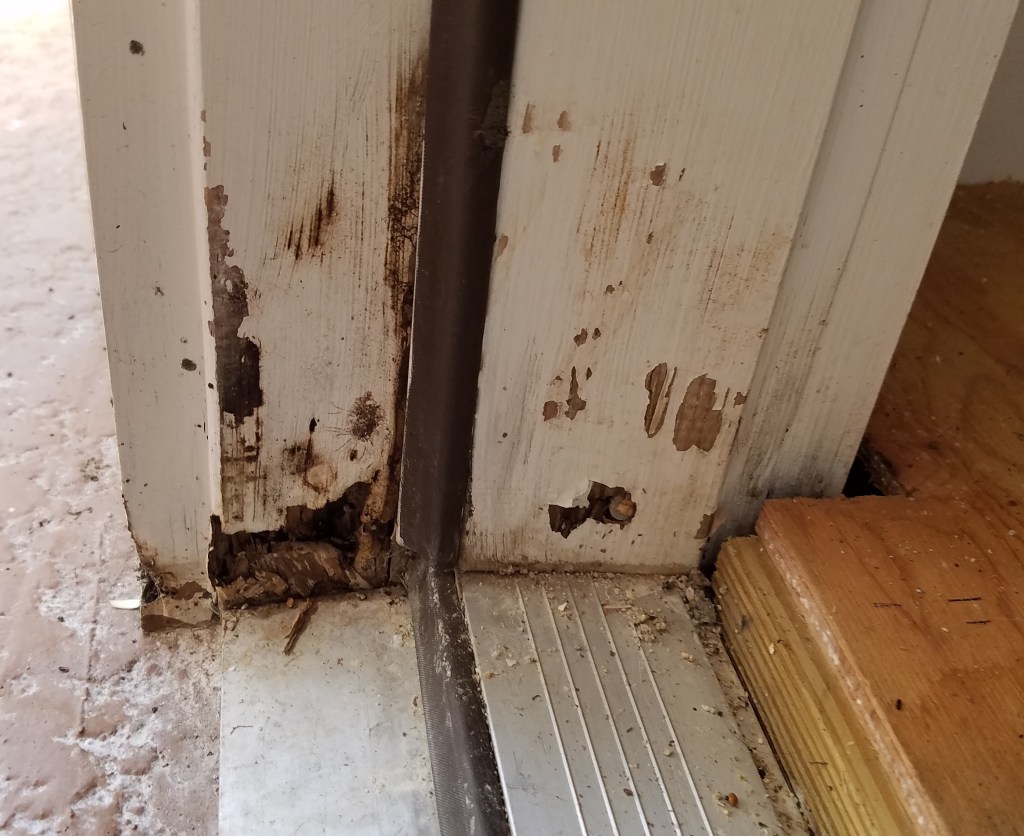
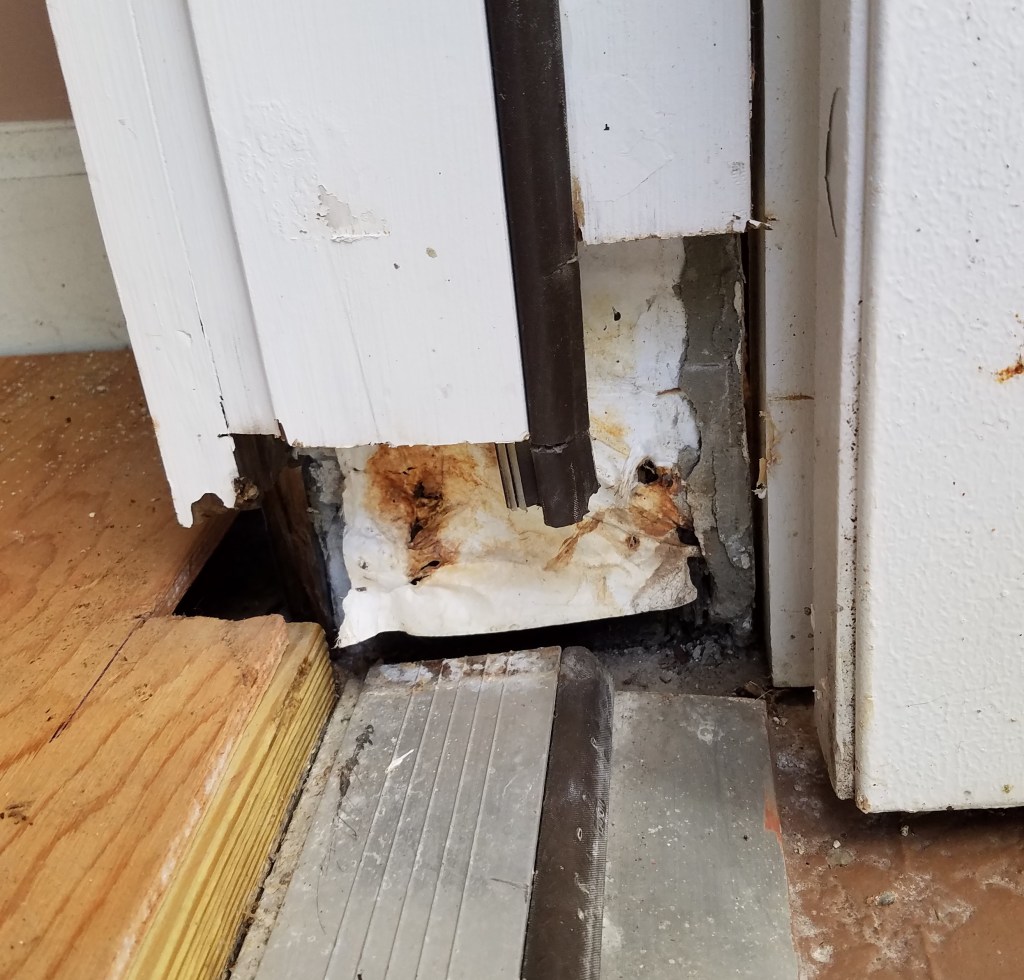
This showed up on the home inspection. I probably shouldn’t have let it go this long, but what can I say? I started chiseling away at the rot and found it was pretty heavy down low, but didn’t go too far up. The 2x4s in the walls ok. They must have some kind of treatment to help prevent rot.

Once I was done putting out the rotted stuff I squared everything up so I could start putting new material back in.

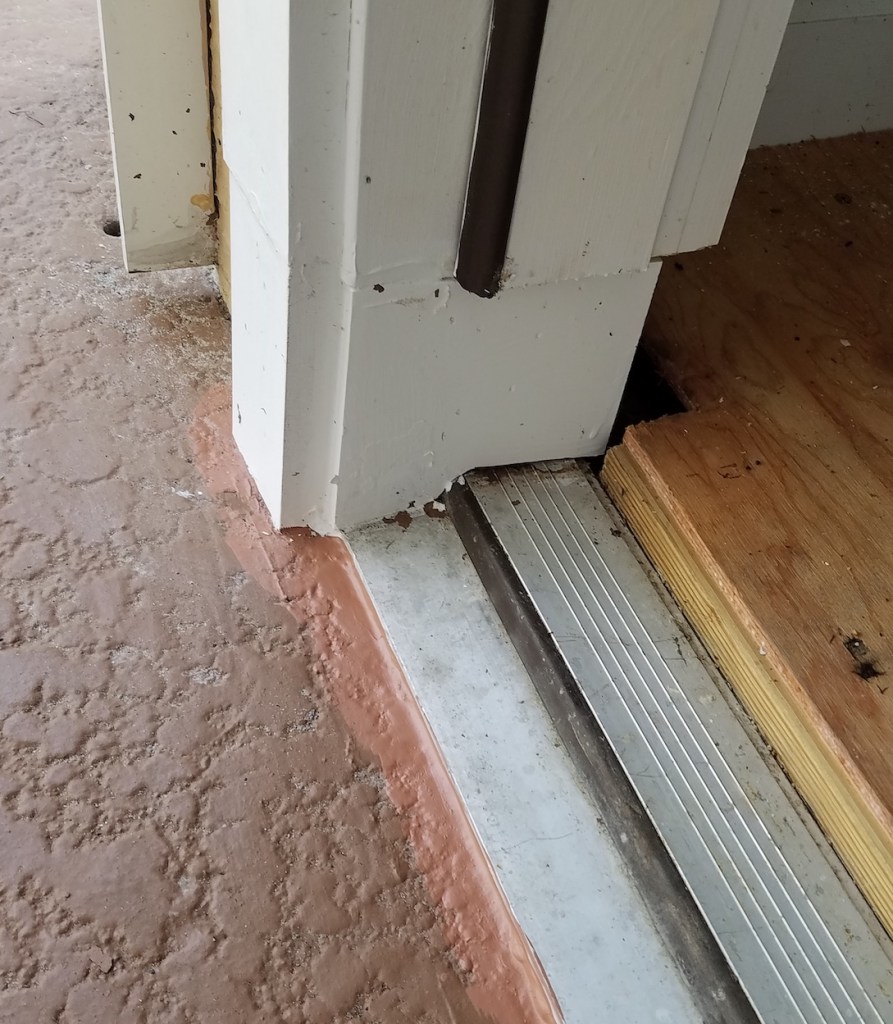
I went with a foundation of pressure treated wood with PVC wood on the outside. The thicknesses didn’t all match up in places. I don’t really care that much, this will definitely not rot.

I did some heavy calking to fill all gaps and painting to keep the wood that is left in good shape. A lot of the door seal is missing at the bottom, but I haven’t seen anything splash against this door, just the rising tide of rainwater backing up. The closet is not under AC, so the seal wouldn’t matter for that either.


I fixed the door rot, but really the root problem is water backing up on the porch. I fixed the door 2 months ago, and it took me working off and on all that time to fully address every aspect of the problem.

First off, the gutters often fill with leaf debris which causes them to backup and overflow on the porch. I have been keeping the gutters clear, but still get overflow sometimes. As it turns out, when it rains hard enough, the water has a lot of velocity coming off the roof, and it can skip out of the gutter.

Next up is the channel drains in my deck. In doing some reading, paint isn’t good for them. I noticed in places the deck paint had completely covered the drainage slits. I used a pressure washer with the narrowest stream to strip the paint off the channel drain.

That was an improvement, but they still didn’t drain well. I picked up a pressure washer drain jetter hose. It is a pressure washer hose with a bullet shaped fitting on the end that shoots water forward and backwards at an angle to help you break up clogs and flush out drains and gutters. It was messy work, but I managed to flush the years of sand and sludge from my deck channel drains.

More improvement, but still not all in the clear. It turns out a root had grown up inside the side of the drain near the rotted door. The channel would move water, but was half full of roots, and didn’t drain as quickly as it should. A lot of work later, I got the roots cleared out.

With gutters clear, paint off the drainage slits, sludge out of the channels, and roots cleared out, it seems like they drain well now. Even if it doesn’t work perfectly every time, this should flood my porch a lot less than it has in the past. I will keep an eye on the water level and check the bottom of that door for cracks. The joys of home ownership.

Straight Edge Clamp Saw Guide

Track saws are one of the hot new things in woodworking. I guess they have been around for a while, but it seems like every power tool company has jumped on the bandwagon. They look handy and appear perform nice clean cuts with the way the track backs the saw blade. They are all really expensive though.

A cheap substitute is to use a clamped straight edge to run your saw or router up against. It works, but doesn’t prevent you from wondering away from the guide and doesn’t back the cut. I have a few clamping straight edges from a company called E Emerson. They sell a saw plate to attach your own circular saw to their track, but it has abysmal reviews and doesn’t back up any of the cuts.

Instead I am going to 3D print an adapter to hold a sheet of 1/2″ plywood to act as a moving saw plate base. I took a pile of measurements and after a few iterations came up with the right design that would hug the tracks available on the clamp.

I had some phenolic faced plywood left over from making my own table saw inserts. I cut the plywood to the rough size of my circular saw base, and attached two long guides.

To attach the saw, I tried printing some different bracket styles, but was never happy with how they held. Instead I found a 1/4″-20 threaded hole in the base near the front to take advantage of (I think it was for some kind of moveable crosscut guide you could buy), and just drilled a hole in the back. It worked out though, the ribbing in the saw plate holds a nut perfectly. I counterbored holes in the bottom to keep the screw heads from interfering with the plate’s movement.

The saw is well fixed now and ready for me to plunge the blade through. With this setup I cut a slot that is perfectly sized for the blade. Now any cutting I do will be well supported and have little to no tear out. It is like a moving zero clearance insert.

It just so happens that I had a full sized sheet of plywood that required crosscutting down to reasonable sized for a project. Here is the setup ready for its first cut.

Everything went smoothly until I got to the end. The guides got hung up on the folding clamp lever (blue and pointing downward in this picture). It left me with a few extra inches of plywood still left un-sawed. Kind of a bummer.

I regrouped and decided to move the front guide back until it touched the rear one, this would buy me a little. It still wasn’t quite enough, and some heavy sanding was required. Once I shaved it down at an angle I was able to make a complete cut across the plywood.


Once I got the cutting part figured out I wanted a set of guides. Setting up one of these straight edges always involves a bit of math. You need to know the distance from the blade to the edge of the saw plate, and are you concerned about the inside or outside edge of the saw kerf? I made a set of plywood blanks that show exactly where your cut will land. Now you can make a mark. line the blanks up, and voila. Just line it up and that is where the cut will happen.

I made a number of different length guides all designed for 1/2″ plywood and uploaded them to thingiverse.