Chimney Cover

Home buying is a nerve racking experience. Thrills and surprises await you around every corner. One big one is the home inspection. On something as big as a house there are always items that crop up. You have to decide if they are deal breakers, or if you can take the risk of them being worse than the inspection indicated.

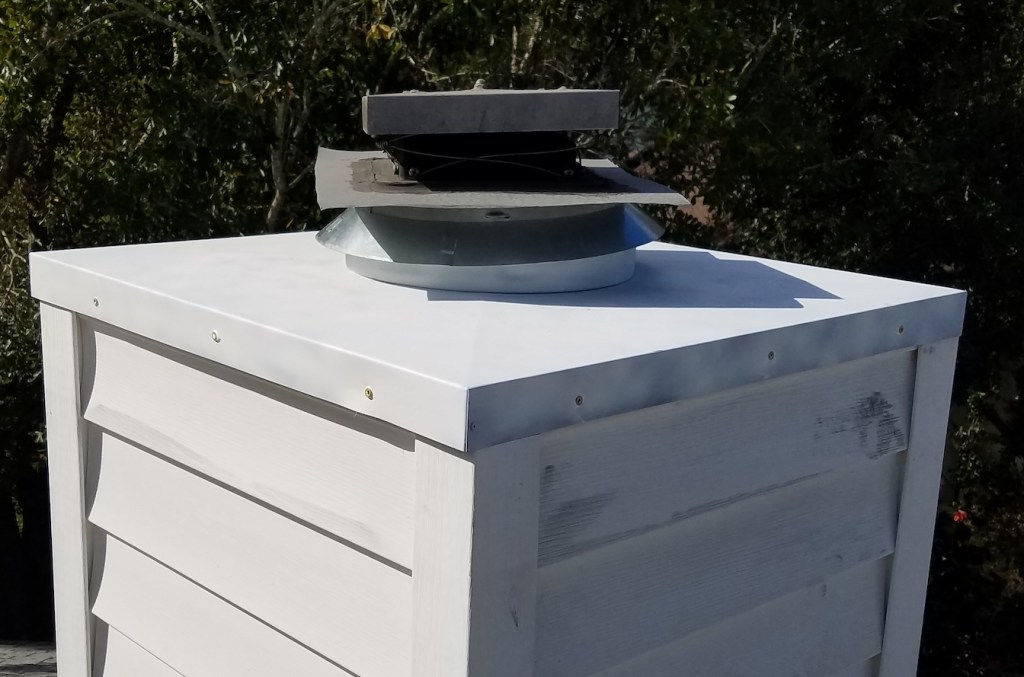
One thing that came up on ours was that the chase cover on the chimney was rusted. It was a surface rust, no emergency, but something to not ignore. A winter break gave me the time, and cooler weather, to get up there and do something about it while not dying of heat stroke. Close inspection revealed that it wasn’t bad and some cleanup plus paint would add many more years of life.

The big square chimney cover bridges the gap between the chimney pipe (might not be the right term) and the wooden structure sicking out of the house. My plan was to take it off, bring it to ground level and do all the paint work. The trick was I couldn’t figure out how to get that top little set of square covers off. I tried rotating the assembly but was worried something in the wall would come apart. 10 minutes of googling while on the roof didn’t give me a good answer.

Chimneys are completely new to me, so I am just feeling my way through all this. The section of roof is pretty tame so I took a grinder up there and did everything on the roof.

Sure enough, the rust wasn’t that deep. I knocked it, and as much other crud off as a I could with a wire wheel and came back with a coarse sander pad. There is still a lot of zinc left, but I had read a self etching primer would bond well with it. A few coats of that, and It was way too hot to keep working.

I came back the next day, sanded the primer and used a full can of high temperature white enamel. Even early in the morning the metal was getting hot and the paint dried too quickly. It isn’t a great paint job, but looks fine from down below. The original plan was to do this all on the ground in the shade. If I had known from the get go I was going to be working on the roof I might have opted to brush on something instead.

I replaced the rusted screw hardware with epoxy coated torx head screws. There is a thin band of metal that covers the gap between the pipe and the newly painted cover. The old one was pretty rusted, but a local fireplace store had new ones, so I replaced it. Not my finest repair overall, but it won’t be rusting through any time soon. When this needs work again I might be calling a fireplace expert of some sort.

Custom USB Stick With Bonus Disaster

I have a media computer hooked up to a TV that had been running windows 8.  After no end of having system updates failing and reformats I finally replaced it with Ubuntu.  I like the operating system.  It was easy to install, does everything I need on that computer, is fast, and appears stable.  Best of all it is free and can be installed with a USB stick.  I am going to be keeping a copy around from now on.  Might as well have a proper storage stick.

DSC_0200

That is the Ubuntu symbol in case you aren’t familiar.  So my spray painting job isn’t exactly perfect, but I am happy with how this one turned out.  I took a standard USB stick, painted it orange (Ubuntu’s color), then carved the logo into the paint to reveal the white plastic beneath.  It may seem like tons of work just to identify a jump drive, but when you have a mill, things like this MUST be done!

It wasn’t without issue though.  I bought two incase I messed up one.  Good thing too, because I forgot to reset the zero (starting position) in my mill software and plunged an engraving bit straight through the poor thing.

DSC_0197

Yes, that hole goes clean through.  Might as well try again.  The symbol milled into this drive was my second attempt.  It needed minor cleanup, but looks pretty good.  My attempt on the backup USB drive and was the finished product I showed first.

I think this speared usb stick can serve as a good example of what not to do.  Why not keep the engraving going and make myself a reminder sign?  I engraved some outline text into a bit of plywood, and sprayed it with black paint to highlight the lettering.

I went a little overboard with the paint, but after sufficient sanding I got through and had a decent looking set of letters.  I attached the USB stick and placed the new sign on the wall behind my mill.  Hopefully this will help keep me from making future mistakes… Yeah, probably not.

DSC_0199

“No Mites” Stencil

I have been trying to make spray paint stencils with my swivel cutter for a while.  It isn’t going well.  Not sure if there are tricks to clean cutting, or if my setup needs improvement.  Probably both.  Instead I decided to go a different direction and use hardboard (sometimes called masonite) to mill spray stencils instead.  It is cheap, mills well, except for a bit of fuzz at the edges, and holds flat against the spray surface.

Our bees are doing well and they look really healthy.  They are kicking so much butt, in fact, that the hive deserves some decorations.  How about a nice “NO MITES!” sign.  For anyone not familiar with mites and bees, look up varroa mites if you dare.  They are horrible creatures that parasite honey bees.

DSC_0069I ran into a few small stencil problems.  To do the NO cross out, I had to break up the spray job.  You mill out the areas for the paint to go through, and there would be two floating half circles if I did that.  Instead I milled most of the shape, but left some edging to hold it all together.

DSC_0067I thought this was a great solution!  Spray the mite down, spray part of the circle, then just rotate, line everything up, and spray again.  Apparently the cross portion isn’t symmetric.  I must have eye balled it in the software.  When you rotate, not everything lined up perfectly, sooooo I kind of fudged it.

DSC_0070

When you stand back a bit, everything looks pretty good, but I need to work more on my spray technique.  Lets just say I didn’t exactly do a lot of vandalism in my youth.  Does that banksy guy offer classes?  At least the mite turned out reasonably well.

DSC_0066