Father’s Day Flippers

These are called pigtail flippers, bbq turners, or I have also heard Texas toothpicks.  Whatever you call them, they are cool tools for the grill.  Here is me demonstrating their use on a set of serious pork chops for my father in law.

20180616_120333I wanted to try one of these tools, and my localish woodcraft had these new kits on sale.  Why not make one for myself and the dads in my life?  I picked up some thick maple dowel to make these handles.  I was building the handles for my mom’s bookbinding press at the same time, so it all worked out.


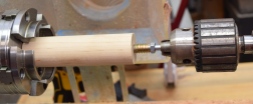
The first step is to drill out a hole for the threaded insert, and carefully thread it in.  I had an issue.  Most kits use 1/4-20 or 5/16-18 threaded inserts.  This one had an M6 insert for the metal turner rod.  I don’t have an M6 mandrel, and I couldn’t find one online.  Time to make one!  I played around, but ultimately a nut and bolt with the head cut off did the trick.

DSC_1251

That let me thread the brass insert into the handle, but I would normally flip the part around and chuck the mandrel up so I could spin with no tail stock.  No such luck here, the bolt is too small for all of my chuck jaws (right picture).  I could try to chuck up the nut, but it has 6 sides and the jaws all have 4.  If I did a lot of these, I would have to figure out how to make my own mandrel.


Instead of holding it by the threaded insert I turned down a shoulder to accept a brass bushing, then chucked up that shouldered section.  It marred the surface, but that will get covered anyways.

With 4 different variations turned I remembered I was supposed to drill a hole in them for their hanging cable.  This would have been a lot easier when they were simple cylinders still.  Order of operations on the lathe is super critical.  I put the whole lot of them on little sticks and went to town with the spray polyurethane.

I pressed on the brass bushing with epoxy and threaded on the turner.  The wire cable as a hanging strap adds a nice touch.  I hadn’t broken out the lathe in quite a while, so this was quite satisfying to get these done with minimal screw ups.

DSC_1284

DSC_1285


One other minor experiment that happened when I had my lathe out was to try and smooth out my 3D printed can koozie.  It turns out that you can really shine that stuff up if you go through the grits.  There are minor voids that show through upon close inspection.  Still, that is a nice shiny looking part.  You could polish up most of a chess set this way!

Porch Fuel Organizer

The slow take-back of the porch continues.  With all the bunny stuff gone, I have to get things organized so we can maximize the available space.  I have grill stuff everywhere.  Three propane cylinders for the grill, outdoor cooker, and spares for hurricane season.  I put all my Traeger pellets into kingsford charcoal bins to keep them organized and from spilling all over the place.  This all needs a nice storage rack.

dsc_0561I was planning on using 1x4s to do a majority of the building, but found that the store was out of their basic grade boards.  Instead I noticed their furring strips.  1×4 with nicely rounded edges for about a 1.70 a piece.  The quality is terrible.  They are very light rough and soft pine.  Many were so bent and twisted you couldn’t even use them for boat building.  Still, with enough cherry picking I got some good boards and was able to keep my whole project cost to less than 15 bucks.

A few scraps of 2×4 made uprights for the two level contraption.  I set the width so that I could store the 3 propane tanks comfortably below with a few pellet bins on top.  Keeping the propane low seems like a good idea.  Less distance to fall.

dsc_0562

Short pickets run between the two frames to tie them together and give the propane tanks a stable surface to sit on.

dsc_0564

The top shelf could hold a lot of weight in pellets.  To help stiffen the two existing runs I wrapped a vertical boarder around the edge.  It added a lot of strength to the shelf, keeps the pellet bins from sliding off, and looks nice!

dsc_0565

dsc_0567

Everything fits as intended, and I am ready to give it all a heavy coating of boiled linseed oil.  Never used this on an outdoor project, but it will live under cover on the porch, so it should work out.

dsc_0568

24 hours later the coating was nicely cured, and the wood took on a lovely golden yellow look.  I may have to use furring strips more often!  It looks good on the back porch and helped clean up a lot of space.  I wish I had gone a few inches wider though, I could have gotten another bucket of pellets up there.  Oh well, next time!

dsc_0569


Chicken Sausage

The sausage maker strikes again.  This time with a smaller load of chicken thighs.

20160916_162720

I started with only 5 pounds of chicken thighs instead of 10+ pounds of meat like last time.  The pieces were chopped up smaller this time, and I didn’t add any pork fat.  This was just simple chicken, salt, pepper, and a little fresh rosemary from the garden.

Last time I was doing a lot of meat shoveling and stuffing, and ended up having to employ my lovely wife to help.  I didn’t get many pictures as a result.  This time my maker mom was in town.  I figured out how to guide with one hand while I pressed with the other.  Mom filled the hopper and took pictures.  

I don’t know if it was the consistency difference, the smaller hunk size or what, but this batch went really smoothly.  My diameter consistency needs help still, but I am improving.  When all was said and done, we had two piles of lumpy but delicious looking sausage.

img_0834

The batch with rosemary got grilled for dinner the same night as it was made.  I don’t know if it should sit in the fridge a few nights for the flavors to meld or not, but this worked well.  It was pretty tender and moist enough.  Not as much as the brats were, but the fat content of this was a lot lower.  A very delicious and cheap chicken sausage for the grill.

20160916_182613

The second batch got smoked a few days later.  It was also quite delicious.  I am glad I didn’t use any white meat, the sausage was good, but could probably easily be dry if it were any leaner.

20160918_170358

Smoker Renoation

My beloved smoker has fallen on hard times.  I bought a traeger pellet fed smoker in the summer of 2009, and have done mountains of delicious meat in it ever since.  All those years outside in florida have taken their toll.

DSC_0092

The paint has faded and is rusting through in places, the outside is quite dirty, and a back leg has completely rusted through. I had to prop it up to keep the thing from rocking.

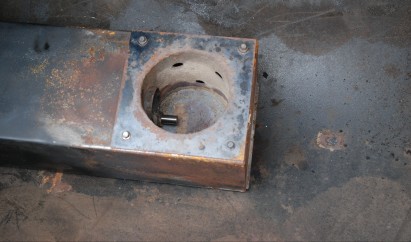
The inside doesn’t look much better.  Surface rust is kind of unavoidable, but neglect had built up on the walls and in the bottom tub.  I should really clean this thing out more.

My bad behavior aside, this thing is built  like a tank.  Even with all the years of outdoor use, I was able to pull all the screws out.  There is a lot of surface rust, but nothing too deep except for the one back leg.  I started to take everything apart and became even more enamored with my smoker’s build and design.

With all the parts pulled out and the mess cleaned up it was time to get everything back into shape.


Rebuild

I used a wire brush on my angle grinder to strip all the bad paint and rust.  I started everything with flat black rustoleum grill paint.  It covered everything but looked kind of bad.  I was in the hardware store and noticed they have a semigloss.  It matches the original paint job.  I redid most of the parts with a primer, and gave everything another coat with the semi-gloss.

DSC_0130

DSC_0131

Once all the paint was down I started rebuilding.  Some of the hardware got replaced, but most of it was actually in really good shape.  The back leg was shortened and fitted with an aluminum extension.  No more rusting off foot!  I replaced the hot rod starter because it is hard to get to and didn’t cost much to replace.

Other upgrades happened along the way.  They have a nice shelf that bolts in with the legs.  It folds away when not in use, and sits nicely in line with the entrance so you can transfer to and from the smoker.

DSC_0143

I pulled out the old controller that only had 3 heat settings.  The new one reads the internal temperature and feeds in pellets accordingly.  It has an autostart-up feature and a shutdown cycle that helps prevent soot.  I also replaced the drip bucket because it was pretty nasty.

All in all it looks pretty good.  Because I couldn’t get all the old paint off there is some odd texture, but it looks way better than when I started.  Now that I have the primer and grill paint around I will make it a point to check every year or so for bad spots that need a touchup.

DSC_0144

Lastly, the accessory I should have bought when I first got the grill.  A cover!  I don’t know how much longer the paint would have lasted with one, but it is worth a shot.

DSC_0146

This smoker rocks.  With a little more preventative maintenance than I had been doing I can hopefully look forward to another 6+ years of service.  Delicious smoked meat posts to follow!