Holiday Lighting

This is the second Christmas at our new house. Last year I didn’t get much decorating done because of how much there was to do still. This year has us in better shape from a maintenance standpoint. Last year I started with some printed cones to go around the carriage lights. I also had little inserts that went in the small lantern yard lights. I didn’t document those last year. This year I added the spotlights to the mix.

Cone Shades for Carriage Lights

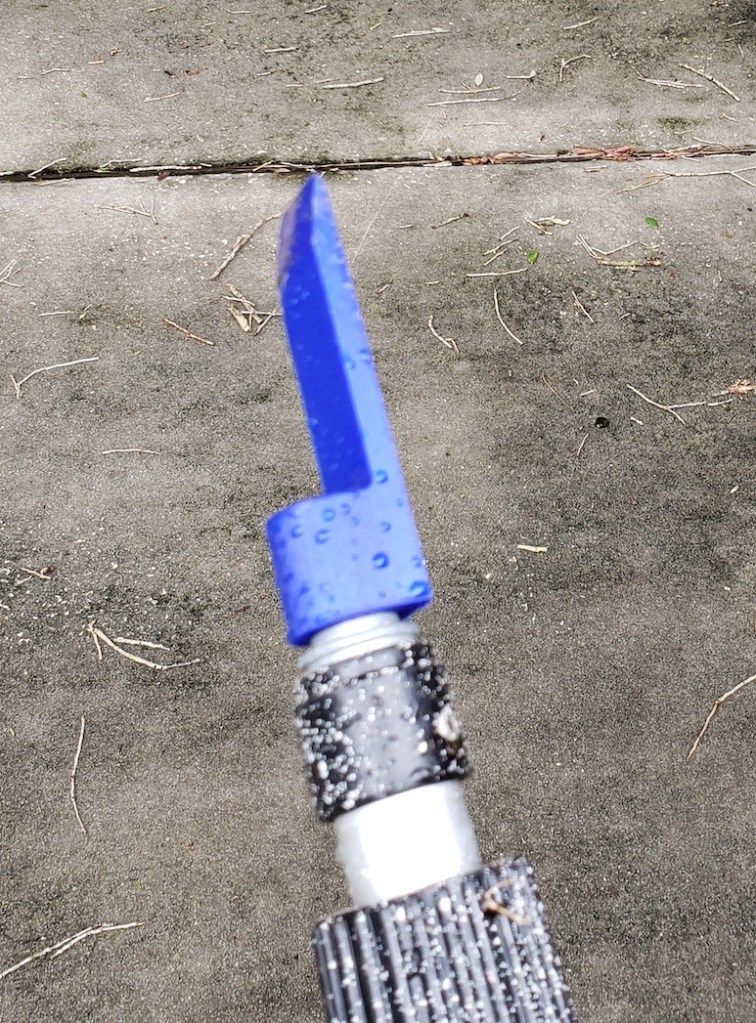
I 3D printed some cone shaped shades that go around the LED light bulbs in our carriage lights. CFLs would likely be too hot for PLA plastic, and incandescent bulbs would melt everything for sure! They are a single layer thick which you can do with the vase setting on most bits of slicer software.

A single layer thick is going to make them delicate, but they spend most of their life in storage or hanging off a bulb. I printed enough to do all 3 lights as orange for halloween and have the two by the garage be red and green for Christmas.


Lantern Lights

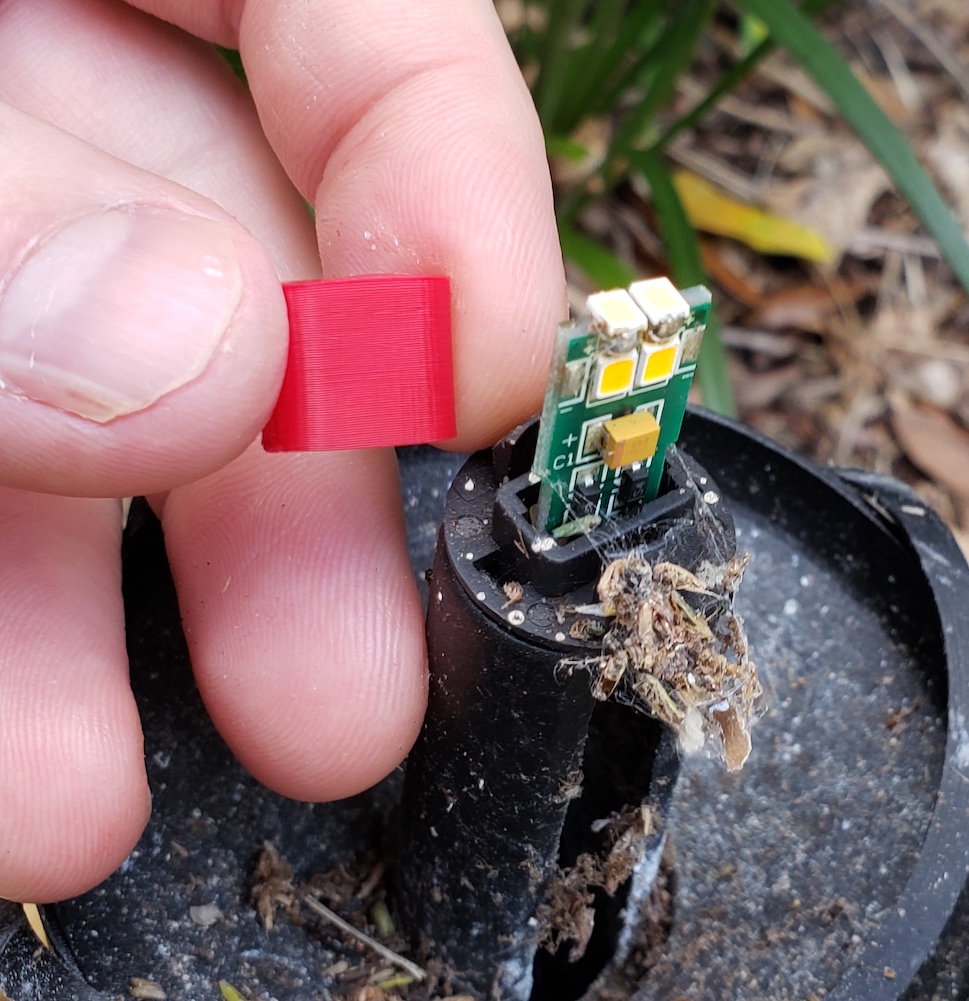
I replaced all the incandescent landscape lights with LEDs really early on. That gave me the ability to add a color hood to each one. These also were a single perimeter width so they would be thin enough to let the light through.
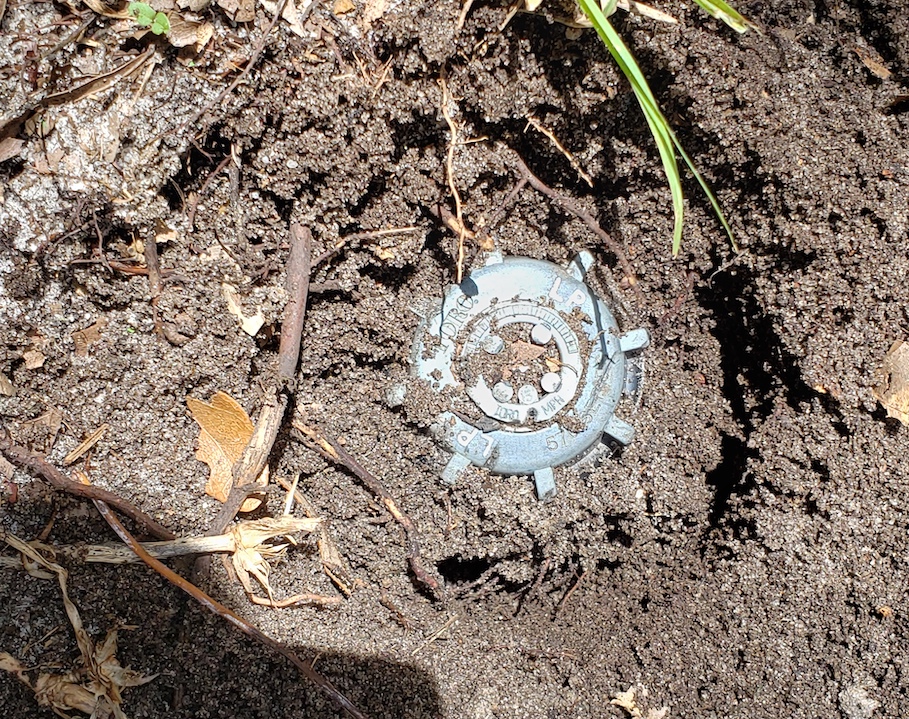
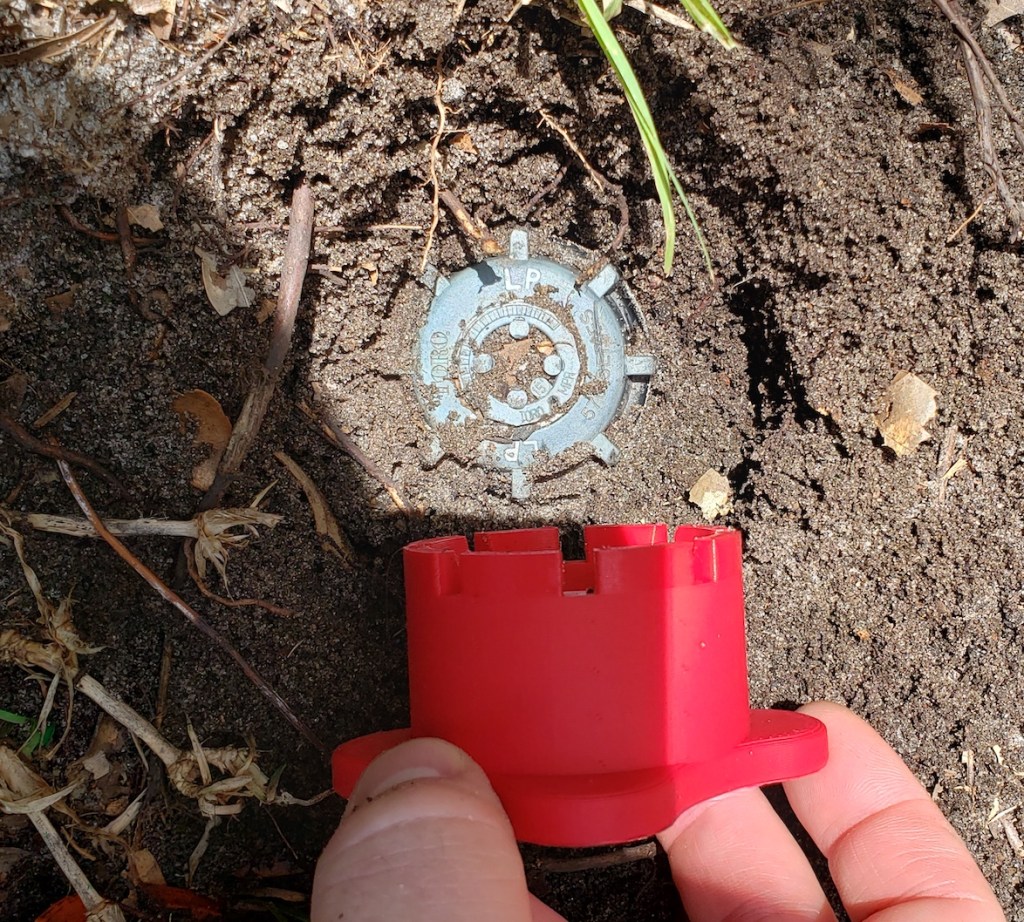

Spotlight Colors

Instead of doing 3D printing alone I picked up some color gel plastic to filter the spotlights in our front yard. I figured this would handle the heat better and let a lot more light through. I printed rings to go around the LED spotlight bulbs. These were glued down to the light gels with E6000 and trimmed once cured.

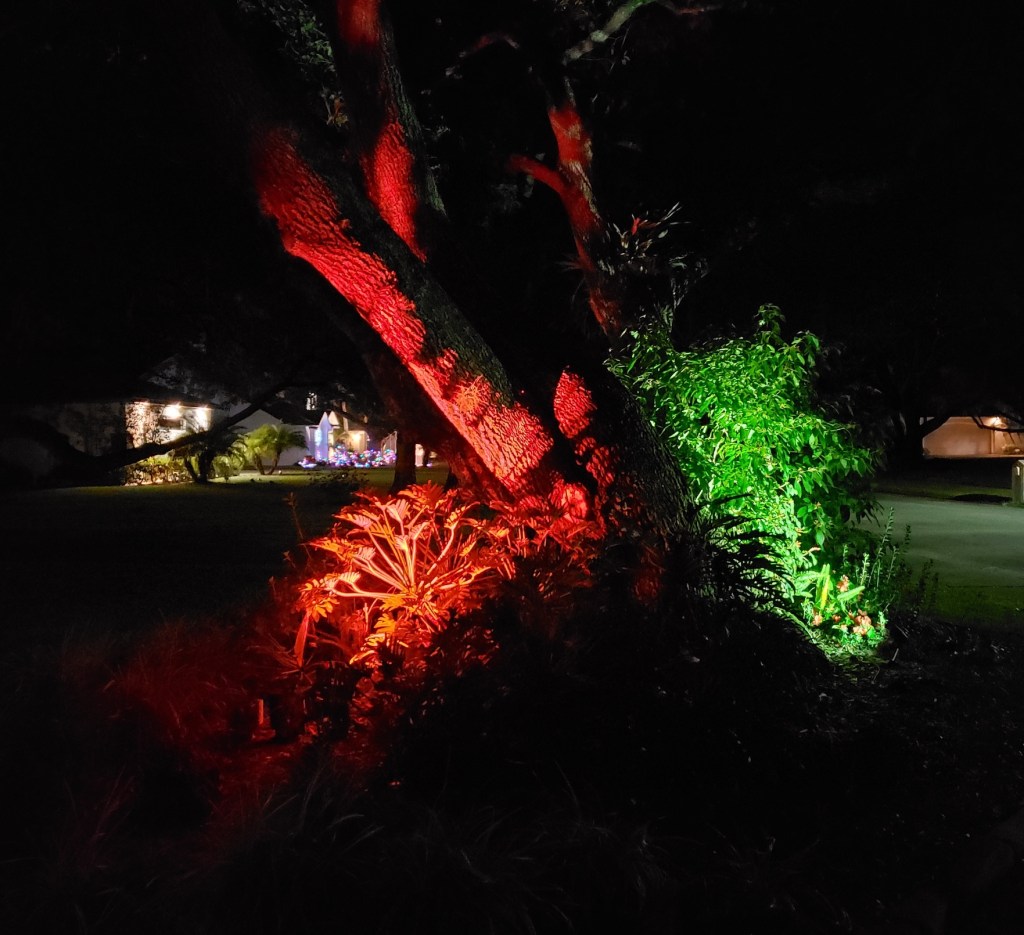
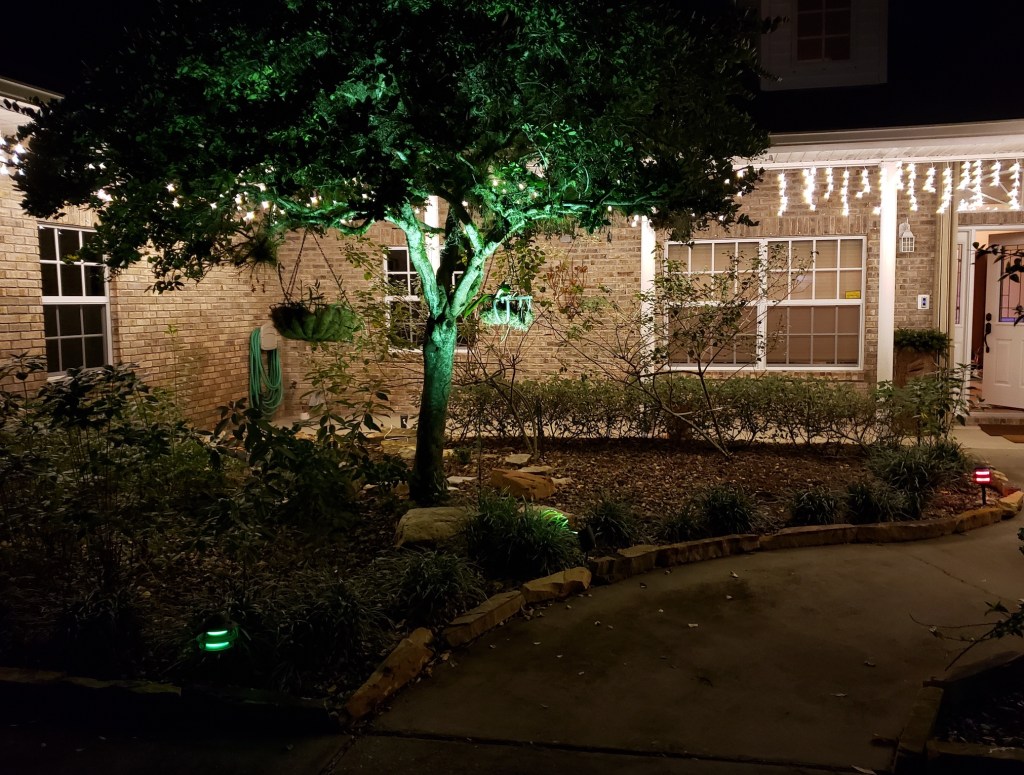
The results were pretty spectacular. Our icicle lights are overpowering when shooting with my camera, but everything looks really cool. Lots of color all across the yard and front of the house.

At least it DID look good for the first few days. I noticed the reds were looking really pale. I pulled a few of the filters off to inspect. The reds must absorb more than the greens, it completely bleached the gel filter right where the emitters were. The green one got hot enough that the printed part deformed and stuck itself to the LED bulb. Clearly this is going to need a re-think. Next year. It is well after Christmas and I haven’t sat down to work on a solution yet.

I did print a canister that holds all the piece parts for next year. The cone lights stack inside each other to be really compact. The lantern bulb covers are tiny and jingle around the bottom. The spotlight filters are junk at this point, so they don’t need to be stored.

Overcome Sign

Now that I have my wooden wall up, it is time to do some decoration. You might notice this broken pipe fragment from a previous engagement with our house. That is the pipe that broke off in the wall when I was trying to change out the supply valve. It was a deep low point in the renovation, but just a few days later I got the pluming and wall repaired and a new vanity installed.

I found a nice looking plaque at the hardware store, but wanted the scale to be a little different. I measured and copied the dimensions and 3d printed a template so I could replicate it at any length I wanted. I could also scale it up and down. The template goes on with double sticky tape, and a router template transfer bit copies the shape over.

With that made I routed the edges using a roman ogee bit and made a little mounting block to hold the pipe section on.

To hang this I was going to run a wire across the back, but the pipe valve’s weight would have the plaque leaning heavily from a center hang point. I needed some way to make two solid mounting points. I came up with this keyhole print. You drill a 1″ forstner hole about 1/4″ deep, and screw on the attachment. Now, a screw or nail head sticking out of the wall will register in the key hole. They make router bits for doing this, but my print is a lot easier to install. I mounted two in the back and hung up the plaque.

Last but not least this sign needs a word. I have always liked the unofficial motto of the Marine Corps. Improvise Adapt Overcome. This felt like an Overcome moment for me, so that is what I will use. I printed a two layer font white on black so that it looks like the IMPACT font with its usual white text and black outline. This is where a multicolor printer would come in a lot of handy. Instead I had to do it all with Z-height differences in color. Hopefully my next printer with come with some multi material options.

Now if I am ever in the shop working on a project that seems to have gone really belly up, I can look up and remember a worse situation I was able to overcome.

Garage Wooden Wall

The wall in our garage next to the house entrance has some issues. Multiple things had been attached and removed, and there was once a dart board. The result is a serious amount of holes. There are a lot of things I want to attach to this wall. They are often too small to use french cleats and I don’t want a million wall anchors. Why not use wood?

I picked up a pile of tongue and groove pine and covered the outward face in boiled linseed oil (BLO) to offer a little color and basic protection.

Everything got pulled away from the wall and I put in the first slat. I made really sure the first one was tight up against the wall and level. After that, things went pretty smoothly. I worked my way up the wall and got to some outlets that were disused. The house had a number of intercoms that were removed, phone jacks, and some switches I don’t need any more. I went through and measured everything’s position and saved it so I can reopen those boxes again if I want them in the future.

I put a corner mold on the outside edge and used a little scribe piece of pine to help smooth the transition between the door mold and the wood wall.

With everything up I could accessorize a bit. I bought wooden switch plates so the light switches and outlet would look nicer and blend in better.


3D Printed Enhancements

As I stated earlier, part of the reason for doing this is to support mounting options. I have a remote for my new AC system, an indoor/outdoor thermometer and a remote for the ceiling dust filter. The AC remote already had a mounting bracket, the others had to be designed and printed

While taking the garage door wall controls off the wall, the plastic started coming apart. The clips were breaking off and screw holes splitting. I printed a cradle that the housing would fit in and offer new mounting screw holes. The bodies were bonded into the cradle and allowed to cure overnight. The only place I had access to screw holes was under the main button. The base is thick enough to keep it from flapping under use.


I continued to add the signs and other accessories to my wall as I put the desk back and cleaned up. I was able to mount my shiny red metal first aid kit down low in easy reach. I also screwed a sealed CAT tourniquet to the wall. Hopefully that never comes in handy. Having the wall here has been nice. The space feels a lot warmer, and I have already added more items since taking this picture. I might pick continue this theme elsewhere in the shop, but not any time soon.

Late Summer 2019 Prints

Kind of a big span of time with a smattering of prints. I am always printing one little thing or another, but only occasionally remember to document them. Let the disjointed presentation begin.

Reciprocating Saw Spray Can Shaker

One of my weirder ideas that was spawned by being locked away waiting for a hurricane to come. Wouldn’t it be cool if you could use a saw to shake new spray paint cans for you? Turns out some folks weld something like this together and sell them on ebay. Not sure I want the full metal version, but a plastic one screwed down to a de-toothed saw blade would be ok. A large hose clamp keeps the can in place.

So far it has worked well the 2 or 3 times I have tried it. Probably one launched can away from it being my worst idea ever, but until then, it feels pretty clever.


Pole Scraper (Paint Handle Threads)

Also while waiting out the storm I had time to experiment with threads. Specifically I wanted to make threads that would go onto any standard mop/cleaning brush/paint roller/etc pole. I did some research and it is an ACME 3/4″ x 5tpi. Turns out Fusion 360 only had that diameter in a 6tpi version. I found a guide on their help area that tells you how to set up custom threads. (Link)

My first project was simple, but useful. I made a little scraper that would go on the end of some extension poles we had. I used it to go all around the house and scrap off the mud dobber nests that had built up all over the house. The printed plastic will not hurt anything on the house, and the extension pole lets me get to everything without leaving the ground. Now I can attach any kind of hook, grabber, poker, or whatever to an extendable pole.


Calking Plug

While working on the rock project I went through a lot of tubes of landscape adhesive. I bought it in the large 28oz tubes (instead of your typical 10oz) because it is way cheaper per ounce that way. My big calking gun had issues sometimes though. The diaphragm in the back of the tube would fail, and I would end up with the plunger pushing through the glue. It almost ruined my gun.

The first time I thought it was a fluke. The second time I got kind of mad. Once the diaphragm fails, you basically can’t do anything with the tube and have to toss it. I cleaned the gun up again, and noticed that the plunger is quite a bit smaller than the inner diameter of the glue tubes. By only pushing in the center of the glue plug, it could be causing them to have a blowout more easily. I printed a larger disk that fits around the existing plunger, and just fits inside the tubes. After that, the glue tubes behaved themselves.


Inside Transfer Calipers

Sometimes you need to measure the inside diameter of something, but the shape makes it difficult to get that measurement. Inside calipers can help, but if going into a flared hole or other situation, it is not easy to pull the tool back out without disturbing the caliper distance. This simple design will produce the same dimension on either end. Stick it in a tapered hole, and just measure the part sticking out to know what that size is. A very special usage case, but I have needed one in the past, and with a little print time, I have one.


Wind Chime Clacker

The house came with a few really nice sounding wind chimes. They are blocked by the trees and screen, so they don’t chime often, but the long tubes make a deep soft song. The wooden clacker on one has fallen apart a few times. I keep gluing it back together, but the wood is really shot. I thought about making another wooden one, but wanted to try a printed one instead. It matches the diameter and thickness. The two halves are the same print just turned around to key into each other. This way I don’t have to untie anything, just glue it into place. The keyed insides align both pieces to center and add additional glue surface area. I am curious to see how long black PLA will last.

Sprinkler Tools

I have been doing a lot of trenching and digging in my yard in service of a rock border project that has been going on for months now. One result of that project has been a lot of sprinkler repair. I have broken pipes underground while cutting up roots, and tried to dig straight through hidden sprinklers. That plus regular sprinkler maintenance has been a new chore for me. The last house didn’t have them and I am learning on the fly what I have and how to fix it.

Most of this is pretty routine plumbing, but repairing or replacing sprinkler heads is a bit different. They are buried, and often very overgrown with grass. Once you get to them, they tend to be tough to pull out of the ground. To help with all this I 3D printed some tools.

First up is a large hole saw looking device. A 1/4-20 bolt fits in the center and gets chucked up in a drill. It has a 3in ID which encompasses all my sprinkler heads. I had a sprinkler that needed to get an extension put on it, so I used it as an example. The bit breaks up the soil and grass around the sprinkler head making it easier to fully expose and extract.

Even with the grass broken up it is still hard to get a hold on those sprinklers without doing a lot of digging. To help with that I made a tool that grabs onto the ribs around the head and provides a good handle. It made extracting the unit very easy.

That one is designed for a Toro 570 series sprayer. I also have some Hunter PGP sprinklers that rotate on their own. Those are a lot bigger and require a different tool to extract. All the designs are bundled together on a single thingiverse post.

Car Phone Charger Dock

My phone has wireless charging built in, and it is a wonderful feature.  Very futuristic.  I wanted this ability in my car when doing road trips or errands.  I started with a flat lipped bed that would keep the phone in place.  There is a spot behind the gear select knob that was just big enough for it to sit.

I took apart a small puck wireless charger and pulled the internals out.  It was all one piece with 4 holes for me to mount to.  Very convenient.  Below are the first 3 PLA iterations of my design.

20180525_141934

The first one on the left was too wide, and din’t have enough space cut out for fingers.  The cover (below) didn’t sit well in the cavity either.  The next one was better, and had more rounding.  The last one had a tapered bottom to lighten the look, and a simple disk to cover up the electronics.

I put it in the car and test drove it for a few days.  It was an awkward fit.  the rubber pads underneath kept it from sliding around, but it was tight navigating it between the shifter and console.  I sat it upright in the change well and found that orientation a lot easier to use.

This sticks up a lot higher than was really needed, but The principle is sound.  I switched to PETG because the other car parts I printed in that material have held up well.  I thought I had a slam dunk with the left one, but the angle of the cable was too low, and the circuit card needed a little fit adjustment.  PLA and PETG shrink differently.  If you prototype something in one material, then switch to another, tight fights might need adjustment.

20180608_085402.jpg

I have run around with this version for a week now and love it.  My phone falls right in and is picked up easily.  The cable is well controlled and doesn’t get in the way.  It took a few iterations to get here, but was worth it.


The only issue with using that space for my phone is that I typically put trash there.  It was easy to see and clean out at the end of the day.  Time for another print!  I can fit a little trash can in the side pocket of my door.  Measuring down inside the pocket calls for something like a pair of inside dividers.  I didn’t have any, but I do now!

With tool created I measured the pocket width in a few spots and came up with a profile.  It took some adjustments, but the second version clicked into place.  That area of the car has a ton of curves.  This didn’t match them perfectly, but it sits well and doesn’t stress the door mold too much.  I gave this design a week as well.

It worked out like a charm, but could stand to be wider.  I printed it 50% wider out of PETG to survive the heat, and called my car project done.

DSC_1271

Spring 3D Prints 2018

I haven’t done a “Prints Of The Month” post in a while, but that doesn’t mean I haven’t had a pile of stuff popping off the printer.  Here is a smattering of prints I completed in the last 2 months or so.


I needed extra retainer cases for some orthodontics equipment I have (bummer).  I could buy them, but where is the fun in that?  Fusion 360 has a half decent thread database, so I dug into it and made a screw together case.  I started with the default settings and couldn’t get the top to screw down all the way.  It turns out I was using a Class 3 thread.  Class 1 is the loosest, while Class 3 is high precision.

I eventually oiled the threads and worked the Class 3 one back and forth a number of times and it closes now.  The Class 1 set I printed worked itself into fully closing a lot faster.  If you are worried about your prints coming together, pay attention to the thread class.


Continuing with the gaudy yellow color, I added a magnifying light to my shop.  They sell screw on bases you can plug the light post into, but they charge 20 bucks each.  I can print as many as I want for less than a dollar a piece.


A co-worker builds guitars with a CNC mill, but occasionally needs chisels to help clean up segments.  I took his flunky grade D chisels and put a nice shine on them.  3D prints and a magnet means nobody gets stabbed by accident when transporting them back to the owner.

20180512_114215


I printed a small cable guide for my car a year ago.  It lasted a while, but fell off recently.  The tape failed to hold the printed part.  Time for an upgrade.  I increased the width by 50% and made it three times taller.  Before attaching the tape I scuffed up the back to help it grip well.  The PETG didn’t melt or deform in the summer heat, so I am sticking with that material.


Not my own invention, but rather a Thingiverse submission by user iamjonlawrence.  They are a set of printable radius gauges.  They have inside radius, outside radius, and a set of circles.  The hole of the circle has the radius marked on the gauge, the outside has twice the radius.  The metric versions have that fact labeled better.  They pack a lot of function in a few small prints.  They are available every 1/16″ up to 1″.  I might have to make a set that goes over 1″.

An example of how to use them is on the right.  A pair of calipers wouldn’t really tell you the proper radius, but this gauge has it pegged.


Last but not least, we have a beloved octopus stained glass in our kitchen window named Eddy.  He guards over the cooking and cleaning activities and always lends a limb.  He is too heavy to hang on a suction cup for more than a few weeks, so we always just sit him on the window edge.  He has fallen before, and that will not do.  I printed this basic profile to clip into the window frame and provide a little spot for Eddy to stay firmly in place.

Printer Upgrade Part 2

Last we left our printer saga, everything was quite broken, and I was waiting on parts.  The 625z bearings came in and I put the extruder motor back together.  When I could easily turn it by hand, I knew my extruder problems were solved.  Sure enough, I can extrude PETG at high speeds and no jams.  The hot end was not to blame.  I did develop a new problem though.

20180430_202617

That is the status of my end stops.  The printer thinks the inductive sensor is touching the bed even though it is nowhere close.  I had an occasional issue with the inductive sensor reading poorly.  That has become constant now, all my messing with the cables finished off my probe.  I can’t start a print without that probe.  I massaged the cable and found a spot that flipped the 1 to a 0.  Time to troubleshoot.

Ok, so the cable is pretty well shot.  I opened the jacket where the issues was, but couldn’t figure out the exact problem.  They used very thin wire, it could be a break within the jacket.  I just cut most of the cable and redid the wiring.  That got me back up and running.  I printed everything I needed for the upgrade plus spares in both PETG and PLA.


I double checked all the instructions to make sure I wasn’t missing anything and started with the tear down.  On the plus side I am really good at disassembling the whole hot end/extruder!  It looks so naked.

DSC_1210

I only ran into one small snag.  The part that holds the x-belt wasn’t accepting the belt on the right hand side.  I printed 3 different versions, and they all had the same issue.  I took that part off and worked around the groove with a hobby knife.  It eventually relented and let the belt seat fully.

After that, the extruder assembly was pretty straight forward.

The bed assembly was a breeze.  I like most of the changes they made to the cable management, and think this will be more robust.  How the rats nest gets handled in the controller box could be a little better though.  Maybe just a bigger box.

I went through the calibration wizard, did some nozzle height testing, then printed a smart looking benchy.  Dimensionally it is great, but course settings mean it isn’t cosmetically the best.

I am thrilled to be over the failures, and proud of myself for solving all the issues.  Given that is almost exactly the 1 year anniversary of getting this printer, I decided to share a few stats.

Printer Stats:

  • 380 successful prints (more than a few failures, especially these last 2 weeks)
  • 44.7 days spent printing (12% of its life)
  • 6.3km of filament


Ladder Feets

I have a trusty little 3 step Werner ladder that is great for doing work inside and outside the house.  It is small, light and provides enough height to be really useful without making you feel too high up.  I bought it when I got my house 8 years ago and have used it a lot since then.

20170929_111449

20170929_111455


The back two legs are basically straight tubes with rubber feet slipped on.  They did a good job keeping the ladder stable and level, but over the years the posts have pushed through the rubber.  The final straw was when I was doing something in the yard and the bag legs sank 6 inches down.

20170929_140541


I pulled the feet off and tried to salvage them.  The only real issue is the bars pushing through.  Maybe “re-soleing’ these shoes is all it takes.  I tried screwing down some plywood to the bottom, but ran into issues.  The post is only resting on its edge, and the squishiness of the feet means they want to wobble around a lot.  No good.

Time to ditch these feet and go with something new.  I would try to make it all in wood, but the post diameter is not close to any standard drill bits.  I want the new feet to fit tightly.  On to 3D printing!

The foot design resembles the original rubbery version.  The difference is that these will be hard.  I added a flat parallel to the bottom of the post.  The reason being is that when you fold the ladder up it only sits on the tips of these feet.  Probably a lot of the reason they pushed through.  This flat spot will help spread the load when stored and hopefully help it last longer.  The larger flat in the upper left picture is what touches the ground when the ladder is deployed and in use.

20171010_194300

I started with basic PLA, as a test, but they fit so well I am going to stick with the first prototypes.  I might make a higher infill PETG version in the future.  Until then the ladder folds up and stores well, and most importantly sits flat and stable when in use.


April-May Prints

April was a pretty quiet month for printing because I knew the new printer was coming.  May turned crazy once I got the prusa up and running.  I already posted on my battery storage and drawer divers in another post.


Salt Grinder

A co-worker had a cool salt grinder that kept breaking.  He wasn’t able to get refurbs anymore, so off to printing we go.  The body is heavy stainless, but that center window is very thin plastic.  It falls over easily and snaps off the threaded area.  I printed a tapered part that threads and glues into the spot where the plastic window was.  In addition I made a little stand for it to sit in so you can’t knock it over as easily.


Tape Measure Pocket

I typically use a tape measure at the table saw to set the rip width.  It works, but I think a wooden ruler would be more reliable.  I printed a pocket for it to attach to my table saw side so it is always close at hand.


Wonderful Wooden Filament

Not exactly the same as woodworking, but fun none the less.  They make wood dust filled filament.  It prints well and has a neat texture to it.  This stuff was made for printing baby groot!  I tried a set of benchy boats; one stained, one not.  It doesn’t appear to stain well, but made a great looking fidget spinner.


Desk Trophies

One of the criticisms of 3d printers is that they are only good for printing desktop trophies.  They are good for lots of other things, but yeah, they make awesome desk trophies!

DSC_0846


Bit Holders

Ok, back to useful prints.  I wanted to better organize my various driver bits, so I made these organizers with nice spacing for you to get fingers in and pick out the bit you need.  The markers are made using prusa’s multi-color print.  The one where you switch spools at a set Z height, not the one that changes color mid-stream.  I couldn’t do that on my last printer, but I am very happy it works on this one!  Too bad they don’t sell filament in dewalt yellow.


Mom Stuff

Don’t look mom, this is all going to be a surprise for you!  My mom wanted some altioid tin organizers and paint holders.  I figured she could also use pen/knitting needle/cable storage stuff as well as some funky knick knacks.

DSC_0853


Arbor Press

I picked up a cheap arbor press for pressing bearings, pressing printed parts, etc.  I made a number of arbor press fittings sized just for skate bearings and bolts.  They have a square hole that gives a perfect friction fit onto the arbor press end.  The printer also provided a nice glue on storage rack for my press ends.  I couldn’t help myself with the two color printing, and made a crush hazard sign.  Watch your fingers.  I should print some pirate flare and turn this thing into an ARRRRRRRRbor press.


Random

Last but not least I found a cool box on thingiverse for holding spare printer nozzles, a handle for turning reciprocating saw blades into short hack saws, and a penny powered fidget spinner.

DSC_0854

I probably forgot something, but that is enough for now.  Since getting the new printer I have printed for 136 hours, and pushed out over 800 meters of filament.  That is kind of impressive.  I can stop any time I want.