New Sanding Monster

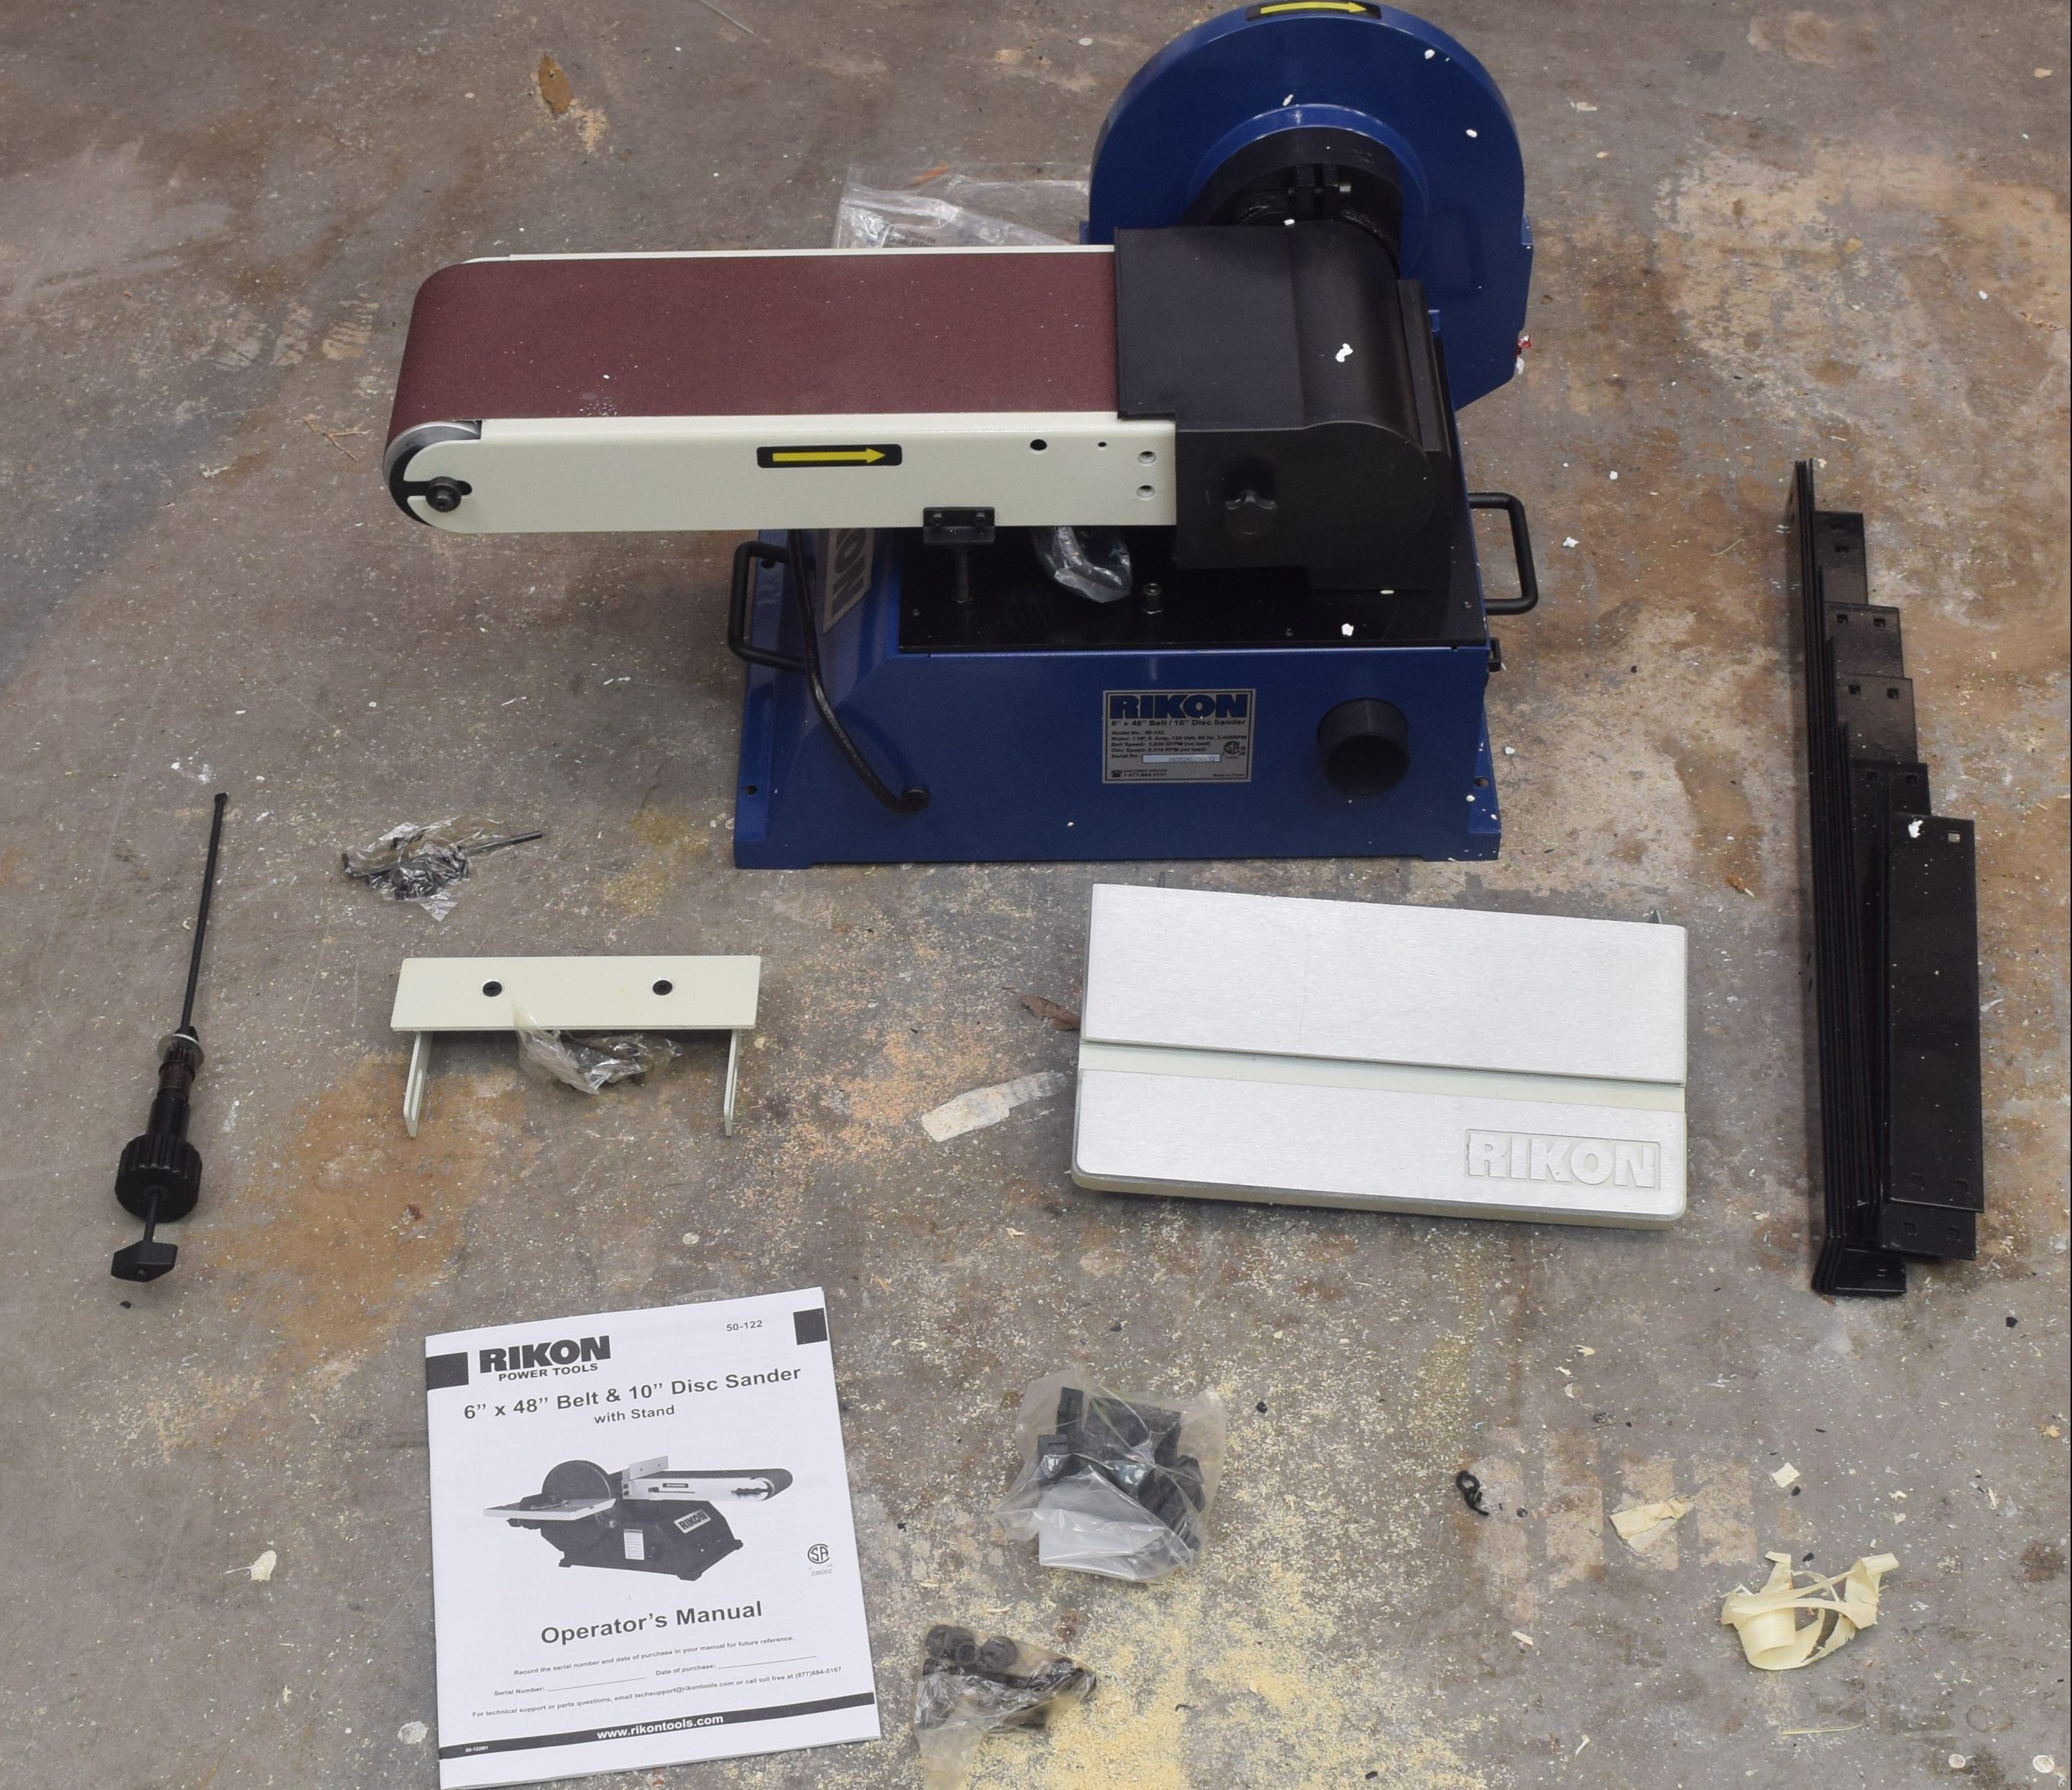
I had an old harbor freight sander with a 4″ belt and a 6″ disk.  It was super useful and a rambling wreck.  Thankfully, Woodcraft was having a bit of a sale on Rikon sanders.  I have been wanting an upgrade for ages.  I was able to call them and get the only unit they had coming in for the sale.  It has been on backorder for months.  SQUEEE!

DSC_0346

Pull everything out and enjoy the smell of new tool.  It smells like productivity.  Also grease.

DSC_0347

I assembled the base and sat the sander on top to attach all the remaining tables and guards.

DSC_0348

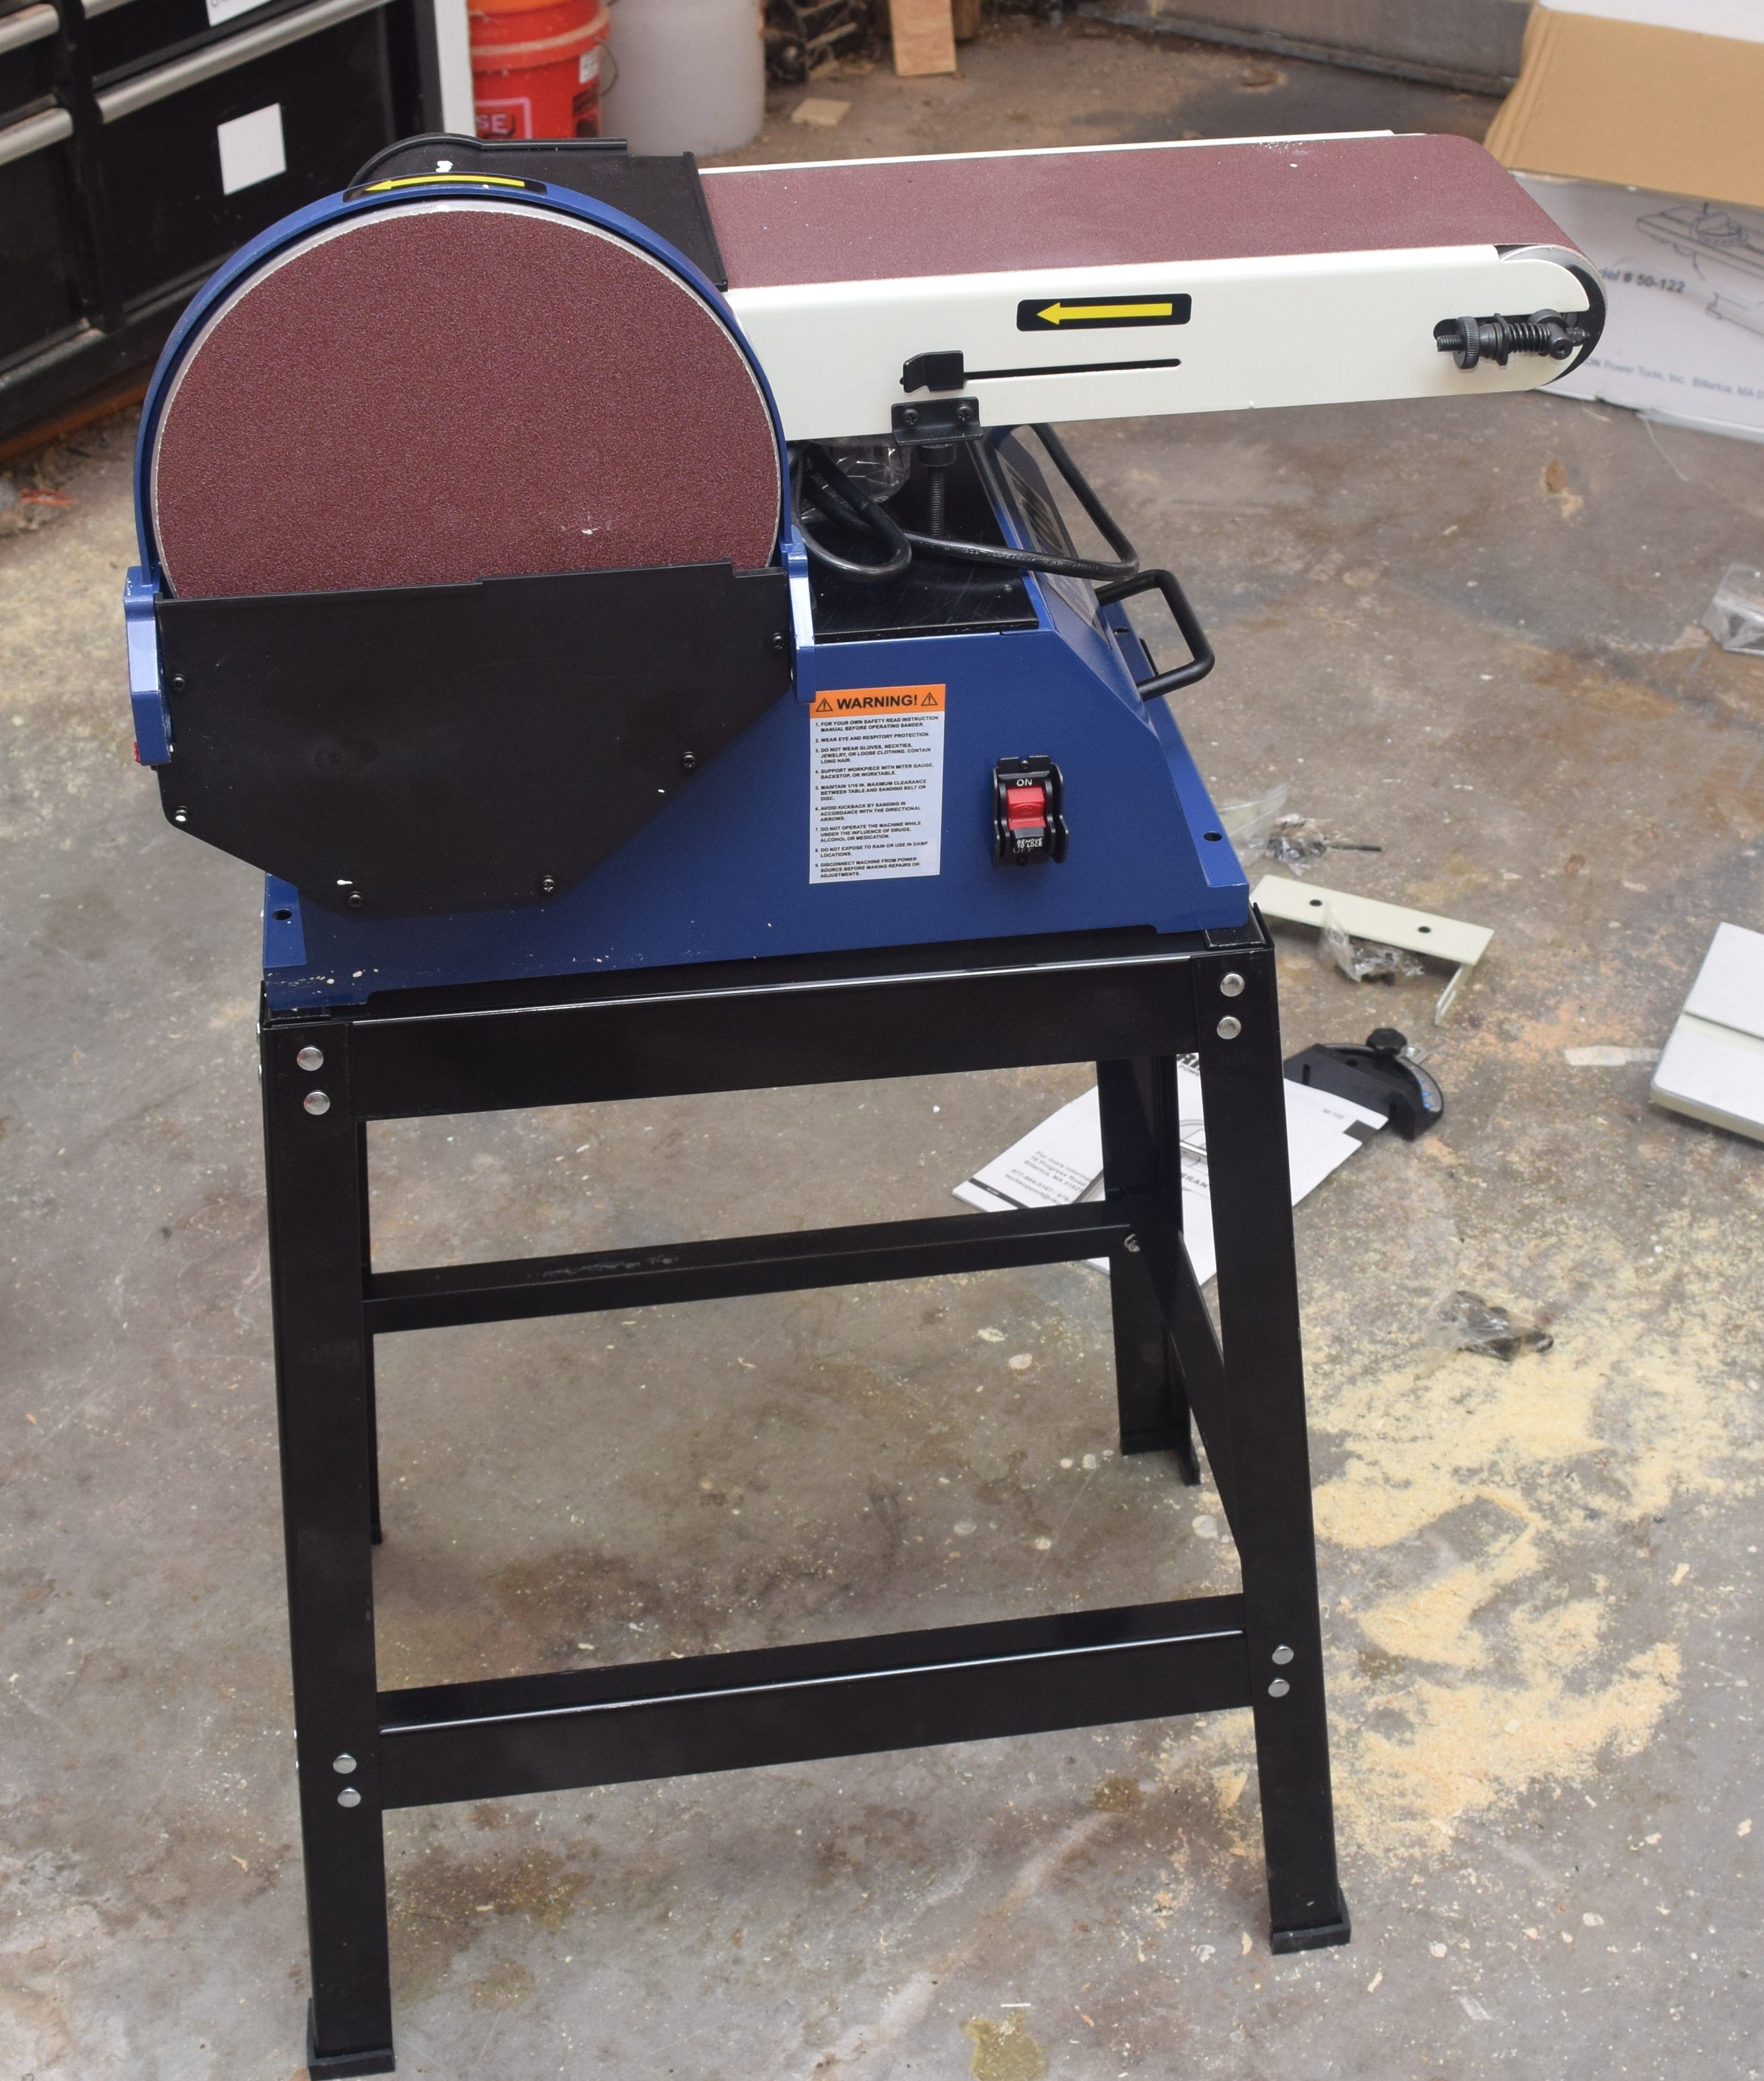
Once everything was in place I moved it over to the side of the shop where my other sanders sit.  The base assembled easily enough, and feels really well built, but has some flaws.   It felt too low even after using some scrap to raise it up a bit.  Another issue, my sanding dust collection system (aka cheap shop vac) doesn’t fit at all in the base.

DSC_0350

I love this tool, but the base is really asking to be tossed in place of a custom built cabinet.  Something that holds the shop vac nicely, and maybe has a little built in storage for good measure.  On the plus side, it is a beast, and it even performs magic tricks.  Expect to see this thing again soon with a new custom cabinet.

Flexing Flashlight Helper

My name is Chase and I have a flashlight problem.  OK, not really, but I love flashlights.  The modern surface mount LEDs can be really efficient and have gorgeous color rendering.  Gone are the days of blueish sterile white light.  I have a small fleet of flashlights that run on 18650 lithium ion batteries.  The lights run a long time, are rechargeable, and have a variety of light settings from stun to kill.

Most of them come in some form of all black tactical form factor.  That is great for clipping to a belt, or holding in the backyard.  What they aren’t always the best for is home projects.  They tail stand ok, but are easy to tip over.  I need something that will give me a stable base and let me point the flashlight where I want.  Enter loc-line.

I started with a finished shot because it is a little convoluted if you aren’t familiar with some of the components.  I had left over loc-line from a CNC mill vacuum project.  This is 3/4″ line, and can be found in kits for reasonable prices from amazon and elsewhere.  I started by prepping a base from some 3/4″ plywood, painting it a zazzy orange, and attaching a screw down base.

The loc-line will snap onto that orange base, and provide flexibility to point the flashlight.  To hold the flashlight I found this snap on 1/2″ PVC fitting.  It came with the cutout, and a threaded female fitting.  Most of my flashlights fit nicely in the opening and their clips help keep everything in place.

DSC_0327

A threaded 1/2″ PVC fitting went on some 1/2″ pipe.  This will all fit inside the open end of the loc-line.  I thought about using epoxy to bond the two together, but I don’t know how well glue sticks to the blue plastic and there is a huge gap to fill.  Small screws in pre-drilled holes did a really good job of fixing both halves together.

Once fixed I spray painted the PVC holder section to match the blue loc-line as much as possible.  In retrospect it would have been easier to paint before I attached.  Live and learn.  Now I can have blinding light pointed in any direction when I am under the sink, changing outlets, or anywhere else.

Paper Organizer with Milk Paint

Summer roars in Central Florida, but I am still in a spring cleaning and organizing mood.  I have kind of a two for one.  My office closet is a mess and needs something to organize printer paper and materials, and I want to try something with milk paint.  I don’t know if shabby chic is still a thing, or if it includes cabinet grade plywood, but here we go.

I cut the height to specifically fit the height of a shelf in my closet, and the width of a sheet of paper plus a bit.  I made as many shelves as I could with the scrap I had left over from previous projects.

A shallow drawer goes in the small bottom cavity.  This will hold ink cartridges and other small printer related items.

DSC_0316

I am 100% new when it comes to milk paint.  I followed the directions and thought I was doing it right.  I could have been making a complete hack of it though.  The final product was really freaking rough, even with some buffing with a maroon finishing pad.

The first coat looked really streaky and terrible, while the second coat evened things out a bit.  It was still lighter than expected and a bit rough.  I hit everything with a coat of BLO to help seal the paint and unpainted sections.  In retrospect a project with lots of internal cubbies and tight spaces was not the best way to try out milk paint for the first time.  I will have to give it another shot later, but am not currently impressed with the results

DSC_0326

The office closet still has a long ways to go, but at least the paper isn’t getting spilled or bent up any more.

Hardware and Sanding Drawers

I built a set of cabinets a little while back to help out the organization of my shop.  I initially built both with pilaster strips and intended them to be mostly shelving.  The one on the left would be best served with a few small drawers for sandpaper related items, but otherwise all shelves.

DSC_0285

It all started innocently.  Just a few shallow drawers for sandpaper and sanding blocks etc.  Then after those I figured I could store all the powered sanding sheets and belts.

Then a few boxes of nails needed a nice cozy home, my jig hardware would fit well there, and then before you know it, the entire cabinet is full of drawers.  It took me a few weeks to slowly build the drawers as I found items to fill them with.  The problem is that when I finally went to add finish to the drawers they were already half full!

For the drawers, I cut 1/2″ plywood for the drawer bottom, and then stacked more 1/2″ ply for the 4 sides of the drawer.  The sides got glue and brad nails through the bottom.  An oversized front was added later.  It could have saved space and probably been strong enough with 1/4″ ply on the bottom, but I had a lot of 1/2″ left over from the cabinet project, so I just kept going with that.  I rip 1×2″ pine in half to make runners.  The runners and sides got a rubdown of paste wax once the finish has had plenty of time to cure.

In retrospect I wish I had planned this all out from the beginning.  The drawer bottoms could have been thinner, and the layout could have been better.  Given that I slowly added drawers as I found a need for them, it is a hodge podge mix of sanding/finishing supplies and fasteners.  Preplanning would have had finishing on top, and hardware on the bottom.

Regardless of the haphazard nature of its creation, the final results look good.  It holds all my sanding supplies and the remainder of my hardware with plenty of room for future expansion.  Bronze card holders let you label everything cleanly.  A must for this many seemingly identical drawers.

Building your own drawers in this fashion can be quick and efficient.  And at 35 dollars a piece, a 1/2″ sheet of cabinet grade plywood can produce probably 8 drawers at this size.

A Finishing Haiku

I was doing some finishing this afternoon and ended up using Boiled Linseed Oil (BLO).  I really admire BLO in the shop.  I use it a lot on shop furniture, jigs and tools.  It is cheap, easy to work with, and dries in a reasonable amount of time.  It adds a lot of color to lighter woods like pine, and I really like how it darkens and changes over time.  The only trick is that wadded up oily rags can self combust.  This is important because I tend to wipe it on with blue shop towels on a lot of my smaller projects.

All of this inspired me get a little poetic.  I sat down and wrote a haiku for my favorite shop finish.

I am B L O
I imbue a golden protection
My rags can combust

Header Explained

I am working on a logo for myself and the website.  I have it partially finished, but have had a bit of writers block.  Or graphic artist block?  I was never very good with art.  I decided to take a tack and work on a header instead.  I was thinking about incorporating this into my logo, but dropped the idea.  It is a way to create a right angle using only a straight edge and a compass.

TriangleHeader

  1. Start with a straight line and pick any point above the line
  2. Use a compass to draw a circle that goes through the line, exact diameter isn’t important
  3. Draw a line from one intersection point of the line/circle through the center of the circle
  4. Come down from that second line hitting the outside of the circle to the other intersection with the original line

BAM!  Very few tools and you have a perfect right triangle.

My work on the logo continues.  I want to take my time and get it right.  That, and I am abysmal at graphics software, so it is going to take me a while to even put what little I can imagine to digital paper.  Stay creative!

Swarm Trap

Getting new bees can be expensive, and cutting them out of the floorboards of someone’s shed is a lot of work.  Why not try to catch a wild swarm in something convenient before they setup shop someplace tricky?  That is the idea behind a swarm trap.  You build a space that is right for a new bee swarm, bait it with essential oils, and hope they show up.

The general consensus is that something like a 5 frame deep nuc is what they naturally look for in size.  I only do mediums now a days, but hopefully they aren’t that picky.  While we were building the screech owl boxes my bee buddy and I put together a set of swarm traps to try and catch some bees!

I started with the dimensions for a langstroth medium and cut the width down so that 5 frames would fit comfortably.  I added a bit of height to allow space above and below the frames that would normally be there in a hive stack-up.  Cleats on the side help with picking it up.

Five frames with foundation went into each box and they got their lids screwed on.  The lid should keep it dry inside, but can easily be removed with a few screws once occupied.  I wanted the trap up in the oak tree in my backyard.  I added a tall piece of pine with screw holes so I could use long exterior screws for attachment.

I got a bunch of medium boxes put together in the mean time and went ahead with my lovely yellow paint for all of them.

DSC_0260

DSC_0261

I hope the bees aren’t put off by the wild yellow.  Who knows, maybe it will attract them to move in.

DSC_0268

The trap has been up in my oak tree for about a month now, and so far no bees.  I have heard that lemongrass oil is supposed to attract them.  I doubt it lasts more than a week or two, so I should probably refresh that.  Oh well, now we wait.

DSC_0298


Water Meter Hive Rescue

Our local bee group got another contact about a person with bees living in their water meter housing.  In Florida they are a plastic box set into the ground with a removable lid for servicing the meter and valves.  This one had apparently been occupied for a while.

wp-1467981535714.jpg

We were fighting dwindling daylight and some tricky comb.  It was quite tall and oddly shaped because of the shape of the water meter box and the piping inside.  We didn’t have time to cut the comb to size and fit it inside the frames so we just stuck it in between open frames.

wp-1467981535713.jpg

Everything fit inside a single medium super nicely, minus the bits of random comb on top.  I need to come up with a technique for quickly cutting and framing the comb.  Ideas are forming and updates should be coming soon.  This one went to my bee buddy that still doesn’t have a running hive.  So far they are making themselves at home.

Screech Owl Box

I got my latest hive from a co-worker by taking the owl box from his yard that was full of bees.  I got to learning about screech owls and even started hearing and seeing them in my neighborhood once I knew what to look and listen for.  I wanted to host some owls of my own, and I figured my co-worker at least deserved a replacement box.

I take no credit for the plans used to make this owl box.  The Treasure Coast Wildlife Center provides free plans to create owl nests from a single 1×10″ piece of lumber.  See those plans here.  They are great plans, easy to follow, and even include a little picture of a tiny screech owl to help motivate you!

My bee buddy wanted a box too, so we got 3 eight foot 1×10″s and went to work chopping up the needed lengths.  One of the pieces was really badly bowed.  I really dropped the ball when picking lumber.  I always check for straightness, but sometimes neglect cupping.DSC_0239

Everything went together with simple exterior screws, and some of the dimensions are flexible enough to make assembly a breeze.  Start with the back, add sides, then move on to bottom, front and top.  The directions should make it pretty clear.

DSC_0240

I used pine, but you might want to go with cedar.  They recommend against any kind of sealing or paint.  I guess the owls don’t like it.  Time will tell how long untreated pine like this lasts.

DSC_0243

The two of us were able to knock out three owl boxes in about 2 hours once we got into the swing of it.  I kept the bowed one, my bee buddy got one, and the co-worker got the last.  With any luck he will catch bees in it again and I can have it back!


I put the box up a month or so ago.  I am a bit late for mating season, but I know there are screech owls in the area.  So far no signs of them having found it, but it can take years for them to decide to use the box.  Now we wait!

DSC_0299