Improved Mite Measures

After my disastrous attempt at trying to track the mite population in my hive I took a closer look at what I was trying to do.  The bottom board is slotted, but does not have any method of sliding in a sheet or board that will keep the bees out.  I have to build some kind of lid on the trap so that the bees can’t get in.

Online I see a reference to number 8 hardware cloth pretty regularly.  It is a wire mesh that has 8 wires per inch, or ~1/8″ gaps.  The bees can get through 1/4″ mesh.  My hardware stores only sold the 1/4″ in hardware cloth, so I had to fall back to aluminum screening.  It feels sturdy and will not get chewed up by insects.

I went with a similar cheap bottom board as before with a single sticky paper sheet tacked down.  The lid is a simple 1×2 perimeter with the aluminum screening stapled on top.  Nothing pretty, but it fits under the hive and keeps the bees out and the mites in.

I tested it out for a 5 day period under the hive, checking occasionally to make sure no bees were being harmed.  It worked well.  In 5 days of usage I counted 5 mites on the sheet.  My current rate of 1 mite per day will help me keep tabs on what the mite population is doing.  Up down or steady, I should have a decent finger in the wind.

wpid-20150531_100035.jpgI wouldn’t suggest placing this trap out much longer than a week.  A lot of little bugs got in there, and the hive is always dropping debris.  As it was, it took a magnifying glass with light to really make sure I could tell the difference between a dark spec of debris and a mite.

Lastly as a bonus of sorts, when I pulled the thing out it was covered in about a dozen small hive beetles.  Horrible as it is to see them, I was able to carry them away from the hive and smash every one.  I wonder if they are attracted to the pollen and other junk left behind by the bees.  Could this make a good out-of-hive trap for SHB?  Who knows, but I will be sure to observe the hive beetles every time I use this trap.

Rotisserie Grill Upgrade

I have thought about making a rotisserie upgrade for my grill for a while.  It turns out they can be had for about 80 bucks on amazon.  Thus, the webber has a shiny new spit!

DSC_0033I couldn’t find tons of info online on how to best cook with this thing so trial and error it is!  I started with two ~5.5lb birds.  Both marinated for a day and a half, one in mojo, and the other in my first batch of home-made lizano sauce.

DSC_0034

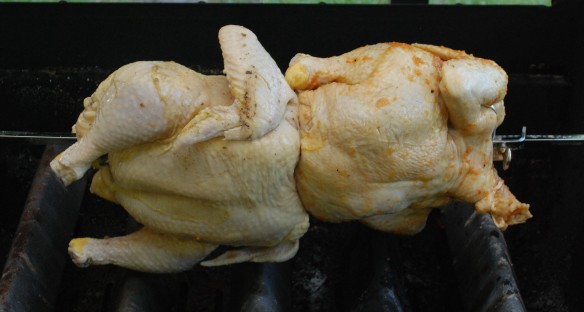
I started the two on medium heat, closed the lid and came back 20 minutes later to check.  FIRE!!!  Yep, medium was waaaay too hot.  Lots of drippings and lots of flare ups.  I pulled it back down to low, and carried on.  The results look terrible, but actually tasted quite good.  The fire must not have been going long, and only charred the skin.

DSC_0035

If at first you char your chicken, try try again.  I picked up another set of birds and set about doing a quick marinade.  One was a short brine session with sprigs of fresh rosemary, and the other marinated with official lizano sauce.  Instead of medium I stuck with the lowest setting throughout, and placed a cookie sheet under them to help deflect direct heat and keep drippings from flaring up.

DSC_0041

Much better.  I was so excited to dig in and eat, that after they rested I didn’t get a picture.  The taste was awesome, the skin delightful, and the breast meat was tender and juicy.  Big Success!  The only downside is that my cookie sheet was ruined.  Next time foil sheets.

A Costa Rican Miracle Sauce

I have found a miraculous sauce from the land of Costa Rica.  Lizano sauce (salsa) is a brown sauce that is apparently quite ubiquitous in the country.  There are a lot of different variations that I have tried, and I am sure in Costa Rica they have a lot of regional differences.  A local burrito shop has their own version that is a medium brown, and tastes amazing.  I found out half moon bay trading sells a “Caribbean Condiment” which is excellent and close to the burrito shop version.  I haven’t found a local source, so it is time to craft my own.

The sauce is rather strange.  It has vinegar and spices obviously, but also vegetables.  Not a sauced tomato mind you, but hearty root vegetables.  I thought they were pickled, but I couldn’t find evidence of that.  In first searching I came up with a recipe that is repeated a lot.  I don’t know who to credit, and spoilers, it isn’t quite right.  I will say that it has chilis, water, a bit of onion and carrot, 2T sugar, 2T lemon juice, 1T vinegar, 1T cumin, 2t salt, 2t molasses.

The results are pretty nice, but the first thing that strikes me is that it is too thin and has way too much cumin.  I love cumin, but this sauce shouldn’t have much, it is a really dominant flavor.  There are various ways to thicken sauce, so I will worry about that part later.  Other than the chilis getting a roast and simmer, the recipe didn’t call for anything else to be cooked.

I bought some “Official” Lizano sauce from an internet supplier for comparison.  It is pretty good, but isn’t as good as others I have tasted.  Looking below, the color is much darker than mine.  Digging deeper on the internet I found an alternate recipe that has more vegetables and less cumin.  There will be a part 2 in the near future!  I tried to marinate a chicken in the sauce and grill it.  Due to an unfortunate flare up the bird was burned beyond recognition.  It still tasted pretty good though.

Sticky Paper Mite Control

I have read that sticky paper is a good method of tracking the mite population in your bee hive.  I bought a vented bottom board for partially this reason.  Great, lets go buy some cheap insect paper, tack it down to a board and leave it under the hive for a few days.

wpid-20150520_172444.jpg

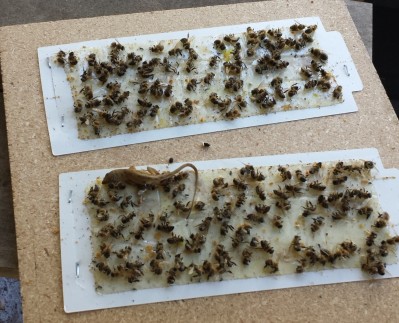
Well crap.  Bees are either attracted to this stuff, or just very exploratory.  It might have a sweet smell to attract things like fruit flies.  I got a lizard too, which is kind of impressive.  Poor girls, I feel horrible.  I need to either build a cage over it that they can’t get to or figure out how to get it under the hive in such a way that they can’t get in.  I will have to inspect my bottom board closely next time I am out.

Might as well look over it carefully for mites.  Do I have any amongst all these poor bees?  Yep.  Taking a picture through a magnifying glass is darn near impossible, but those two ovaly things are mites.  The good news is that in 2 days I only count a hand full of mites on the sticky paper.  So much for the sign keeping them out.

wpid-20150522_170248.jpg

Chalk and Magnet Board

Chalk boards are big now.  Not sure why, I can’t stand chalk.  Chalk markers exist though, and those are pretty cool with me!  Our fridge is stainless and doesnt allow for the typical magnet and picture collection that I am used to.  I combined the new trend and my old fridge problem to make a magnetic chalk board.

I cut down a sheet of metal to 18in x 24in.  I picked up a spray can of chalkboard paint from valspar to give it the right surface.  The metal got a light sanding to rough things up, then a wipe down with alcohol to clean everything up.  1 coat of primer and a few coats of chalkboard paint and it looks like a disaster.

DSC_0007The spray chalkboard when on really patchy and irregular.  I tried sanding it a bit between coats to help even things out, but it isn’t going to happen.  I flipped the piece over, sanded cleaned, primed, and then switched to rolling on chalkboard paint from a can.

DSC_0006This looks much better, but it took 3 coats.  The first didnt appear to like the primer coat.  It had a crazed look to it after drying.  I just kept putting on coats until it had consistent coverage.  I took some decent looking walnut and made a frame.  No pictures of the progress, but it is a basic miter frame.  The metal plate fits in an inside groove.  After gluing it all up I used a lot of epoxy on the backside to keep the metal from bowing or rattling around when writing on it.  Tung oil is the finish.

The can of paint said to coat with chalk, then wipe off as a finishing move.  Once cleaned up I threw up some pictures and magnets and it looked perfect!