Lime and Orange-cello

My limoncello has been quite good.  It isn’t something you gulp or drink large quantities of, but a few ounces in the late evening or on a hot day is quite refreshing.  Though less popular it appears you can do the same thing with oranges and limes, so lets do that!

I didn’t quite use all of the oranges, but the limes got either peeled or zested and tossed into a quart jar.  I juiced the left over fruit and had some really awesome limey orange juice.

DSC_0064
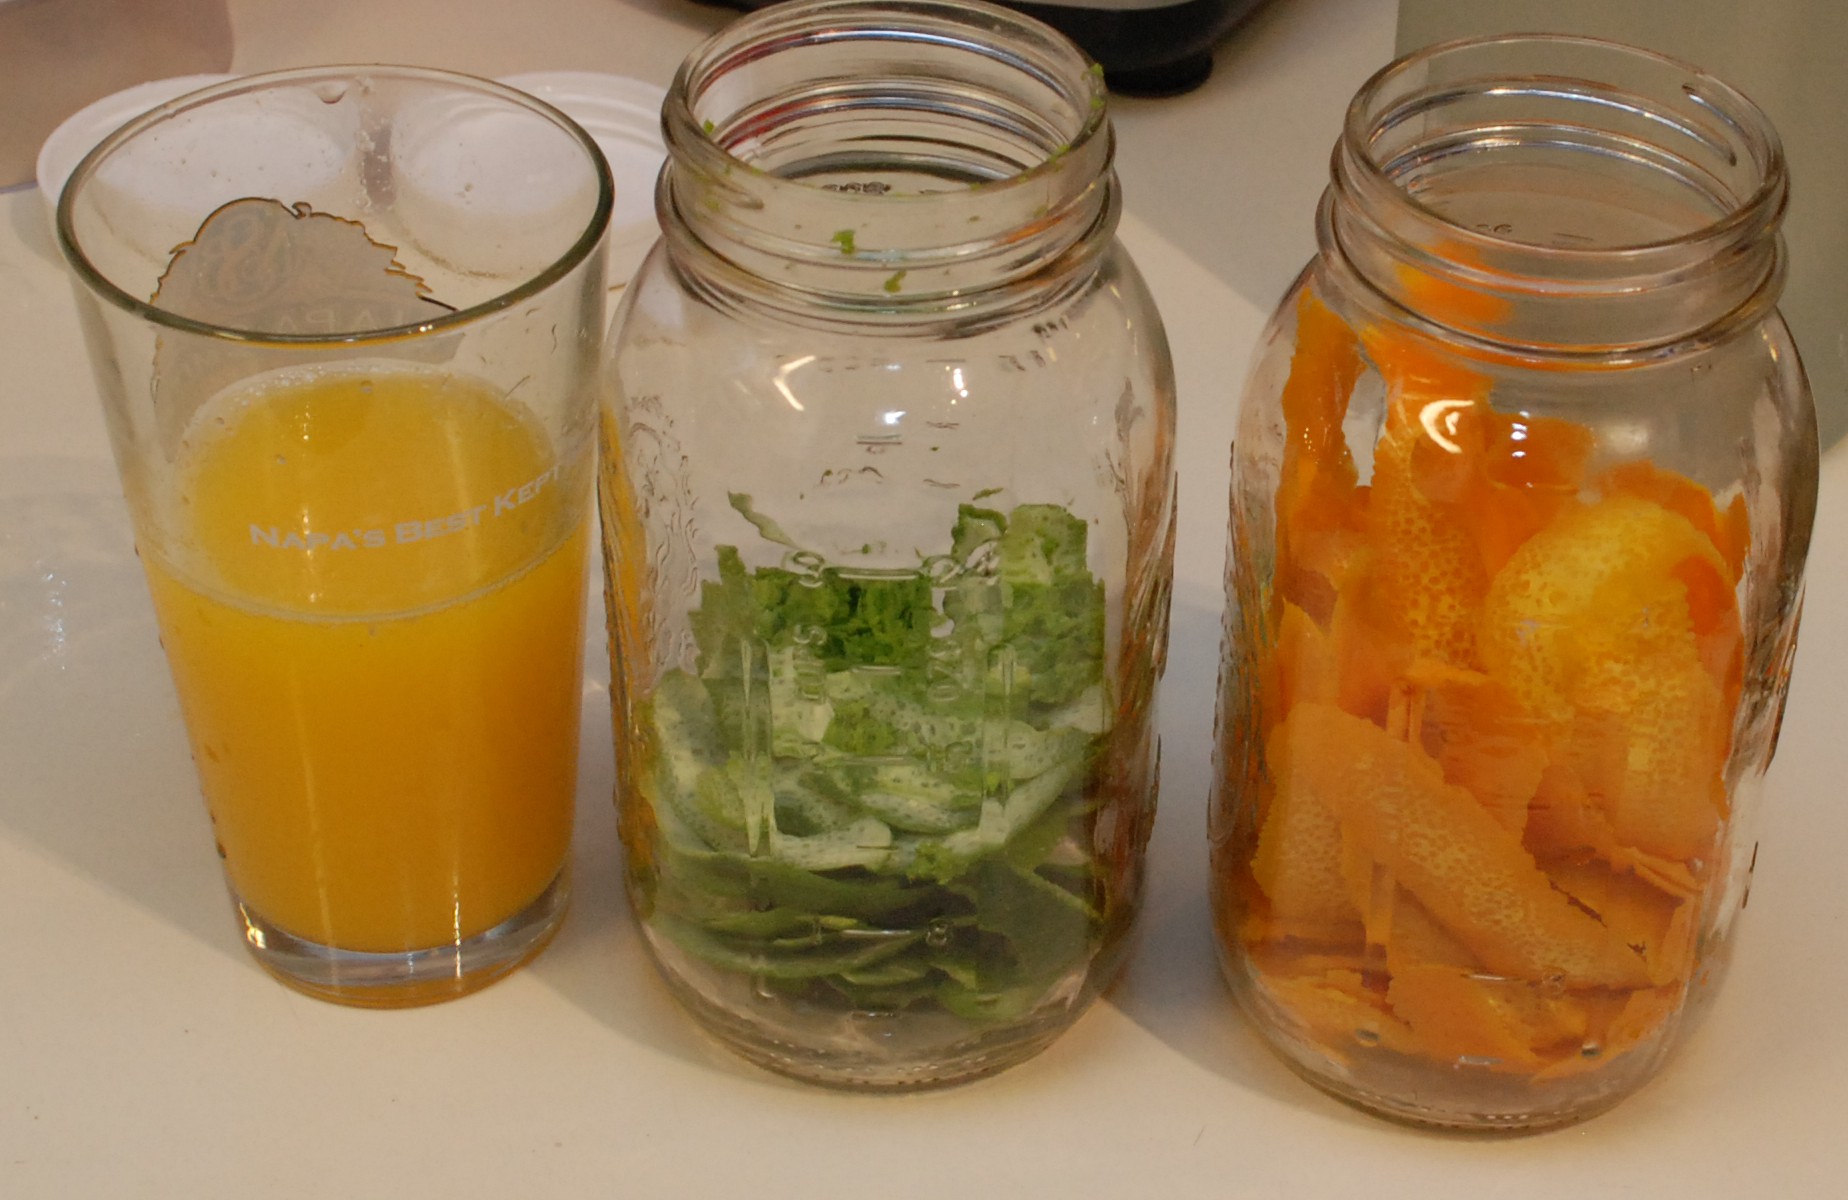
Next, I tossed in some multi-distilled vodka and left them to sit for a week.  It worked well last time, so why mess with success?

Both batches got filtered through a coffee filter into a 1L glass bottle with a sealable top.  Here is a picture of the two liquids with a shot of my limoncello between them.  Orange is on the left and lime is on the right.

DSC_0012

I am kind of amazed that there isn’t a bigger difference.  They seemed so different in the jar, but that must have been mostly the rind.  I mixed up a batch of 2:1 simple syrup and filled both bottles up most of the way.  My goal was again to make it drinkable with a hint of sweetness, but not super syrupy.  Chilling and an upcoming dinner party will tell how I have done.

DSC_0013

8in Cedar Planter Boxes

We have been bringing home a ton of plants this spring.  Most of them are even still alive too!  Having the flower bed areas covered in rocks lets us do all sorts of potted plants.  Pots get expensive and often aren’t big enough, so I decided to make some customized cedar planters.  First grab a pile of cedar and start cutting.

DSC_0054

I cut 8in boards to 24in length and made some 8in end caps.  It turns out a cedar 2×4 is actually 2 inches by 4 inches.  When you rip them in half they are still a decent chunk of wood.  I took the fronts of each box and milled an “H” into it.

DSC_0055

A touch of spray paint highlighted the letters nicely.  I used a hand plane to remove the excess spray.  The box construction is pretty simple.  I screwed the long segments together and tied the sides and ends together through the 2×2 chunks.

DSC_0056

With cedar wood, epoxy covered screws and a coating of thompson’s water seal, they should last a while.  I moved our two basil plants into one box.  The one on the left was in a plastic pot that never drained well.

DSC_0001

For the other boxes I had help picking out the plants.  Looking around the plant section at lowes I found a pile of bees on the mexican heather.  They seemed to whisper, “pick this one!”

wpid-20150419_112856.jpg So mexican heather for us!

DSC_0005Lastly, as I was standing in the checkout line a monarch butterfly was making a visit to a pile of scarlet milkweed near by.  That came home with me too.  By the time I got around to planting it was looking a little sad.  Hopefully regular watering will perk it back up.

DSC_0002

The 8″ boxes are a decent medium size.  They totaled about 20 bucks a piece for the materials.  Next I will probably make a set with doubled or tripled up 6″ boards.

“No Mites” Stencil

I have been trying to make spray paint stencils with my swivel cutter for a while.  It isn’t going well.  Not sure if there are tricks to clean cutting, or if my setup needs improvement.  Probably both.  Instead I decided to go a different direction and use hardboard (sometimes called masonite) to mill spray stencils instead.  It is cheap, mills well, except for a bit of fuzz at the edges, and holds flat against the spray surface.

Our bees are doing well and they look really healthy.  They are kicking so much butt, in fact, that the hive deserves some decorations.  How about a nice “NO MITES!” sign.  For anyone not familiar with mites and bees, look up varroa mites if you dare.  They are horrible creatures that parasite honey bees.

DSC_0069I ran into a few small stencil problems.  To do the NO cross out, I had to break up the spray job.  You mill out the areas for the paint to go through, and there would be two floating half circles if I did that.  Instead I milled most of the shape, but left some edging to hold it all together.

DSC_0067I thought this was a great solution!  Spray the mite down, spray part of the circle, then just rotate, line everything up, and spray again.  Apparently the cross portion isn’t symmetric.  I must have eye balled it in the software.  When you rotate, not everything lined up perfectly, sooooo I kind of fudged it.

DSC_0070

When you stand back a bit, everything looks pretty good, but I need to work more on my spray technique.  Lets just say I didn’t exactly do a lot of vandalism in my youth.  Does that banksy guy offer classes?  At least the mite turned out reasonably well.

DSC_0066


Half Lap Canning Crates

The pile of half-pint jars is starting to pile up in our home, so it is time for half-pint crates.  A while back I built some pint crates with dovetails.  They were good looking, but rather time consuming to build.  This time around I decided to break out my old No 78 rabbet plane and do all half laps.  First, the wood!

DSC_0028

I used 1/4″ plywood for the bottom, and was able to hide that plywood by using the right sized rabbet on the bottom.

DSC_0030

Rabbets with the grain are an absolute joy.  Simply clamp the wood in a front vice, start at the far end, and shave away.  The half laps were another story all together.  Even with a spur and a relatively sharp blade, there was a lot of chatter, tear out and fence wander.

DSC_0047The fences of my old plane did not want to stay put.  I tightened everything as much as I dared, but feared damaging old cast iron threads.  The result is that a lot of the half laps are gaped.  It might be worth carefully making a master part, in the future, so I can go back and reset my fences as needed.  Until then, here are some bottomless boxes!

DSC_0048I went nuts recently and bought a pile of old style cut nails from lee valley.  I put these crates together with “fine finish” cut nails.  They performed well and did not cause splitting even though they were close to the edges.

After a good coat of boiled linseed oil I cut some vinyl blackboard stickers out and put them on the fronts.  It makes finding your desired jam easier.  They aren’t as nice looking as the dovetailed crates, but they are very functional.  Besides, crates aren’t supposed to be super fancy!

These canning crates were brought to you by my Stanley No. 78!  80ish years old and still kicking some butt!

DSC_0049

Raised Garden

Our collection of pepper and tomato plants were starting to have a problem.  The tabasco plant was rapidly declining, and some of the other peppers had a burnt look to them.  After asking around we decided to move them from the front to the back.  Our front receives full sun from mid day on.  The back is filtered by some oak trees early on, full in the mid day, then house sheltered in the afternoon.  The results have been better, the plants look less withered when I go to water every afternoon.

DSC_0050

Honestly our little back garden area doesn’t look great.  We have made a few attempts at growing thins in there, but none have succeeded.  Many of the better gardeners in the area seem to forgo in ground planting for raised beds.  I guess our soil sucks for most things.  Lets try a raised bed.  The brick edgers came out and weed screen went down.  It worked out, we put screen around and behind the AC unit, and poured lava rock on it.  It needs more rock, but this should keep the grass from going too crazy back there.

DSC_0051

Lowe’s had garden soil on sale for 2 bucks a cubic foot, and HD had the cedar raised bed thing for 10 bucks off!  I put in two bags of compost for good measure along with the soil.  After some jockeying we got all our various tomatoes, peppers, and a few new vegetables in.  Any more plants and we will need to build another one of these units.

I am leaving the screen too wide until everything settles.  In retrospect I should have run it up the insides of the cedar.  Oh well, that is what next time is for!  Until then hopefully our plants thrive and we get more of those awesome little tomatoes the one bush was giving us.


Added a Super

The hive is going like gang busters!  We had a weight increase of 4 pounds last week, and 5 pounds this week.  They are starting to pack away a lot of capped honey in the deep, and they are filling the outside two frames.  Time for a super!!!!  Look at that gorgeous growing hive.

wpid-20150411_132305.jpg

In bad news I got stung a few times.  I didn’t have the smoker lit well at all, and managed to fumble getting the first frame out.  Oops!  From now on I need to make sure I always have the smoker going well before I crack open a hive.

For all the Florida heat and trials by sting I am still glad to have bees and look forward to seeing if they have done anything with the new super next week.  I updated the bee journal to include the new super weight as well.  I measured it empty so any weight reported is purely honey/bees/wax.  The empty super weighs 11Lb 12oz.


Illuminated Wall

The LED strip lights strike again!  The reason I originally bought strip lighting and used them on my mill lighting project was because I wanted to add lighting to a partial wall in my great room.

I started by running solid core wire down the inside of the wall, and tying into an existing switch.  The wire runs up and terminates into a single female receptacle (indicated in red in the picture below).  The 12V supply lives up there and will need a small cover at some point.  You can just see it peeking out on the left hand side.

DSC_0045

With the wiring installed I just plugged in the 12V supply and started running strips down the length of the wall.  It went quickly, and aside from a pile of dust was easy.  The results are pretty good.

The picture was taken around dusk with very similar camera settings.  I adjusted exposure a little to help match what you actually see.  The after still looks a little bright.  It provides a nice mood lighting around the great room.  The only issue I have is that the CFLs in the living room are a lot warmer than the light.  I will probably slowly change out the other bulbs to match.

I love soft indirect lighting in my living spaces!

CNC Mill Ring Light

There is a warm and fuzzy feeling that accompanies using my mill to make something for my mill.  Not quite a self replicating machine, but it helps make itself better.  I finally figured a ring light design I like.

I have made a number of different test parts and played with a few different LEDs before I settled on some LED dome light replacements.  They are from amazon.  They have 4 surface mount LEDs with a resistor built in, and are supplied with 12V.  The metal cones are meant to go into a car’s dome light receptacle.  I removed the cones with a soldering iron to leave a flat solder pads.

DSC_0589I milled a few test pieces and settled on a design that was compact but allowed enough room for the lights.  The mill did a fantastic job on 1/2″ plywood.  Once cut out I popped a quick hole in each pocket for the wires and glued the lights down.  A quick spritz of yellow paint will help it blend in with my dewalt spindle.

It goes right above the bit area, and two screws coming in from either end help hold it in place.  I gathered the red and black wires to a single connector each.  They connect to a set of wires that run up to the 12V that powers the under-mill lighting I installed a while back.

DSC_0026

I could fit more lights in if I wanted, but the 4 “bulbs” look great.  Very bright and easy to see what is going on.  The camera made it look a little blinding, but it is not.

DSC_0022

DSC_0021

I ❤ my mill!

Bee Hive Entrance Cam

I took some time out to stick my GoPro at the entrance of our hive.  There was a lot of activity, and if you look carefully you can see some coming in with pollen on their back legs.  Almost therapeutic to see and here them coming and going like that.

Jellied Mistakes Were Made

My parents were in town last weekend and I thought a fun activity to do with mom would be making jelly.  Strawberries are still reasonably cheap and after my massive jam success what could go wrong?

I processed a lot of strawberries just like I did in the previous jam job.  For jelly, you take cut up fruit and cook it down a little to help get the juice flowing.  After about 5 minutes of boiling the strawberry slurry was looking just right.

DSC_0001

The next step is to strain the cooked mush through a jelly strainer, then proceed with the strained product just like you would for a jam.  This is were the disaster came in.  I neglected to tie the strainer.  A healthy pouring of strawberry slurry turned into a huge mess. The bag slipped through its retaining ring and fell into the bowl.  Hot strawberry sludge went everywhere including on me.  I got a few burns and my kitchen looks like a murder scene.

DSC_0003 DSC_0002

Luckily I wasn’t hurt badly, and everyone helped clean up.  We poured everything back in the pot, tied the bag securely and restarted the straining process.  It went reasonably well after that.  For an afternoon of work I got 5 jars of gorgeous ruby strawberry jelly, some burns, and a cleaned kitchen.  Interesting experience, but jam is less work and has higher yields.  Still though, look at this jelly!

DSC_0005