Living Room Renovation

Another holiday break has rolled around which means it is time for me to get off of work and kick my own butt with some serious house renovations!  This year, the living room.  The before pictures make it look a little more like a dark dungeon than it really was, but not much more.  Dark paint, dark flooring and light bulbs that were a little under powered.

The remainder of the vinyl flooring came up, and the paint came down.  Originally in the house a roll on orange peel texture was added.  I don’t know if it reached the end of its life, or wasn’t mixed well or what.  It was turning to powder, and the paint would peel off in sheets if you looked at it wrong.  I peeled it all off and sanded the texture right back down to the drywall.

Lots of hole patching, and a coat of primer later and the walls are starting to look a lot nicer.  The previous owner had used a considerable number of drywall anchors for me to fill!  I was able to finish a majority of the tile in a day which meant I couldn’t do anything else… Time to go see Star Wars!

20151221_182323

With the tile able to be walked on I finished the painting, worked on trim, and eventually did the grout.  Grout and baseboards really make the room feel like something.

There always ends up being a day of painting trim, touching up this, reinstalling covers on that and such.  Worth all the little efforts.

Finally after a little over a week of solid work we were able to push the big soft couches back into our little space.  I missed our comfortable evening hangout spot more than I thought I would.

DSC_0058

DSC_0057

This room feels a thousand times brighter.  The light tile, bright walls and new phillips daylight LED bulbs make it feel like a million bucks.  Not bad considering the material cost was only about 700 bucks.  Now, by contrast, our kitchen looks even worse.  Oh well, next year’s project!

Cheese Boards (Part 1)

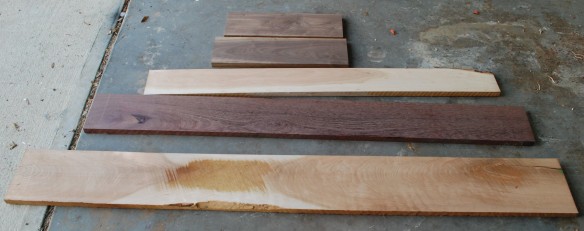
In the beginning of December I took a look at my wood pile and decided to kill two birds with one stone.  First, get rid of a lot of one off boards I have lying around, and two, make a ton of gifts.  I made a big pile of handles for pizza cutters, ice cream scoops and the like on my lathe.  Every once and a while I want a quick gift, and bam, there it is.  Lets start with my smattering of wood.

DSC_0481

DSC_0482

I later added my roasted hardwood to the pile.  Everything got planed down to an even thickness.  I started to take a picture of each board glueup, but I started going through them so quickly I forgot the pictures.  The plan was to run them through the thickness planer, so I didn’t need the top or bottom to be perfectly aligned.  This let me just use side clamps and ignore cawls.  It was quick and easy, and I had enough clamps to do 4 or 5 sets at a time.

I glued together everything I was going to make in three big waves.  Many of them I made long enough to cut into 2 or 3 cutting boards.  Much more efficient than doing each one individually.

After glue-up

After glue-up

Cleaned up from the power planer

Cleaned up from the power planer

I took about half the pile and moved forward.  I was running out of time before a big house renovation and wanted some to get finished before Christmas.  Everything got squared up on the table saw, and a nice round-over on the router table.

After a minimal sanding on the faces and round overs, they were ready to get oiled.  I like to use howard’s butcher block conditioner on these long grain cutting boards.  It has a little wax in it which works better for long grain in my opinion.  I love how the colors come out when you just start to hit them with oil.  Below is a shot of each one half oiled so you can see the before and after color.

DSC_0008

DSC_0009

I have already given most of these away, and will have to get started on the next batch soon.  I also plan on making a nice video to discuss the care and feeding of these cutting boards for anyone that has one.

Hardwood Roasting On An Open Oven

Tis the season for merriment, delight, and cooking wood.  No, I haven’t been hitting the egg nog too hard, but I did read a great article in popular woodworking recently.  It turns out you can roast some hardwoods in your oven and get a lot of great effects out of them.  I started with cherry (left) and maple (right).

DSC_0508

It turns out they couldn’t all fit in my oven.  I might have to get a rib rack or something to stand them all up next time.

DSC_0510

In they went for 4 hours at 360F.  There was an odd smell, and a mild smoke that was given off in the process.  Luckily the weather was good enough to have the doors open.  I wouldn’t attempt this if you don’t have some means of ventilation.

The results were quite striking.  Everything got darker, but it didn’t do so evenly.  Some boards have a really neat gradient across them.  The insides are a bit lighter than the surface, but not a lot.  The cherry is my favorite!

DSC_0512

Maple

DSC_0513

Cherry

One issue with using roasting wood is warpage.  I left them to re-stabilize in the shop for a few weeks before working with them.  Regardless, they were warped and twisted, and had a lot of internal stresses on the table saw.  Be really careful when cutting and make sure the splitter is properly in place.

I should be posting a project soon that used up some of these beauties.

PE Desk Name Plaque

My most wonderful wife has really knocked one out of the park by passing her Professional Engineering exam.  It takes years of experience, many referrals, and an all day examination.  Her year of studying really paid off.  Once you are a “Professional Engineer” you can legally put PE after your name, kind of like being a doctor.

I thought she could use a new name plaque for work that showed off her accomplishment.  The day she left for the test I found a nice looking piece of padauk, her favorite wood, and got started.

DSC_0453

My first attempt was to mill in the letters and infill with black color.  My black infill resin has gone bad.  It came out kind of chunky and left a ton of voids in the infill.

DSC_0454

After that failure I planed off the messed up inlay, and started over.  Instead I tried painting the top surface black, then did a relief cut around the letters.  It was going ok, but the edges were left with a lot of fuzz and fraying.  Sanding the edges was ruining the black surface, so I planed all the paint off.  It looks good as all one color, so lets go with it!  Tons of sanding the mill marks off later, and I had this.

DSC_0003

It took a few weeks of working on this while she was out of the house, but luckily for me it takes the PE board months to get back about the results.  Finally this past week she got the got the good news and I was able to deliver her new desk trophy.  Congrats dear!

It’s Beginning To Look a Lot Like…

CHRISTMAS SHOES!

The last two years I have used a pair of red and green converse to give myself some festive footwear.  I took it to a whole new level with some zazzy laces.  DSC_0593

Barely a craft project, but I am so happy with these that I had to share.  I have an alternate left/right pair so I can switch off every day.  Next year?  Bells!

Bunny In The Hay Feeder

I didn’t bother with a lid for my hay feeder because I figured the bunnies couldn’t get inside, and there was no other reason to cover it.  Well, as it turns out, they can get in.

DSC_0592

That is a baaaaaad bunny.  I don’t know why sitting in the litter box and nomming the hay from the hole wasn’t good enough.  Maybe sitting in your food while eating offers some special pleasure.

New Gutter

My house has a small front porch who’s roof is an extension from the rest of the house.  During a good rain storm, which we get a lot of around here, it can produce quite a waterfall when coming into the house.  I had a free Sunday, so why not try to fix it?

DSC_0575

It turns out gutter materials are pretty cheap.  I think this cost me under 50 dollars to do total, but I didn’t save the receipts, so that is a bit of a guess.  There are a variety of anchor systems for these gutters.  I went with these right angle brackets.  They will hold the gutter at an angle, which isn’t ideal, but they are easy to install one a time.  These made doing the project solo much easier.  All the other attachment methods require the entire gutter be in place as you attach with a single screw into the joist.

DSC_0580

I set the right clip as high as it would go while still allowing clearance under the drip flashing, then used a level to give each successive clip a little down bubble.  It is hard to say exactly how much drop I gave it as the fascia isn’t level.  Either way it has a gentle slope towards the drain.  Now to rivet together the drain and gutter section.

Because no good project goes without a disaster, my old rivet gun had an accident.  The back end had loosened up and popped off right in the middle of my first rivet.  I recovered the internal parts and the spring.  After 20 minutes I gave up on the back end nut.

DSC_0581

So, another unexpected trip to lowes later and I had it all riveted and glued together.  I was able to snake the drain section along the side of the support column instead of the front so it is less noticeable.

DSC_0582

DSC_0583

As usual it took more time and trips to the hardware store than I anticipated, but overall it was pretty easy and cheap.  Should have done it years ago!


Now for the real reason to add gutters it makes for a highly convenient christmas light hanging surface.

DSC_0585