TPU Printing Tips

Printing flexible filaments holds a mixture of horror and delight. On one hand making something squishy and flexible allows for custom grips, cushions, dampers, and all sorts of fun wiggly toys. On the other hand it can print like a nightmare. I had enough bad experiences early on I nearly completely swore off printing flexibles. Eventually I had someone requesting some flexy parts, so I got back into it.

Most printable flexible filaments are either TPE (Thermo Plastic Elastomer), or TPU (Thermo Plastic Urethane). TPEs tend to be a little softer, but you can print a structure with more infill to make it stiffer, or less to make it more complaint.

Problem 1: Bed Removal

Normally when 3D printing it is a hurdle to get things to stick to the bed. Not so with TPU. It sticks to the bed sheet material with such fervor that it will actually peel the PEI layer off the bed. I did this in the past and was upset about it. I found spreading down talc powder helped, but never fully alleviated the issue. Then along came my little purple friend.

I have heard people talk about glue sticks to help print adhesion. I never had any luck with normal hard plastics. But it acts as kind of a barrier or release agent with TPU. Sticky enough that it won’t come off during printing, but soft enough the part can be peeled off. It builds up over time, but is water soluble, so just wash it away in the sink. A thing layer is all you need. I never heat the bed when printing TPU.

Problem 2: Loading

Once I tackled the removal issues a little while back I was happy to perform occasional prints. Loading flexible filament could be a pain though. Half the time it would jam and wrap around the extruder. I did some reading and experimenting and came up with a two part solution.

When loading, increase the temp 10-20 degrees. It makes the TPU flow better. My Prusa has an automatic filament loading function. It detects the filament, loads quickly, then slows down to extrude new filament and flush the old residue. That initial quick load gets me in trouble about half the time. Instead I insert the filament, but not all the way to the extruder gear. I let it perform the fast load, then push it in the rest of the way when it slows down. It hasn’t jammed yet using that method.

Problem 3: Stringing

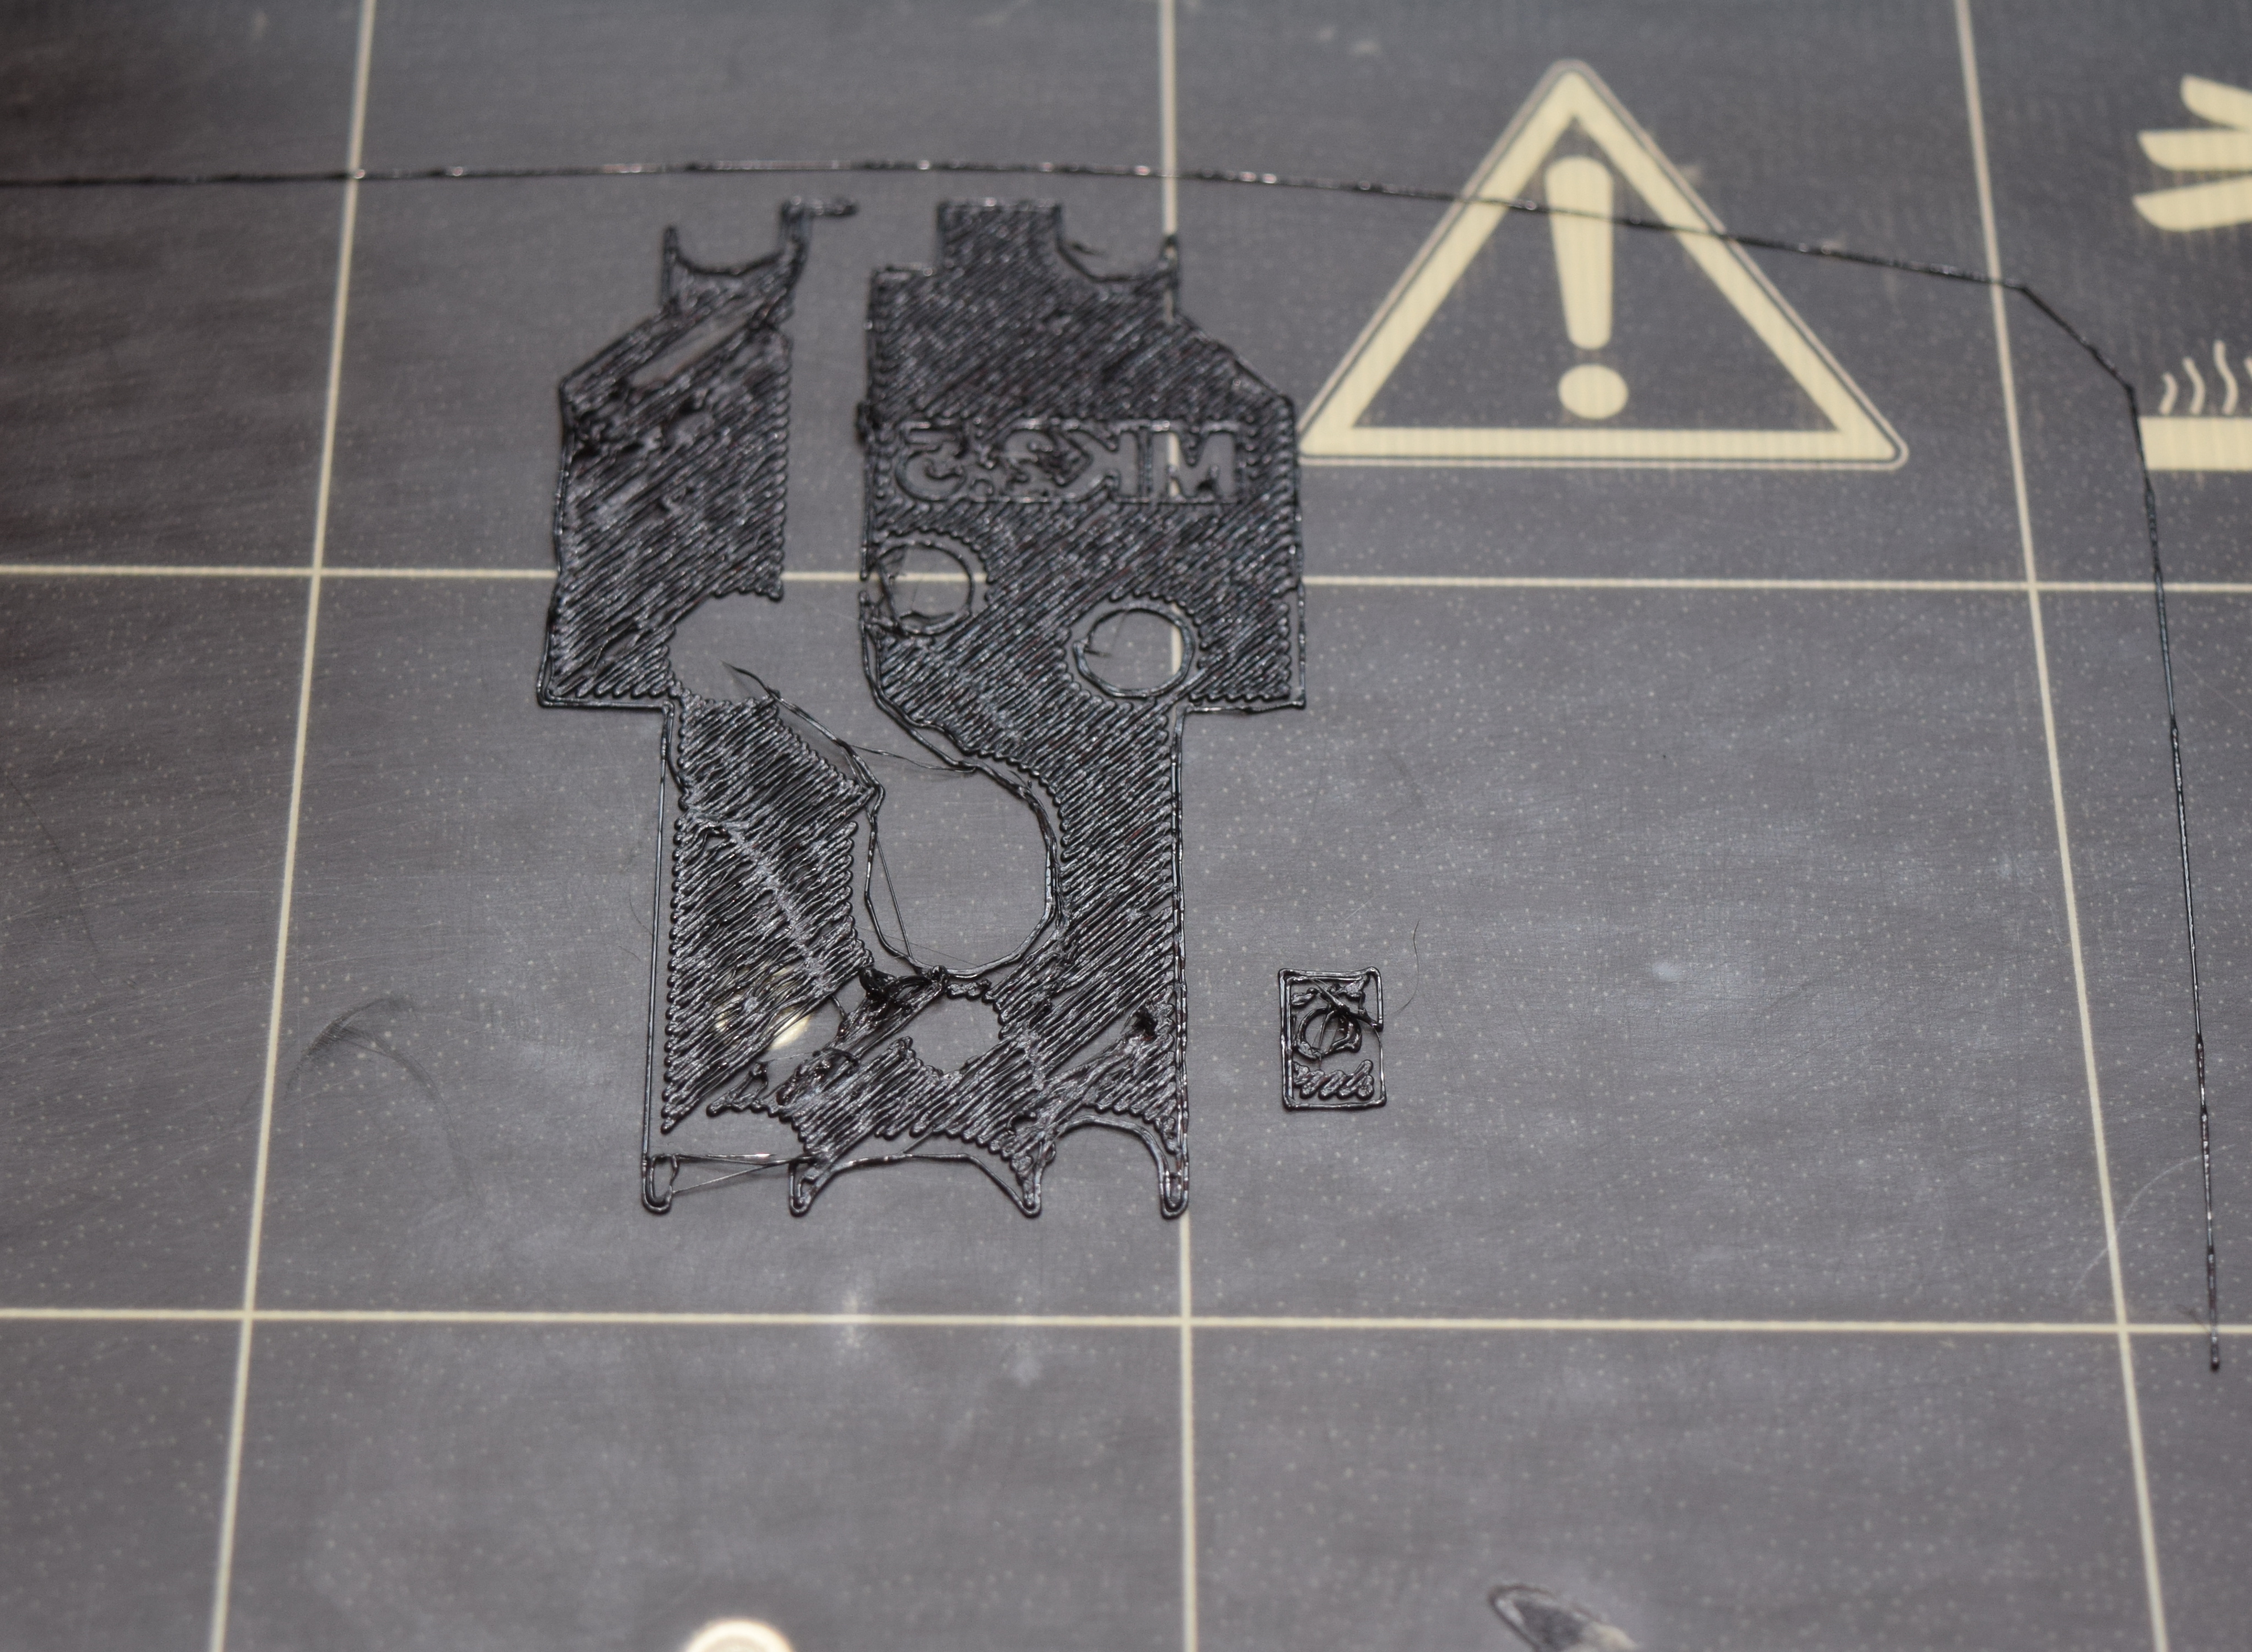
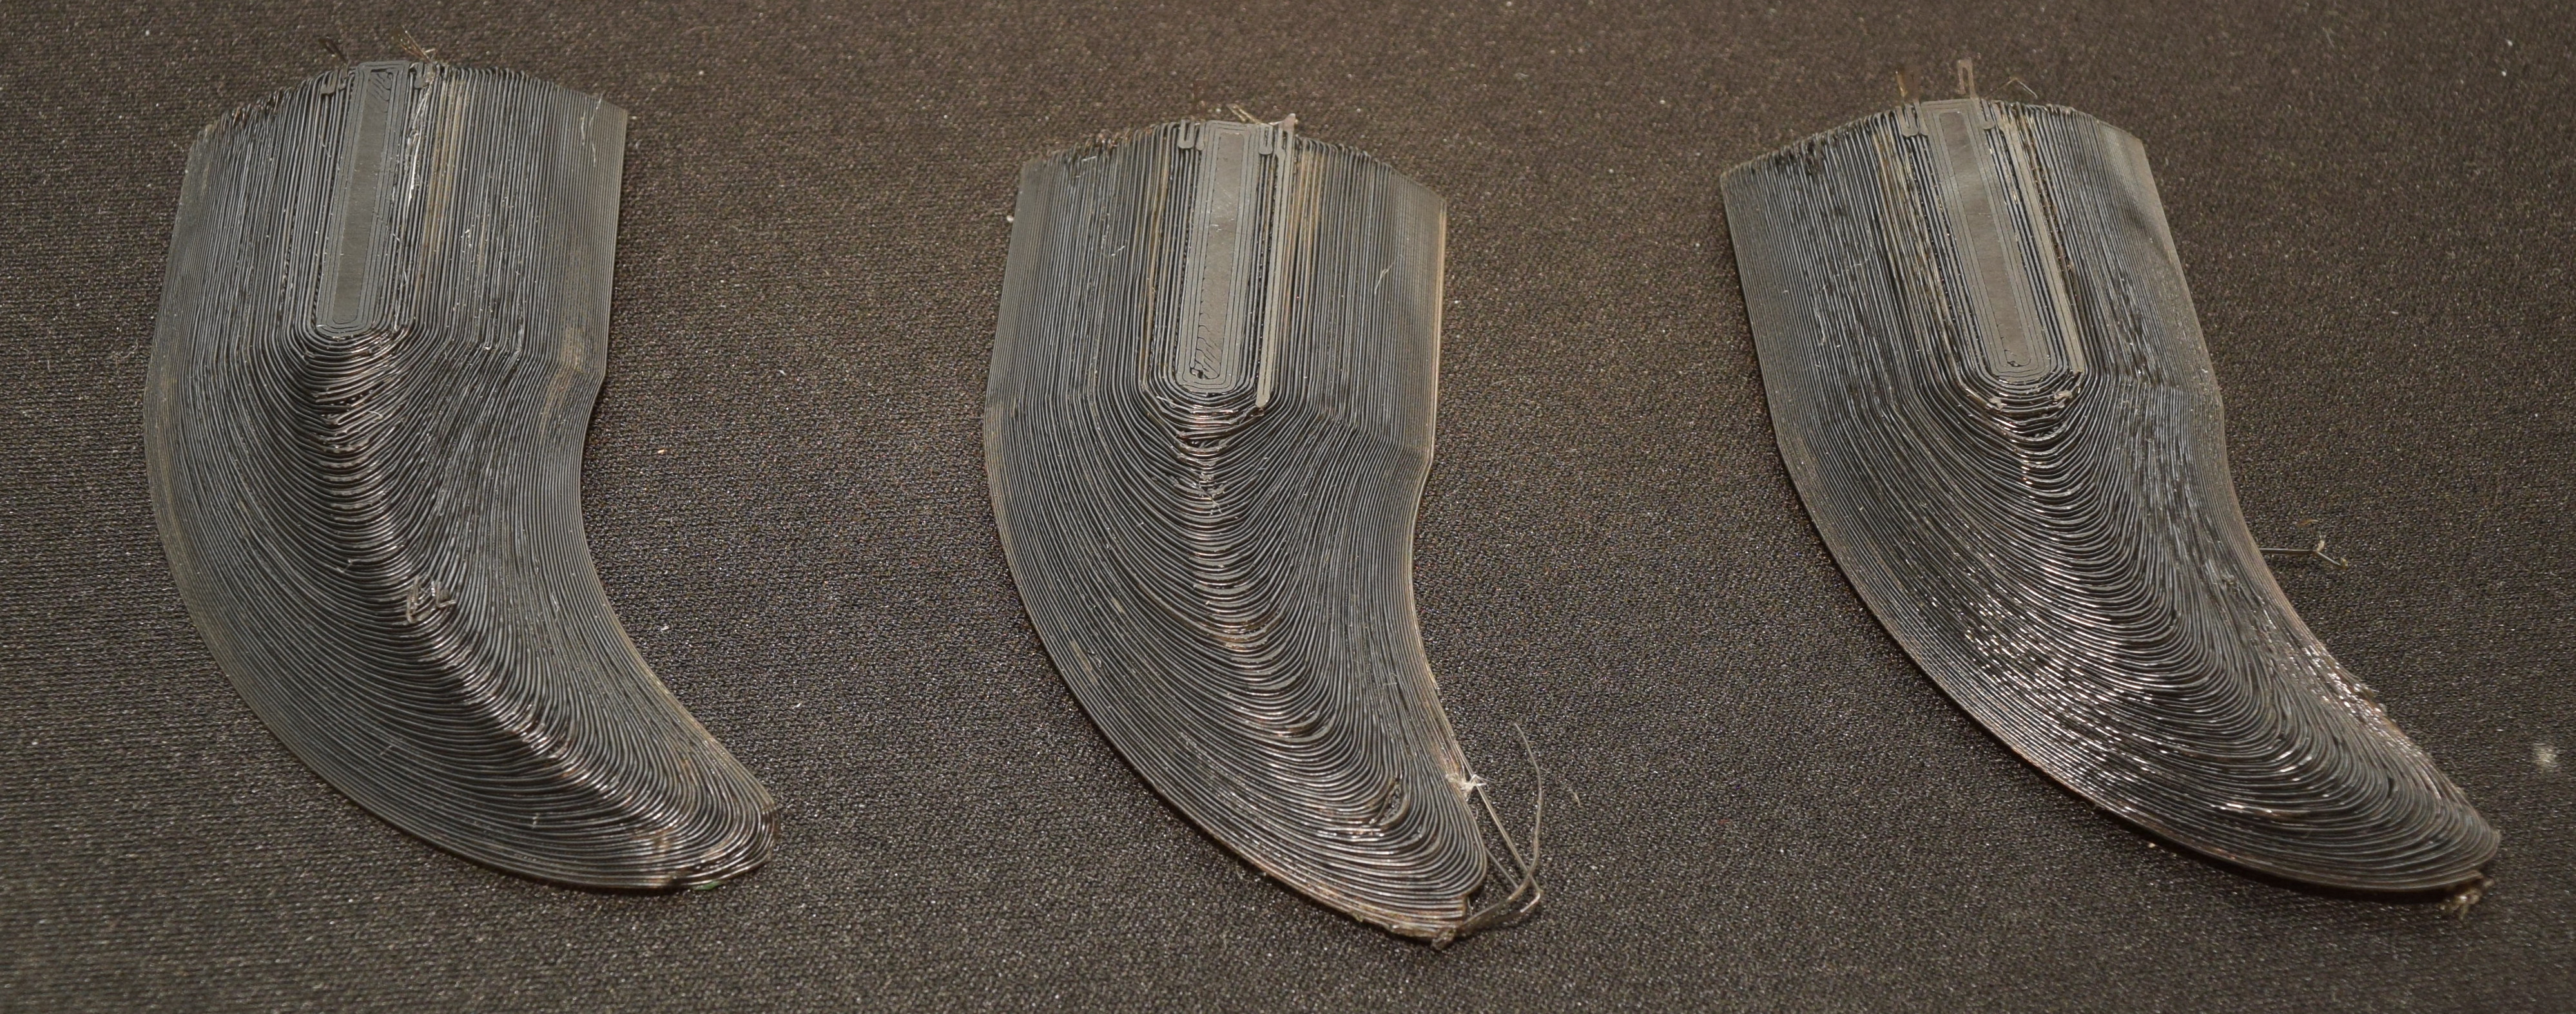
My TPU prints had crazy stringing. It was annoying, but a set of side cutters would take care of it. I was just so happy to be printing flexible materials I didn’t care at first. Now I am annoyed at the post process work required. I started googling and came up with some things to try.

First up, a number of places talked about the flexible materials not working well with retractions. It is flexible and might jam, but I thought that would make the stringing worse. Sure enough, it was a lot worse.

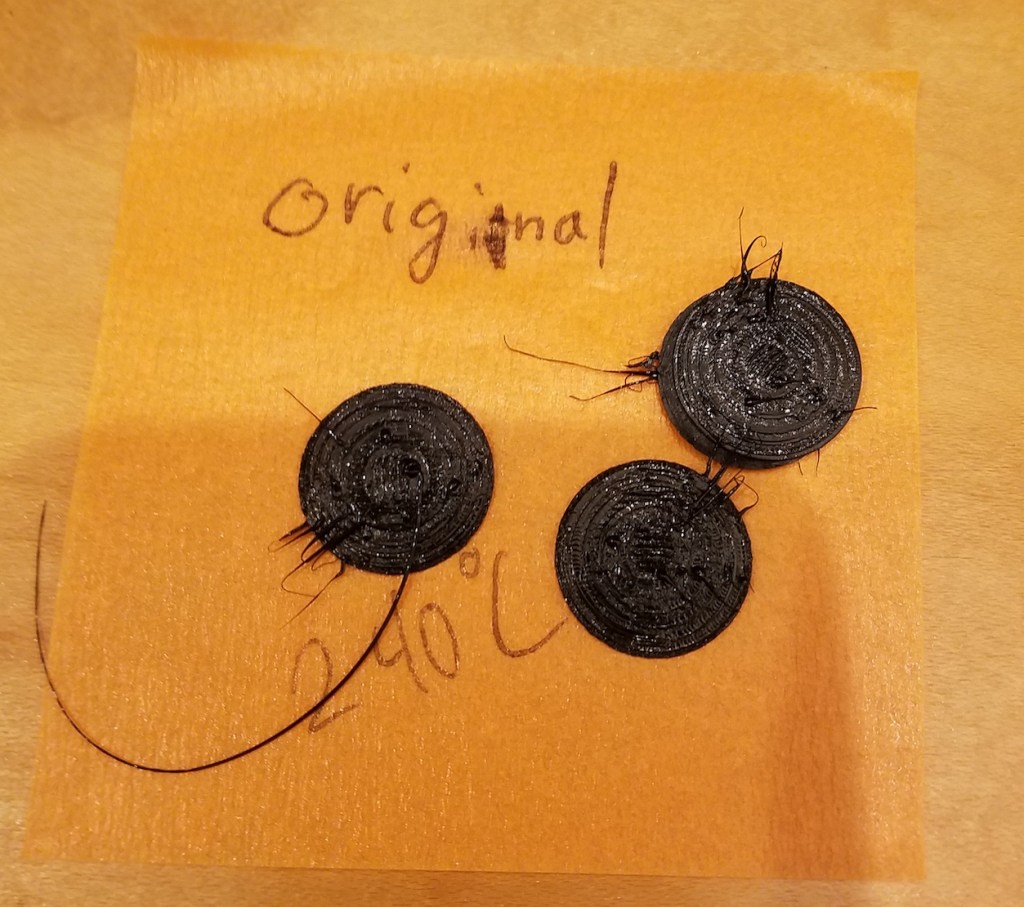
My original settings were what came with the Prusa Slicer. No retraction caused considerably worse stringing. Ok, how about instead we lower temperature, that was supposed to help out.

Sure enough, that worked. It makes sense, the stuff wants to solidify faster. I checked the manufacturer of my filament, and 240C is a little hotter than they suggest. I tried one at 220C, but was starting to get poor layer adhesion. I also slowed down the retraction speed from 35mm/min to 20. Some stringing still exists, so I will try to retract further.

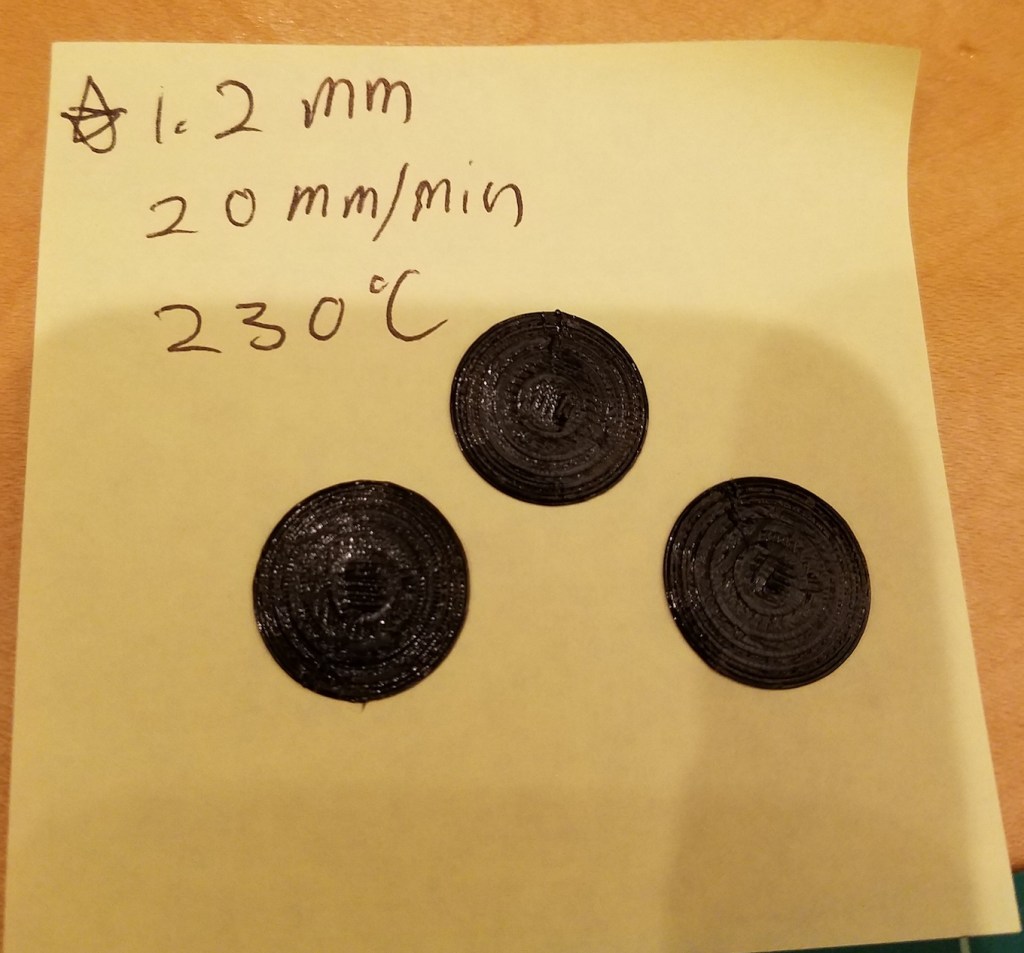
Even better! There are some nubs left (hard to see with black filament), but this is so much better than before. I will call this good for now, but might go back in the future and do more turning.

While I was testing these I was slowly increasing my initial Z off set. They were coming off the bed more easily with 100um of increased Z height without significant impact to the bottom layer quality. It turns out you can alter the first layer Z height in the slicer, so I made that change for my flexible material profile.

Summary:

TPU sticks too well?

  • Use a layer of purple glue stick on the print surface, it acts as a release agent
  • Increase initial Z height so first layer doesn’t get pressed in so hard

TPU strings badly?

  • Reduce temperature till you have layer adhesion or jam issues, then back up. Lower temps have less stringing.
  • Longer retractions at slower speeds might be needed.

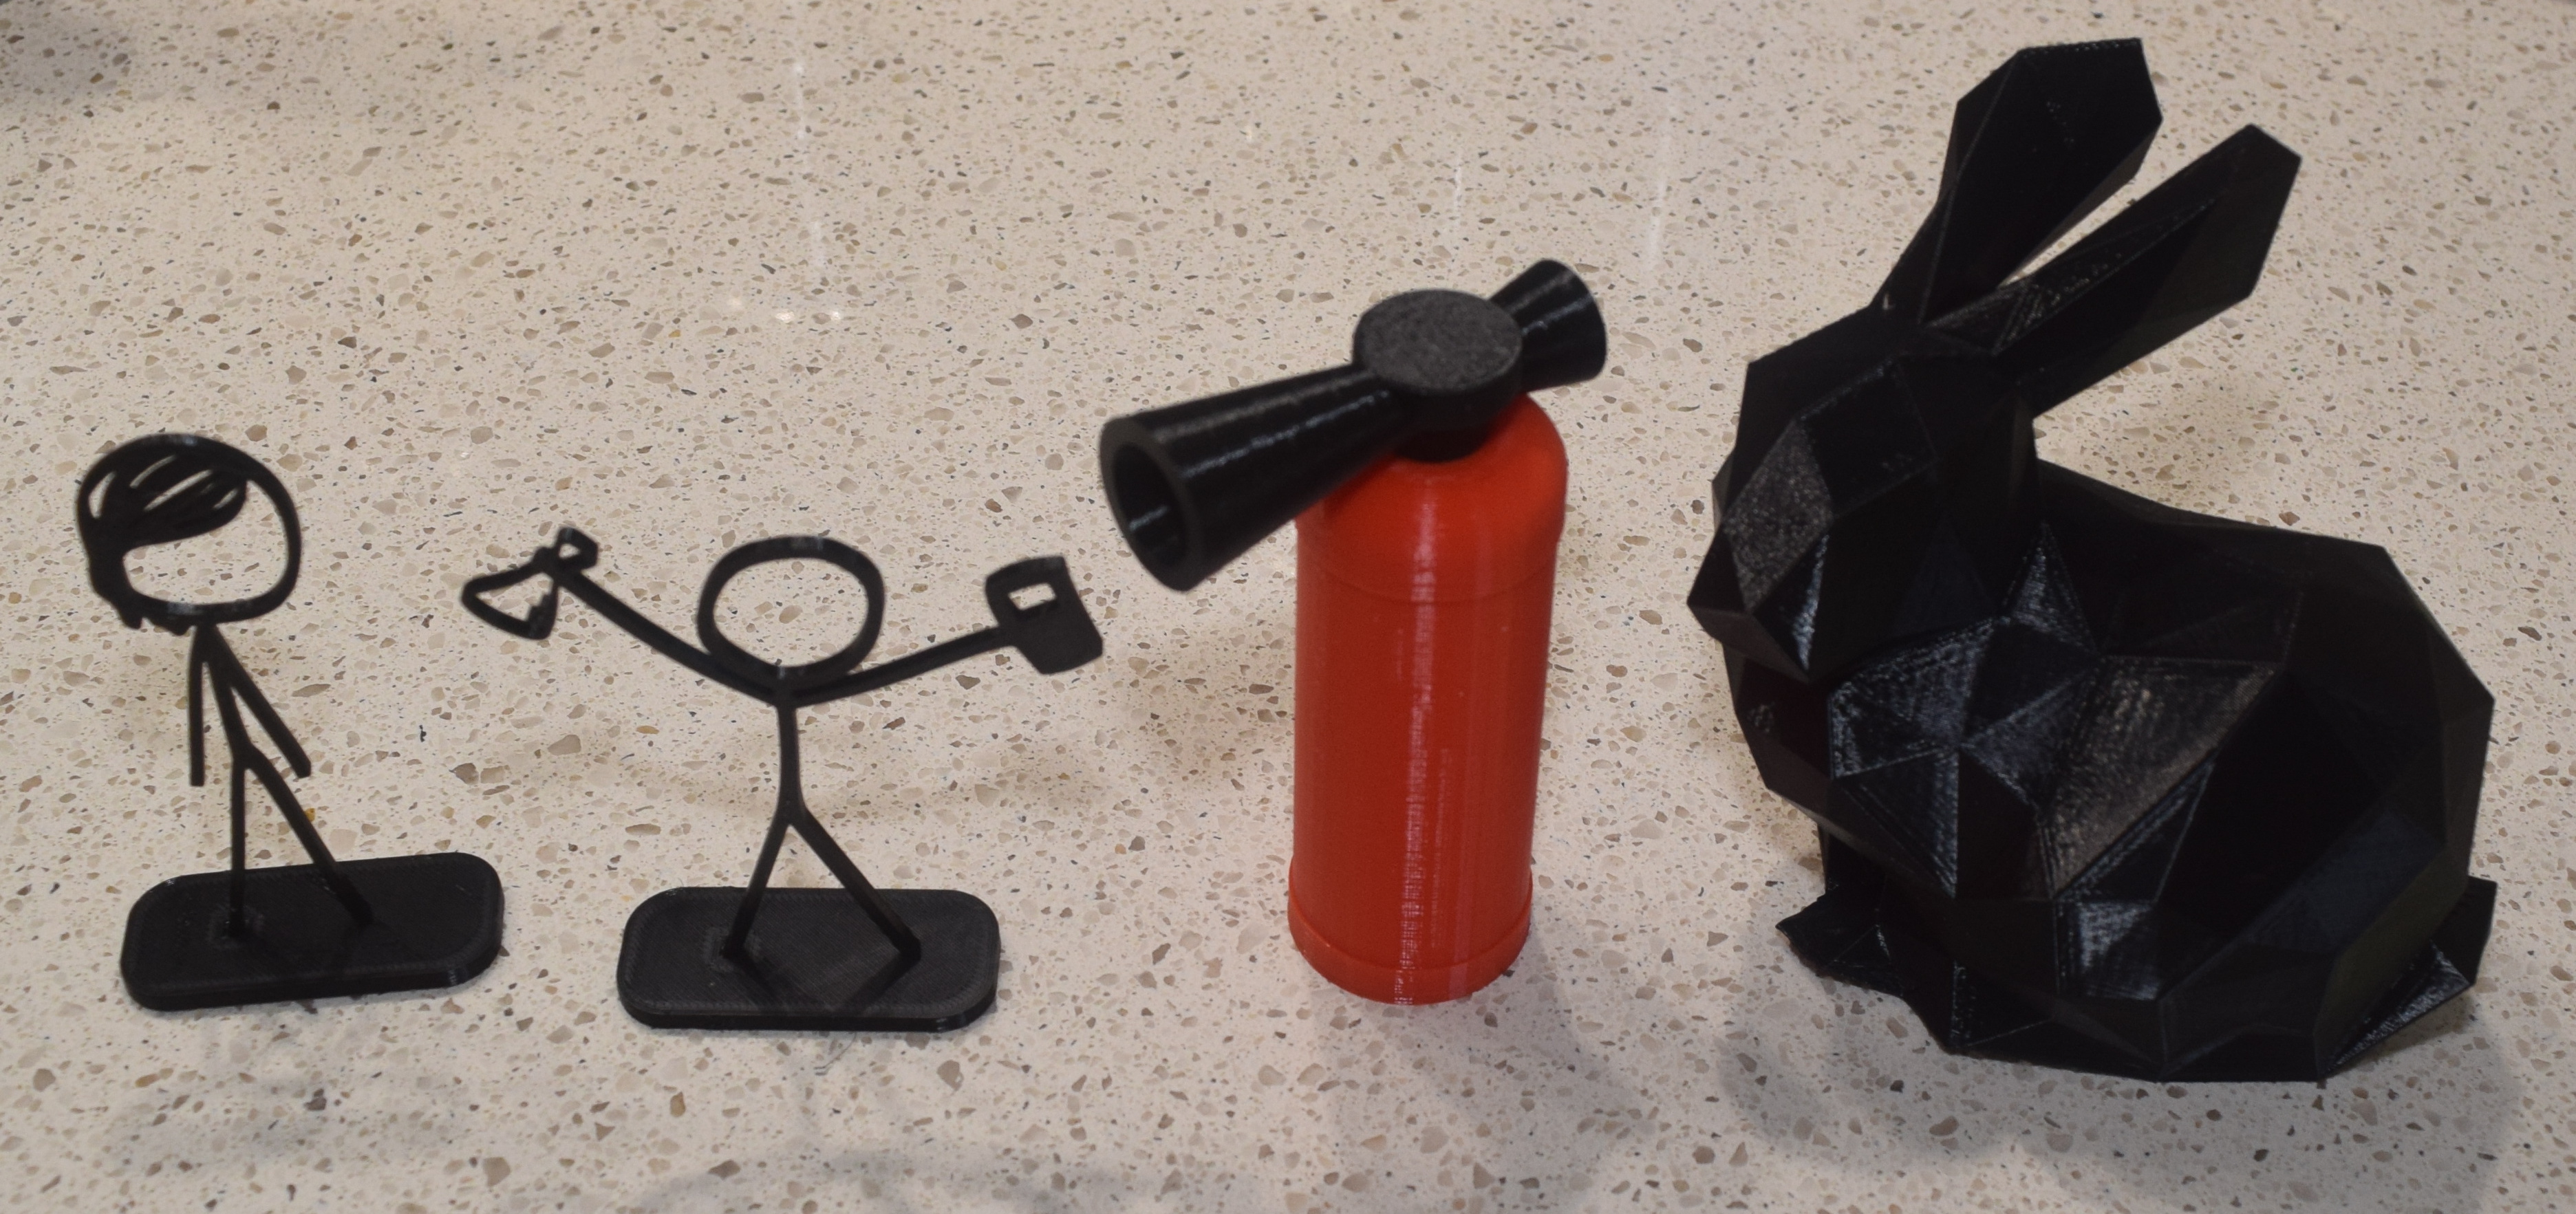
What does one print with flexible material? Well Those test prints were feet for my macbook laptop. The originals keep falling off and getting lost, so I have been printing new ones and gluing them on.

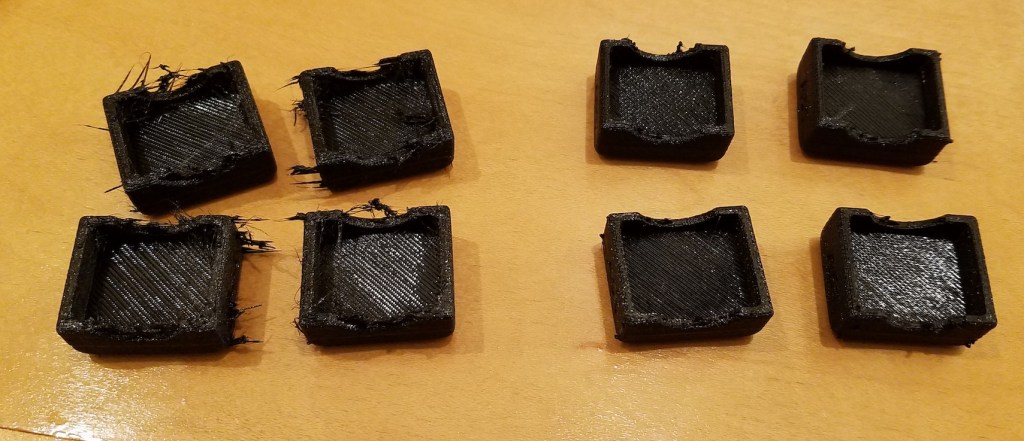
Speaking of feet, I printed a set of vibration damper feet (thingiverse link) for the printer. The first set looked so ugly I figured I had to spend some time tuning to get rid of all this stringing. The before and after tuning results are pretty dramatic.

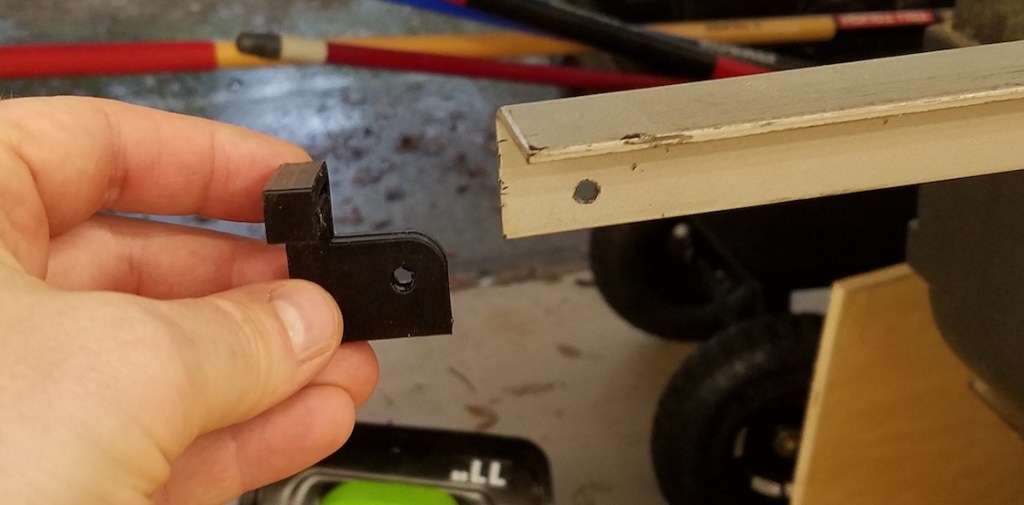
Other fun prints are a set of flexible hex bit holders (thingiverse link). They grip well enough to keep the bits from slipping out, but are easy to insert and remove. I tried making a set from hard plastic, but they just don’t compare.

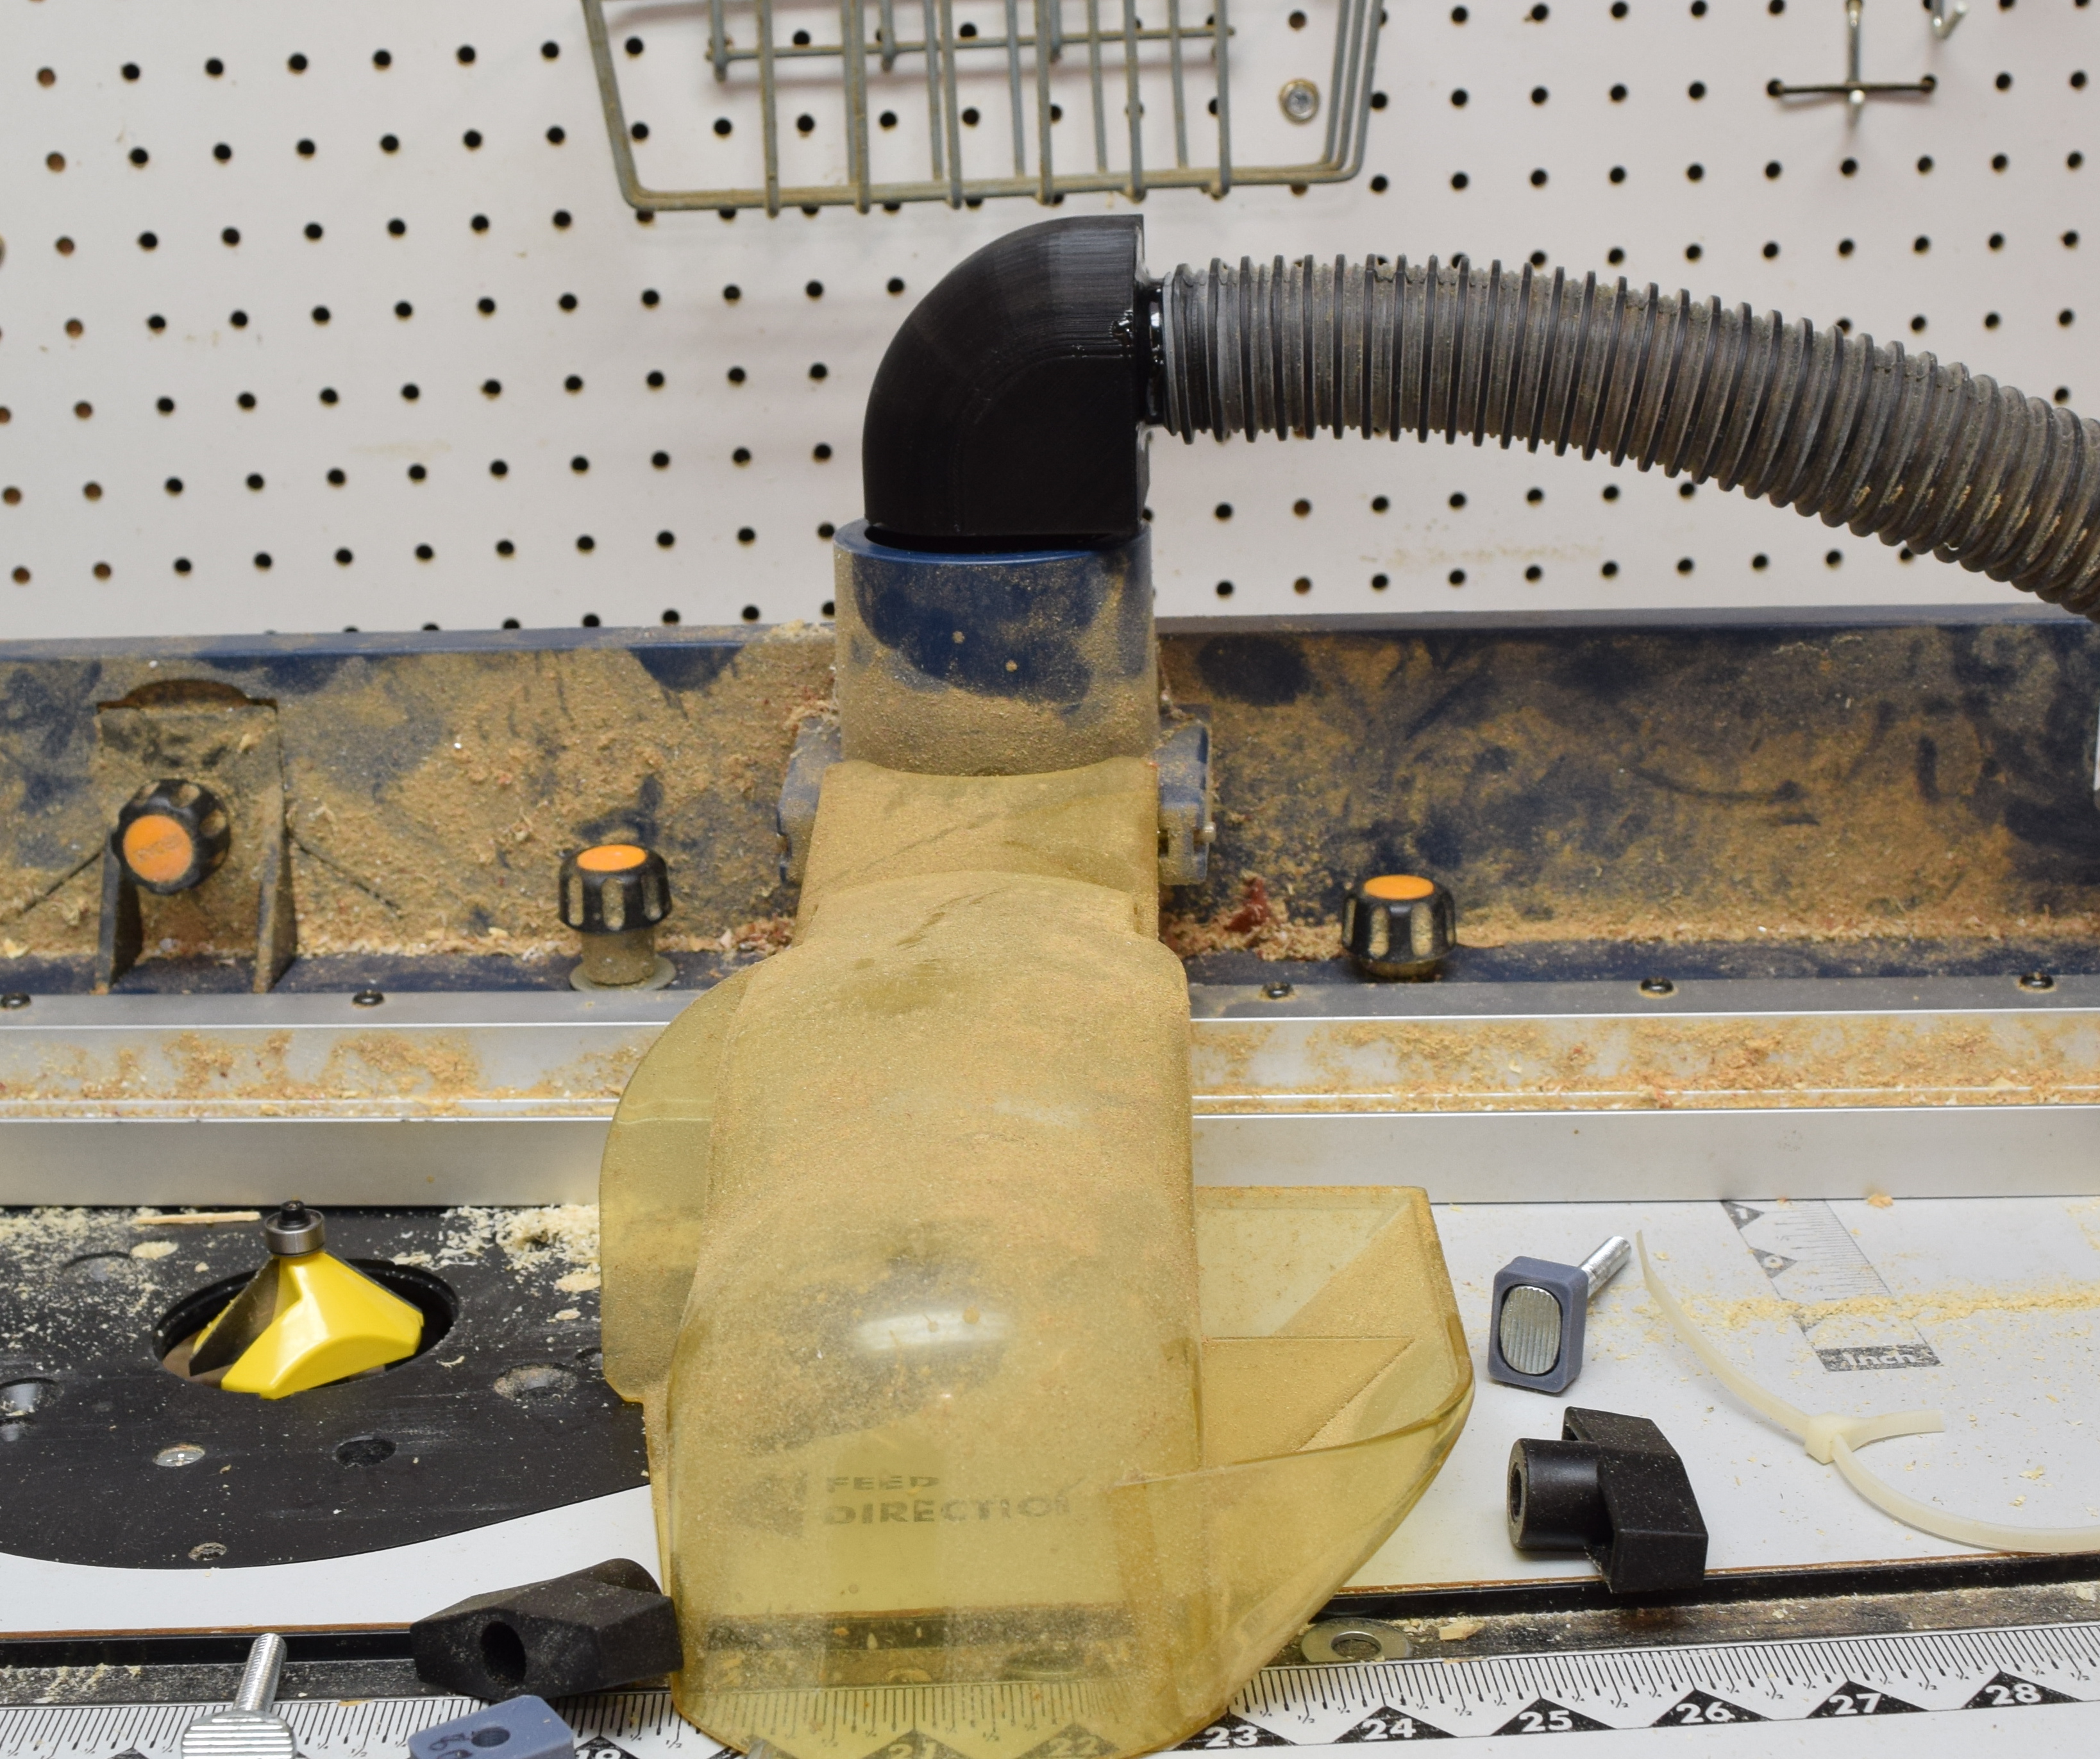
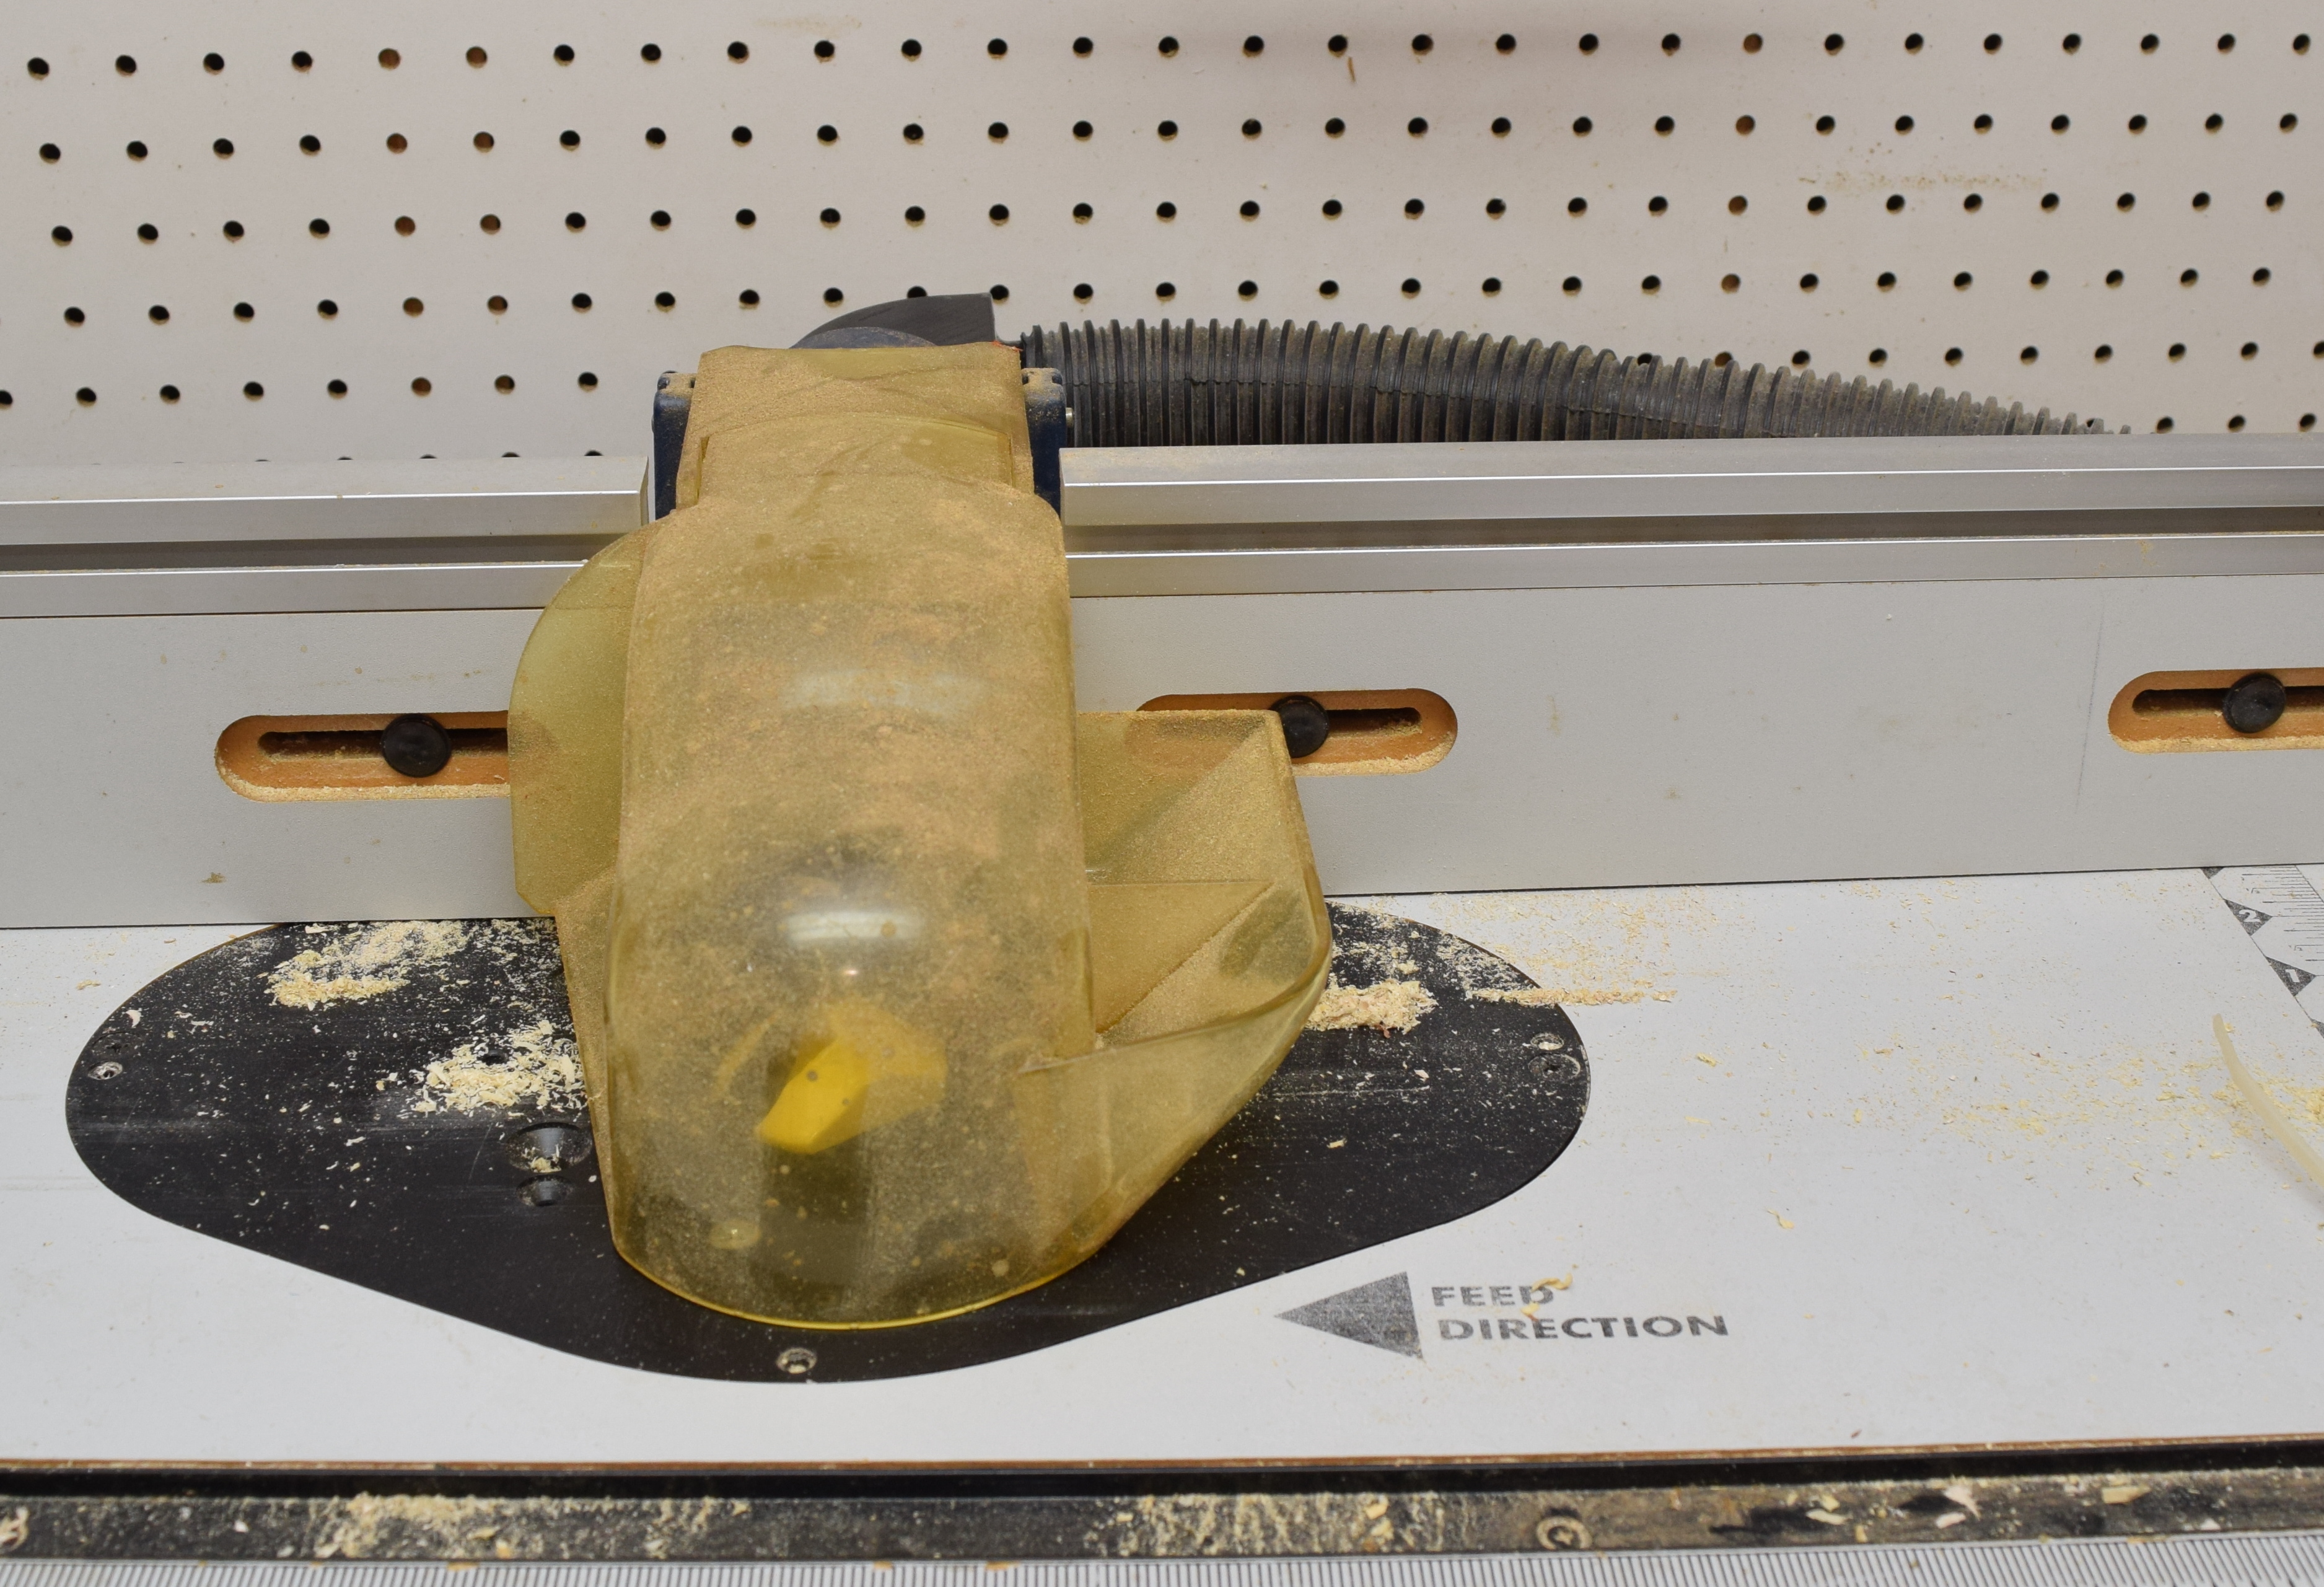
Lastly the support arm on my tablesaw had a rubber guard to keep you from catching the edge. It got lost ages ago and and I have found it to be very uncomfortable when impacted at walking speeds. I made a push on flexible cap, but it too got lost after a few months. This one bolts into place in such a way as not to interfere with the fence. I bet I won’t be losing this one. Hopefully I won’t be racking my hip on it either.
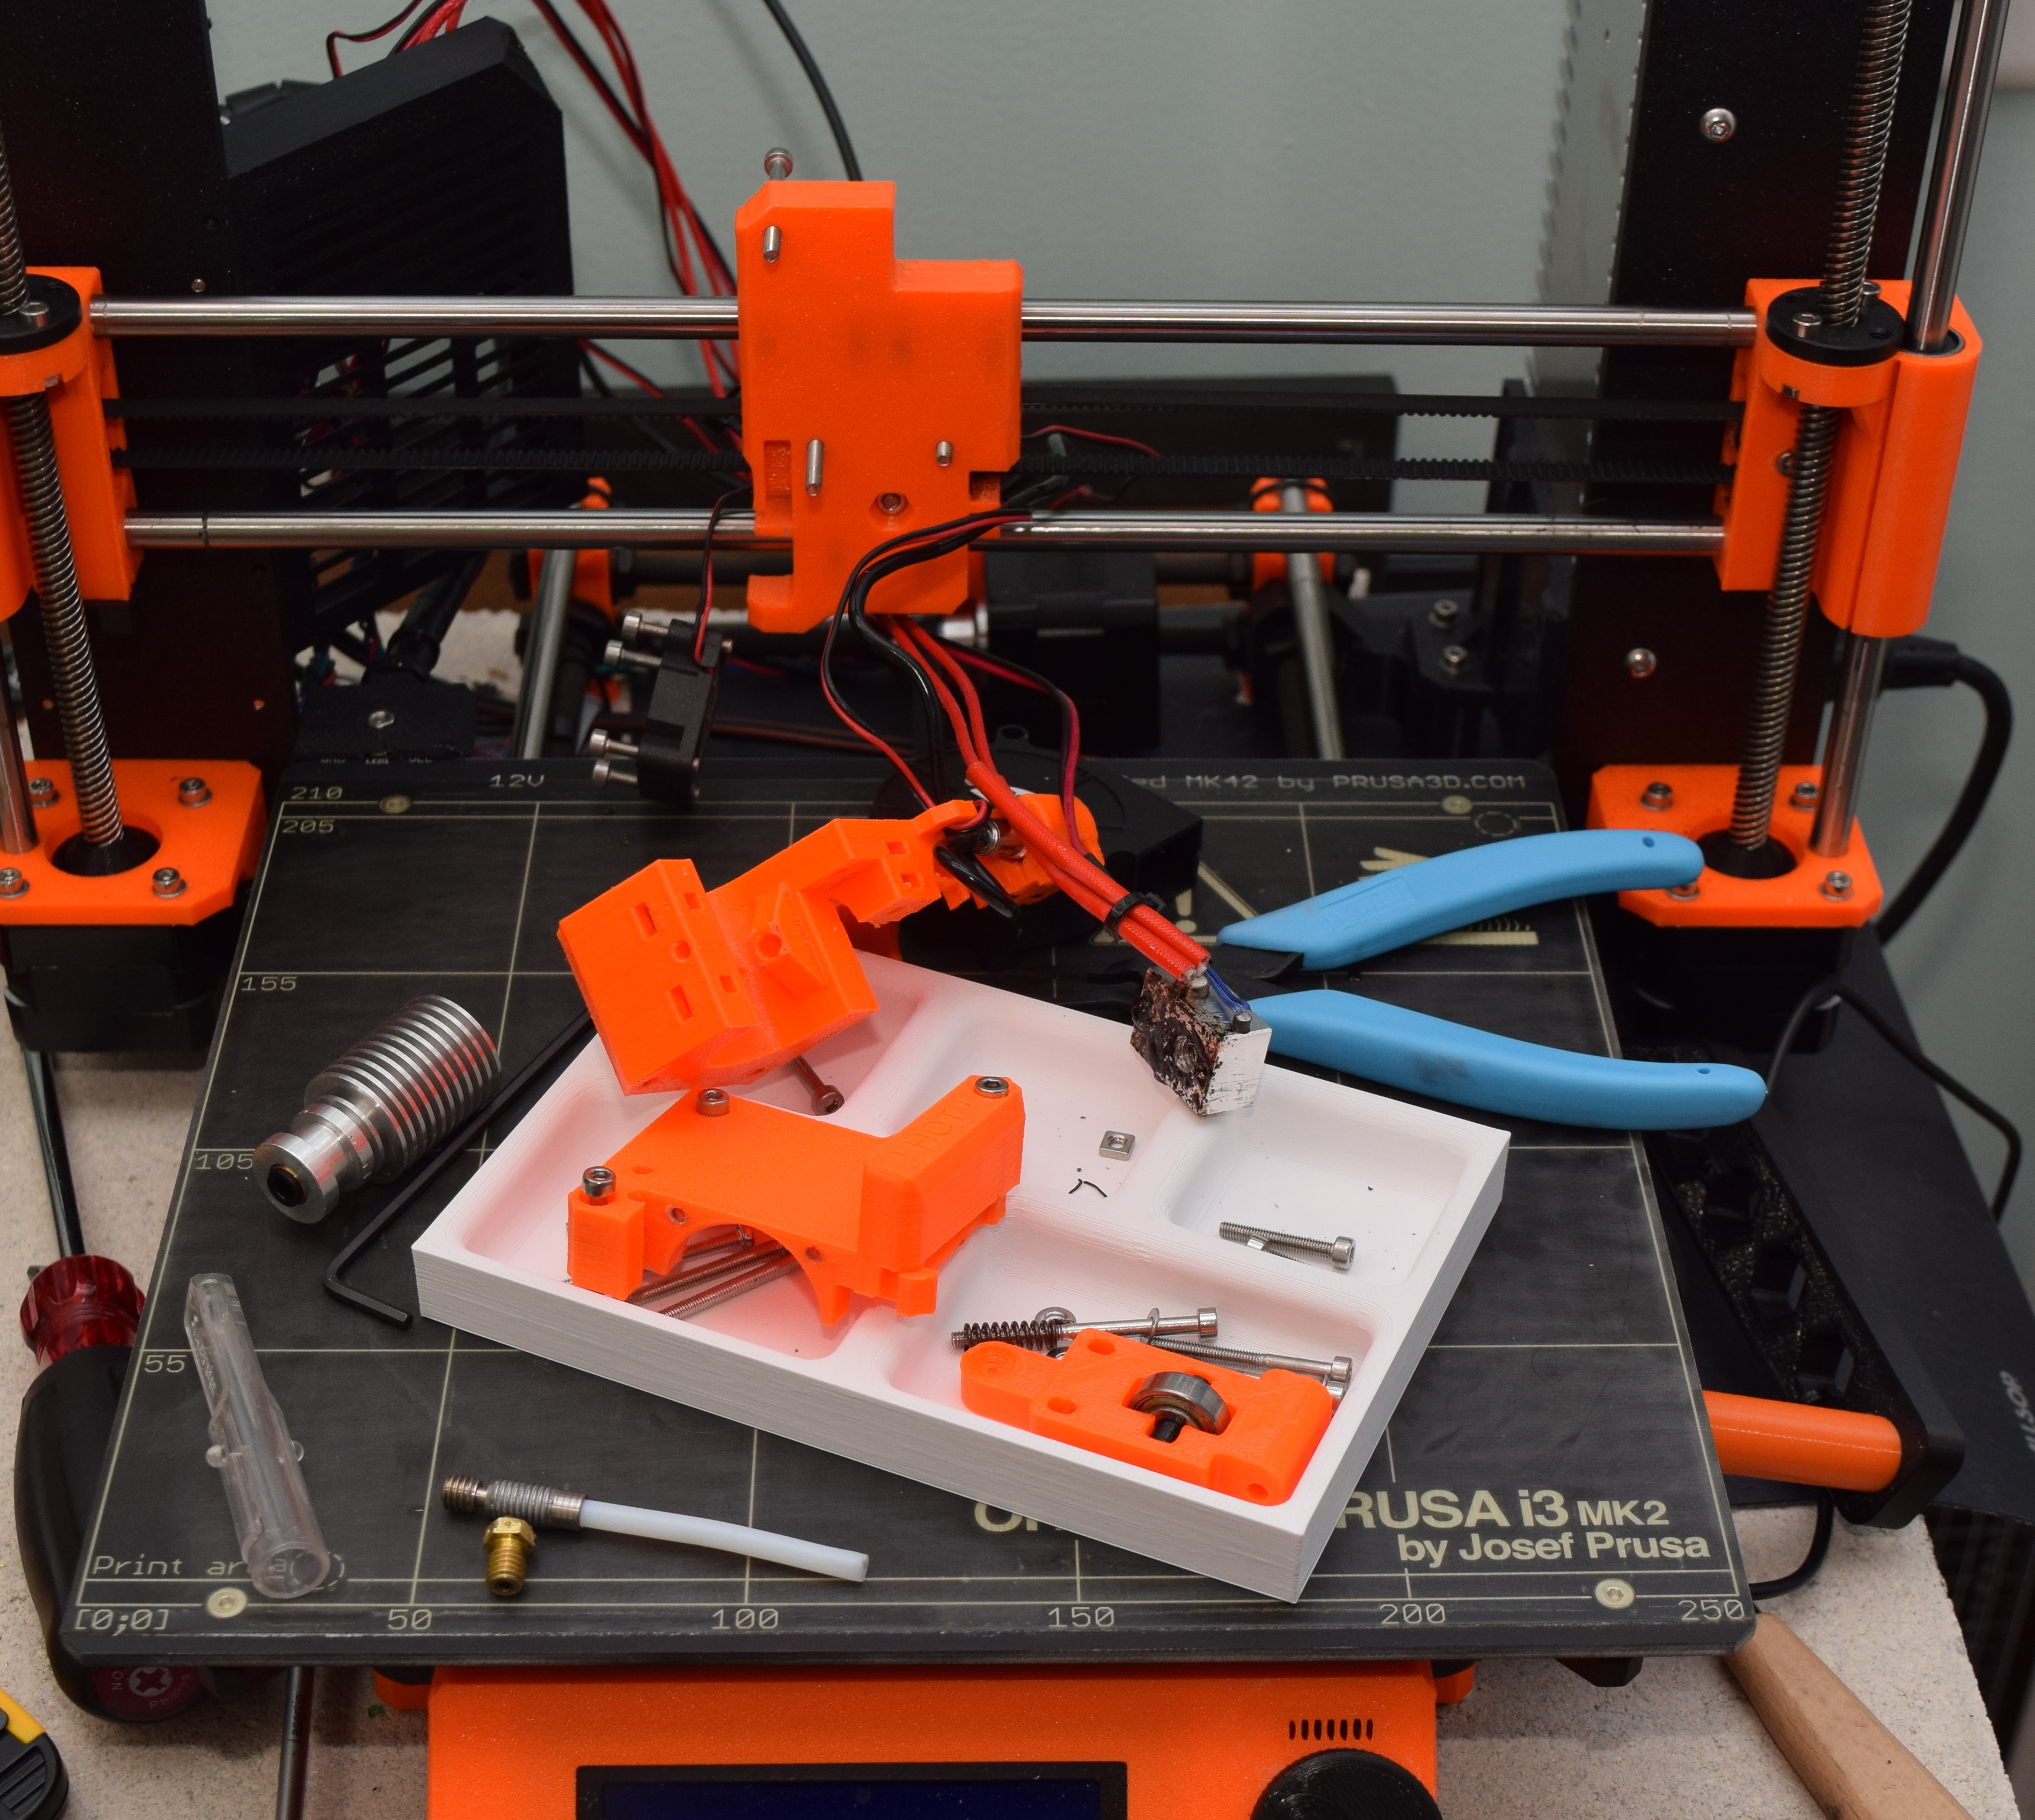
Printer Upgrade Part 2

Last we left our printer saga, everything was quite broken, and I was waiting on parts.  The 625z bearings came in and I put the extruder motor back together.  When I could easily turn it by hand, I knew my extruder problems were solved.  Sure enough, I can extrude PETG at high speeds and no jams.  The hot end was not to blame.  I did develop a new problem though.

20180430_202617

That is the status of my end stops.  The printer thinks the inductive sensor is touching the bed even though it is nowhere close.  I had an occasional issue with the inductive sensor reading poorly.  That has become constant now, all my messing with the cables finished off my probe.  I can’t start a print without that probe.  I massaged the cable and found a spot that flipped the 1 to a 0.  Time to troubleshoot.

Ok, so the cable is pretty well shot.  I opened the jacket where the issues was, but couldn’t figure out the exact problem.  They used very thin wire, it could be a break within the jacket.  I just cut most of the cable and redid the wiring.  That got me back up and running.  I printed everything I needed for the upgrade plus spares in both PETG and PLA.


I double checked all the instructions to make sure I wasn’t missing anything and started with the tear down.  On the plus side I am really good at disassembling the whole hot end/extruder!  It looks so naked.

DSC_1210

I only ran into one small snag.  The part that holds the x-belt wasn’t accepting the belt on the right hand side.  I printed 3 different versions, and they all had the same issue.  I took that part off and worked around the groove with a hobby knife.  It eventually relented and let the belt seat fully.

After that, the extruder assembly was pretty straight forward.

The bed assembly was a breeze.  I like most of the changes they made to the cable management, and think this will be more robust.  How the rats nest gets handled in the controller box could be a little better though.  Maybe just a bigger box.

I went through the calibration wizard, did some nozzle height testing, then printed a smart looking benchy.  Dimensionally it is great, but course settings mean it isn’t cosmetically the best.

I am thrilled to be over the failures, and proud of myself for solving all the issues.  Given that is almost exactly the 1 year anniversary of getting this printer, I decided to share a few stats.

Printer Stats:

  • 380 successful prints (more than a few failures, especially these last 2 weeks)
  • 44.7 days spent printing (12% of its life)
  • 6.3km of filament


Printer Upgrade Part 1

While out on our euro-trip the MK2.5 upgrade for my beloved Prusa printer came in.  I had finally plowed through enough chores to get started on the upgrade when I realized you need to print everything first.  I ordered this 6 months ago and could have easily lined up all the replacement parts by now.  Oh well, shame on me for not reading ahead.  They did include a 1/2kg spool of PETG to print everything with, so lets get that started.

DSC_1206

Now I know my bed is shot, thats why I wanted this upgrade.  It gives you a double sided spring steel printing bed.  Still, I couldn’t get the first layer of Prusa supplied PETG to stick to save my life.  This was my best attempt, and this was pretty bad.

I switched to some Push Plastic brand PETG that I had around and it initially looked golden.  Soon though I ran into issues.  There were z-layer striations in many of the prints like the nozzle was partially jamming.  I thought some of the odd and difficult to print features were to blame and broke up the prints into smaller batches.  These batches had problems too.  I spent 2 days printing with different settings, cleaning out the nozzle, replacing the nozzle, taking everything apart, switching to PLA, and doing about 10 other things.  All I did was get more frustrated and produce a pile of garbage.

DSC_1208

I was incapable of producing small parts without error and big parts would completely jam before finishing.  These were the most horrible frustrating times I have ever had with a printer.  Even worse than my monoprice, and that is saying a lot!

I thought the hot end section was damaged, and on one of the tear downs to look for issues, I decided to give the extruder a rotate.  I had checked its pin out with a multimeter, and inspected the wires for frays, but a single rotation by hand gave me the clue I needed.  It was nearly impossible to turn.

DSC_1207

Here is what the inside of a Prusa MK2 extruder motor looks like in case you ever wondered.  The bearing on the left is fine, the one on the right is frozen solid.  They are a smaller size than the 608 bearings I have around, and that most people use for projects.  I ordered some to repair this unit, and contacted Prusa about getting a whole new extruder.  If it isn’t too expensive I will eventually swap my repair job for a new unit.

The bearings will be in shortly, but I am dead in the water till then.  Once repaired I will, hopefully, be able to finish printing all the upgrade parts, then I can have a whole new extruder setup and print surface.  Until then, this is what my poor printer looks like.  Never a good site.  Nice use of my printed organizer tray.  It keeps screws and bits separated and organized when you take something apart.

DSC_1209

Printing With Supports, DC Fittings

I started off wanting to create more custom dust collection fittings.  This time for my router table.  I need something to go from the back of the fence to the dust hose, and take a tight 90 degree turn.  I quickly came up with a 3D design that smoothly transitioned between the two diameters.

Screen Shot 2018-04-05 at 7.03.43 PM.png

This isn’t a simple print.  Previously I used a PVC elbow to make the turn, but I wanted to work on my support skills. The shape starts large on the left, but gets smaller on the right.  That means very little is ever touching the print bed.  I knew this would require a lot of support material to work, but thought it would be a good challenge to fiddle with support settings so that bottom surface was as smooth as I could get it.

Screen Shot 2018-04-05 at 7.09.30 PM.png

The slicer software shows in green the support material.  I can only print one material at a time.  What it does is tries to make a very sparse little structure just below the main model surface.  The printed model will droop a little bit, but hit the support and not droop any further.  If you get it right, the bottom looks good, but is able to be broken away from the support.  That is the theory at least.  In practice, anything I have printed with support has looked horrible on the bottom.


I started with the default settings that were recommended for my printer.  Instead of printing the whole thing I only let it print the bottom bit just past the support.

DSC_1200

It made it out alive, but looks rough.  The bottom layers are pretty loose and separated from each other.  Could I improve on this?

DSC_1202

Not really as it turns out.  One trick is to reduce the print temperature.  If it is cooler it will solidify faster and not droop as much.  I also tried modifying that support surface to be more solid so it would offer smoother support.  On every one, the edge would peel up and get caught by the nozzle.  They all failed at roughly the same spot.  No big deal, go back to the settings I started with.

DSC_1203

The left one was the original settings, and the right one had the support structure even closer than before.  All of them fail in the same way, that thin bit on the bottom right bends up and catches the nozzle.  Printing the support with no gap would make it hold well, but might make removal difficult.

DSC_1204

Ok, the print didn’t fail, that thin bit was firmly stuck down, but the support structure is welded on there.  Time for a re-think.


I wanted elegant, but now I am going with simple.  Instead I printed a tube to connect to the hose, a tube to connect to the router, and a block with a swept section that connects the two.  5 minute epoxy is the universal force that binds us together.

This lets me print each segment in the ideal orientation and then put them together later thus maximizing the ability of the printer in each situation.  The final result works well.  So much for increasing my supported print skills.

DSC_1192

DSC_1193

Prusa Spool Upgrade

When I got my current 3D printer, I quickly upgraded the spool holder.  The original worked ok, but was a pain to load and adjust in width.  Every spool manufacturer has different widths to their spool.  The spool support I found on thingiverse was easy to adjust and load.  Eventually it had issues though.  The black threaded shafts that held the bearings in place started breaking off.  I installed 5/16″ bolts as a replacement.  Left photo was the original installation, right photo shows my bolt mod.

As those shafts failed they caused a lot of rolling resistance on the spool, and it ended up failing a few prints before I diagnosed the issue.  The bolts help, but there is a fundamental issue.  They hold the spool at the outer edge.  Any force imparted is a long distance from the axis of rotation.  If it were held in the center, then it would take a lot more resistance to induce the same torque.  That is how the original supports worked, so maybe they were on to something.  A diagram might help.

Spools.001

The extruder will pull at roughly the same angle and with the same force in either setup.  A full spool will be heavier and require more force to spin, but the filament will be at the outside edge, far away from the axis of rotation (red cross hairs).  This produces higher torque.  Think of putting a pipe on a wrench, you can push further away from the axis of rotation, which makes more torque.  My old setup (left) held the spool at the outside edge (orange dots), far from the axis of rotation.  My newly devised holder (right) runs through the middle.  Even if it doesn’t spin well, it can’t impart that much torque on the spool.


I heard Adam Savage give a good talk about how everything you try involves a lot of failure and trying again.  He was suggesting maker spaces nail to the wall (literally) the progression of projects to show that it takes effort and that nobody gets it right the first time.  I wanted to show some of my work on this one.

DSC_0964

First I needed a way to hold the spools.  I decided a center hub (for reasons explained above) was best.  After measuring all my spools I set the outer lip just small enough to pass through the hubs, then made the center area a little smaller so the spool can’t walk off the hub.  Pressed in bearings mean it spins really effortlessly.  I had a bunch of red filament, so I started with that.  It was simple and worked right the first time.  So much for showing progression!  The next task took an extra try or 4.  I used jam nuts to hold the two spool halves (they are identical) together.  Don’t tighten the nuts against the hub, the bearings spin better without side loading.  To make handling easier I printed a handle with internal 5/16″ threads.  The first one was too short for my hand, so I cooked up a longer one.  The threaded rod goes 2.5″ into the handle.

This hub system will need some kind of support to keep it up high on the printer.  I took some measurements of the printer frame and started with a thick test piece to make sure it would clip on and be secure (far left).  I thought it was good enough and went forward with a full spool support (second from left).

DSC_0967

This worked but was a little too thin and wobbly.  The odd rounded rectangle cutout is for my LED strip.  It was too close to where the spool will be.  I couldn’t have the light and spool installed at the same time.  Next I made a few minor adjustments to the frame clip and printed another test (middle).  That was more snug.  I moved the LED strip to a reasonable location and tried again (second from right).  I ran with this one for a week or two and liked the results.  The only changes to the last version was to increase the thickness for slightly less wobble, and an extension of the hub shaft holder.  My current spools fit, but a future spool might be larger in diameter.  The final design was printed in Prusa orange (right).

DSC_0969

Everything fits together nicely.  The large flange on the handle keeps it from sliding up your hand, and aids in alignment.  My LED strip slides in its slot with a little wiggle room.  The uprights can move if need be, but are in a good place.  The center hub is wide enough to accommodate a large range of spools.  I think this will be a great holder for a long while (until 5 minutes after this post when I run into an issue with it!).

This should be compatible with any of the Prusa i3s.  I think the MK1, 2, and 3s all have the same size and shape frame.  If I am wrong on that, then this only works for the MK2.  I uploaded it all to thingiverse.


As a bonus, it is holiday time, and that calls for cookies.  Cookies that come in fancy shapes taste better than normal ones.  True fact!  Add some pizzazz to your holiday gathering.

DSC_0973

Woodsaw 3D Printed Parts

Miter Saw Zero Clearance Insert

Sawing with a tight fitting insert is almost always the right way to go.  It supports the wood being cut and prevents the fibers from getting torn as the saw teeth punches through.  The plate that comes with the saw works, but has a wide gap.  I made a thin plywood insert, but they don’t last that long.  This is my attempt at a 3D printed one.  The original is on the right.  Notice how wide the saw blade gap is.  I took a picture of the original saw plate on one of those self healing cutting mats.  They have good ruled lines in both directions to make sure the image didn’t get distorted.

The first print out of the gate fit really well.

20170805_130315

I made the first cut with no wood in the way.  It chopped right through the plastic and cut a self fitting slot that is just exactly the size of the blade.  I might have been a little too cautious.  Slow cutting built heat and there was a bit of plastic fuzz at the top edges of the cut.  A little light work with a utility knife had those cleaned up.  Some subsequent cuts have shown the insert to properly back the cuts.

I still need to find a spool of Dewalt yellow filament.

UPDATE: Decided to upload it to thingiverse.

Table Saw Organizers

I am in a near constant state of looking for pencils and rulers/tape measures.  I should attach one of each to my body with a short retractable cable.  Until then I try to stage as many as possible at each work station.  At my table saw I made two different organizers to hold commonly used  items.  They both attach to the far side of my rip fence.

The white organizer holds my wooden ruler and a small stack of pencils.  The pencil well could have been a touch deeper, but otherwise it works well.  The yellow holder area keeps my grrripper push block.  It is at a really convenient hand position for quick use when sawing.

DSC_0927

DSC_0928

June 2017 3D Prints

Lots of good prints this month.  I have got the new printer pretty well figured out and have ventured out into new materials and longer prints.  First up is a cool blade guard I made.  I picked up this nice boning knife for bbq goodness.  It is crazy sharp but came with no guard.  I printed a two piece guard with magnets set into the one half.  The two bits glue together.  It keeps the edge and my fingers safe and fits snuggly.

DSC_0858

DSC_0859


Porch Cup Holder

I have some Adirondack chairs on the back porch.  They are reasonably comfortable, but have a distinct lack of cup holders.  I fashioned some a while back out of wood, but the sizing was all wrong.  These are perfect.  They hold coffee cups, large tumblers and small glasses alike.  The RTIC’s blue handle was printed back in September and is still alive after daily use.  Thingiverse Link


Thermocouple Kickstand

I got a cheap thermocouple reader for reasons beyond my obsession with measurements… I swear.  It works well, but didn’t come with a kickstand.  I am used to all my multimeters having some way to sit themselves upright.  This one clips together, then slides on snugly.  It doesn’t add too much bulk and stands steady.


PETG

I have a few high temperature projects, so it is time to venture beyond the safety of PLA.  It is a great material to print with, but loses strength quickly when things get hot.  Enter PETG.  It is higher temp and strength like ABS, but less toxic, and lower warping.  One of my firsts was the Franken-Cooler.  Not without issue, but largely a success.

Next I made a small clip to keep the USB cables in my car in order.  They always get pinched in the lid when I close my center console.  This will keep them in the pass through.  Simple but effective.  I needed the higher temp material because cars get hot in Florida.

I made some mods to the camera setup on my prusa.  Someone made a decent set of parts to attach a common webcam to the Y stage.  The only problem is their main bracket was a bit loose.  I started with PLA because that was all I had.  It sits up against the underside of the heated bed.  If I need higher bed temps the part could fail.  I designed a lighter tighter fitting version with speed holes to help cord wrangling.  The PETG part will not fail due to excessive bed heating.

DSC_0874

While I was at it I found a lens adapter that could replace the original webcam lens with a very wide angle one.

The new lens give a much better view of the print bed.  I can see the whole thing instead of just the middle third.

Screen Shot 2017-07-05 at 7.54.08 PM

Finally I can take time lapse videos that don’t look terrible.  Behold the birth of a baby groot.

April-May Prints

April was a pretty quiet month for printing because I knew the new printer was coming.  May turned crazy once I got the prusa up and running.  I already posted on my battery storage and drawer divers in another post.


Salt Grinder

A co-worker had a cool salt grinder that kept breaking.  He wasn’t able to get refurbs anymore, so off to printing we go.  The body is heavy stainless, but that center window is very thin plastic.  It falls over easily and snaps off the threaded area.  I printed a tapered part that threads and glues into the spot where the plastic window was.  In addition I made a little stand for it to sit in so you can’t knock it over as easily.


Tape Measure Pocket

I typically use a tape measure at the table saw to set the rip width.  It works, but I think a wooden ruler would be more reliable.  I printed a pocket for it to attach to my table saw side so it is always close at hand.


Wonderful Wooden Filament

Not exactly the same as woodworking, but fun none the less.  They make wood dust filled filament.  It prints well and has a neat texture to it.  This stuff was made for printing baby groot!  I tried a set of benchy boats; one stained, one not.  It doesn’t appear to stain well, but made a great looking fidget spinner.


Desk Trophies

One of the criticisms of 3d printers is that they are only good for printing desktop trophies.  They are good for lots of other things, but yeah, they make awesome desk trophies!

DSC_0846


Bit Holders

Ok, back to useful prints.  I wanted to better organize my various driver bits, so I made these organizers with nice spacing for you to get fingers in and pick out the bit you need.  The markers are made using prusa’s multi-color print.  The one where you switch spools at a set Z height, not the one that changes color mid-stream.  I couldn’t do that on my last printer, but I am very happy it works on this one!  Too bad they don’t sell filament in dewalt yellow.


Mom Stuff

Don’t look mom, this is all going to be a surprise for you!  My mom wanted some altioid tin organizers and paint holders.  I figured she could also use pen/knitting needle/cable storage stuff as well as some funky knick knacks.

DSC_0853


Arbor Press

I picked up a cheap arbor press for pressing bearings, pressing printed parts, etc.  I made a number of arbor press fittings sized just for skate bearings and bolts.  They have a square hole that gives a perfect friction fit onto the arbor press end.  The printer also provided a nice glue on storage rack for my press ends.  I couldn’t help myself with the two color printing, and made a crush hazard sign.  Watch your fingers.  I should print some pirate flare and turn this thing into an ARRRRRRRRbor press.


Random

Last but not least I found a cool box on thingiverse for holding spare printer nozzles, a handle for turning reciprocating saw blades into short hack saws, and a penny powered fidget spinner.

DSC_0854

I probably forgot something, but that is enough for now.  Since getting the new printer I have printed for 136 hours, and pushed out over 800 meters of filament.  That is kind of impressive.  I can stop any time I want.

Prusa I3 MK2s Build

I finally got my new printer.  Nearly 2 months after purchasing it shows up the day after my birthday!  That is one serious adventure in a cardboard box.

20170510_174042.jpg

I rolled out some paper onto the dinner table and got rocking.  I couldn’t help but setup my gopro and get a time-lapse of the assembly.

The total build time was between 5 and 6 hours plus some tweak and tune time.  The first print had to be the prusa logo in honor of the great maker.

With it up and running I got to bootstrapping.  The kit comes very complete, and really is a wonderful printer.  That having been said, the little knob they included to run the interface isn’t great.  It rubs and is awkward to use.  Print a new one!

DSC_0830

A lot of my filament is from when I first bought the monoprice back last summer.  It spent a lot of time sitting out collecting dust.  Someone made a nice clip in dust filter that goes right on top of the extruder.

Next came a replacement for the spool holder.  The one included works, but you have to sort of bend it out of the way to get a new spool on.  Plus something with bearings would DSC_0832roll a lot smoother.  Any catches or resistance in the spool rolling could cause Z banding as the extruder fights to pull in filament.  Thingiverse had a great assembly that sits on top.  It included a printable threaded nut and bolt that turned out gorgeous!  Skate bearings pressed into the rollers so the spool rolls with little resistance.  A filament guide keeps it running true.

Speaking of spool holders, my one major disaster so far has been this print job.  Sometime over night the extruder actually pulled the spool off the holder.  Nothing broke except the filament guide (just print another).  It turns out the spool was wrapped poorly and kind of synched itself off.  Poor spool wrapping perhaps.

I monitor all my prints with a webcam and octoprint.  This works out well while on the other side of the house, or on the go.  The only trick is that I have to leave a light on after dark.  Instead of leaving the room lights on constantly I designed and printed some brackets for holding thin under-cabinet LED lights.  Serendipitously one light will fit in a slot the spool holder had.  Only a small printed wedge was needed to keep it secure.  The other two went on my bracket.  It clears the extruder at full height.

It is turning into a proper looking monster!  Let the print games begin.