Inlay Experiment

After royally screwing up the inlay sign I made a few posts back I decided it was time to experiment with different inlay techniques.  I had mixed success, but will share my current round of results here.

I started by milling some test shapes into a block of maple and sealing them with a few quick coats of spray lacquer.  I thought I had a picture before applying any inlay, but apparently I do not.  There is a section for each inlay technique.

annotations

  • Polyester resin with added “castin` craft” pigment
  • Two part epoxy with added “castin` craft” pigment
  • Acrylic craft paint like you can find in any craft store
  • Inlace brand black inlay fill

Each section is made up of 3 letters.  The left most letter is 25mil deep, the center is 20, and the right one is 15mil deep.  I wanted to see how shallow I could go and still have the results turn out well.

My first observation is that the the castin` craft additive did poorly with both the epoxy and resin.  For starters, it took a decent bit to get a good looking black.  I was worried about adding too much, and you can see the polyester section is fairly translucent.  Both were very soft and gummy.  Attempted sanding mostly just pulled them out of their inlay pockets.

DSC_0132

This is really disappointing.  I bought a few different colors of the castin` craft stuff which I don’t know what to do with now.  On top of that, I bought a container of polyester resin and don’t know what to do with that either… I really thought that was going to work.

There are a few bright spots.  The inlace material looks great!  It is pricey, but at least it works.  The acrylic was promising.  The picture looks bad because I over sanded it.  Looking at the first picture, I barely put any acrylic paint down, just enough to cover the wood.  The surface texture looked bad, so I tried sand the paint smooth and got too aggressive.  Acrylic paint is a good option if I can get it to look smooth.  It is easy to get ahold of, comes in lots of colors, and is color mixable.  My next test will be to figure out how to apply paint thick enough so that it can be sanded to look smooth.

Big Apple Batch!

I am getting better at batch processing food for canning.  There was a nice swing of chop-boil-mill going on yesterday  Apples are on sale here so we went to our local produce market and stocked up with 37 pounds of galas, pink lady, braeburns, fujis, and honey crisps.  I was going for 50 pounds, but stopped when the box they gave us was getting pretty full.  Good thing too, my sink can’t hold any more!

DSC_0130

I made a previous post detailing how I make applesauce and apple butter, so see that if you want instructions.  I filled up the crock pot for butter, and jarred the rest.  In all 37 pounds of apples produced a full crock pot (4 quarts of sauce -> 10 half-pints of butter) and 7 quarts of applesauce (a very full stock pot!).  This is a good size because my crock pot was full, and my canner only holds 7 quart jars.  Next time I have a weekend at home I can use a few sauce jars to make more butter.  Hooray for fall!

Based on my previous few attempts I am producing 1 quart of sauce for just under 3 pounds of apples.  50 pounds would get me a full crock pot and two rounds of quart jars in my canner.  That would be a full afternoon!

DSC_0138

DIY Moustache Wax (Part 1)

I entered into a beard off with a co-worker earlier this year.  We both stopped shaving at the beginning of August, and will not do so again until sometime in December.  We had an agreement that small trimming could be done for cleanliness.  I don’t like my moustache getting into my mouth, or tickling my upper lip.  One option would be to trim, but figured why not train it!  So I picked up a tiny comb and some moustache wax.  This is where my problems set in.

I have tried a hand full of different waxes available online, because I can’t find any in town.  All with the exception of one smelled so bad I couldn’t bring myself to apply them.  These things sit right under your nose for goodness sake!  Many of them are quite pricey too.  10-15 bucks for on ounce or two.  That is rich considering it is mostly bees wax.  How about I make my own?

I did some reading and found a whole host of recipes out there with a lot of different ingredients.  EXPERIMENT TIME!!!  Bees wax on its own is too hard to use, so oils are added to soften.  I used the following ingredients:  Bees Wax, Shea Butter, Cocoa Butter, Cocoanut Oil, and Vanilla Extract.  The ratios for the first 6 batches are:

Slide1Everything was measured out with a scale and combined in a double boiler.  I went through the week using one each day and recorded my thoughts.

  1. Way too thin and easy to spread.  Not enough hold for my course stache.
  2. Decent consistency and hold.  No bad smells.  This one has potential.
  3. Too little hold and the Shea doesn’t smell good in my opinion.
  4. Not enough hold for my liking, but the smell was light and pleasant.  With more wax, this could be a good one.
  5. Practically melted off my fingers.  No go!
  6. The vanilla extract didn’t mix well.  Oil and alcohol.  Anything I add should be oil based if I want to influence the smell.

In all it was a good round.  If nothing else, number 2 is probably an acceptable substitute for my previously preferred wax, and at a tiny fraction of the cost!  I kind of liked the cocoa butter additive.  My next round will be variation on that version with more wax.  I might try a round with petroleum jelly instead of cocoanut oil.  That seems to be a popular alternative to the cocoanut oil.  Until next time, let it grow!

Liquid Inlay Failure

AKA Always read directions carefully

The plan was to make a small sign that said “CUBE sweet CUBE” for a friend/co-worker and myself.  I was going to mill some lettering into a nice piece of wood, and fill the pocket with colored inlay resin.  I will introduce the mill in a post soon.  Until then, I want to share a complete screw up I had.

I started by re-sawing (Cutting in half length wise.  It turns a thick piece of wood into two thinner pieces of wood) a scrap piece of maple.  Some quick sanding got the tops flat and ready to go into the mill.  A 0.063″ mill bit did a great job of removing material where the text will be.  I sprayed both pieces with a quick coat of lacquer to keep the dye from soaking in along the grain.  With the woodworking over, I moved on to filling the text area with a colored epoxy resin.

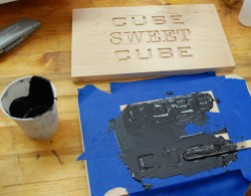
I taped off the area to be filled with black and mixed up the product.  The inlay filler I used is a resin with dye made by Inlace.  I metered out an ounce of the black resin and put in the proper amount of hardener.  After a good mix I poured it into the “CUBE” letters and let it sit.  There was a bit of shrinkage, but the results seemed ok. Next I switched to the “sweet” area and mix up the red resin with a proper amount of hardener… or so I thought.

It turns out that the black I got was both resin AND dye pre-mixed together.  The red, was just dye.  It is supposed to be added to clear resin.  12 hours later, It is still liquid, and I am sad.  I can’t come up with any good way to wash out the offending dye.  I think this is going to have to be a do-over project.  In retrospect, the lettering is a lot deeper than it needs to be.  A big waste of resin.  Unfortunately this stuff is hard to get.  I can’t find it in town, and no one online carries inlace’s full product line.  I might try to find their clear resin and do it over, or I might try someone else’s epoxy dye that is more attainable.

Pint Canning Crate

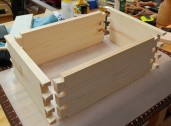
This is both a simple, and overly complex project.  It is simple in that I have made a set of pine boxes with glued on plywood bottoms.  Had I been only interested in making them functional, I could have finished these in an hour or two.  Instead, I wanted to practice hand cut dovetails, and make them look good.

If you want to make basic boxes to hold canning supplies, then cut the boards and attach via whatever method you like.  Screw/glue, pocket holes, nail, half lap etc…  1×6 boards are the perfect size for pint cans.  Remember they are actually 0.75×5.5″.  Cut them so the outside dimensions end up being 11×14.5″, and attach a plywood bottom.  1/4″ plywood seems adequate.  It took me a number of hours to finish the two crates, but the experience was worth it.

DSC_0106


Dovetails

If you are crazy like me and want to make basic utilitarian boxes with super fancy joints, then read on.  Or if you just want to see how I make dovetails.  There are a lot of good resources out there that detail how to make dovetails.  I am going to give a brief overview of how I do it now.  Maybe in a few years when I get good at them I will make another post with some sage advice.

  1. Cut boards to rough length, and use a shooting board to clean up ends and get lengths exact.
  2. Use a marking gauge to set tail depth to thickness of wood.  Pencil marks make everything easier to see.
  3. I start with an end pin mark, then use a divider to layout the remaining tails.
  4. The veritas dovetail marking gauge is quite excellent for marking up the tails.  Always use a knife for the best marks.
  5. I hand cut the tails on the waste side.  The hope is that they are cut close enough to not need any chisel work.
  6. Remove the waist material with a coping saw, then carefully pare out with is left with a chisel.
  7. Use the back side of the tails to guide a marking knife for the pins.
  8. Cut pins and clean waste out in a similar manner as the tails.
  9. After a test fit I apply glue to the pins and assemble the box.
  10. If everything was made right the box should go together square and require minimal clamping.
  11. Applying BLO (boiled linseed oil) provides an easy and cheap finish.

There were 8 joints total.  Most of them turned out decently, but not GREAT.  Practice will help out, but I think pine might be hard to work with.  I will have to try making dovetails in a harder wood to see what the results are like.


Shooting Board Handle

I have been using my shooting board a lot the past week.  It was becoming hard on my hand because of a lack of handle.  You just kind of grip the side and push.  After a while that starts to hurt.  Some of the more expensive planes made for this purpose have an angled handle, or a “hot dog” handle near the middle of the plane.  I decided to make one that sits in the middle of the plane.

I took a chunk of maple I had sitting around and got to work tracing out the shape of the plane onto the wood.  The edges of the trace were chopped out to allow for pairing with a chisel.  This is one of the many times that I wish I had a router plane.  Maybe next year.  With the center area cleaned out I cut out the handle and did some rough shaping.  The plane sits well in the cut out pocket, and with a strip screwed down across the back, It feels very solid.  I can still get the blade in and out even with the handle installed.  I might continue to shape the handle for comfort as I use it.  Otherwise, it is a huge improvement over the nothing I had before.

Shooting Board and First Dovetail

For further adventures in hand cut woodworking I will need a shooting board.  If you don’t know what one is, the use will become clear soon.  After my miter box debacle I should have gone simple for a shooting board.  I didn’t.  My first attempt had an adjustable and removable stop cleat on top with hand cut grooves and yada yada.  It didn’t work well.  I backed up and thought simple and short term.

A shooting board lets you place a low angle jack plane (good for cutting end grain) on its side while holding a board to be trimmed square against a backer fence.  The plane runs across the end grain taking tiny shavings as it goes.  I attached two pieces of 3/4″ plywood to each other allowing a two inch strip on the right for the plane.  Then, at a 90 degree angle to the plane running slot I attached a stop fence.

wpid-20141012_151232.jpg

Here it is with a scrap pine board being trimmed.  The plane is my new No 62 woodriver low angle plane.

wpid-20141012_151610.jpg

As you push the plane forward, it cuts off tiny shavings from the end grain.  If the original cut wasnt perfectly square, the shooting board should fix it.  Also, It makes the end grain finish look much nicer than any saw could.

wpid-20141012_151624.jpg wpid-20141012_151918.jpg

The top piece of pine was saw cut, the bottom was cleaned up with the shooting board.  I will have to monitor the squareness of the fence.  If it wonders over time, that will introduce errors into my work.  Until then, this one works well.  So well, I had enough time to start some dovetail practice parts.


TADA!  My first hand cut dovetail.  I needs some cosmetic help, but holds well and is a really sturdy joint.  I will post more details once I have been through a pile of them and have a more solid procedure.  The shooting board did a good job of squaring up the pine and giving me a workable surface.

wpid-20141012_161352.jpg

Next, dovetail joined crates to store half pint jars.  Practice makes perfect.

How Not To Make a Miter Box

I have been slowly getting into more hand tool woodworking as time goes on.  I am starting to practice dovetails, and instead of using one of my power saws to cut the wood down to length, I wanted to do it by hand.  A miter box helps this by aligning the saw square every time, and providing a zero clearance backing to prevent tear-out.  I thought building one would be super simple and straight forward… I was very wrong.  Follow my misadventure, and learn from my mistakes.


Round 1:  First, I cut out everything, and attached the side fences to the top of the bottom piece as shown below.

wpid-20141010_173319.jpgThis might not seem like a problem (it didn’t to me at the time), but the error will reveal it self soon.  Next, I started the guide cut by using a square against the front fence.  This acts as a guide for my blade.  Once that is started, everything cut from here out should be square.

wpid-20141010_173505.jpg

After cutting down 1/10″, I used another square to try to keep the blade vertical.  When the cut is about half an inch in, the saw should guide it self straight the rest of the way.  My resulting cut shows an issue.

wpid-20141010_173614.jpg          wpid-20141010_174527.jpg

The cut wasn’t very straight, and the end section of fence rotated.  The only thing holding it in was a single screw coming up from the bottom.  I should have attached those to the sides of the bottom piece, not the top.  Also, western saws cut on the push.  Holding the part to be cut to the front fence is nearly impossible, and I did not square my saw to the back fence.

Ok, no problem.  Try try again.  Square to the back fence instead of the front, be more careful on the vertical squareness and make new fences to attach to the sides of the bottom part.  Great, lets do it!  The next one even has the front fence cut short and rounded to help get my hand in there and hold the cutting stock firmly against the back fence.


Round 2:  I made the changes, used the squares, and here is the resulting cut.

wpid-20141010_180147.jpg

Hmmm still not doing well on that vertical cut… In fact that almost looks like there is some curve to that cut.  Well what happens when I try to cut something for real?  Jamming that is what happens!  I got completely bound up half way through a piece of pine.

wpid-20141010_180300.jpg

I am starting to think something is wrong with my new saw.  I checked the edge of the saw against a ruler and saw a lot of bow along its length.  It was hard to take a picture of, but there was at least 40 thousandths of an inch gap.  I guess I shouldn’t expect more from a 10 dollar lowes purchase.  My loving wife bought me a good quality crosscut saw for christmas.  It is too small to properly use in a miter box, but let me give it a try.

wpid-20141010_180713.jpgwpid-20141010_180534.jpg


Nice cut, and it did a great job cutting through that pine mentioned earlier.  Very square cut and not a ray of light past the straight edge!

wpid-20141010_180859.jpg

The moral of the story is to buy decent saws.  Too bad new ones are very expensive.  I feel like good old ones are to be had on ebay, but I have no experience sharpening saws.  Maybe that is a project for a future day.  About the only thing I did do right was the cleat on the bottom.  It lets you push the box up against the edge of the workbench, or clamp it in the vise.  I guess I will remove the front fence, and buzz down the back fence.  Basically turn it into a bench hook.

Next adventure, shooting board!

Peanut Butter

Homemade peanut butter is one of life’s simple pleasures.  It is pretty easy to make, stores well, and every batch I have ever made tastes good.  A question that immediately comes to mind is: “Why make peanut butter?”  After all, it is cheap and plentiful at the store.  Even if you were just looking to avoid the hight fructose corn syrup that exists in most there are many “natural” brands that exist without added sugar.  That is all true, and yet still I like to make my own.  Why?

I think it comes out tasting better than the “natural” store bought brands, and it really doesn’t take much work.  Plus you can tweak things to your liking.  I enjoy a little honey in my peanut butter.  Some things are just worth trying to make once.  If only to see how it gets to the shelves of your stores.  It is easy to forget how much modern industrialization has saved us in labor and time.  An occasional reminder is refreshing.


 Directions

  1. I start with 2 cups (~10oz) of dry roasted peanuts (you can use honey roasted or any other nuts for that matter) in a food processor.
  2. Turn food processor on.  At one minute it should look coarse but kind of like peanut butter (see picture)
  3. At two minutes, it will look about done.  Don’t stop there!  I take the top off and scrape down all the sides to make sure everything is getting combined well.
  4. Take this time to add ingredients
    1. 2-3 teaspoons of peanut oil (for added creaminess)
    2. 1 Tablespoon of honey (I like tupelo)
    3. 1/4 teaspoon of salt
  5. Continue processing for an additional minute, and you have peanut butter!

Ingredients: I have worked out those ratios based on my tastes.  You can get by with out adding anything or by adding lots of stuff.  Just don’t go overboard with the salt, that can sneak up on you.  The two cups of starting peanuts used my 20oz jar in two pretty even batches.  Dropping down slightly to a 16oz jar of peanuts should be fine.

Food Processor: I have made this with a smaller food processor and it had a lot of trouble keeping up.  If yours doesn’t look like my picture at the set times, then keep going till you get the right texture.  Drop back on the amount of peanuts next time.  Mileage may vary with the quality and power of food processor.

Storage: I stick mine in cleaned half pint mason jars.  The 20oz of peanuts gave 3 half-pint jars of peanut butter.  These can not be canned with normal methods, but do store well in the fridge for a few months.  These jars will not last that long in the Hansel household.

Cold peanut butter tough to spread?  Give it a 20 second trip through the microwave to get the right viscosity.  A longer trip will make it more like a dessert drizzle for ice cream!  The texture is pretty smooth, but you will never get it as smooth as the skippy guys do.  Crunchy peanut butter can be made by chopping up a small batch of nuts in the processor before hand, and combining in the final few seconds of your batch.

-Chase