Clamp Bucket

Lots of people store clamps in large racks and in rows along their wall.  I don’t have much wall space with easy access, and a big clamp rack is a no go.  I do have some buckets though!

DSC_0046

Good, but it kind of tips over easily and could use higher sides.  Screwing the bottom of the bucket to a scrap of spare particle board keeps it from tipping.  I used small segments of pine to create risers for the second bucket.  Cutting out the bottom of the second bucket let the clamps go all the way to the bottom.

Better, now how does that happy little clamp sit in there?  Oh look, 20 friends decided to join.  Bessey and Jorgensen and Wood River Oh My!

DSC_0052

A clamp bucket for less than 10 bucks.  I had a pile of 12, 18 and 24 inch clamps lying around that really needed some organization, and this has fit the bill.  It could be a little tough to find the exact length of clamp I want in the bucket without some trial an error.  That having been said, space is at such a premium in my shop, I am willing to sacrifice a little speed for space.


Butcher Paper Holder

Butcher paper is an amazing thing to keep around the house.  It makes a temporary place-matt for messy projects on the nice dining room table, a large drawing surface, a good backdrop for small photography, a big clean surface for meat prep, holds cookies after baking, it wraps briskets for the Franklin Texas crutch, keeps wood finish and glue off your nice workbench, and about 1000 other uses.

Butcher paper is pretty reasonable if bought in a large roll.  The problem is that large rolls are heavy, tough to cut straight and just a pain to deal with.  In comes a butcher paper holder with fun features.

First, I took a few pieces of clean wide pine and cut some decorative sides.  I used to only make curves by tracing round objects like paint cans, but wanted to push myself outside of my comfort zone.  French curves let me get a little fancy and free form.  They could have been blended better, but at least I am learning.

I didn’t get fancy with the construction, just basic wood screws to hold it together and BLO to seal it.  Simple, but it looks right.

DSC_0005

This holds the roll and allows for easy removal of paper.  Next comes cutting.  I picked up a small strip of steel and started free-handing an edge on my grinder.  It is hard to get a consistent edge on something over 2 feet long.  I eventually went to an angled table on my little belt sander.  It performed well enough to produce an edge capable of cutting/tearing in a line.

Lastly I added felt pads to the bottom and left side of the holder so it can sit on its side for storage and not scratch the table when in use.  A handle at the center of gravity on the right side makes it easily portable.  Now I need a brisket to smoke and try out that butcher paper wrapped Texas crutch.

DSC_0032

Botanical Fest

Our local university has a botanical fest every year.  It is a wonderful event.  Plant vendors galore and fun people everywhere!

They also usually have fun nature displays and animal groups.  Here is an adorable little bat!

2016-03-05 09.22.32

We started pulling our little wagon around and picking up lovely planties.

2016-03-05 09.40.24

Before we even got home we noticed one of the girls couldn’t wait to snack on our new plant selection.

By the time we finally did get home we had a pretty full wagon.  I traded my old wheelbarrow for this dump wagon a few weeks back and couldn’t be happier, it is really useful.

2016-03-05 14.58.56

With the plants out I used the wagon to mix up a batch of coconut coir.  A small brick of the stuff can soak up a lot of water and help keep it in the soil.  Unfortunately the brick is hard to breakup.

2016-03-05 15.15.50

A bit of sawing and soaking later and I had a big soupy mess.  I was going to toss in a bag of compost and vermiculate with this, mix it and call it potting soil.  I went a little overboard with the vermiculite.

I mixed equal parts of this stuff with compost to make a potting soil.  Some plants needed sprucing up, others were dead and needed complete replacement.

We probably need another 8 or 10 plants to finish out our replacements, but we are off to a good start and we have plenty of diy potting mix material.


Bee Rescue #2, Frame Capture

My friend found another hive setup in the floor of a piece of industrial equipment nearby. They were going to rebuild the equipment and wanted the bees gone.  Imagine an ISO shipping container with two layer thick plywood and a load of bees setup underneath.

2016-02-27 09.26.44

I can see a few of them, I wonder how far back they are?

2016-02-27 09.30.42

Oh boy, that is looking like a lot of bees!  There was a lot of equipment inside that couldn’t be moved, so I had to do some creative crawling and cutting to get into the floor.  Lots of cutting and prying later we had pay dirt!

2016-02-27 10.06.54

There was about a foot of space between the two floor bars, and they went back about 4 feet from the outside wall with comb and bees.  We came up with a new technique for getting the comb back home.  Put them in empty frames, and use string to bind it in place.

2016-02-27 11.06.07

2016-02-27 11.06.24

This worked really well.  One person would hold the frame upright and keep the comb in place while the other would wrap the string around.  At first we were trying to be really careful with clove hitches and half hitches to keep it all together.  After a while, everything got so sticky in honey that you could kind of just wrap a few times and it would all stay put.  Hopefully the bees will expand that comb out and cement it in place.  Later they will either chew through the string, or you can remove it yourself.

There were a lot of bees around.  I will try to update in a few months when they get well established to see if the string trick works.

2016-02-27 11.13.59

Bunny Fence Upgrade

Our ravenous rabbits know no bounds!  We have a baby gate we put up across the porch door to their area when the weather is nice.  The only trick is that they have taken to chewing on the fence from time to time.  It was cute at first, but they have been making headway on an escape.

DSC_0218

I cut out all the gate material below about 15 inches to clear out the chewed spot and make way for the new barrier.

DSC_0214

I could have upgraded to titanium coated steel mesh, but I figure they would chew through that in a few months as well.  Instead I went with thin acrylic sheeting.

DSC_0219

Covering just the bottom half kept the cost down and I doubt they will be able to reach high enough to do significant chewing above the clear plastic line.  I attached the left piece over the outside face of the frame because there was room.  The sliding action of the gate wouldn’t allow the right piece to be attached the same way.  Instead, I used some of the remaining white gate material as a backer, and drove screws in at an angle to wedge the plastic in frame.

DSC_0220


The Reaction

How was it received?  Pretty well I guess.  They have nosed it a few times, and tried to paw at it a bit.  Here was their first introduction.

DSC_0225

DSC_0227

DSC_0228

The window is clean for now, and provides an unobstructed view of extreme cuteness.  The way these buns are, I will come out one time to find them all raiding the fridge with a 4″ perfectly circular hole cut in the plastic window.  Clever buns!


Bee Rescue Rangers

We had a first in our beekeeper careers.  We helped rescue a wild hive that was setup in someone’s shed.  Lots of mistakes were made and a considerable amount of improvising occurred.  Here is the scene, a shed next to someone’s house has a very active hive coming and going from the corner.

20160206_112556

It was hard to get a picture of, but there were a few bees coming and going every second.  This was obviously a big active hive.  A bit of work on the outside panels led us to thinking that they were probably setup under the floor.  A stethoscope would be helpful next time.  We did some cutting between the joists and came up with this chunk of floor.

20160206_115045

Lots of slow careful work got all the comb out and into a medium box.  We should have brought a bigger boat!

20160206_121117

This was the only box I had spare, so it will have to do.  In addition we did a lot of really careful vacuuming with a shop vac.  We were able to grab thousands of bees this way, and they all seem to have survived the encounter.  This hive was found by our friend Willow, and it is going to live in her yard.  She has a thing for hot pink.  Good luck in your new home bees!

2016-02-06 15.19.02


Bonus Farm Tour

I got to start the bee rescue day off with a short lecture to the Melbourne Village  community garden about beekeeping.  They were very interested in beekeeping, but had a lot of questions.  After a bit of chatting they are on board and are looking into doing a few hives as a community.

After the rescue we were invited to one of the garden member’s backyard.  We got to see chickens and sheep and goats oh my!

The best part of it all was the dozen eggs I got as thanks from this backyard farm for giving my little bee talk.  Fellow beekeepers should seek out local community gardens.  They would probably be interested in hearing about beekeeping as a matter of interest if nothing else.  Some might be into it enough to start their own community bee hive!  Seriously though, check out these eggs!

2016-02-06 16.05.35


Smoker Renoation

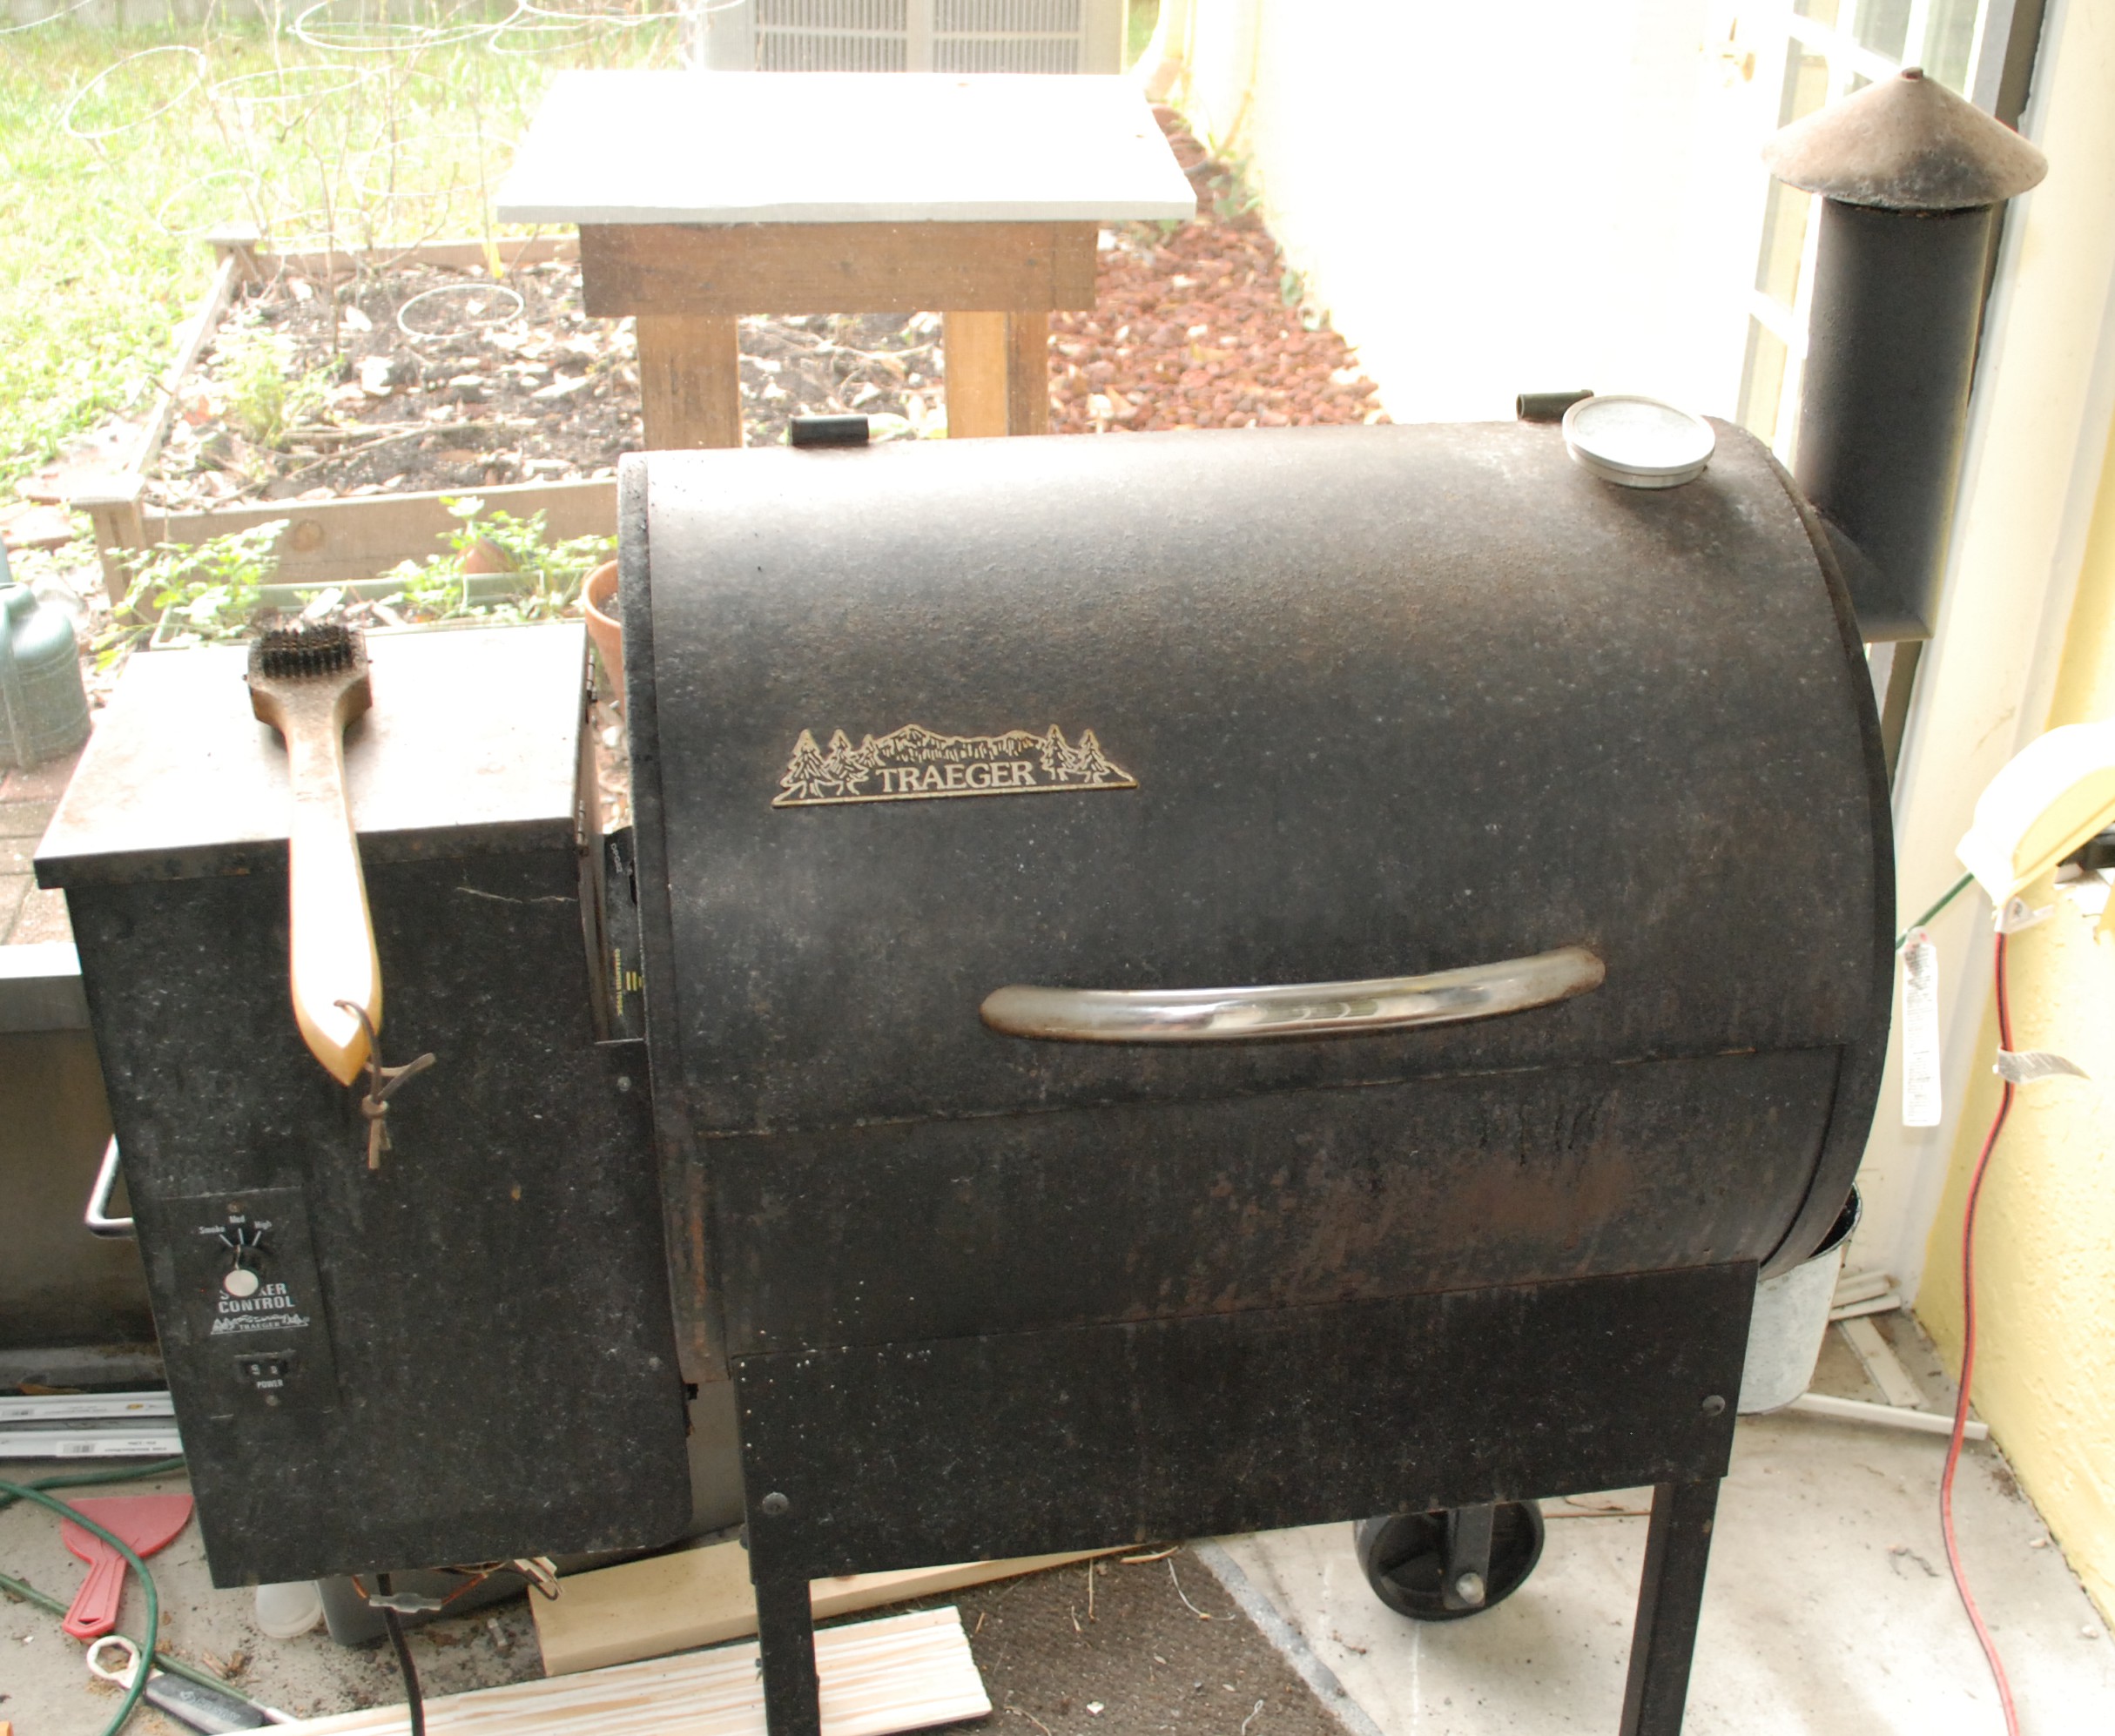
My beloved smoker has fallen on hard times.  I bought a traeger pellet fed smoker in the summer of 2009, and have done mountains of delicious meat in it ever since.  All those years outside in florida have taken their toll.

DSC_0092

The paint has faded and is rusting through in places, the outside is quite dirty, and a back leg has completely rusted through. I had to prop it up to keep the thing from rocking.

The inside doesn’t look much better.  Surface rust is kind of unavoidable, but neglect had built up on the walls and in the bottom tub.  I should really clean this thing out more.

My bad behavior aside, this thing is built  like a tank.  Even with all the years of outdoor use, I was able to pull all the screws out.  There is a lot of surface rust, but nothing too deep except for the one back leg.  I started to take everything apart and became even more enamored with my smoker’s build and design.

With all the parts pulled out and the mess cleaned up it was time to get everything back into shape.


Rebuild

I used a wire brush on my angle grinder to strip all the bad paint and rust.  I started everything with flat black rustoleum grill paint.  It covered everything but looked kind of bad.  I was in the hardware store and noticed they have a semigloss.  It matches the original paint job.  I redid most of the parts with a primer, and gave everything another coat with the semi-gloss.

DSC_0130

DSC_0131

Once all the paint was down I started rebuilding.  Some of the hardware got replaced, but most of it was actually in really good shape.  The back leg was shortened and fitted with an aluminum extension.  No more rusting off foot!  I replaced the hot rod starter because it is hard to get to and didn’t cost much to replace.

Other upgrades happened along the way.  They have a nice shelf that bolts in with the legs.  It folds away when not in use, and sits nicely in line with the entrance so you can transfer to and from the smoker.

DSC_0143

I pulled out the old controller that only had 3 heat settings.  The new one reads the internal temperature and feeds in pellets accordingly.  It has an autostart-up feature and a shutdown cycle that helps prevent soot.  I also replaced the drip bucket because it was pretty nasty.

All in all it looks pretty good.  Because I couldn’t get all the old paint off there is some odd texture, but it looks way better than when I started.  Now that I have the primer and grill paint around I will make it a point to check every year or so for bad spots that need a touchup.

DSC_0144

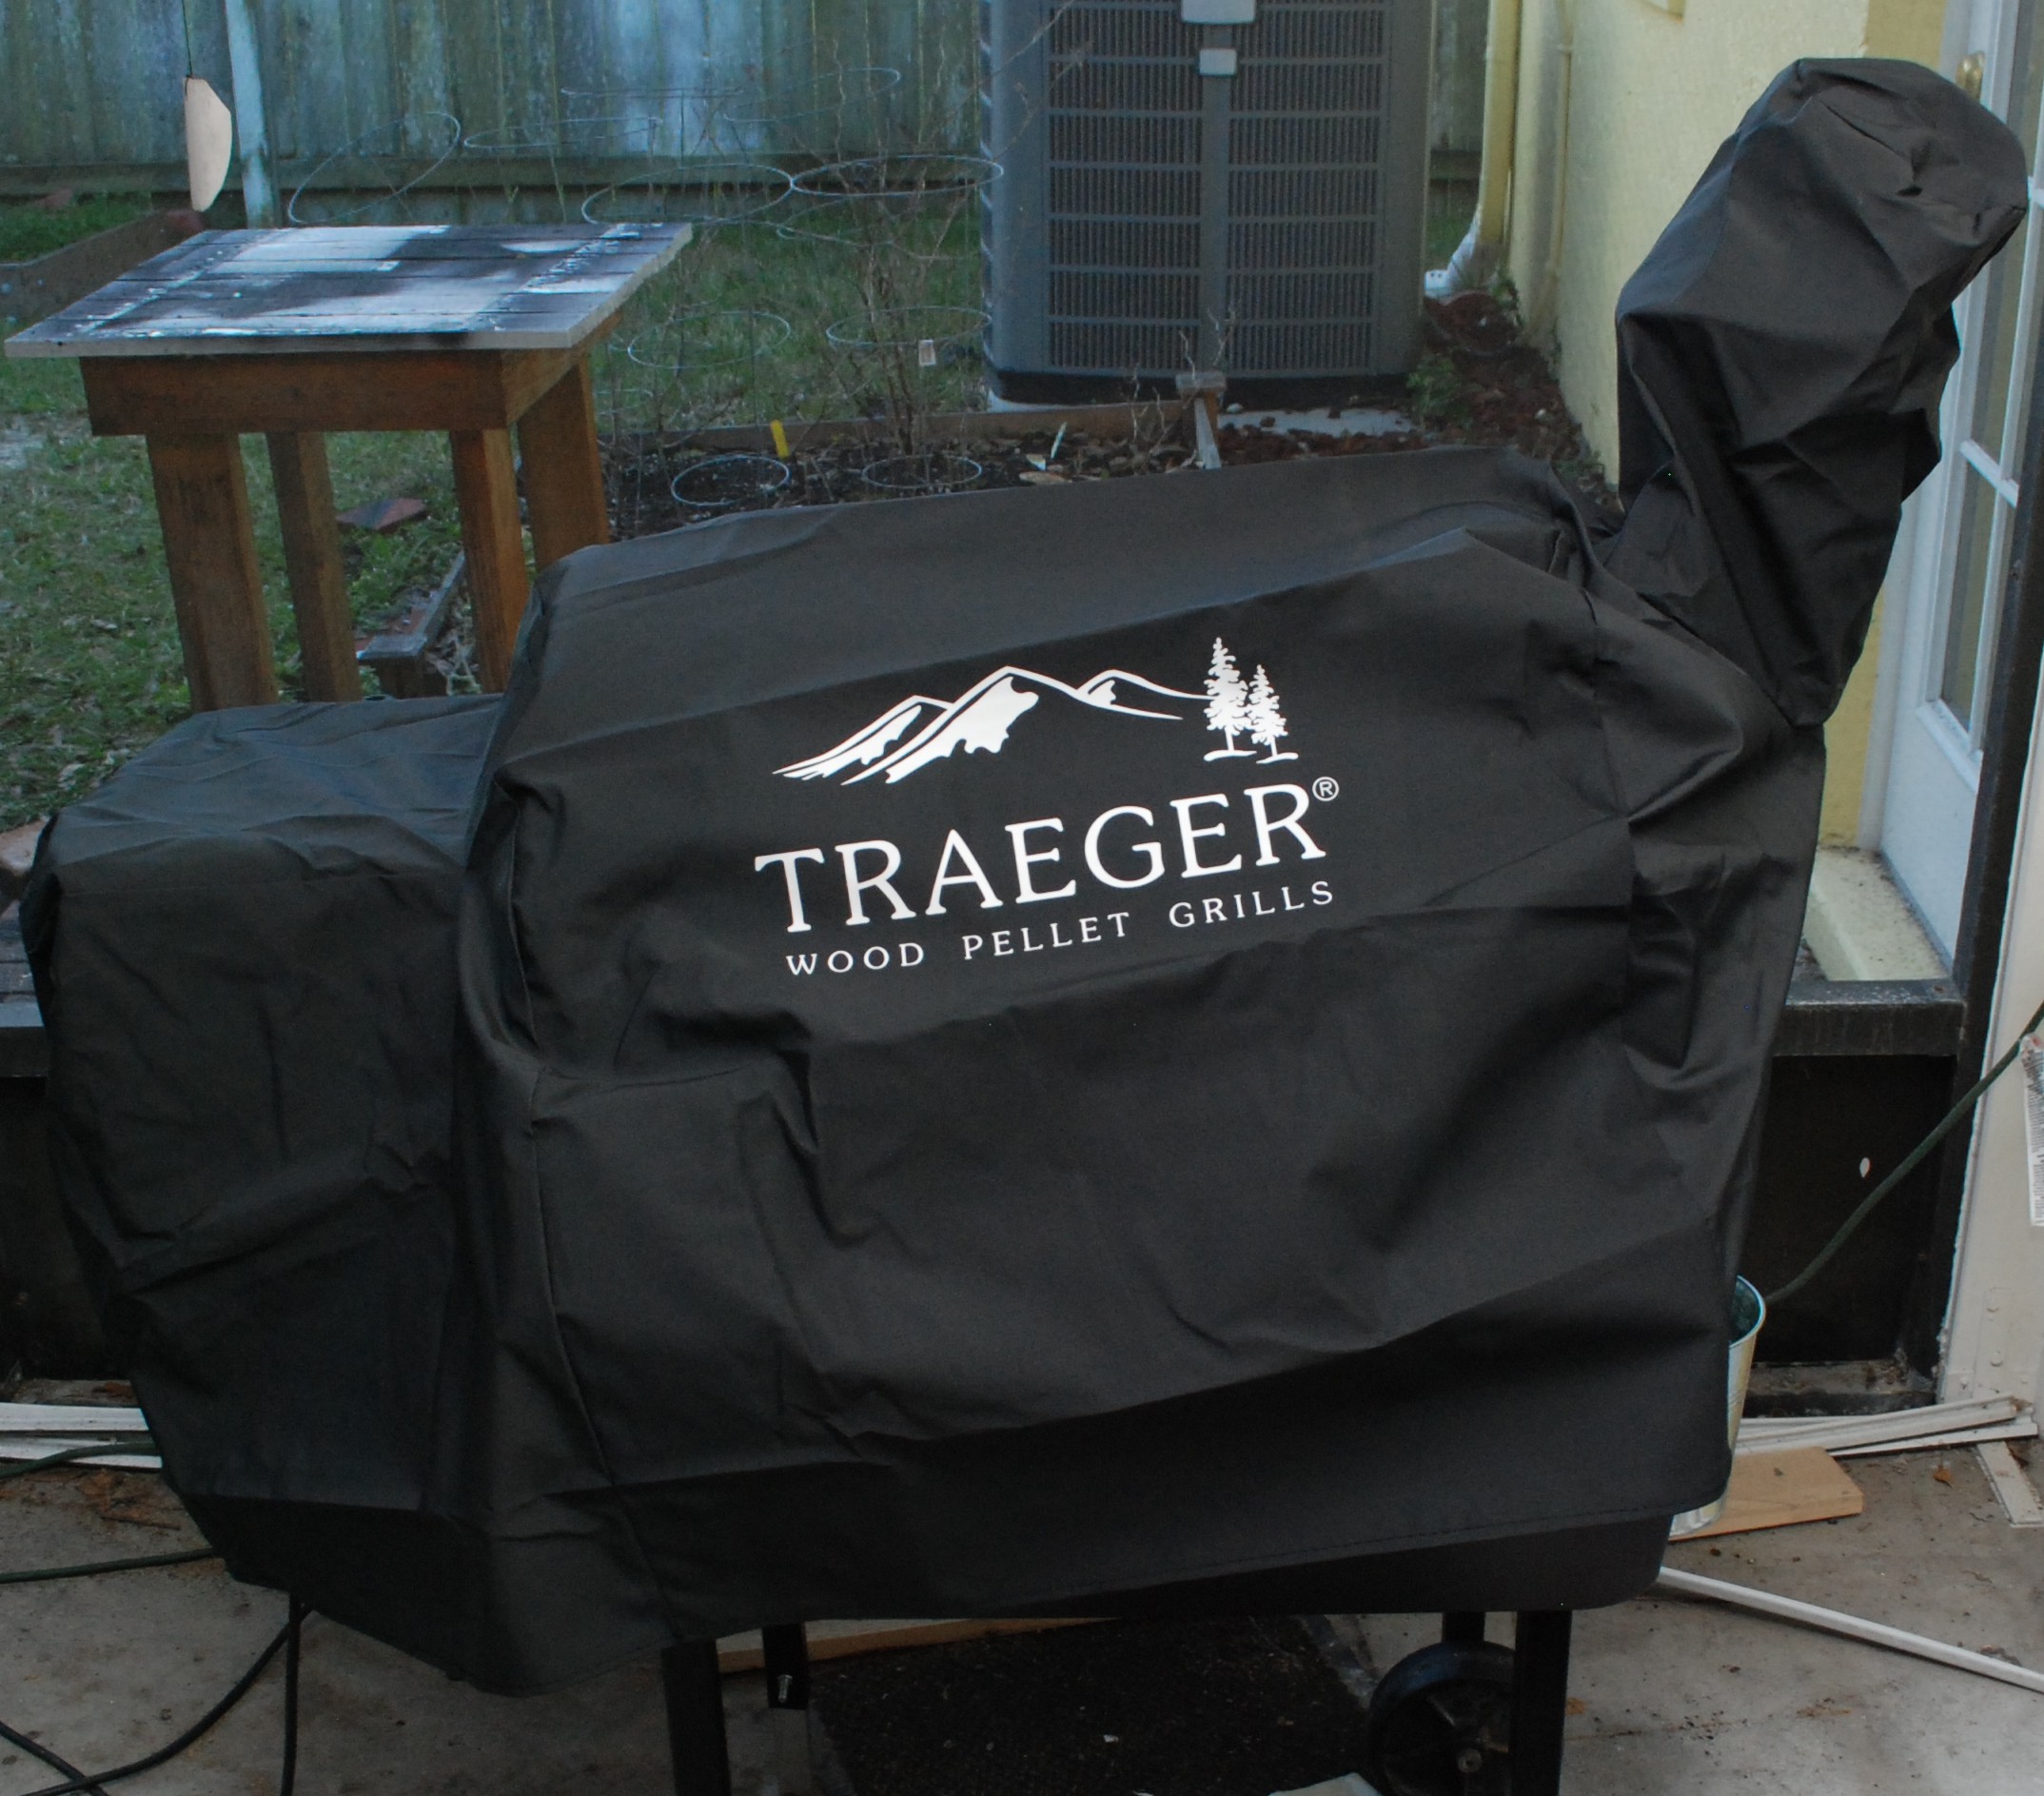
Lastly, the accessory I should have bought when I first got the grill.  A cover!  I don’t know how much longer the paint would have lasted with one, but it is worth a shot.

DSC_0146

This smoker rocks.  With a little more preventative maintenance than I had been doing I can hopefully look forward to another 6+ years of service.  Delicious smoked meat posts to follow!


New Ukulele Collection

I mentioned in the previous post about a small collection of ukes that came my way.  After a little cleanup and a restring, they were ready to be accepted into the collective.  First though they needed straps.  I have found a strap to be very beneficial to my playing.  Changing chords goes much faster and more reliably without having to worry about the head dropping.

DSC_0135

The button installation went quickly and smoothly when using the technique I laid out in my button install post.  I pulled together a hodge podge of straps.  They all work, but some are maybe not the best style for the instrument.  I will have to keep an eye out for fun and flashy straps to match each ukulele.

DSC_0136

On the left is an acoustic-electric Cordoba, the middle is an eight string Lanikai, and on the right is the Kala I restored.  They are all tenors which is a bit bigger than the concerts I typically play.  The size upgrade is nice, and I think this might be my new standard size.

Ukulele Restoration

I came into a few well loved and used ukuleles by chance.  This kala is my favorite by far.  It is very similar to one I had looked at new in a sam ash.  This kala is a slightly different style and is even more gorgeous!  It has obviously seen a lot of play time.

DSC_0120

DSC_0122

The fretboard looks almost black near the top frets, while you can actually see the rosewood at the lower frets.  Years of finger oils has given it a great color gradient.  Likewise on the back of the neck, the finish has been polished from satin to a high gloss near the top frets.

DSC_0118

Unfortunately there was a pretty heavy level of grunge built up around the fret wire, and the nut fell off when I tried to change the strings.  A few dabs of titebond type 3 and a small spring clamp had the nut back on the road to happiness.

DSC_0123

The cleaning was all done with a microfiber cloth.  I didn’t really want to clean off too much of the oils, and I don’t know what, if any, finishes were used on the fret board.  A good microfiber cloth is perfect for this.  Good at buffing, and non-abrasive.  All that green was from the frets being mildly corroded by salty body oil.

DSC_0126

Once the glue had all dried and the body had been buffed clean, I was able to restring.  It looks and sounds gorgeous.  More images of the collection and recordings to follow!

DSC_0129

Paracord Wrapping Jig

I went a little nuts and bought a 1000 foot spool of paracord.  I went from having no rope around the house to having more than I knew what to do with!  What to do with it was actually a bit of an issue.  The spool stores nicely, but isn’t immediately useful.  You have to pull out what you need, cut some off, and then burn the ends to keep it from fraying.

Enter the fast pull rope wrap.  It is a simple way to bundle up paracord into neat organized bunches that don’t get tangled, and they let you pull out a little or a lot as you needed.  The best way to make one is with a jig.  My jig has some neat and novel features you are sure to want if you have to make more than a few bundles at a time.  With it I was able to break my spool down into more reasonable sizes that could be sprinkled around to various locations that might need rope.