Table Saw Fence

I have had the same fence on my table saw for most of the life of the saw.  It is a bit of plywood and some UHMW plastic.  The plastic has great wear and friction properties, but was never that flat.

DSC_1073

I was looking for phenolic resin faced plywood as a replacement, but was coming up short locally.  It is available at the wood stores in Orlando, but they are far and charge a boat load of money.  I read about using cabinet grade plywood and applying formica to the front.  That is a lot of work, and bubbles could prevent flatness.

Instead I found out my local cabinet shop sells something called “White Liner” plywood.  It is nice birch plywood with a side covered in some kind of hard slick plastic.  It seems pretty durable and is very smooth.  I got a whole sheet for 58 bucks.  Cheaper than the 1/4 sheets the wood stores were selling the phenolic stuff for.

DSC_1072

I cut up 4 inch wide slices and doubled them up with glue to make a thick flat fence.  If the face gets damaged I could probably flip it over and redo the countersinks to keep using it.  I had so much material I made a pile of spares.  These could be used for sacrificial fences or whatever!

The new fence is very square to the table and parallel to the blade.  I have made some cuts with it, and life is good!


With nearly 2/3rd of the sheet left over I needed to get creative.  I use a piece of melamine in my planer to act as a flat surface to bridge the gaps between the fold out tables.  It makes for easier smoother cutting, but the inner particle board is starting to fall apart.

I cut up two pieces and glued them together using my table saw top as a good flat surface to clamp to.  This is thicker than my old one, but the planer can handle up to 6 inch thick boards.  No clue how I would ever get anything that thick into the planer, so I can sacrifice the depth.  A curved bit of plywood on the front acts as a stoping cleat so the sliding surface stays put.

It fits well and ought to stay really flat with the added thickness and quality material.  With a small touch of paste wax my planer has a new lease on life.

Sharpening: Flat Back Jigs

I don’t always build sharpening equipment, but when I do I go overboard.  With a more stable work station I can get deeper down the sharpening rabbit hole and focus on doing better work.  I am trying to take sharpening from an afterthought to an everyday part of my woodworking.  This post’s focus is going to be on flat backs.

It is important to have flat chisel backs and for the last inch or two of your plane irons to be flat.  Pushing down on a small area gives me hand cramps after a while.  I always want to cut corners in this area, but need to get better.  Ideally when human frailty becomes a process issue I would advocate for robotics.  I am not that rich, so a helper jig will have to do.

I started with the idea of embedding some magnets in a block of wood sized right to fit in your hand.  Instead I found this magjig switchable magnet.  It has a lot of force when you rotate the knob and align the magnets.  I thought about woodworking a handle of some sort, but printing turned out to be a lot easier.

The magnet is be better than hands even without the printed parts, but they help spread the force over a larger area of the chisel, and makes for a better handle.

DSC_1060

I made a gif of it in action.  It holds really well and lets me put downward pressure across the chisel while controlling the back and forth motion.  This works well on wider chisels, narrow ones don’t take long to flatten.  Added to thingiverse.

Flatening Gif


Plane blades are a lot wider and thinner.  That makes the magnet option harder.  This jig I found in a popular woodworking article won’t have that issue.  I started with a quite lovely short piece of maple.

DSC_1064

I used to never make a jig out of anything but the cheapest material I could find.  Now I am starting to get the idea of the jigs being tough and good looking themselves.  That having been said, I made a complete hack job of this slot.  It was an odd size so none of my chisels quite worked.  I drilled out a little pocket so my handle bolt wouldn’t spin.

A big mushroom handle on top lets me grip with the whole hand and have a lot of control and force.  The slot allows for a wide range of plane blades to be clamped.

It probably isn’t the best mirror polish the back of a plane blade has ever seen, but it is hands down the best I have ever done.  Plus, it is a jack plane, so perfection isn’t exactly required.

DSC_1071

DSC_1084

I played around with the jig for a while before applying a finish.  I made a second hole on the other side to move the handle closer to the edge.  That seemed to control a little better.  Adjustment there might be nice in the next version.  The bolt that clamps down the blade was an issue too.  I could only tighten so far before the head would spin.  Sometimes the blade would want to rotate.  I thinned a scrap of maple and cut another pocket.  Now there is wood on metal instead of metal on metal (no chance of damaging the blade), and I can tighten to my hearts content.

Lastly a touch of tung oil made everything look gorgeous.  This thing will probably be black with grinding good in a month, but for now it is gorgeous.

DSC_1085

DSC_1086

Sharpening Station Stability

I built a sharpening station last year and like it a lot.  It has one issue though.  The whole thing wobbles badly during use.  The casters and small base don’t make a good combination.  I came up with a solution in this video:

It took a bit of messing around with feet material, but felt will work just fine for now.  I might find some kind of heavy duty rubber feet for longer term use.  Until then, stay sharp my friends!

Bunny Defense Network

Our two renegades rabbits are always looking for exploration and adventure.  Often they try to find it beyond the barriers we put up to keep them out of certain areas.  At first, opening up their exercise pen and placing the edges against the wall corralled them enough.  Now, they realize they can shove and move the fencing enough to get beyond.  I need a way to anchor the fence so they stop venturing beyond designated borders.

I started with sort of a three way corner thing to sit on the other side of the fence.  I wanted to add weight so the brace would be harder to move.  Boxing in the one leg segment and filling it with sand made the whole thing quite heavy.  I glued on a lid to keep from spilling sand all over the house.  I left off finish because I figured the little devils darlings would figure out how to chew on it through the fence.

This 20180114_162217
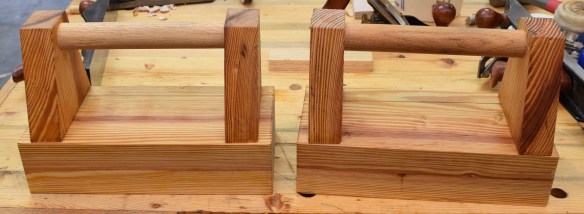
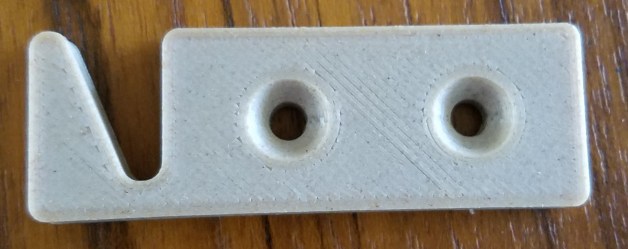
all started when I had an idea for a simple 3D print that would hold the fence segments if you screwed them to something sturdy.  It seemed like a good idea, but eventually needed another iteration.

DSC_1037The brackets looked pretty good in wood filled PLA and held the fence well.  The issue I ran into was when it came to actually holding the little beasties beauties back.  On the first night they rattled it enough to knock two of the rungs off their hooks.  It only took them a few hours to figure out how to chew on my new creation as well.  Good thing I left off the finish.  I was going to need a deeper hook to keep them from breaking the fence section loose.

DSC_1039


In thinking about the design, it became apparent that the right half of that hook wasn’t needed.  The wooden upright would act as one side of the hook, I just needed to provide the other side.  I increased the hook size and stripped the part down till it was the bare minimum of what was needed.

DSC_1041

A few clear grippy bumpers on the bottom along with the sand mean it is impossible to shift this thing.  The new hooks ought to make it very difficult to disconnect the fence unless you are a human.  The whole thing tucks neatly next to a piece of well protected heirloom furniture.  Tyrion has been heavily inspecting and disapproving of my work since its installation.  Their hunger for items you value knows no bounds.


Jacked Up PushUp Bars

I built a set of pushup bars to go with my pullup bar from early last.  You grip them while doing a push up and it lets you dip down further than when using your hands on the ground.  That stretches your chest and gives a harder workout.  The only problem with them is that now I am flexible enough that my chest can touch the ground.  Time to jack them up a bit!  I started with the same 2×12 that they came from.

DSC_1017

It turns out old ratty 2x12s can be quite beautiful if you just give them a bit of planing.  Hand planing construction grade pine to make a piece of exercise equipment is probably some kind of sacrilege, but I like using hand tools when I can.  Besides, sanding is just the worst!

DSC_1018

I chopped this piece up to give two layers of material beneath each bar and glued.

All the load will be pushing down on these, so only a minimal joint is needed.  1/2″ dowels will be more than enough.  You drill in one side, insert these metal plugs with a sharp point in the center, align the other part and give it a wack.  The sharp points all transfer over the exact center of where you should drill to the mating part.

Some drilling, gluing, drying, and a fresh coat of boiled linseed oil later they looked smart.  Well not really smart, kind of chunky really.  If it were architecture I would call it brutalism.  Probably fitting for a room full of kettlebells.

DSC_1026

My beard touches easily, but my chest still has inches.  This is hopefully the last raise these will need for a long while.

DSC_1027

Maple Trim and Half Wall

There is a half wall in the foyer that was topped with a dark stained bit of pine.  I sanded it and panted it white to match the rest of the trim when I renovated that part of the house.  It sees enough use that interior house paint didn’t last long before scratches and stains got to it.  I wanted to install counter top material when the kitchen got re-done, but there was not enough quartz left over.

After nearly a year of the kitchen being finished I decided to tackle this project.  Instead of quartz countertop I went with maple.  I started by removing the old top and trim and cleaning up any issues around with the wall paint.

This job called for a 7.5 inch wide board that was 6 feet long.  The length wasn’t an issue but that width left me with few options at the yard.  This one is gorgeous with a lot of cathedral, some tiger striping and other character.  That makes planing it really tough.  After getting a lot of tear out in places I fell back to sanding.  It took forever, but I got the top very smooth.

DSC_0996

I needed trim for under this part and under a window between the dining room and kitchen.  I got a nice beading bit and went to town.  Thankfully before doing everything I experimented.  Having the bit start with just a little nick, then going for full depth on a second pass produced a lot less tear outs at the sharp corner.  Notice how crisp the line is in the top example, while the bottom one is jagged.

DSC_0997

With all the stock prepared I moved on to finishing.  I wanted to use a water based urethane from General Finishes.  It has sprayed well in the past and doesn’t yellow the maple, so it should match the kitchen cabinets.  The trick is we were due for days of cold, wind, and rain.  I moved everything inside and tried to pad the finish on.

DSC_0999

Having finished many pieces with oil based wipe on polyurethane, I can say that this stuff is no substitute.  It isn’t thin enough, but then dries too quickly and leave streaks.  I eventually switched to applying it with a foam brush.  That worked out the best overall, but still left a lot to be desired.

The two trim parts that go under the kitchen window had interference issues.  They used a lot of calking to hold down the quartz, and left a fillet underneath.  Instead of trying to cut it all out, I rather relived the back hidden edge with a chamfer bit.  The finish was indeed a good match with the cabinets.

DSC_1003

DSC_1002

After that success I installed the half wall and its trim.  Once again drywall’s tendency to be out of square made the miter joints a little off.  I fall for that every time.  They still look really good unless you get up close.  I used a combination of loctite power grab (fantastic stuff for installing molding), and my pin nailer to fix everything.  Pin nailers are perfect for these kinds of installations.

Wooden Gift Tags

I was getting ready for a birthday party for this 1 year old I know.  Our conversations are one sided, he is a little short, and fails to reciprocate on high fives.  Still, he has more hair than I do, and a pretty cool set of parents.  So we got him a gift.  I was bagging up said gift when I thought of a cool way to add a little personal touch to the tag.

I dug around my scrap bin and came up with some thin maple I had from a resaw project.  Some quick hand hand planing and I had a really thin sheet of wood to make a tag out of.  I think it was about 1/16″ to start with and was a pretty consistent 1/32″ when I was done.  Still heavier than card stock, but a pretty impressive thickness

DSC_0984

I cut it out and gave it those beveled tag edges along with a whole in the center.  I wrote out the message in sharpie and gave it a quick spray lacquer coat.  That was an error in order of operations.  The solvent in the spray lacquer lifted the sharpie and let it bleed out.  It isn’t horrible, but is noticeable.  Next time, spray first, let dry, then write the message.

My miserable handwriting is probably the worst offense.  Do they teach handwriting classes for adults?  I might have to plan out some resawing and make a stack of these tags.  Buying a small section of veneer would yield a lot of cards for a little cost, but I would rather start with some 3/4″ stock and do the milling myself.  Yet another project for the woodworking pile.  I need to craft more time so I can get out in the shop regularly.  I have been terrible this year.

iPad Stand

I recently bought an iPad for use during travel and for things around the house.  One such thing is for use as a recipe holder while I cook.  I have slowly been collecting my various scraps of paper and bookmarks into an organized google drive collection.  Most fit nicely on a single page in portrait mode.  I needed a way to prop it upright and started with a nice swoopy 3D printed part.  I liked the shape, but it was a little too light and the color clashed with my kitchen.

20171013_113039

Unusual for me, I built a test piece first.  Typically I just launch into this sort of thing head first and start making mistakes.  The pine shape was made using the green 3D print as a tracing template.  I liked how it came out and proceeded with maple.

As I was cutting the groove on my router I made a huge mistake.  I wanted to rout the groove a little wider, and moved the fence closer to the bit to make a second pass.  CHOMP!

20171013_120158

I forgot, when I moved the fence closer I used the wrong side of the bit.  When pinched between the fence and bit, the bit bites in and drags everything forward.  I made a little graphic below to show the issue.  The bit rotates counter-clockwise.  Keep out of the red zone and use the green side.

I recovered by starting over and moving on to a new piece of wood.  This time without any issues.  20171013_121914

Once I got the groove completed I tapered the back a little.  It doesn’t need to be 3/4″ thick all the way across, so I thinned the back end down.  I like the effect a lot, but in retrospect I could have gotten a lot more aggressive.

20171013_123053

With the tapering done I used the green printed part as a template to lay out the two curved cutouts of this part.  I made the center cut wide enough to help lighten the look, and provide a cutout around the speaker ports at the bottom edge of the iPad.  I was able to orient the front to show off some lovely rays (little speckles in right hand picture) in the maple.

I am really happy with this, a past version of me would have cut the groove and called it good.  The block would have been functional, but chunky and brutal.  This is lighter and more elegant.  Truth be told I could have done more lightening and still had a functional part, but as always it is a learning-by-doing experience.  A spray coat of lacquer sealed the deal.

Woodsaw 3D Printed Parts

Miter Saw Zero Clearance Insert

Sawing with a tight fitting insert is almost always the right way to go.  It supports the wood being cut and prevents the fibers from getting torn as the saw teeth punches through.  The plate that comes with the saw works, but has a wide gap.  I made a thin plywood insert, but they don’t last that long.  This is my attempt at a 3D printed one.  The original is on the right.  Notice how wide the saw blade gap is.  I took a picture of the original saw plate on one of those self healing cutting mats.  They have good ruled lines in both directions to make sure the image didn’t get distorted.

The first print out of the gate fit really well.

20170805_130315

I made the first cut with no wood in the way.  It chopped right through the plastic and cut a self fitting slot that is just exactly the size of the blade.  I might have been a little too cautious.  Slow cutting built heat and there was a bit of plastic fuzz at the top edges of the cut.  A little light work with a utility knife had those cleaned up.  Some subsequent cuts have shown the insert to properly back the cuts.

I still need to find a spool of Dewalt yellow filament.

UPDATE: Decided to upload it to thingiverse.

Table Saw Organizers

I am in a near constant state of looking for pencils and rulers/tape measures.  I should attach one of each to my body with a short retractable cable.  Until then I try to stage as many as possible at each work station.  At my table saw I made two different organizers to hold commonly used  items.  They both attach to the far side of my rip fence.

The white organizer holds my wooden ruler and a small stack of pencils.  The pencil well could have been a touch deeper, but otherwise it works well.  The yellow holder area keeps my grrripper push block.  It is at a really convenient hand position for quick use when sawing.

DSC_0927

DSC_0928

Drill Caddy

I am in a caddy mood for some reason.  Having organized grab and go tool sets make life easier when you have a problem to solve somewhere.  Most repairs don’t happen within arms reach of the tool box.

Up next is this zazzy little 12V drill driver.  It is small and highly controllable.  I like it for use as an electric screwdriver for assembly/disassembly and for installing small and delicate hardware in wood.  First you need a holster.  I did some careful measurements and in just 1 iteration came up with this design.  It is easy to insert and holds really well even through heavy shaking.  The key was how it catches on the pull out chuck.  A rounded leadin helps it find hold, but a square edge keeps it from erroneously falling.

DSC_0911

I attached this to a piece of wood and started carving off a handle area at the bandsaw to give more finger room.  This needs to be the most accessible thing on this caddy.

DSC_0912

With the gun set in place I could start planning out other accessories.  satisfied I had enough room everything got a coat of paint.  My blue was running out so it is a little spotty of a job.  Once everything gets installed I doubt it will be noticeable.  It would be great to buy Bosch blue and Dewalt yellow filaments and paints.  I bet a lot of effort goes into picking the colors for tool companies, and they don’t want to give those away.  Plus I have way too many paints and filaments, I need to use my current stash.

DSC_0913

I had a pretty good idea at this point where I wanted everything from the layout stage.  The only change was the addition of the bottom blue short bit holder.  I was running out of “wall” space and realized that would be perfect.  The nut drivers came with an odd loop on the holder.  It made building a little slide on clip easy.  The red case is full of a zillion standard and security bits.  No hardware is safe from me!

The handle is a copy of the previous design with a switch to red to keep with this color scheme.  The kobalt set has some decent quality standard bits, sockets, and a basic assortment of drill bits with hex shanks.  I don’t plan on doing much drilling with this, but occasionally they might come in handy.  Ok, what needs fixing?

The only thing this might need is a removable magnetic parts tray.  Maybe a clever, secure yet removable, design will hit me in the shower.