DIY Drill Powered Honey Spinner

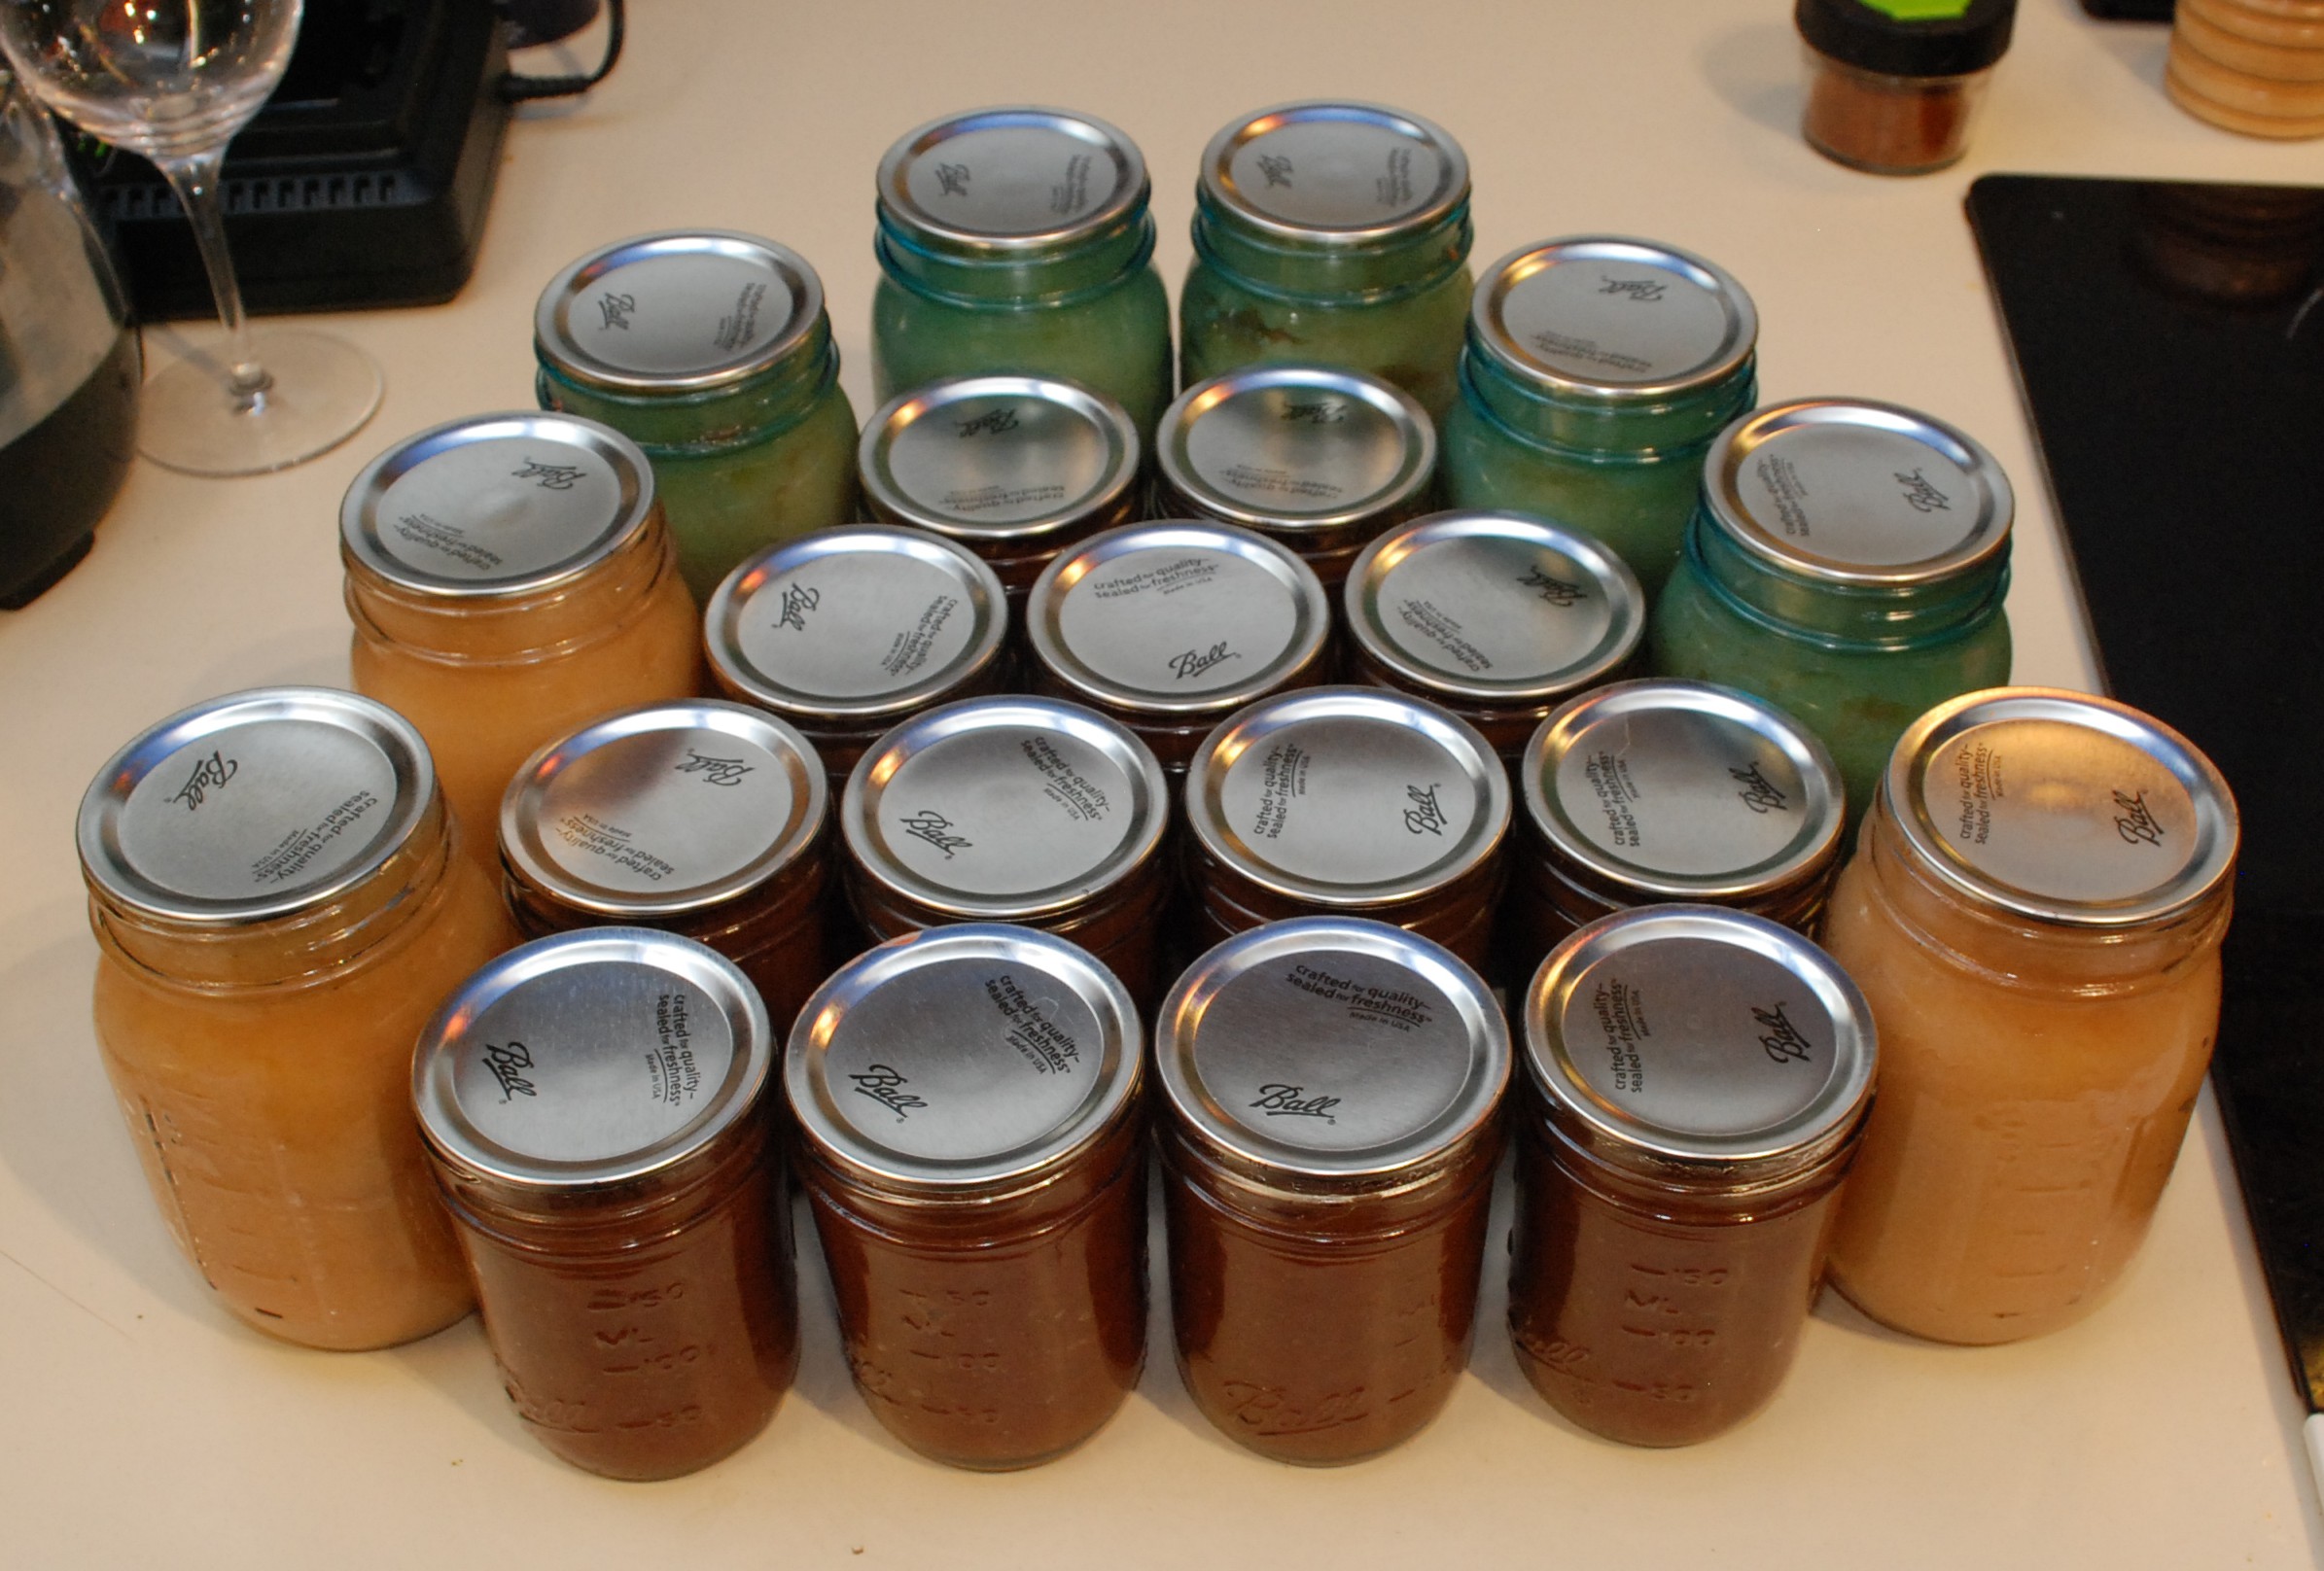
There comes a time in every beekeeper’s life where he or she will want to harvest some honey.  This is usually done with a centrifuge extractor.  These start at a few hundred dollars for a very cheap unit, and the price goes astronomical from there.  I spent quite a bit of time and money building test articles and doing mini test extractions, but ended up with a really good design that can be had for 50 dollars and a minimal set of tools.


VIDEO UPDATE

Due to the attention on this post I felt a video was needed to help with some of the questions.  Enjoy and thank you for watching.


This spinner is specifically designed to hold medium super frames.  Slight adjustments will be needed to make this work for shallow super frames.  Does NOT work for large frames.  The 5 gallon buckets are too small.  Maybe find a larger trash can if that is your preferred frame size.

DSC_0378

DSC_0390

DSC_0389

The above images show what a loaded out spinner looks like.  The spinner now needs a container to catch all the honey.  I really wanted to use 5 gallon buckets for their price and size.  One bucket isn’t deep enough, so I cut the bottoms out to use them as height extenders.

DSC_0381

I used a mix of firehouse pickle buckets and white food grade buckets I bought at the hardware store.  I cut the bottoms off of two buckets to stack them inside each other to increase the height and allow for a good spin without messing up your kitchen.

The bucket with all the holes in the bottom holds the bottom shaft from the spinner and keeps it stable during a spin.  The center hole is just big enough for the 3/4″ PVC pipe.  The others are there to help the honey drip down into the white bucket with the honey gate.

DSC_0383

DSC_0386

The stack up is: White bucket with honey gate, red bucket with holes, and two bottomless buckets for height.  It is a very small setup that will quickly process two frames at a time.  I just did 20 frames with this tool and had a really good time with it.  Best of all it doesn’t take up much space in the house.


The Spinner Build

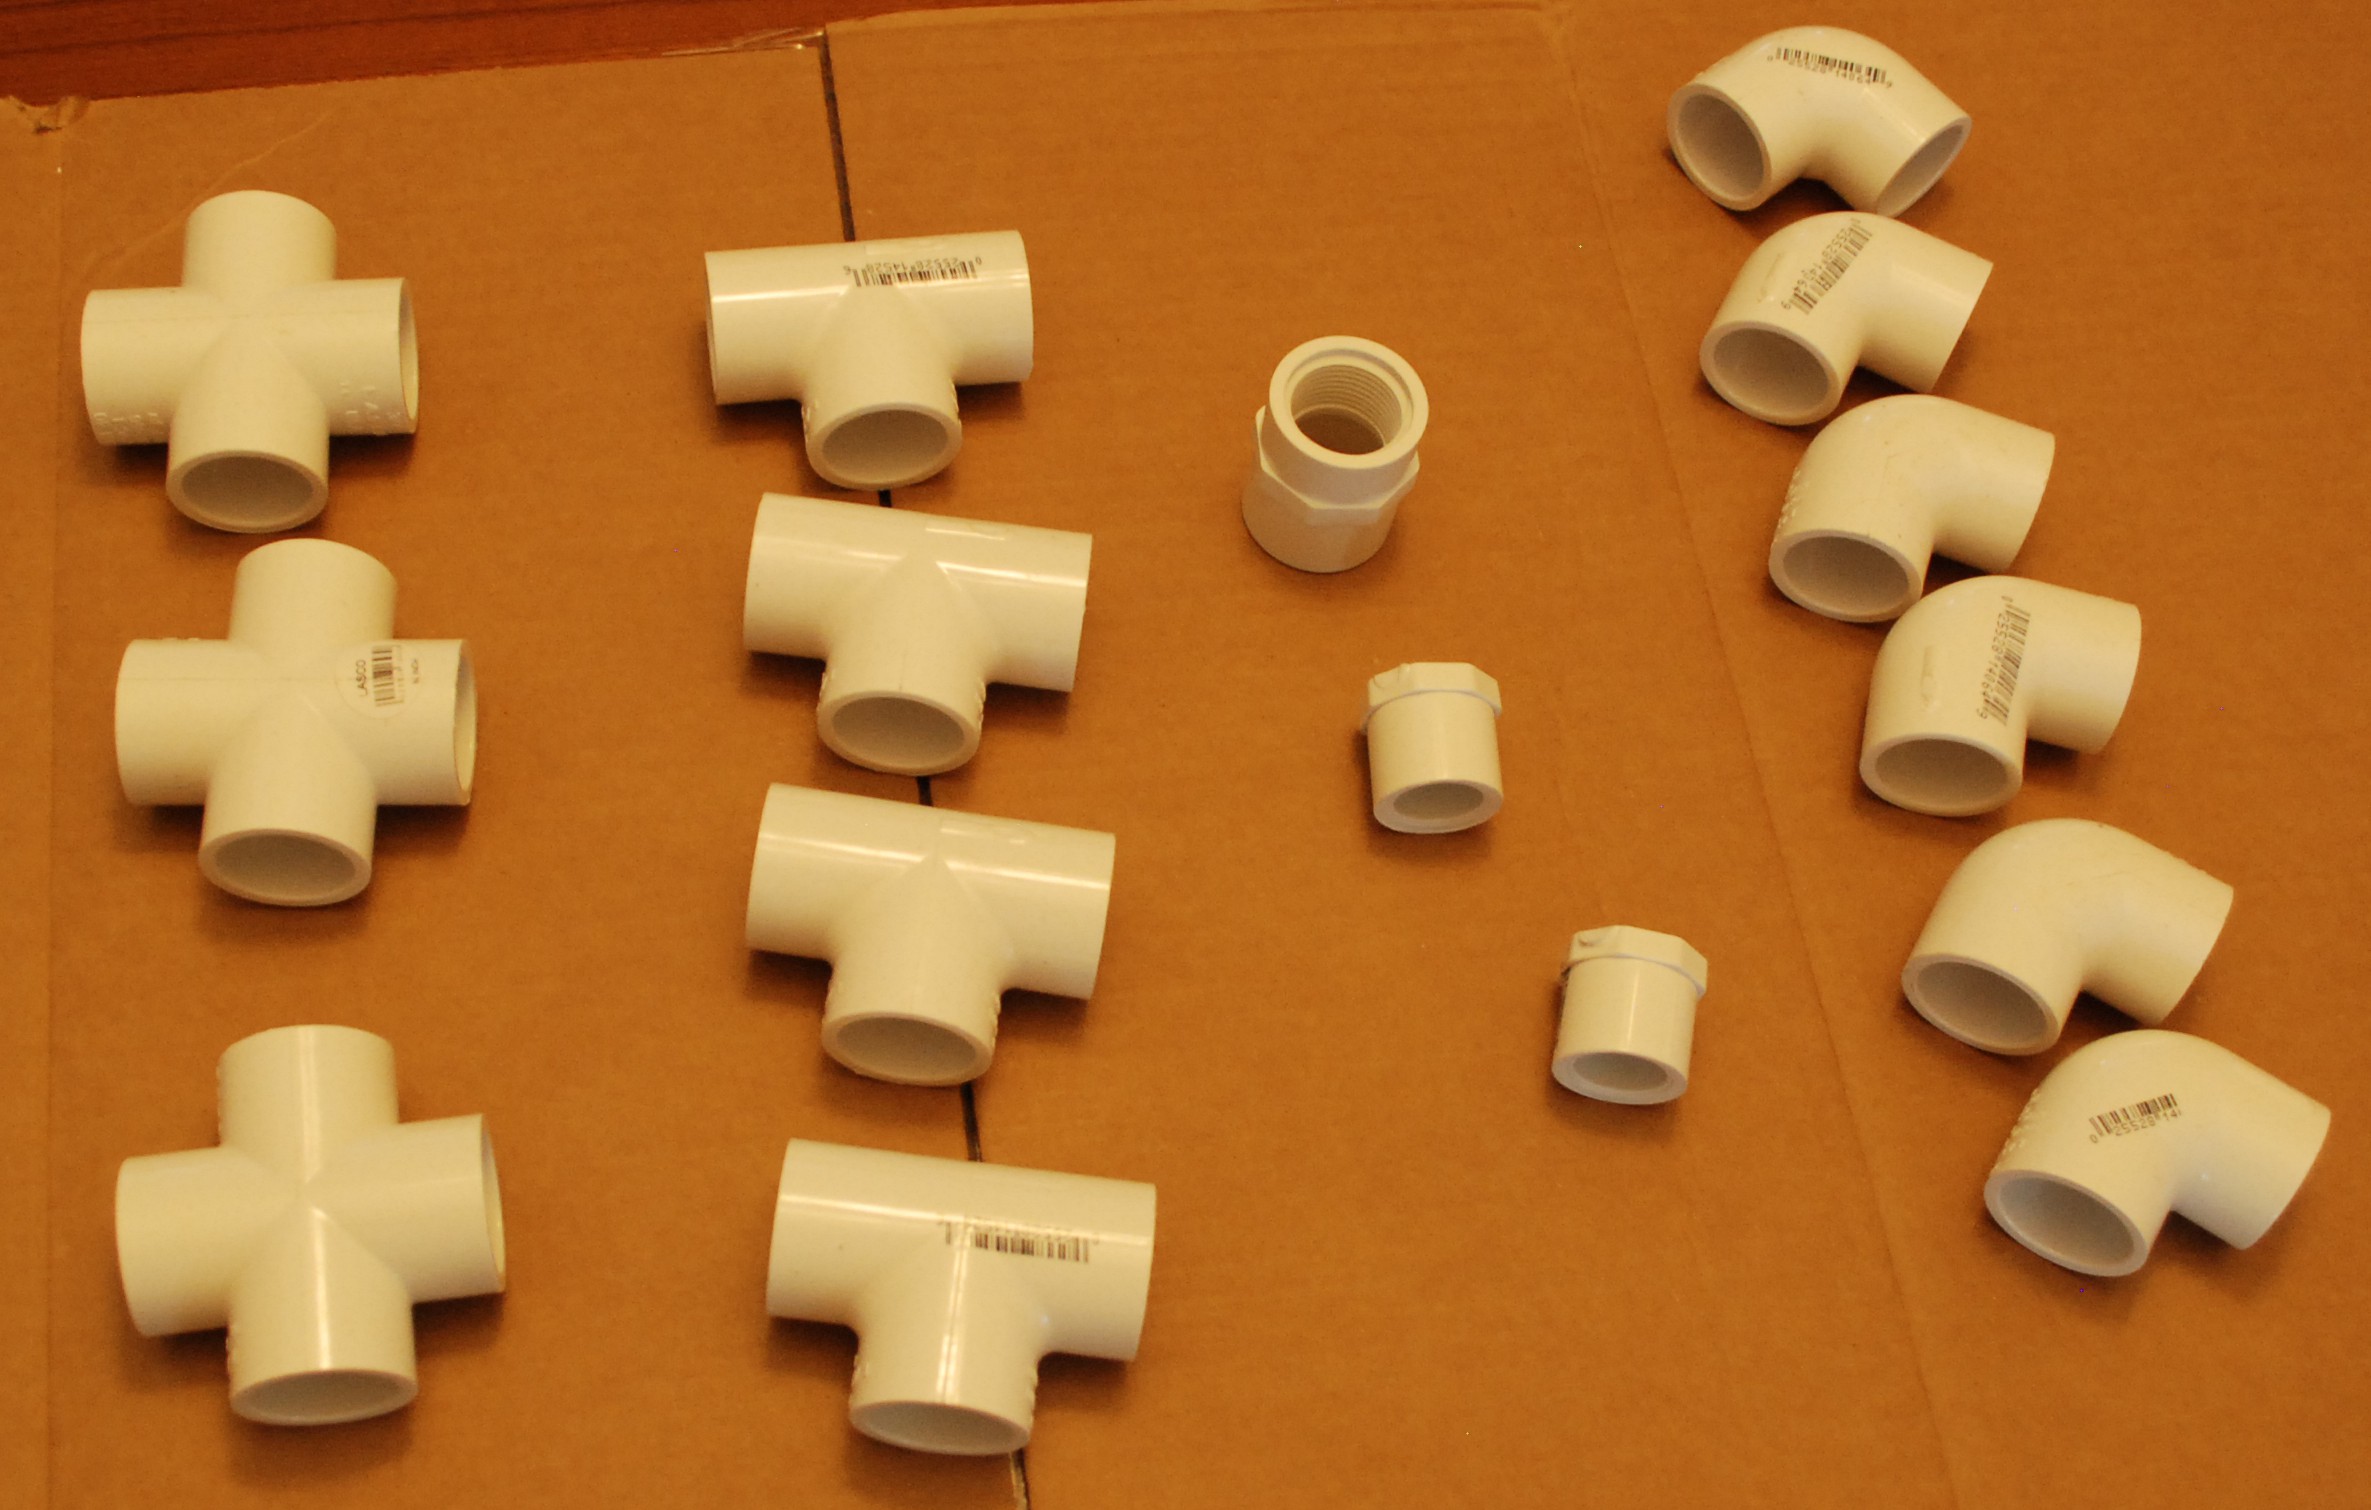
You will need the following items for the spinner.  I included the prices I paid for everything, though your prices may vary.  Not included in the list below is the buckets and the honey gate.  The white food buckets can be had for 4-5 dollars each at lowes.  The firehouse pickle buckets can be had for 2 bucks each!  They do require a bit of soaking to get rid of the vinegar smell though.  Honey gates can be had for 5-10 dollars.

Screen Shot 2015-10-02 at 4.26.16 PM

In total you will spend about 50 dollars on the whole setup.  Filters, a capping knife, honey bears, and others will cost you more, but a whole extraction and bottling setup for under 100 dollars is very attainable.

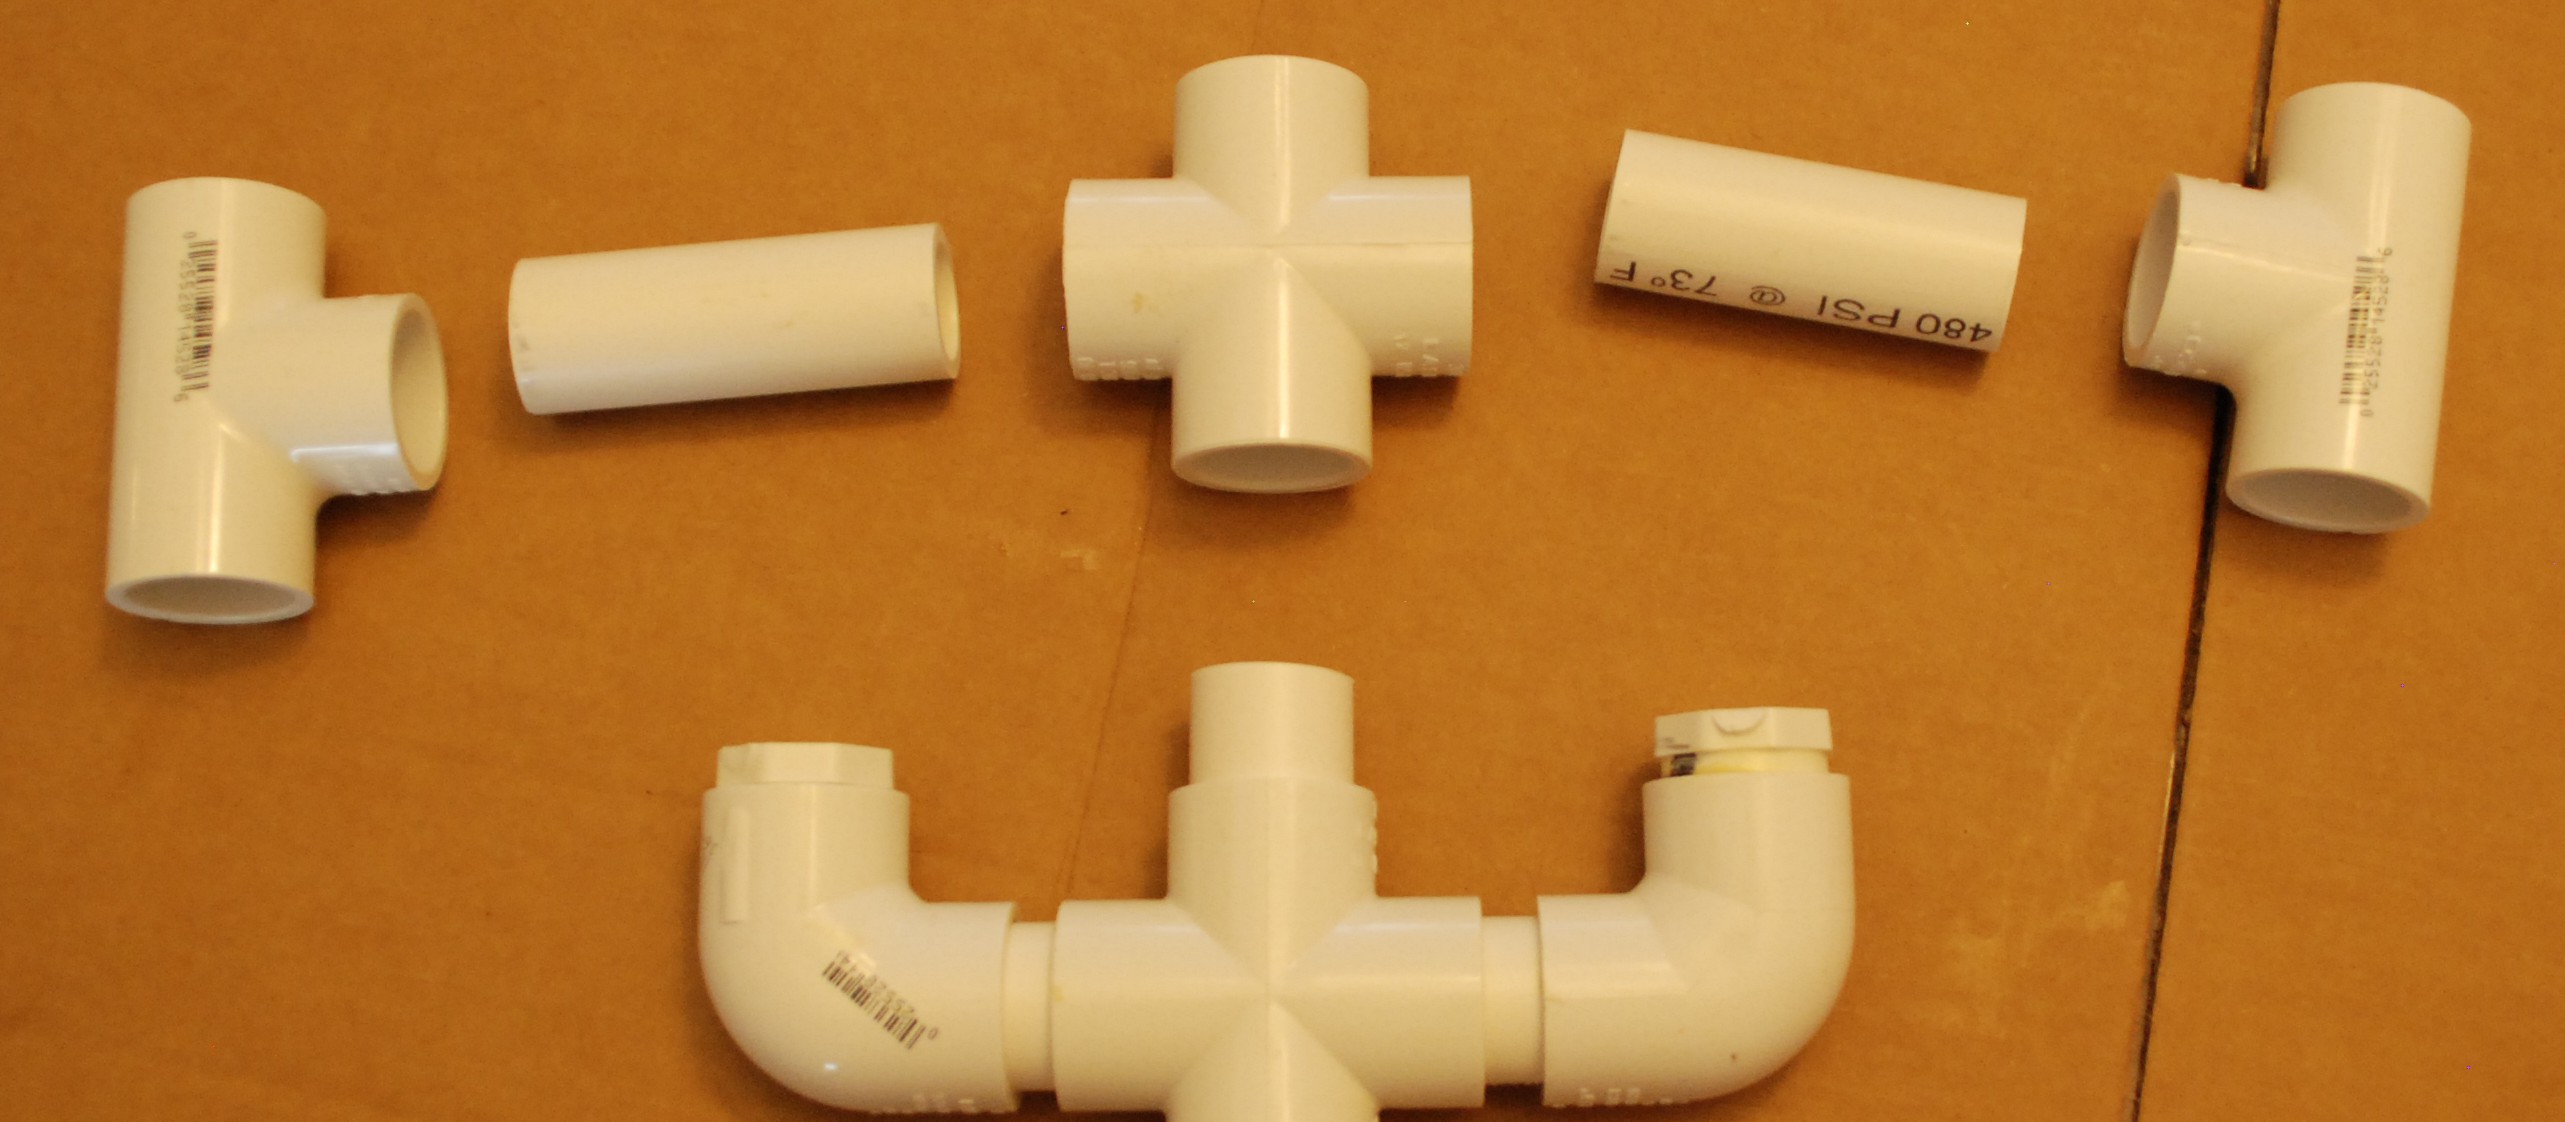
From a tools standpoint you will need PVC pipe cement, a saw or PVC pipe cutter, tape measure, and a marker.  The pipe parts should look like those shown below.

UPDATE: Fresh PVC cement can be helpful.  Fresh glue allows longer open working time than old glue.  You only have a few seconds to get it right, so if your glue is old, get a new one.

DSC_0363

While assembling the sections be mindful of how much cement you use.  Too much will drip on your work surface, and will drip down inside to the sections you want to glue in the future.  Work slowly and purposefully.  Once you put two segments together, they are permanent in just a few seconds.  Dry fit everything beforehand to make sure it all fits with your frame hardware.

UPDATE: Dry fitting is really important!  Some stores may sell fittings with different sizes and depths.  Dry fit every stage and check it often with your frames and bucket.  Use multiple frames, as there can be variation in their construction as well.

Bottom Hooks

These features are the depth stops for the frames.  Gather a cross, two elbows, two plugs, and cut 2x 1.75″, 1x 1.5″, and 1x 3″ sections of pipe.

DSC_0364

The 1.5″ section of pipe will connect to the bottom guide, the two 1.75″ pieces will hold in the bottom hooks that keep the frames from sliding down any further.  I used plugs to keep honey out of the lower section of the spinner.  This is what the finished part should look like

DSC_0368

Bottom Guide

Next comes a bottom guide to keep the frames from sliding left and right.  This step requires a cross, two tees, and two 2.75″ pipe sections.  Be careful with this step.  Too narrow and your frame will not fit, too wide and it will not fit in the bucket.

DSC_0369

Assemble the sections and attach it to the bottom hook as shown below.  Now the frame will come down into the hook and be held from sliding left and right.
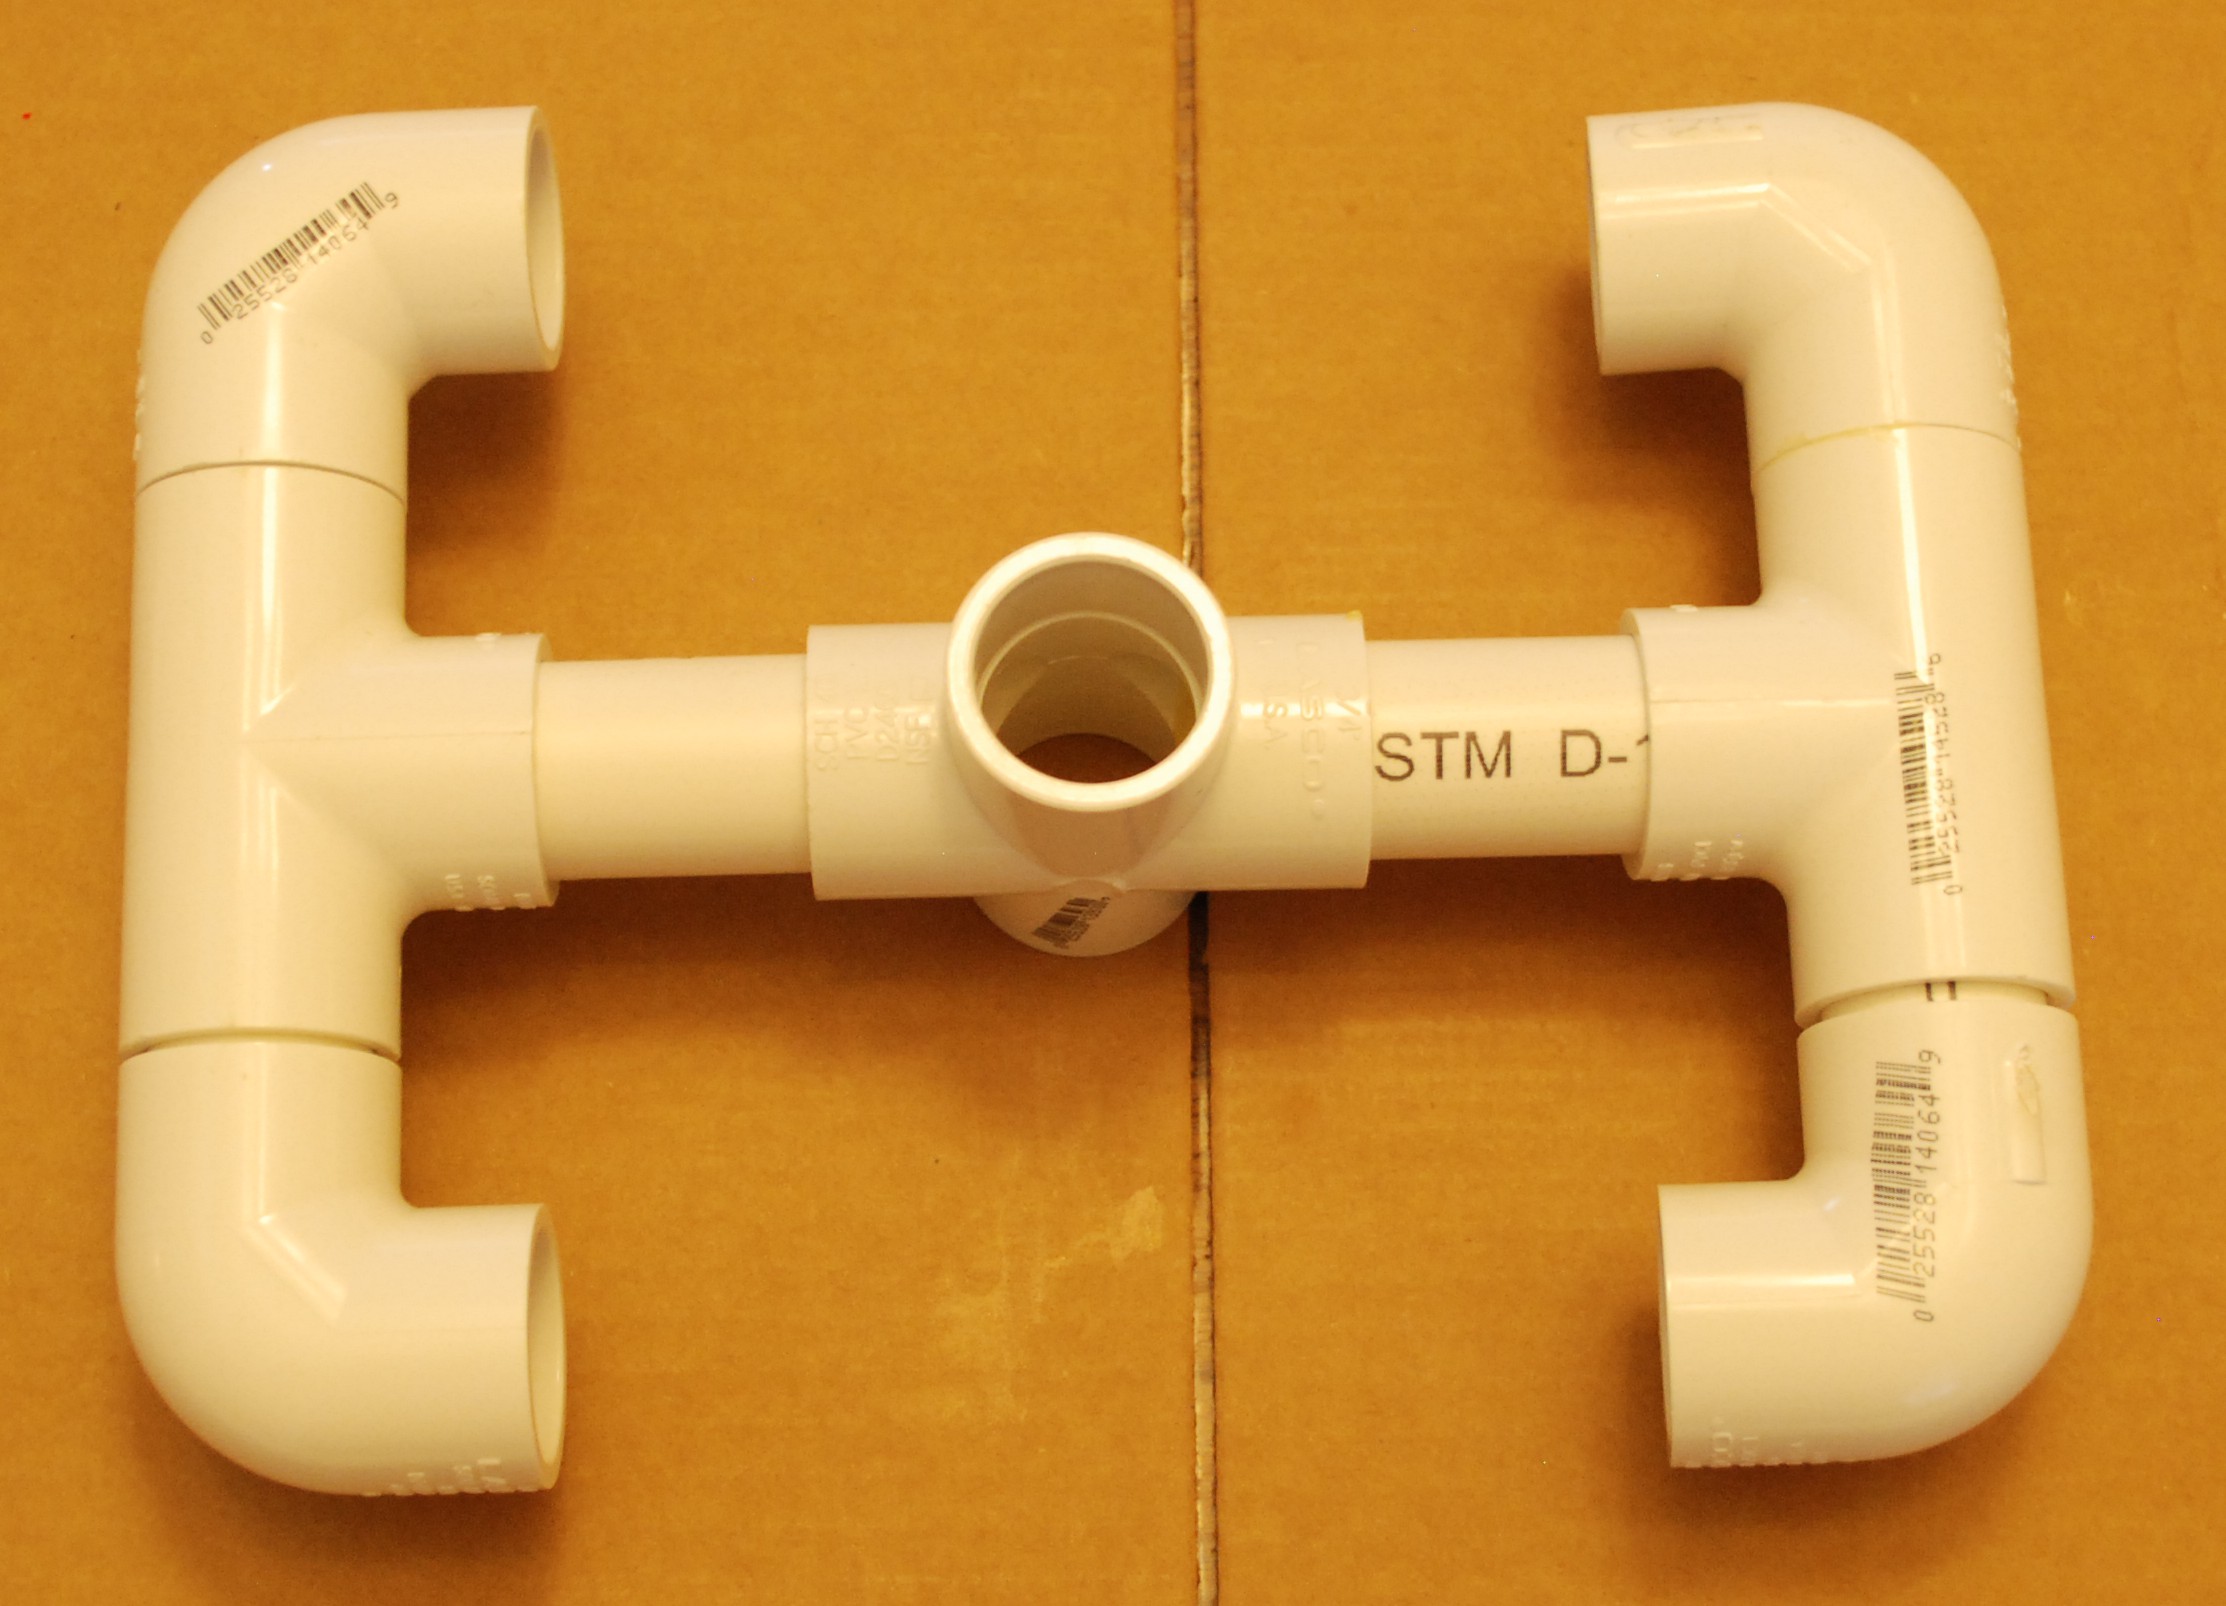
DSC_0370

Top Guide

The top guide will hold the top end of the frame and prevent it from going out during the spin, and from going left or right.  Gather a cross, two tees, four elbows, 2x 2.75″ pipes and 4x 1.5″ pipes.

DSC_0372

It is probably best to assemble the two outer arms first, then attach them to the central cross.

DSC_0373

DSC_0374

Drill Post

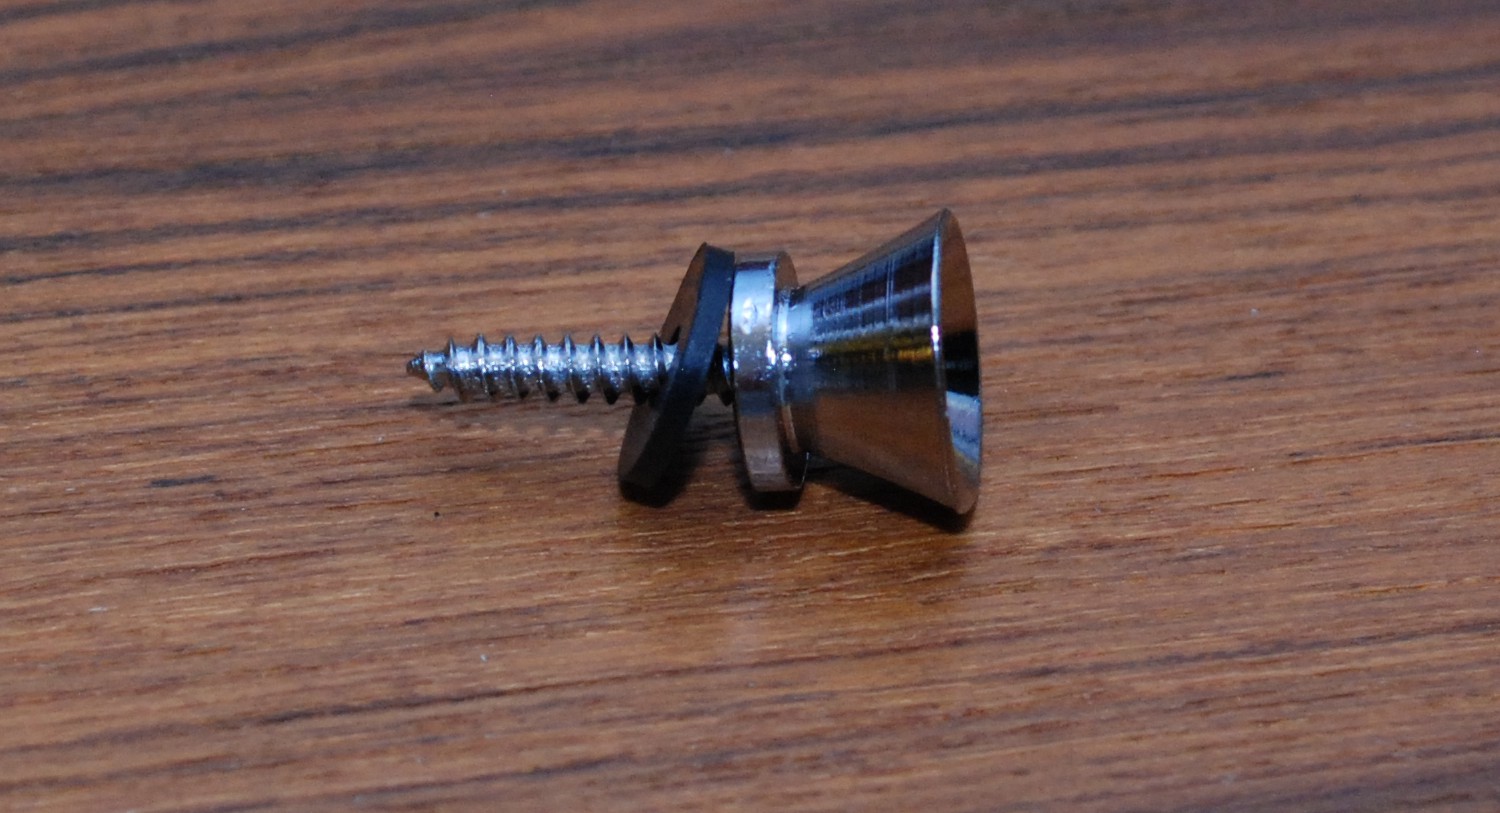
A short 3 inch section of pipe and the threaded pipe fitting goes on top to allow for the drill to be attached.  I chose 3inches for that length, but it could honestly be longer or shorter.

Central Post

A single 14.5″ piece of PVC attaches the top and bottom half.  Dry fit this piece to make sure it holds your frames correctly.  The two sets of guides should line up so that a frame can be slid down through the top guides into the bottom hook.

DSC_0378

Drill Barb

A threaded coupling was installed at the top of the spinner earlier.  Now comes the final piece of the puzzle.  An iron pipe threaded adapter takes the size from 3/4″ to, I think, a 3/8″ female thread.  That allows a brass barbed fitting to thread in.  The brass fitting is small enough to fit into my drill.  Most drills can chuck onto anything smaller than 3/8″ in outer diameter.  I used a hose clamp around the PVC threaded fitting to help reinforce it.  My dewalt drill runs it pretty well on the lower speed setting.  Just accelerate slowly, and stop slowly and everything will be ok!

Update: A good alternative is to cut the barb off and use the remaining brass hex portion as a nut.  Get an adapter for your drill and put the appropriate socket on there.  Now you don’t have to tighten your chuck every time, just slip on the socket and drive!

Cigar Box Storage

Small accessory storage is often an issue.  Many hobbies end up with a bunch of loose bits and bobs that you need to keep track of.  My flashlights for example have special batteries, a charger, instructions for each light, spare o-rings, etc.  I thought about building a series of boxes for small parts storage, but am swamped with projects.  It would be good practice, but I need the storage sooner rather than later.  Enter the humble cigar box.

wpid-20150927_121922.jpg

It turns out you can get a random assortment of cigar boxes for really cheap.  35 bucks for 10 boxes on amazon.  Some weren’t very nice or in good shape, but most were pretty good looking.  They have labels and stickers all over them, but otherwise are gorgeous wooden boxes.  The two pictured above hold my light stuff.  Each one is very unique, so even without applying your own labels, they should be quickly recognizable.  I might try to sand off all the adverts and refinish them, but much of the hardware looks like it wouldn’t come off cleanly.

The list of things someone could use these for is quite long:

  • Ukulele accessories
  • Board game extras like dice and pencils
  • Spare USB cables
  • Pocket change
  • Specialty tool kits
  • Flashlight accessories

Get yourself some old cigar boxes!

Applesauce and Apple Butter 2015

I had some family in town so I figured why not put them to work!  Apples were at a great price locally, so I picked up 30 pounds of a mix of gala, pink lady, braeburn, macintosh, and honeycrisps.

DSC_0354

My process for making applesauce and butter is documented in previous posts.

DSC_0355

One big difference from last year’s efforts was my new crock pot.  I bought a bigger fancier one at a black Friday sale last year and hadn’t done apple butter in it till now.  It is a quart or two larger than my last and the settings seem to be a lot hotter than my old crock pot.  The apple butter was easily cooked down by the next day and a fairly full pot yielded a little over 13 half-pint jars.  My canner can only hold 13, so all is right with the world.

DSC_0359

The 30ish pounds of apples gave me 9 pints of sauce and 13 half-pints of butter.  In reality I could probably fill another jar of each, but those are the limits of my canner.  The remainder always goes in the fridge and gets eaten in short order.

Hurricane Boxes

Living in the land of sunshine can have its downsides.  One is the summers here.  It is still super hot here, though I think we are done with the 90+ degree days for the year.  The other issue is hurricanes.  I had a loose setup of batteries on an ups to provide 12V power for charging phones and whatnot.  It was kind of a mess and the batteries were pretty well shot.  Our most recent hurricane scare pushed me into action.

I wanted something more compact and organized with greater capability than my first setup had.  I am making two boxes to use as general sturdy hurricane supply storage.  A third box will house a deep cycle battery and have some tricks up its sleeve.  Everything is made out of either 1/2 or 3/4 inch plywood.  These all got assembled and painted at the same time I was building my bee cabinet.

Once the painting was complete I started assembling the battery box.  First I used cleats to kind of clamp in the battery a bit.  It can still move vertically, but I don’t ever plan on flipping the box over.  The charger goes in the back, with its cord coming out the side of the box.  A divider keeps most things away from the battery and allows for some storage space.  Next came a terminal block screwed to the roof, and a switchable panel voltage meter.  This will let me monitor the voltage during charging and operation.  Next came some 12V car power sockets so I can plug in all my accessories when I need them.  Finally I stuck some black plastic HDPE over the terminal block to keep anything from accidentally shorting.

Once I had that all wired up and tested out I put in a front divider to make the lower right area a storage bin of sorts.  It holds a 12V fan, inverter, USB phone charger, and a special LED light box.

DSC_0347

Speaking of light box, here it is.  I found some bright LED car lights that run directly from 12V.  They got installed in a custom box with switches and a 12V car plug.  Now I can plug these in and use either 2 or 4 lights to help light up a room during a power outage.

With all the innards assembled I put hinged doors on all the boxes and some beefy folding handles.  The battery box got a locking mechanism to keep the doors closed.  The battery box is really heavy.  To help with hauling around the house I screwed it to a small fold up hand truck.  This means that just about anyone can move it around the house without causing a hernia.

The two storage boxes are about 14 per side on the inside.  The size worked out pretty well.  One holds a pile of expandable 5 gallon water containers.  I figure instead of trying to buy water ahead of each storm or season, I can just bottle it myself right before a storm hits.

The other box carries a wide variety of odds and ends including solar cells and a charging circuit to charge the deep cycle up, candles, matches, other fire starters, soap and disposable bowls/utensils, playing cards, a weather radio, lantern, and other odds and ends worth keeping around.

Now that I have gone to all this trouble and expense to be really prepared, we probably wont have the power go out for many years.  Wouldn’t that be nice!


Bee Storage Cabinet

Our back porch is a hodge podge of furniture, bbq stuff, and bee equipment.  The bee equipment is starting to get in the way and makes it harder to use the porch.  In comes a bee stuff storage cabinet.  It will have enough room to store extra hive body equipment, my scale, the tool tote, our veils and the other odds and ends.

I started with a 3/4″ plywood open faced box.  The box is 4 feet tall, which made dimensioning from a 4×8 sheet of plywood easy.  The legs are there to allow for a plastic straw storage tub to sit underneath.

A morning of cutting and assembling and I was ready to paint.  I moved it out to the back porch and began to prime and paint it along with another project.  I am working on hurricane supply storage boxes that got made at the same time.  More on that at a later date.

DSC_0331

I couldn’t help the use of that wild yellow paint again.  Anything bee related gets it!  The black strap hinges, handle and bee spray logo really pop and give it some life.  I might have to come up with another spray pattern for that big untouched left side.

Everything went inside just as planned.  The straw tub (smoker fuel) fits perfectly underneath.  The bottom shelf has our feeder, an extra super, winter inner cover and bottom board, and the mite screen equipment.  The other shelves hold our protection gear and some odds and ends.  On the right side a set of decorative plant hangers holds the tool tote, and a less than decorative shelf bracket holds the hive body scale.

Everything we need is exactly where we want it and there is storage room to grow.  The total cost was probably under 50 bucks assuming you don’t count labor.  I doubt I could find anything out there for that cost that fit my needs so perfectly.

Circular Saw Guide

I do a lot of rough processing of plywood from the back of my truck into my shop. I’ll bet a lot of people do, because plywood is really heavy!  I thought this was going to be a super simple project, and it mostly was.  As always though, there has to be a hitch or two in my simple plans.

My main goal was to be able to cut off segments from the short side of a 4×8 sheet.  I started with a 5 foot section of 19/32″ plywood.  Don’t you love all the bizarre sizes at the lumber yard?  A 7 and 2 inch strip would be glue and screwed to form a guide.  You make a first cut with it, and from there on out, the fence is matched to your saw.  No more guessing, just line up the edge, clamp and go!

The clamping was the problem.  My little battery operated saw hugs close and doesn’t give room for a clamp.  I can raise the saw up to avoid the clamps, but this thing will only cut 1/4″ ply if I do that.

Try try again.  Now, using a 12″ base piece I attached my old guide as a new fence.  The sizing is right now, and it makes processing big sheet goods a breeze.

A few lessons from this for anyone looking to make their own.

  1. Having the guide be longer (mine is 5 feet) than what you are cutting helps align and guide the saw
  2. Make the guid plenty wide enough to clear the motor housing with a clamp installed.
  3. It is ok to go thin, I used 1/2″+ and this sucker is heavy!  3/8 would be just fine

Easy Faux Cedar Planter

Making cedar boxes is a great way to have a gorgeous looking planter box.  The only problem is that cedar is kind of expensive.  A 1×8 cedar board is about 2 dollars a linear foot where I am at.  Instead of doing a whole box, I just outlined a cheap plastic tub.

This ended up being cheaper and way faster to put together.  The added bonus is that I don’t have any wet dirt sitting against the cedar, and it doesn’t hold any weight.  I expect this box setup to last a lot longer than any of my other cedar planters.  Doing this with a large yet shallow box would really reap a lot of benefits.  Under-bed plastic tubs for example.  Don’t forget to drill a few holes in the plastic tub

The only drawback is that you can see a bit of the plastic where this one is sitting.  Thankfully the wildflower mix I planted a few weeks ago is starting to work some coverup magic.

DSC_0308


For no apparent reason here is a tiny frog I found on my pepper plant a few days ago.  Hard to tell scale in this, but he/she is well under an inch long.

DSC_0307


Ukulele Strap Button Installation

I got a ukulele a few weeks back and have been learning to play.  One issue I have run into is with holding the instrument while playing.  The instrument is rather small and doesn’t sit well on its own.  My left hand ends up holding up and stabilizing the instrument as well as trying to hold the strings for chords.  It makes playing difficult and tiresome.

In comes a strap to keep things stable and supported.  My ukulele didn’t have a strap or even a button, so I decided to install one.  An experienced musician friend of mine warned against messing with buttons in instruments.  It seems like it should be a simple enough woodworking operation.

DSC_0316

After watching a few guides I decided to create my own video with some steps that would be natural for woodworker, but that musicians might not be as familiar with.


Written Instructions

  1. Use painters tape to mask off the area
  2. Measure twice and carefully mark your button location with a pencil
  3. Use a nail or awl to create a small indent
  4. Drill slowly with a bit just smaller than the shaft of the screw, hold both up to a light to check
  5. Use some kind of wax to help the install, very little is needed
  6. Install screw slowly by hand, you can always tighten more later

Things you will need: masking tape, pencil, awl or small nail, drill, drill bit, wax, and screwdriver.  A ruler would be helpful.

I hope this helps others be more confident about installing a strap button.  The method can be used to install a button anywhere on the instrument.  Just go slow, tape the area and be mindful.

Pinball in Cube

This goes nicely with my nail in the block “puzzle” as a way to confound coworkers.  Once again it takes advantage of wood’s ability to swell along the grain when wet.  I started with a 3″ block of maple and drilled centered holes all the way through.  I had a 3/4″ pinball, so 5/8″ was the drill diameter

After looking at it for a bit, I felt like the holes were too small for the total block size.  I needed bigger pinballs or a smaller block.  The install was pretty easy.  I dunked the block in a bucket for a day, and then pushed the ball in on my wood vice with the help of a small 1/4″ deep socket.  The hole still looked ok, but I threw it back in the bucket for a few hours to make sure it returned to its original shape and size.

With the ball installed and everything dry, I took it back to the table saw for a diet.  All the edges came down till the proportions seemed right.  I liked the look of the chamfer, but my crummy chamfer bit chewed up a few edges.  Still, overall it looks nice and should leave some heads scratching.

Full Sized Mite Board

I built a small mite board using sticky pest strips a while back.  It worked, but you had to keep buying the strips, and the sample area was small.  The new mite board is bigger and instead of sticky strips uses white coated masonite board and spray oil.

DSC_0241

The bottom board (right) is the white coated masonite with a 1×2 cleat attached to the bottom.  Its purpose will be more obvious later.  The top that holds the screening is a 1×2 ripped in half and held together with small angle brackets.  Everything got a coating of bright yellow spray paint as much for ascetics as for environmental reasons.

DSC_0243

Once the paint had cured I put down more of my aluminum 1/8″ screening.  Looks good, but I am starting to wonder if my use of yellow for every bee related article is over doing it…  NAHHHHH!

DSC_0291

Now to put it under the hive.  Before I do, I gave the mite board a heavy spray of cooking oil.  The coated masonite shouldn’t soak anything up, so when I am done I can clean it and use again as many times as I want.

DSC_0292

It looks good under the hive, and the cleat is more obvious now.  Just sit the top on there, and slide it back until you hit the cleat.  It also gives you something substantial to quickly grab and get away.  Trust me, you don’t want to spend a lot of time messing around under there.

The board works perfectly, I am really happy with this design.  It installed quickly, caught the mites, didn’t cost much, is super reusable, doesn’t trap bees, looks great, and makes it very easy to see mites.  The only problem is that I have a lot of mites.

DSC_0294

It is hard to distinguish in the above picture, but there are dozens from a single day of monitoring.  We are going to have to start doing something immediately.  I have read good things about the powdered sugar treatment.  I still have honey supers on, so I can’t use some of the really aggressive stuff.  A single powdered sugar treatment isn’t highly effective, but done consistently week after week, it can supposedly knock down the population.  Our starting numbers are really high, so hopefully it can only go down from here.  Look at those horrible buggers!

DSC_0296