Wee Walker Wagon V1 and 2

Getting back to baby furniture, I have seen different kinds of little pusher wagons that kids learning to walk can use to help them build muscles and coordination. A co-worker mentioned that his daughter had a plastic store bought walker that she was learning to walk with, but that it was so light that it would shoot away from her. I had him measure her height to the shoulder to act as a rough starting point

I will probably build one for us and a few for friends having kids. That means making use of templates to repeat the work once I figure out what I want it to be like. I broke out the compass and thin bandsaw blade and got curvy.

I added holes to the templates and used a transfer punch to copy those holes over to each part. That way the wheels will connect in the same spot, and the handles will go on evenly. To add a little color and flare I painted green accents to the handle and wheels and a racing stripe for +2 speed. When the paint was all dry I coated everything with polyurethane.

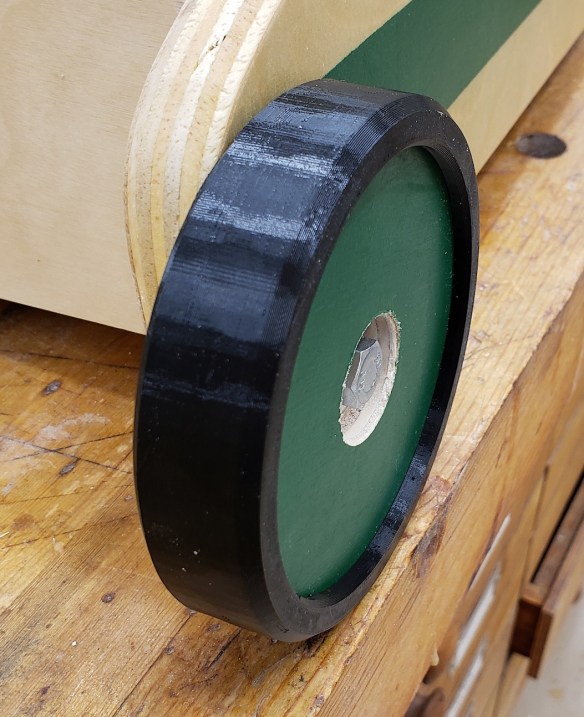
I was worried the walker would go skidding across the floor if placed on anything other than carpet. I printed thin TPU bands to act as tries and glued them to the wooden wheels. The TPU isn’t as grippy as a rubber tire, but I was able to produce it in house and it will grip better than the bare wood.

I spent some time fiddling with the arms, and probably built them a little too short. I will give this to the co-worker and have him test it out on his daughter.

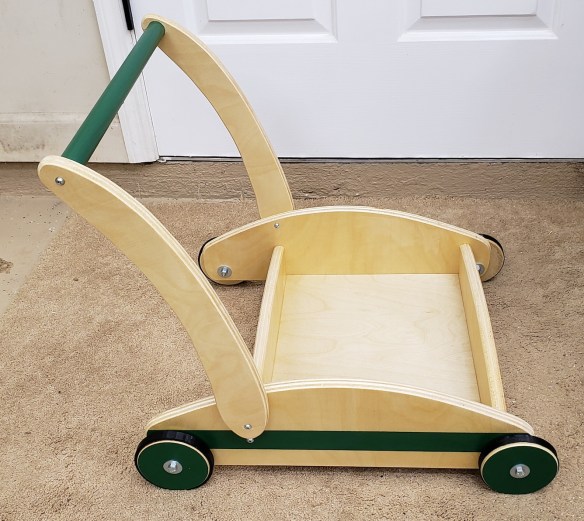
The finished product looks nice. It is heavy enough that a child just learning to climb up will not have it shoot away, but light enough they can still push it. Lock nuts set the tension at the wheels, so there can be more or less resistance as needed.


I gave this one to the co-worker that was complaining about the plastic one his daughter was using. The only catch was that he had to report back how it worked, and let me tweak it if need be. A few weeks later the reports were in. The bigger kids liked to play with it too! They treated it like a bumper car and crashed it into a lot of things. Also they wrenched on the handle hard enough that the arms were flexing where they screwed into the body. Lastly, it was a little on the wide side.

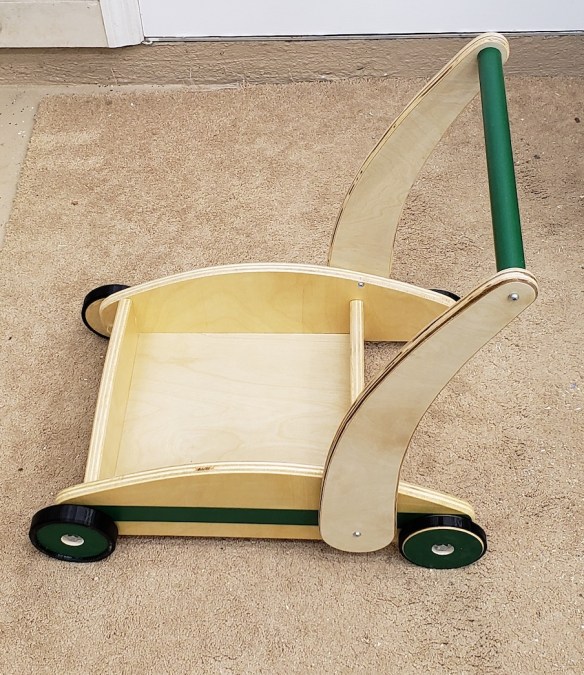
No problem, this is why I gave it to him! I didn’t like how the old arms turned out, so I went ahead and remade the template. Instead of freehanding some curves I got more systematic. I drew two circles that were the size I wanted each end of the arm to be, and drew them further apart than the original arm so I could move the base down lower on the cart. Then, to connect them, I set my drawing bow to a nice curve and connected the tangents of the two circles. The results look a lot better than my first arm template.

I assembled everything with pocket hole screws from underneath, and a few visible screws on the side. That let me take everything apart for alterations. I trimmed the center width down from 16 inches to 12. That should lighten the look and load of the thing and make it more maneuverable.

The bumper car comment had me wondering. I had left the bolt heads stick out beyond the wheel. If they caught a piece of furniture or baseboard, the bolt would probably fair better than the target. Also, there wasn’t much cushion to the tires. I mostly added them for grip, not as a bash protector. I counter-bored all the wheels, to recess the bolt heads, and upgraded to 5/16″ bolts as that was what I had available. The old tires were cut off and replaced with thicker ones that wrap around the outside face of the wheel. Now they shouldn’t be so offensive to fine features in one’s house.

With those upgrades complete I reassembled everything and gave it back to my co-worker. If there aren’t any more changes needed I can go into production and make a few for myself and other co-workers that are having kids.

Father’s Day Flippers

These are called pigtail flippers, bbq turners, or I have also heard Texas toothpicks.  Whatever you call them, they are cool tools for the grill.  Here is me demonstrating their use on a set of serious pork chops for my father in law.

20180616_120333I wanted to try one of these tools, and my localish woodcraft had these new kits on sale.  Why not make one for myself and the dads in my life?  I picked up some thick maple dowel to make these handles.  I was building the handles for my mom’s bookbinding press at the same time, so it all worked out.


The first step is to drill out a hole for the threaded insert, and carefully thread it in.  I had an issue.  Most kits use 1/4-20 or 5/16-18 threaded inserts.  This one had an M6 insert for the metal turner rod.  I don’t have an M6 mandrel, and I couldn’t find one online.  Time to make one!  I played around, but ultimately a nut and bolt with the head cut off did the trick.

DSC_1251

That let me thread the brass insert into the handle, but I would normally flip the part around and chuck the mandrel up so I could spin with no tail stock.  No such luck here, the bolt is too small for all of my chuck jaws (right picture).  I could try to chuck up the nut, but it has 6 sides and the jaws all have 4.  If I did a lot of these, I would have to figure out how to make my own mandrel.


Instead of holding it by the threaded insert I turned down a shoulder to accept a brass bushing, then chucked up that shouldered section.  It marred the surface, but that will get covered anyways.

With 4 different variations turned I remembered I was supposed to drill a hole in them for their hanging cable.  This would have been a lot easier when they were simple cylinders still.  Order of operations on the lathe is super critical.  I put the whole lot of them on little sticks and went to town with the spray polyurethane.

I pressed on the brass bushing with epoxy and threaded on the turner.  The wire cable as a hanging strap adds a nice touch.  I hadn’t broken out the lathe in quite a while, so this was quite satisfying to get these done with minimal screw ups.

DSC_1284

DSC_1285


One other minor experiment that happened when I had my lathe out was to try and smooth out my 3D printed can koozie.  It turns out that you can really shine that stuff up if you go through the grits.  There are minor voids that show through upon close inspection.  Still, that is a nice shiny looking part.  You could polish up most of a chess set this way!

Bookbinding Press

During a visit to my crafty mother, I came across a good build to support her habits.  She showed me a series of bookbinding finishing presses.  I am not super familiar with how they work, but they looked a lot like a moxon vise.  I am planning out a moxon vise build of my own, so this would be a good learning experience and make a great gift.

DSC_1280

DSC_1281

Traditional books have a lot of layers of material that need gluing together.  This helps keep it all clamped for various operations.  The side wings let you clamp it to a table, and with it hanging over the edge, any length book can be held.  The jaws will open to accept a 3″ thick book, and there are 13 inches between the screws, allowing for a very tall book.  5/16″-18 hand screws should provide plenty of clamping force.  The hand screws come out, so it can be disassembled and packed into a smaller space.


I started with the backbone and dovetails.  If something was going to get screwed up, it was the dovetails.  I need to cut a lot for an upcoming project and I am beyond rusty.  Mark, saw edges, fret away waste and pare the rest.

My dovetail transfer jig has already come in handy.  The pins look pretty rotten, but they should be very structurally sound.  Sorry mom!


With that taken care of I glued up two pieces for the front, and added another to the backbone.  One piece was taller than the other which eventually got planed to an angle.  That gives your fingers easier access to the book spine.

DSC_1236

DSC_1237

DSC_1238

I assembled the dovetails and put on side wings that let you clamp this jig to any table or workbench.

DSC_1240

DSC_1242

When all the glue was well cured I put on a few coats of polyurethane in the hopes that bookbinding glue wouldn’t stick to it.  Felt pads on the bottom should keep it from scuffing any tables.  I pounded in some threaded inserts meant for wood.  They should hold just fine, but to be sure I sank a few screws beside them.


To run the threaded rods in and out you are going to need a stout handle.  I chopped some maple dowels down to size, drilled out for a 5/16 threaded insert, reduced the entry shoulder for a brass sleeve, then flipped it around, threaded it onto a 5/16 mandril, and smoothed out the back side.

The bare wood got multiple coats of spray polyurethane, then when cured, I epoxied the brass sleeve on the handles, and the threaded rod in place.  DSC_1276.JPG