Beard Oil

I have been wanting to do my own beard oil ever since I made shave oil.  I had a commercial beard oil that was pretty decent and easy to reorder.  Now, no more excuses, my store bought stuff was running out, so I bought the ingredients to make my own.

There are a million oils available that should be good for your hair and skin.  I chose argan, jojoba, and sweet almond oil because they seemed to be in a lot of the high end beard oils.  The raw ingredients are kind of pricy, but I use this stuff so slowly that this batch should last me for a year plus gifts.

DSC_0121

The tiny bottle is sandalwood oil.  The sandalwood shave oil is awesome, so I figured I would continue the theme.  I used equal parts of each major oil as measured by weight.  50 grams of each yielded 3/4 of a cup.

DSC_0119

I didn’t measure the essential oil by weight but rather with a shake.  I shook it for a total of 20 seconds.  The bottle gave 2 to 3 drops per second.  I am guessing 40-60 total drops for this 150g batch.  Stop to mix and smell as you go, the right amount is very subjective.

DSC_0122

This batch was perfect for two 1 ounce droppers (gift for bearded co-workers), and a 4 ounce bottle for myself.  I have only used it for a few days, but have really enjoyed the results.  It is thicker than the other oils I have used, which means this 4 ounce bottle should last longer.

Last but not least every good product needs a fancy label.  This is no exception.

DSC_0123

Easter Brisket

Since my smoker renovation back in January I have been working to re-learn the process.  The new controller holds everything at different temperatures than I am used to.  Time to experiment!  I had a lot of family over on Easter, and decided to skip the ham and go for an Easter brisket!

This badboy started off at 2am weighing in at over 13 pounds!

DSC_0110

A lot of trimming later he was ready for some coarse salt and pepper rub down.

Off the little brisket goes to smoker school to learn to be tender and dark and delicious.

DSC_0115


5 hours later I woke up and did a check.  It was really far along.  I started off with the setting of 275, but I know that the smoker runs a little colder in the center than the built in probe reads.  Maybe using oak changed the setting.  I lowered the temp to 225 and let it go for another 4 hours.

20160327_114609

Our little brisket has graduated with a bachelors degree in deliciousness.  Some post graduate school would do it well.  All wrapped up in butcher paper it continued its studies in a cooler.  Resting in a cooler is great, all the insulation keeps it hot for hours.  We ate nearly 3 hours later, and it was still piping hot.

The bottom 1/8 to 1/4″ of the brisket was a little dry and hard, but the rest was pretty good.  I am guessing this was due to the heat being too high at the outset.  The fat was well rendered and melted in your mouth.

20160327_143533

Over all it is a really tasty brisket, but there is always room for improvement.  Next time, I will start at 250 and see how things run.


I couldn’t completely buck tradition.  Sometimes you just really want ham for Easter.  I stuck a little half ham in the smoker for the last few hours to warm it up and impart a little smoke.  Oak and ham aren’t a perfect match, but it turned out well nonetheless.


Paracord Wrapping Jig

I went a little nuts and bought a 1000 foot spool of paracord.  I went from having no rope around the house to having more than I knew what to do with!  What to do with it was actually a bit of an issue.  The spool stores nicely, but isn’t immediately useful.  You have to pull out what you need, cut some off, and then burn the ends to keep it from fraying.

Enter the fast pull rope wrap.  It is a simple way to bundle up paracord into neat organized bunches that don’t get tangled, and they let you pull out a little or a lot as you needed.  The best way to make one is with a jig.  My jig has some neat and novel features you are sure to want if you have to make more than a few bundles at a time.  With it I was able to break my spool down into more reasonable sizes that could be sprinkled around to various locations that might need rope.

Care and Feeding of Wooden Cutting Boards

I made a comprehensive video for the care and feeding of wooden cutting boards.


Cutting Board Types

Long grain boards have grain running parallel to the table.  They are not good for chopping but look gorgeous as a cheese board or display platter.

End grain boards have the grain running up and down with respect to the table.  They are excellent for general kitchen cutting of meats and veggies.

Care

Long grain boards should be oiled occasionally with either mineral oil or an oil with wax.

End grain boards must be oiled regularly with mineral oil to keep the water and bacteria out.  Use a generous amount of oil flooded across the surface and let it soak in.

In both cases if water appears to be soaking into the board, it is time to oil.

Cleaning

Both board types can be cleaned in the same fashion.  Use hot water and soap to clean the surface as you would anything else.  Do not soak or immerse the board, and never use the dish washer.  Dry immediately after cleaning.


It’s Beginning To Look a Lot Like…

CHRISTMAS SHOES!

The last two years I have used a pair of red and green converse to give myself some festive footwear.  I took it to a whole new level with some zazzy laces.  DSC_0593

Barely a craft project, but I am so happy with these that I had to share.  I have an alternate left/right pair so I can switch off every day.  Next year?  Bells!

Cigar Box Storage

Small accessory storage is often an issue.  Many hobbies end up with a bunch of loose bits and bobs that you need to keep track of.  My flashlights for example have special batteries, a charger, instructions for each light, spare o-rings, etc.  I thought about building a series of boxes for small parts storage, but am swamped with projects.  It would be good practice, but I need the storage sooner rather than later.  Enter the humble cigar box.

wpid-20150927_121922.jpg

It turns out you can get a random assortment of cigar boxes for really cheap.  35 bucks for 10 boxes on amazon.  Some weren’t very nice or in good shape, but most were pretty good looking.  They have labels and stickers all over them, but otherwise are gorgeous wooden boxes.  The two pictured above hold my light stuff.  Each one is very unique, so even without applying your own labels, they should be quickly recognizable.  I might try to sand off all the adverts and refinish them, but much of the hardware looks like it wouldn’t come off cleanly.

The list of things someone could use these for is quite long:

  • Ukulele accessories
  • Board game extras like dice and pencils
  • Spare USB cables
  • Pocket change
  • Specialty tool kits
  • Flashlight accessories

Get yourself some old cigar boxes!

My Mi Trip

I went with the lovely wife up to Michigan to see the family in laws.  I didn’t intrude with my camera on any of the reunion activities, but I did get a chance to shoot some nice time lapse and highlight a few roadside attractions.  Mi is very green and gorgeous this time of the year, but their roads are terrible!

GoPro Time Lapse Endurance

I love time lapse videos.  They can show progress and life in a way that we couldn’t normally comprehend at our human pace.  I have started a few time lapse shots only to have them go sour part of the way through.  Changing lighting conditions are one culprit, but so are dead batteries.  When they only give you 3 little bars to show battery life, it can be hard to tell how much time is available.  I decided to do some time trials with various batteries and capture rates.

All tests performed with a GoPro Hero 3 White, WiFi off


Storage Space

A simple one to test is storage space, or so I thought.  Everything was pretty straight forward until I paid attention to the file sizes.  It turns out the image size varies quite a bit depending on lighting conditions and capture speed.  At 1 second and below, the file size cut way down.  Similarly low lighting conditions will produce smaller files.  Even with a 10 second delay.

  • 0.5 – 1 second delay: 250kb – 750kb
  • 2+ second delay: 1.3mb – 2mb

This mean that mileage may vary by quite a bit.  1 second delay in low light vs bright conditions can be a factor of 3 difference.  This is all a little academic.  Memory is cheap, and often more available than battery life.  The worst case would be a 2 second capture delay in full lighting.  That could theoretically be 3.6gb/hr.  A few of the actual numbers I got are below.  Most were taken in fairly low lighting.

  • 1 second delay, 2 gb/hr
  • 5 second delay, 1 gb/hr
  • 10 second delay, 0.5 gb/hr

In theory 5 seconds could go from 1 to 1.5gb/hr.  Again, probably not going to break the SD card bank.  Take my above file size numbers, multiply by your acquisition rate and figure out how much space you will need.


Internal Battery Endurance

This is what I originally set out to do before I got really side tracked with file size.  I had a hypothesis that the higher acquisition rates would yield shorter battery life.  The idea being that the GoPro would consume less power in the delay cycle vs when capturing.  100% wrong!

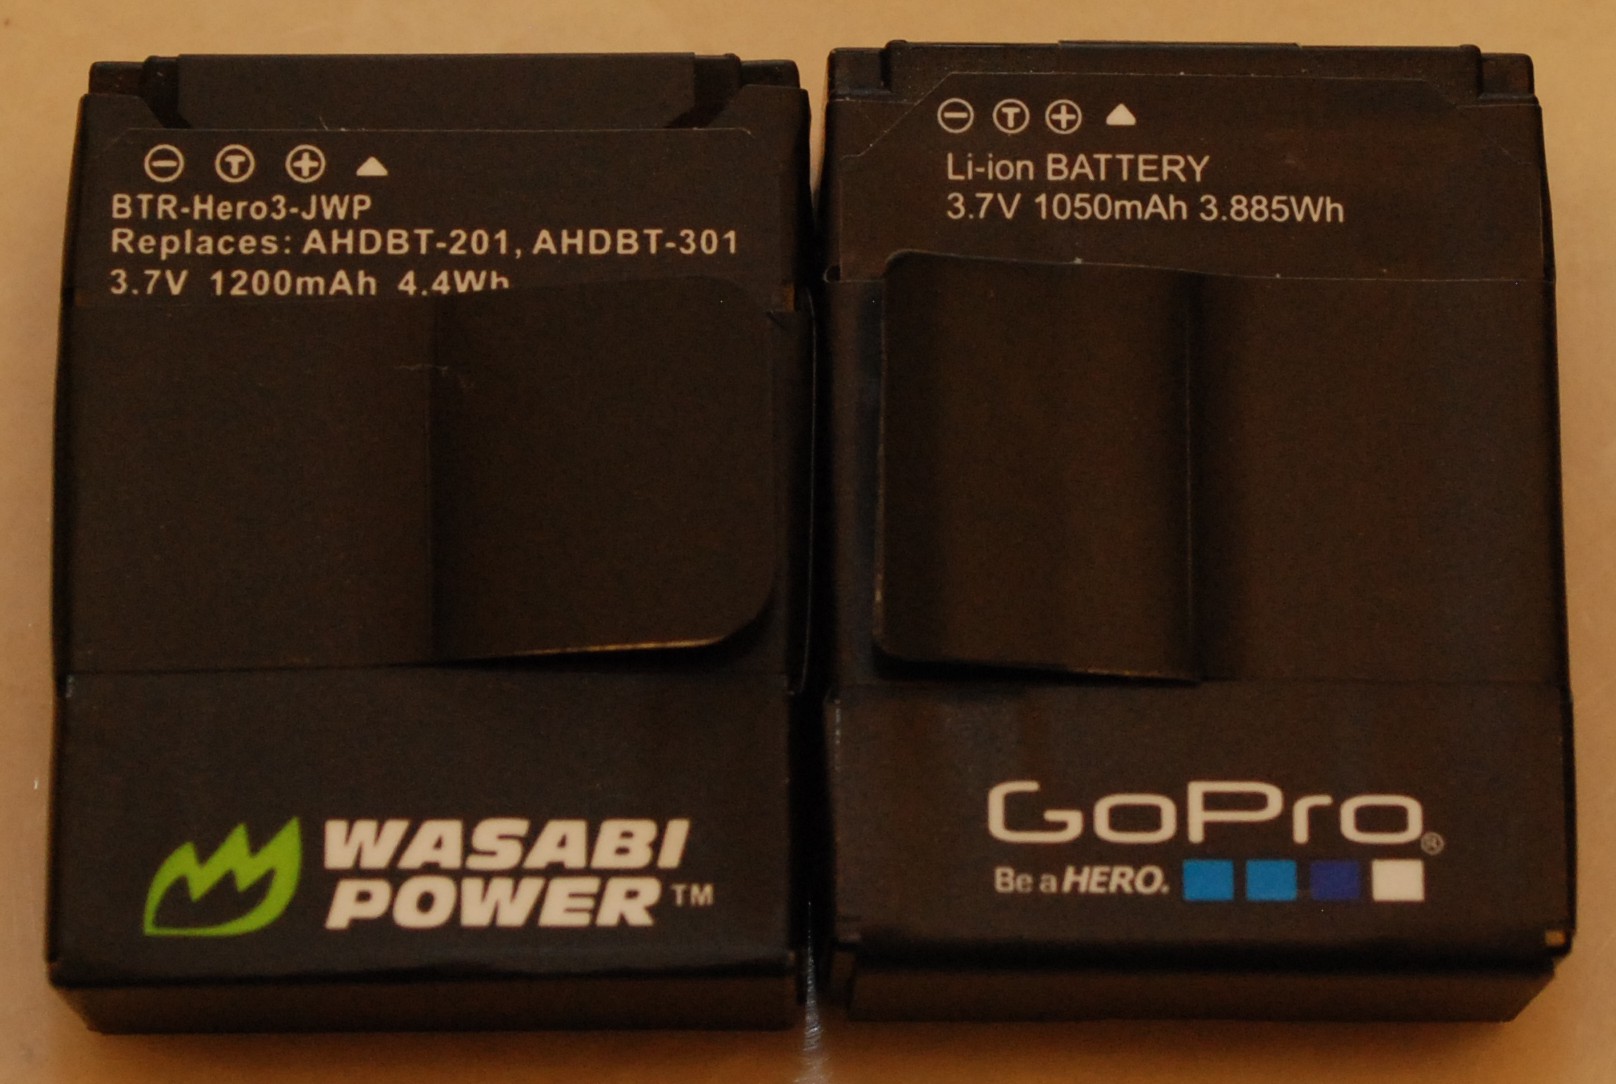
It turns out there is no measurable battery life difference.  I tried 1s, 5s and 10s delay.  They all turned out the same on a given battery.  I compared a stock GoPro battery and a Wasabi power battery both with a 5s capture delay.  They came out really close.  That is surprising considering the stated mAh rating is higher on the Wasabi.

  • Wasabi Power Battery (1200mAh): 3hr 45min
  • GoPro Stock Battery (1050mAh): 4 hours

DSC_0142

4 hours isn’t bad, but when you consider there will be setup time, that drops.  An extra battery source is whats needed.  GoPro sells a backpack, but I wanted something cheaper to rig.  How about one of these portable batteries used to charge a phone?


External Battery Endurance

I have an Anker portable battery (3200mAh) and an EasyAcc (10,000 mAh).  Often the stated ratings are not correct.  See Wasabi example above.  Still, they ought to last longer.

  • Anker battery: 8 hours
  • EasyAcc Power Bank: 29+ hours

The power bank was crazy.  I eventually gave up and just stopped it.  There are 4 indicator lights on it, and one was still lit up when I called it quits.  I have no idea exactly how long it would run, but obviously well over a day.  I can’t imagine I will want to do time lapse for that long.

DSC_0182Using a portable pack, you will not be able to seal up the GoPro.  Time lapses done in a rough environment will require an official backpac with new case.  Still, I can think of a lot of places where having all day time lapse without water resistance would be useful.

DIY Camera Reflector

I shoot all the photos for the blog on an older nikon DSLR.  The flash I have works great, but is not the typical form factor.  It makes adding a reflector really difficult.  Someone sells a reflector online, but it is more than I am willing to pay.

Although this post is about a photography accessory I felt a video would best explain the whole situation.  In comes Mr. GoPro.  Sadly my D80 does not support video capture.  Maybe someday I will upgrade.

Now that the concept is out there a demonstration is in order.  I find that doing a bounce of the ceiling takes care of 95% of my shots.  Sometimes there is a lot of contrast, or for some reason a bit of fill lighting is required.  That is where the reflector comes in.  As you angle it forward, more of the light is directed forward instead of up.

For whatever reason my kitchen has the worst results with bounce flashes.  Below are 3 shots done with the flash facing forward, up for the bounce, and up with the reflector.  There isn’t a huge difference in the forward and reflector shot.  The contrast isn’t so extreme, and the shadows are nice.  I used a bit of white paper on the reflector.  A grey sheet, or more diffuse surface maybe in order.  It will probably take a lot of experimenting before I am happy.  Still, as a mechanism the reflector works great!

DSC_0132

Forward Flash

DSC_0133

Ceiling Bounce

DSC_0134

With Reflector

Jellied Mistakes Were Made

My parents were in town last weekend and I thought a fun activity to do with mom would be making jelly.  Strawberries are still reasonably cheap and after my massive jam success what could go wrong?

I processed a lot of strawberries just like I did in the previous jam job.  For jelly, you take cut up fruit and cook it down a little to help get the juice flowing.  After about 5 minutes of boiling the strawberry slurry was looking just right.

DSC_0001

The next step is to strain the cooked mush through a jelly strainer, then proceed with the strained product just like you would for a jam.  This is were the disaster came in.  I neglected to tie the strainer.  A healthy pouring of strawberry slurry turned into a huge mess. The bag slipped through its retaining ring and fell into the bowl.  Hot strawberry sludge went everywhere including on me.  I got a few burns and my kitchen looks like a murder scene.

DSC_0003 DSC_0002

Luckily I wasn’t hurt badly, and everyone helped clean up.  We poured everything back in the pot, tied the bag securely and restarted the straining process.  It went reasonably well after that.  For an afternoon of work I got 5 jars of gorgeous ruby strawberry jelly, some burns, and a cleaned kitchen.  Interesting experience, but jam is less work and has higher yields.  Still though, look at this jelly!

DSC_0005