Hive Ester II is Dead

We aren’t doing very good at this whole beekeeping thing.  We checked our hive just over a week ago.  They showed some signs of mite issues, but otherwise were laying a lot of brood and had a decent looking population.  Today they are nearly all gone.  I bagged and sealed up the frames and left them in the yard.  We are having some pretty harsh sun which should kill the small hive beetle larva and other nasties that were starting to take hold.

20160405_160303

I am very seriously considering getting rid of these frames and starting over again.  It is horrible to see, but below is a picture of one of the brood frames.  Poor little girls.


20160405_154752

Stop Loss Bag Jig

I never intended to do any reviews when I made this blog, but I have picked up a few things recently that I feel warrant some ranting and raving.  This is only half of that.  I have been moving away from new finishes like polyurethane, and towards older finishes like tung oil and shellac.  The problem is some of them spoil easily if not stored properly.  That is where stop loss bags come in.  You can fill them up and push all the air out every time you use them.

Filling is a bit of a problem though, they don’t stand up on their own when empty, and are pretty floppy even once filled.  Buying the bags gets you free plans for a funnel and turkey baster stand.  To fill, you push this tubing thing on your bag and a funnel and sit in the stand.

The filling is fine, but I am honestly going to use this thing a few times a year at best.  I hate having a thing around that rarely gets used and takes up space.  Instead I took a small funnel and screwed the holding tab into a board.

I clamped the board in my front vise and adjusted the height until the bag was at a good level.  This worked out really well.  Any board will do, and you can throw it back on the scrap pile when done.  Don’t bother with the jig, do this.

Off we were to the races until the bag started to slip off.  It turns out the clear tube should go over the bag, and the red part should go over the funnel.  Oops!  The picture below is the proper setup.

DSC_0131

Getting the air out involves an awkward squeeze and screw on of the top.  It does stand up reasonably well once past about half full, and pouring has been easy.  I went into my boiled linseed oil bag twice so far and both times I found it easy to do a controlled pour.  Time will tell if these are a keeper or not.  Over all I find them a little finicky, but worth the effort.  They help me get rid of rotten rusty cans like this one, and stack nicely in my finishing cabinet.

DSC_0132

DSC_0133

Conclusion:

Filling is a bit finicky, but very doable with help of a single board.  Long term storage remains to be seen, but he principle seems sound.  Labeling is easy.  Pouring is a big bonus that I hadn’t thought about.  I hate pouring out of cans, you always gunk up the rim.  Even the big upright tins get the finish all over the threads.  The difficulty of pouring finish back in is also kind of a feature, you shouldn’t be doing it.  I want to start using a lot more tung oil and varnish, and this should facilitate!

Giant Jenga

A few weeks ago a friend of mine asked for help making a giant jenga game.  It sounded like a lot of sanding, luckily I could make him do that part!  Step 1, acquire a lot of 2x4s and plywood to make a box.

DSC_0090

Now, cut a minimum of 72 10.5″ sections.  We cut a few extra 2x4s so we could be choosy and kick out ones with bad knots or dings.

The stack up comes out to 3 feet tall.  It is the equivalent of eight 8 foot 2x4s.  That is a lot of weight.  How about a box to move it around?  Stacking them 6 wide gives a box that is more or less square in width and height.  It should be a good dimension for picking up and transport.  We used pocket holes to tie it all together.

Once the box was assembled the moment of truth came.  Would it all fit?  I left a 1/2″ in length so the wouldn’t get bound up coming out of the box, and added an inch in width to help get fingers in for pulling them out.  It worked well, you can comfortably stack 3 wide at a time from the tower to the box.

Best of all, the box fits perfectly in the back of his hatch back.  It is heavy enough to require two people to haul across any distance, but it is a good size for one person to carry for a short bit.

DSC_0109

Dread Knot

I posted about attending the Tampa woodworking show just after I got back.  What I didn’t talk about was some of the cool people I met.  Lots of fellow hobby woodworkers attend the show and you get to talking.  One super cool dude also happened to do a bit of blogging himself.

Darryl has a really clean and well organized shop on youtube.  Take a look if you want a garage setup that will make you drool!  He even has really well done stickers to hand out.  This badboy went on my bandsaw along with a few others.  It makes me want to step up my game and do more all-video posts and maybe even get artsy and do my own logo with sticker.

wp-1459460721270.jpg

wp-1459460721243.jpg

Beard Oil

I have been wanting to do my own beard oil ever since I made shave oil.  I had a commercial beard oil that was pretty decent and easy to reorder.  Now, no more excuses, my store bought stuff was running out, so I bought the ingredients to make my own.

There are a million oils available that should be good for your hair and skin.  I chose argan, jojoba, and sweet almond oil because they seemed to be in a lot of the high end beard oils.  The raw ingredients are kind of pricy, but I use this stuff so slowly that this batch should last me for a year plus gifts.

DSC_0121

The tiny bottle is sandalwood oil.  The sandalwood shave oil is awesome, so I figured I would continue the theme.  I used equal parts of each major oil as measured by weight.  50 grams of each yielded 3/4 of a cup.

DSC_0119

I didn’t measure the essential oil by weight but rather with a shake.  I shook it for a total of 20 seconds.  The bottle gave 2 to 3 drops per second.  I am guessing 40-60 total drops for this 150g batch.  Stop to mix and smell as you go, the right amount is very subjective.

DSC_0122

This batch was perfect for two 1 ounce droppers (gift for bearded co-workers), and a 4 ounce bottle for myself.  I have only used it for a few days, but have really enjoyed the results.  It is thicker than the other oils I have used, which means this 4 ounce bottle should last longer.

Last but not least every good product needs a fancy label.  This is no exception.

DSC_0123

Easter Brisket

Since my smoker renovation back in January I have been working to re-learn the process.  The new controller holds everything at different temperatures than I am used to.  Time to experiment!  I had a lot of family over on Easter, and decided to skip the ham and go for an Easter brisket!

This badboy started off at 2am weighing in at over 13 pounds!

DSC_0110

A lot of trimming later he was ready for some coarse salt and pepper rub down.

Off the little brisket goes to smoker school to learn to be tender and dark and delicious.

DSC_0115


5 hours later I woke up and did a check.  It was really far along.  I started off with the setting of 275, but I know that the smoker runs a little colder in the center than the built in probe reads.  Maybe using oak changed the setting.  I lowered the temp to 225 and let it go for another 4 hours.

20160327_114609

Our little brisket has graduated with a bachelors degree in deliciousness.  Some post graduate school would do it well.  All wrapped up in butcher paper it continued its studies in a cooler.  Resting in a cooler is great, all the insulation keeps it hot for hours.  We ate nearly 3 hours later, and it was still piping hot.

The bottom 1/8 to 1/4″ of the brisket was a little dry and hard, but the rest was pretty good.  I am guessing this was due to the heat being too high at the outset.  The fat was well rendered and melted in your mouth.

20160327_143533

Over all it is a really tasty brisket, but there is always room for improvement.  Next time, I will start at 250 and see how things run.


I couldn’t completely buck tradition.  Sometimes you just really want ham for Easter.  I stuck a little half ham in the smoker for the last few hours to warm it up and impart a little smoke.  Oak and ham aren’t a perfect match, but it turned out well nonetheless.


Rule To Sector Conversion

I have been reading a set of books that are directed at teaching the old methods of design using simple tools and ratios.  How did people build so many things and design such gorgeous furniture before industrial era tools and production?  A lot of it had to do with ratios.  They noticed basic ratios and proportions of the body, and used them to create furniture that fit our proportions and was decorated with ratios that are pleasing to the eye.

Getting ratios can be tough, but one tool helps a lot.  The sector.  I will start with a sector demonstration, then go through converting a ubiquitous folding ruler into a ratio tool.

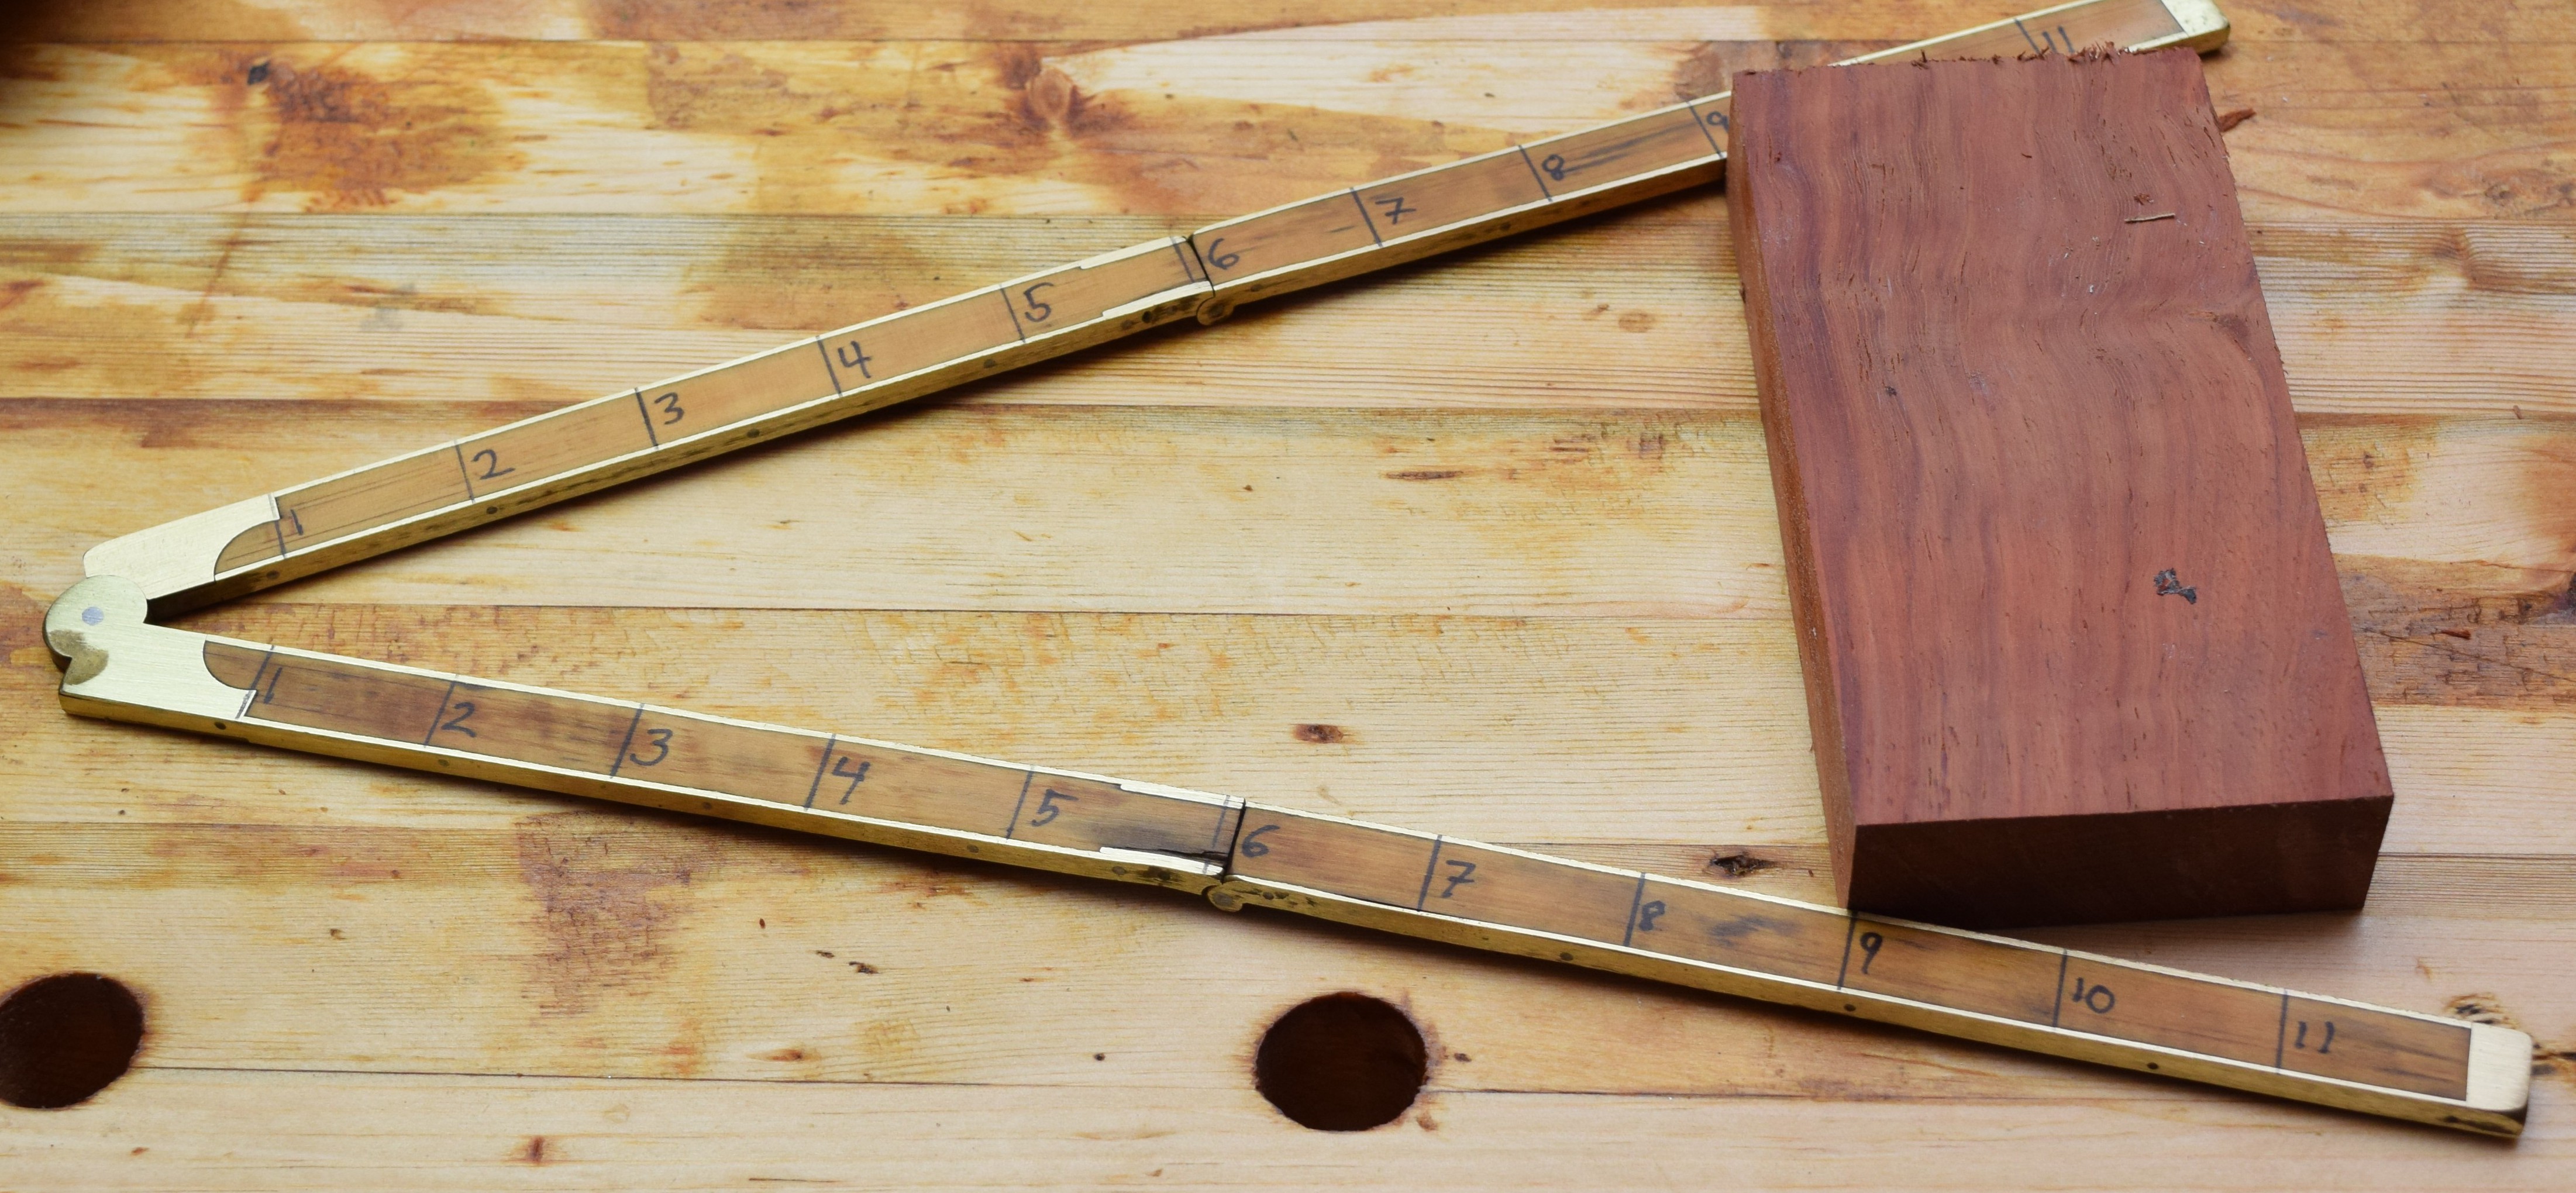
SO!  Say you have this nice block of wood, and want to divide it into 3rds for some reason.  Instead of reaching for the fine ruler and calculator, take this pivoting stick with equal divisions on it and line both edges up on the 9s.

DSC_0084

Now you take your divider, (it looks like a compass, but only has points, no pencil) and line it up with the 3 marks.  The 3 to 9 ratio is also a 1:3 ratio.  The dividers are now set at 1/3rd of the width of that piece of wood.

DSC_0085

Line up one leg of the dividers with an edge of the wood and step in twice.  You leave a little pin prick in the wood as you step over.  Put a sharp pencil or marking knife in those divots left by the divider and use a square to transfer across the piece.

DSC_0086

Bam!  Divided into 3rds in no time.  Find the center point of something in a snap, set drawer pulls up 4/7ths from the bottom of a drawer face, or divide an area up to figure out how wide a mitered framing should be.  The possibilities are endless and require almost no math skills.  Now you know how an early 18th century woodworker could divide something up with extreme precision even if their ruler had nothing finer than 1/4″ marks.


Sector Construction

You can build a sector out of any two straight pieces of wood or other material, and a tight hinge.  I opted to start with a folding rule.  There are plenty to be had on ebay for ~10 bucks, and they look really nice when cleaned up a bit.  This one started with a lot of years of use, and a brass edge that was coming undone.

DSC_0060

I sanded a mountain of nasty finish and imprinted lettering off before getting to clean bare wood.  I fixed the splayed brass edge with epoxy and put a nice set of markings down.  The divisions I used are arbitrary, but they must come from the center of the pivot point, and must be consistent across the sector.

All that hard work didn’t really matter though, because a coat of spray lacquer lifted the sharpie text and bled it everywhere.  Now my lines are blurred beyond use.

DSC_0067

Pro tip: Don't use spray lacquer over sharpie!

Rule #2 Conversion

Luckily I am addicted to buying old tools on ebay and purchased not one, but two folding rules!  While the first one sits in time out, take another rule you haven’t ruined, sand it down, put equal marks on both sides, and use BOILED LINSEED OIL to finish it.  It will look great.

I left the backside unchanged so I could have a basic ruler handy when using my sector.


Hay Feeder Lid

It is all fun and games till someone has a tinkle in the hay bin.  The hay hopper I built for our new buns had an open top for filling.  Somebunny was taking advantage of this, and would sit in the hay bin while eating.  We were ok with this until the new babies started peeing in the hay pile.

DSC_0037

Fine, if you are going to be a bad bunny, then we have to add a lid.  I would make a simple flat top, but I don’t want them using it as a launching platform for going over the fence.  So, start with a piece of wood, and angle smartly with your great grandfather’s number 3 plane.

Now add a magnet and strap hinge.

DSC_0042

I screwed the hinge into the vertical fence support that the feeder is suspended on.  the magnet lets you open the lid and use both hands to load hay.  The sloped top seems to be keeping the buns at bay.  I have yet to see any of them try to get on top or into the bin.  Bad bunny behavior has been blocked!

DSC_0044

DSC_0045

Tampa Woodworking Show

I finally attended my first woodworking show this weekend.  I don’t know why I didn’t do this years ago, it was a blast.  I went for Friday and Saturday and had a non-stop run of seeing cool tools, attending demonstrations and classes, and talking to other woodworkers.

There were a ton of vendors selling everything electrical, mechanical and sharp.  I got to put hands on some really sweet vertias planes and rummage through endless piles of junk!

There was a ton of wood being sold there as well.  I should have brought my suburban.

People were demonstrating all sorts of carving and turning techniques and even giving attendees the chance to try out a skill for themselves.

I attended some really informative free classes while there.  I filled up pages of my field notes with different techniques and tips from the instructors.  One guy was a multi-generation housewright.  His shop still takes on apprentices and works on period houses using period tools.  I learned some things about finishing that will have to be included in my next big project, and walked away with some free varnish samples.  How cool is that?!

I spent way too much on “show special prices”, but managed to pick some some things I had been drooling over and actually did find some good deals.  Last but not least they had a monster of a log section for display, and a big portable wood mill.  Who doesn’t want one of these?