Botanical Fest 2017

Spring is in full swing here, and summer is probably just around the corner.  We are already starting to see 80+ degree highs pretty regularly.  That must mean it is time to hit the garden!  We usually kick things off with a visit to the local botanical festive.  This year it was moved and by my estimate was about half the size it normally is.  Very sad.  As a result we got no herbs and still have a number of empty planters.  Still, we got a lot of good plants!

Our big backyard planters I made were looking kind of sad.  All my attempts to grow clover kind of went kaput.  Only the pink flamingos were coming in nicely.

20170304_112916

20170304_112911

Some native friendly variant of Mexican petunia went into the right side bed while some blanket flower and Mexican heather went in on the left.  We transplanted the flamingos so they could spread more.

20170304_114621

20170304_114527

Even the back door planter got in on the action.  I found a tiny lime bush and some lavender for the bees.  This one still needs some help filling out.

20170304_114517

Out front didn’t see a lot of new flowers.  We were trying to pick up native sun happy pot friendly plants.  Not sure how successful we were, but here is some of what we got.

20170304_120749The sweet almond smells amazing and looks good in these cool new 90 degree pots we got.
There was a Florida friendly daffodil apparently and something called nemesia.  We probably need to fill out about 6-10 more pots out front for everything to look right.  Hopefully we will have another free Saturday soon to do more gardening.

Last but not least this little simpson stopper is hopefully going to grow up big and bushy to help cover up the trash cans.  Right now he is a runt, but a little water and a strong summer ought to fix that.


To The Best of Buns

16465569_1653277584969017_6315287317531590656_n(1).jpgAs if allowing two long eared fuzzy ingrates in the house wasn’t enough, I eventually relented to us hosting a temporary visitor.  A particular bun from the mean streets of Melbourne got picked up by a cop and needed a home for a short while so he could get fixed and make his way to the greater Orlando rescue group.  I was expecting an ornery skittish bad bun.  What I got instead was an incredibly sweet creature.  Someone either lost him or kicked this guy out.  Either way, they are losing out big time.

I have never been much of a pet or animal person.  Herbie changed how I feel about keeping animals a bit.  Every time I would open up the back door he would be pawing at the edge of the cage for pets.  I could scratch his nose, rub his ears, pet his side, and he would just lean in for more.  I was sick while we had him and sat in his cage quite a bit.  He came over and gave me lots of love and attention that helped take my mind off the cold.

This story ends in tragedy though.  We were supposed to have him for a month.  A few weeks to recover from his street injuries (a few bad scrapes on his side and back), a quick neutering from the vet, and then a few more weeks of recovery before going off to the main Orlando group.  Though he appeared quite healthy and healed from previous injuries, he did not survive the neutering operation.  Rabbits are very delicate and sedation for surgery is touchy.  Maybe he had other issues we didn’t know about.  Maybe he was very old.  Maybe we just got unlucky.  We will never know.

In the two weeks we had him he completely nuzzled his way into my heart.  I was even starting to think of a way we could keep him along with the other two we are beholden to.  In the short time he earned himself a few nick names.  Herbie was the name he came with, but he also went by Herbacious, Herbie The Love Bun, Herb-a-licious, Herbert Hoover (when food was around), and Herbert J Whiskers (when he was feeling formal).  Honestly I probably forgot a few at this point.

Though we never got him to a forever home, we can still give him a final resting place.  We had him cremated and collected his ashes.  I thought it would be fitting to build a little box for the occasion.


20170212_144546

Something this serious calls for the family wood.  These walnut pieces have been in my family for decades.  I cut a chunk off and decided to go for a bandsaw box.  I have never made one before, but thought this was a good time to try something new.

I didn’t make any layout marks, just went went with my gut and cut out the first things that came to mind.  First the overall shape is cutout, then the back comes off.  With that set you can cut out any number of drawers you please.  In this case, just one.  A similar thing happens for the drawer, only you need to cut a front and back before carving out the central drawer cavity.

Cutting and glue-up went smoothly.  I did only minor sanding and didn’t bother with finish.  A wealth of off cut pieces gave me plenty to make a drawer pull in the shape of an H.

20170215_191515

After a few weeks of waiting we got his ashes back along with a few paw imprints in clay.  We laid him to rest in his little hand made home under the orange tree in the back yard.  Maybe we should call it the Herbert J Whiskers memorial orange tree.

16230127_751708518314283_6814505707241472000_n(1).jpg

Kitchen BackSplash

The kitchen is finally complete!  The last two months have involved a lot of waiting on things to get in, but it is all done.

With the countertops installed I was able to go ahead with a layout scheme.  The tiles are glass, of different heights and widths, and on a floppy mesh.  Figuring out where and how to cut to make it around the outlets was tough.

20170211_084428

Everything started and stopped at a metal quarter round boarder strip.  After a few different tactics I figured out that measuring everything from the edges and countertop gave me the best results for cutting around outlets.

20170217_105701

T20170225_112227
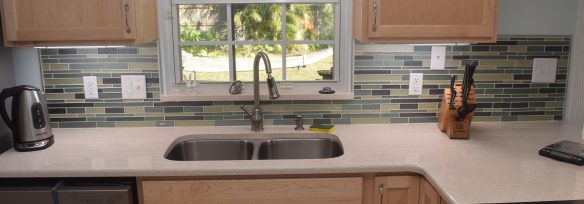
he gaps between each tile varied between 1/8″ and 1/16″.  It made any errors on my part easier to hide, but keeping everything looking right meant I needed a variety of shims.  When installing the tile I did my best to keep the gaps clean, but sometimes the mortar squeezed through.  It is tough to clean without disturbing the wet tile too much.  Instead  I waited till it was cured and used a custom little tool to scrape it out.  It is a thin putty knife ground down to make a small hook/dovetail shape.  I was able to get into the  gaps and clean out any stray mortar that even the smallest grout saw couldn’t get to.

With all the edges and gaps cleared out I could move on to grout.  Backsplash grouting seems to be pretty similar to floor grouting.  The grout is un-sanded on account of the narrow gaps, but otherwise you smear it on, let it sit for a bit, then wipe off.  The high ratio of gaps to tiles means a lot ends up staying in place and getting wasted in the wiping.

20170225_091326

20170225_094035

Hazing is really noticeable on the glass tiles, so they took a few dozen extra rounds of wiping, but you really knew when you got it all.  After months of work and waiting, and more money than I care to admit it is really good to have a gorgeous working kitchen.  Time for a kitchen warming party!

dsc_0734

January 2017 3D Prints

My newly resurrected frankenstein is doing reasonably well.  Months without a printer has left me a bit of a back log.  Here are some of the things I was able to create now that I could print again.


Plugfones Clip

I use plugfones liberate when mowing.  Basically rated sound isolation plus bluetooth tunes connected to my phone.  The body is pretty light, but tugs at the ear buds a tiny bit every time you turn your head.  I printed a clip that they slide into snugly, and that clips to my sweat band.  Now when I turn my head, the body moves with me and the ear buds don’t get slowly tugged out.  Thingiverse link to my design.


Contact Solution Bottle Pry

We both have contacts and often carry small travel size bottles of the contact lens solution around.  Instead of buying a new tiny bottle every time we run out I just pry the top off and refill from the big bottles.  They aren’t really designed for this, and the bottle tops are hard to get off.  Enter a custom wedge/pry tool that is perfect for getting under the lid.  Thingiverse

20170128_152838


Battery Terminal Wrench

Marine deep cycle batteries use a 5/16″ stud and nut.  I have a battery system around in case of hurricanes, and thought a dedicated wrench to include in the kit would be handy.  It is small to fit inside the tight space, has a through hole so the post can pass through the wrench, and even comes with a small custom holding bracket for storage close by.  Thingiverse


Propane Tank Valve Wrench

I get all my propane tanks through a gas cylinder exchange we have in the area.  Sometimes the new tanks come with the valves screwed way too tight.  This wrench gives you a lot of extra surface to grip with.  Magnets in the back keep it stuck to the grill close by.  Thingiverse


DnD Cultist

Many of my friends play DnD, but live far enough away that it is hard for me to join regularly.  Add a busy schedule in and I never play with them.  But, one GM had the great idea of me coming in as a one time special character.  I got to be a twisted cultist in a Lovecraft style otherworldly dungeon crawl.

I found a model that was split in half from top to bottom.  This kept me from using support but resulted in a big seam down the length.  Lots of spraying with rustoleum sandable filler helped with all the printer layers, but didn’t fill the gap between the two halves completely.  Next time I will use something else on that.  Still, a bit of thick primer and paint made it turn out well.

Drawer Dividers

While the cabinets were being installed I was hard at work making accessories for the drawers.  Most commercially available drawer dividers had a few strikes against them.  They were either plastic or bamboo (doesn’t match my maple cabinets), they weren’t very adjustable, and most don’t fit the narrow drawers next to my stove.  So I made my own.  The first trick is to take two thick boards and make four thin boards.

I resawed (cut standing on edge in the bandsaw) these two 3/4″ maple boards to make four slightly undersized 3/8″ boards.  After a few trips through the planer to clean up all the heavy bandsaw marks they were all about 1/4″.

I could have tried to glue various thin pieces together to make dividers, but wanted to include 1/4″ plywood as a bottom.  It would make the thin dividers a lot stronger to glue along those long edges.  I pulled out some silverware and got to settings sizes.

dsc_0654

Every edge got a few swipes from my lovely little lee neilson tiny block plane.  That thing is perfect for knocking down sharp corners.  Once I had all the dividers in place for a particular drawer I applied expert and professional clamps until the glue dried.

dsc_0656

Drawers full of spatulas and cooking spoons needed backup in the rear to keep them from leaning, so I used a short segment to shore them up.

dsc_0657

I had planned to divide out our junk drawer and a drawer full of odds and ends, but that doesn’t appear to be feasible.  Entropy will reign supreme in those drawers for the time being.  I did however get all the heavy use drawers near the stove well organized.


dsc_0683As a bonus I had extra thin cut maple left over.  I want to use this stuff up quickly.  At these sizes and with it being flat sawn, it will cup and bow quickly.  At work we stretch regularly using a deck of cards with different stretch moves.  The box the cards came in was complete junk.  I thought having a two sided card caddy would make transport and use easier.

The cards are in a tray at an angle to keep them from falling out when carried.  As you do a stretch the card moves from the face down side to the face up side.  Eventually you get through all the stretches, shuffle everything and start over.

dsc_0684

I took this as an opportunity to try two new things.  The first was liquid hide glue.  I have been hearing a lot about this (very old) product recently.  Long working time, reversible and low visibility under finishes made me very interested.  It was a fine glue, I will be using it more.  The next was my  new pin nailer.  It worked miracles on my quarter round baseboard molding and did a great job sneaking pins into this thin stock.  The pin heads are only somewhat visible on the flat sides.  It wasn’t the best usage case, but I like them a lot.  They kept it clamped and are much lower profile than brad nails.

Printer Rebirth

After months of being without a printer since the breakdown, I am back in business!

dsc_0665I was 99% sure that all it really needed was a new hot end.  Not sure what happened to the last one, but it would jam up no matter what I did.  Monoprice of course doesn’t sell new ones, and I didn’t want some cheap knock-off.  I didn’t realize it when I first had this problem, but it turns out E3D makes a “lite6” version of their famed V6 for half the price.  It can only do PLA and ABS, but that is all I ever wanted anyways.  Step one, remove old hot end with extreme prejudice.

I was able to reuse the heating element from the old system, but the thermistor is new.  This setup doesn’t have any part cooling fans so I bet the overhang performance will suffer dramatically, but at least it should work.

Some things that aren’t working out for me are power.  The old fan was 5V and got modulated by the micro-controller to change speeds for variable part cooling.  The new one is 12V and needs to be on all the time.  After some frustrating work with non-standard connectors, I ended up cutting out their connectors and directly wiring the given 12V supply to the machine with a power tap off for the hot end fan.  The fan power runs up the back, and the old 5V fan power just hangs out front.  I might use it to add a part cooling fan someday.

I learned a lot about how hot ends are made, and ended up having to completely replace the tubing on mine to get a full range of motion.  It is one ugly critter now.

wp-1484962752067.jpg

Ugly, but working!  I made a few of these small 1/4″-20 nuts as test pieces, and they turned out all right.  This wounded beast should keep me going till I can get something better and more permanent.  No more trying to print 24/7 now, just the things that I really want… This might be harder than no printer at all!

dsc_0674

Kitchen Renovation Part 2

Welcome to Kitchen Base Camp Charlie.  It is starting to really look like something now!  The cabinets were not installed by me, so I can’t take any credit there.  I did install the lovely plywood countertops though.  The real countertop guy isn’t going to show up for weeks, so we had to make due.

There was always a light over the sink, but I tied in two more lights under the cabinets that flank the sink so they are all on the same switch.  Very bright now!

Similarly I ran wiring so the two lights over the microwave are tied in with the pantry and lights over the stove.  Now, with the switch for the stove and the one by the sink you have a considerable amount of kitchen lighting without even going to the main overhead lights.  It is a nice place to be with a lot more storage than before.  I’ll let the pictures do the rest of the talking.

Bunny Feeding Fix

Our rabbits are many things, and one of them is tenacious when it comes to food and treats.  We got them an automatic feeder to make sure they get pellets at the same time every morning.  Honey found she could chew, claw, dig, and ram the feeder to get more.  Screwing it all down to a wooden base made tipping harder, but didn’t stop the chewing.

dsc_0642

I needed to remove their access to the device.  Listening to Honey claw and dig at the bowl for hours on end is getting old.  I ditched the old bowl and used a 4″ to 2″ PVC coupling as a funnel.

I mounted it with some small screws run in through the side.  I can remove it and make repairs or changes if need be.  The dispenser sits over it nicely and is held in place with a few low cleats.  They keep it from shifting, but you can pick it right up if adjustments are needed.

dsc_0647

dsc_0649Next a length of pipe acted as a down spout.  I start with only this downspout, but the pellets came out too quickly from the drop.  They would hit the bowl and go everywhere.  The bunnies didn’t mind the game of 52 pellet pickup, but some pellets would escape the fence.

A few elbows helped slow everything down.  They have enough velocity coming down the chute to not get stuck in the first one, but aren’t going so fast to scatter all over when they hit the bowl.

The whole contraption sits nicely on the bun-servation tower, and a few screws ensures they can’t knock it down on themselves.  It has been a week and the silence is golden.  The furry raptors don’t seem to mind the change, they get food all the same.  Now they just don’t short tomorrow’s meal by shaking it out early.

dsc_0648


Kitchen Renovation Part 1

After a lot of early salvos, the kitchen war has finally begun.  First, let’s look in horror and disgust at the kitchen that was.  Painted 1980s particle board cabinets with rotted bottoms, dark blue peeling paint, and no flooring.  Not a pretty set of pictures.

Don’t look too long, you will hurt your eyes.  Granted the next set of images aren’t that much better.  I happily smashed cut and dragged out all the old cabinets, and peeled the various paint layers off.  At least it looks a lot brighter in there.

dsc_0621

Most of the kitchen stuff and appliances had to be spirited away to back rooms and the porch.  What was left was the bare essentials.  I call it Kitchen Base Camp Alpha.

dsc_0622

Next came the sanding of texture.  When the house was built, some kind of roll on orange peel texture was used.  In decades since installation it has turned to powder and sluffs off in chunks.  Every square inch of wall had to be sanded back to the drywall.  It was messy business.

Next came patching of various issue areas, priming, more patching of missed issues, and then two rounds of the brilliant blue/green color that was in the living room.

At this point I got a lot of plumbing and electrical fixtures changed, and even a bit of routing done to account for changes in cabinet location.  With the walls complete I could scrape the floor of any glues or gunks and get to tiling.  As usual odd walls and squareness issues confounded me, but I was able to stitch it together pretty well with the existing living room tile I did last Christmas break.

dsc_0636

dsc_0638I could now work on the small pantry without any fear of getting in the way of cabinet installation.  It would give us a place to put back some of our boxed junk and help out in minor cooking adventures at Kitchen Base Camp.  I went with adjustable wire shelves and wired an under-cabinet light in the top that goes on with the lights over the stove.  Some basic molding happened on the inside, but most will wait till I can do everything after the cabinets are complete.


Until the cabinets get installed we got to move a few essentials back into the new area.  I call it Kitchen Base Camp Beta.

dsc_0640


Backyard Ballistic Target

The kitchen renovation rages on, but between painting and tiling there is time to work on a little side project.  A backyard knife throwing target.  It also works for hatchets!

wp-1483059011512.jpgThis project took only 3 2x4s, a bit of glue, and a hand full of screws.  I started by cutting up a pile of 3.5″ long 2×4 segments.  These are going to go together like a end grain cutting board.

At 5 across and 10 tall the target comes out roughly square.  15 x 17.5.  You could add another row to make it very square, but that would have required additional 2x4s and this seemed like a big enough target.  Easy to say now when I hadn’t missed 10 times in a row.

Titebond type 3 is an outdoor compatible glue, even if standard 2x4s aren’t.  Not sure if that matters or not.  It will be a race between the environment rotting and pulling the target apart, and my ability to actually hit something and cause damage.  My monster belt sander came in handy for leveling the edges of the rows after the first glue up.

wp-1483059011520.jpgWith everything glued I had a big block target.  This alone would probably last a while, but could somewhat easily cleave in half along the grains.  To help with strength I wrapped the edges with 2x4s screwed into the core.  This will help hold the relatively delicate center together longer.

A bit of throwing shows that I am no good at this.  Maybe the environment will get to it before my accuracy chunks out the center.