I have been making good use of my new router table. It was already very capable with a flat surface and adjustable fence, but there is always room for improvement. I am going to trick it out with a few printed accessories.
I have seen dust collector chutes that sit at the end of the table and suck up dust from dado cuts. I have a big enough table that I can do some pretty wide cuts before needing to break out the handheld router. First up, here is what the critter looks like. It sits at the end of the router table and collects the dust that blows out from the slot you are cutting when doing dado work.
I made a housing with a groove around the edges that would accept some brush material from a door sweep. It turns out if you remove the brush material it comes crimped in a little metal frame. That can be cut with a heavy pair of diagonal cutters. Doing that pinches off brushes so that nothing falls out. I cut up 3 segments and glued them into the housing.
To hold it down to the table I printed a bracket with alignment features and slotted screw holes. Now the dust chute can be raised and lowered or removed. The brushes will help catch dust, but won’t interfere with a board passing over the table’s edge. It certainly isn’t an accessory I will use every day, but it was a fun build and will come in handy from time to time.
An accessory that will see far more use is a pair of rolling stock guides. They are based off a design that Jessem sells. Theirs are made of metal and the wheels don’t allow kickback. I think my version is good enough given the price difference. I found a pack of cheap rubber wheels for luggage. There is an infeed and outfeed version with the wheels angled slightly towards the fence. They can adjust to accept thin or thick stock.
I needed a few small knobs for this job and experimented with using coupling nuts. The tall nuts give a lot of surface for the printed part to bear against. I tried tightening one against a vice, and couldn’t twist it hard enough to break it by hand. I will be making more of these in the future!
Here is a quick animation of it in action. The guides keep it pressed down to the table and the angle of the wheels guides the board towards the fence. I purposefully started the board away from the fence to illustrate it being guided in.
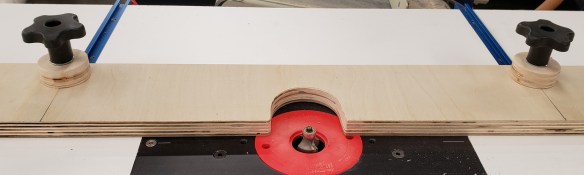
Lastly, I spent a lot of time making sure everything on this router table was flat and precise. I want to be able to do precision joinery, and that requires fine adjustment. It can be frustrating when you are trying to fine tune in a joint and just need a little nudge out of the fence. These little jigs will secure down via the T-track on the table and run a fine screw up against the fence.
The front of the screw has a ball bearing glued into a coupling nut. This means that the fence is only touched by the very tip of a hard bearing. When you rotate the screw it is a consistent touch point centered on the axis of rotation. The bottom of the jig has rubber bumpers so it doesn’t slide around on the slick table top. The shaft is a 10-32 screw. That means every rotation is 1/32″ of an inch. The mounting block uses another coupling nut and the handle is just threaded plastic. With one of these on either side of the table you can square the fence, or move it in very carefully prescribed movements. 1/8 of a turn of both handles will adjust the fence by about the thickness of a sheet of paper!
I have been using my new router setup for a number of weeks now. The lift is fantastic, the top is a little wonky and too soft, and the fence is barely adequate. I am settled enough on some of my other projects and have spent some time thinking out how I want to build a final top and fence. So, let’s get building and address all the issues my first top created.
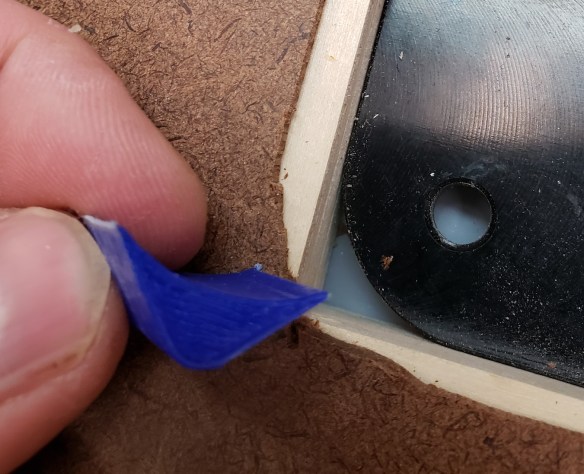
The first thing to fix is the cutout the router lift fits into. The radius required is a size of router bit I don’t have. My last attempt didn’t go well. This time, I have a good plan. First, I put the router lift down on a piece of hardboard and snugged up pieces of plywood next to it. I then glued and weighted the plywood to the hardboard so it would provide a very tight hold of the lift top plate.
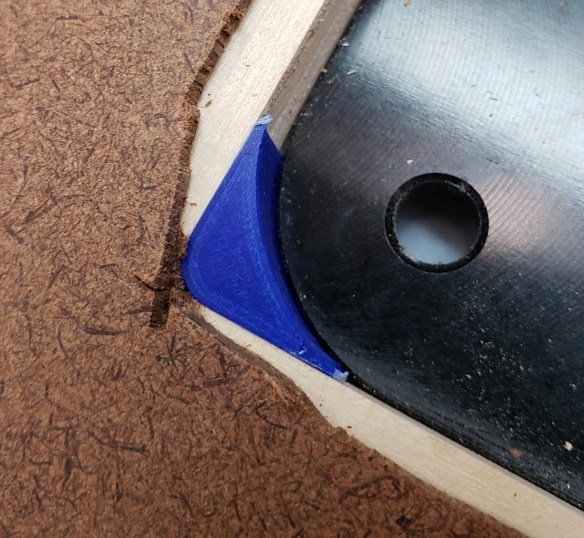
That all made the edges fit snugly, so I know there won’t be any wiggle when I drop the router lift in. Next, to solve the radius problem I just 3D printed some corners that take up the extra space. Now, the router bit I have will follow the contour and there won’t be any gaps at the corners. I used thin CA glue to hold the printed corners in place.
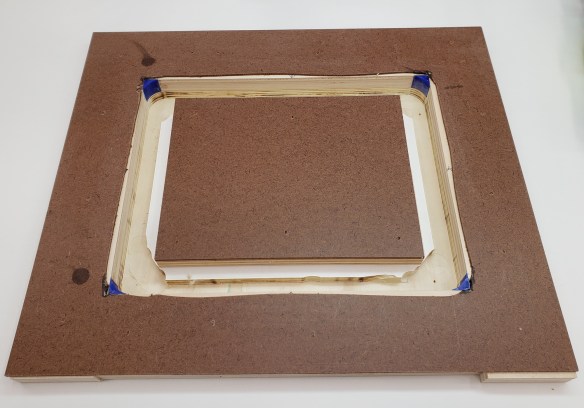
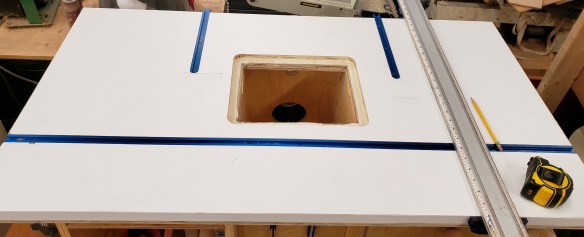
With the cutout template finished I double sticky taped it down to a big piece of laminate faced plywood and got routing. The first pass hogged out the lip that the router lift will sit on. A jigsaw opened up the rest.
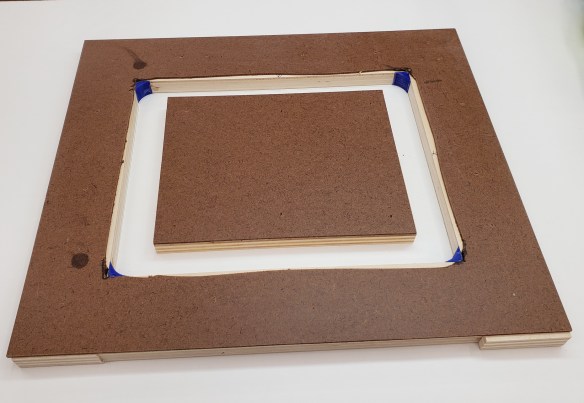
Finished template
Template in place
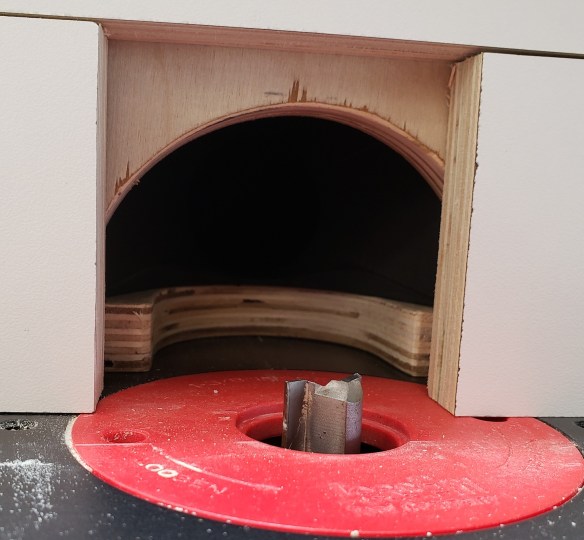
Routed recess
Opening cut
I checked the fit and it is wonderful. There is almost no slop, and the corners match the lift well.
I cut a piece of 3/4″ plywood to go under the laminate top to act as support. I sat the two pieces on my flat table saw top and went around with a straight edge and flashlight to check everything. I found some slight bows and used cawls to clamp everything flat, then slowly brad nailed everything together.
Some light is peaking through. I used this plywood as a clamp cawl to flatten the top while I nailed.
With everything tacked together I moved the top to the router base I built earlier. I found some slight dipping in the center, so I cut brass shims to bring the top back to flat when everything was screwed down. With the top in place, flat, and securely fastened, I added edge banding all the way around to help protect the laminate from getting chipped.
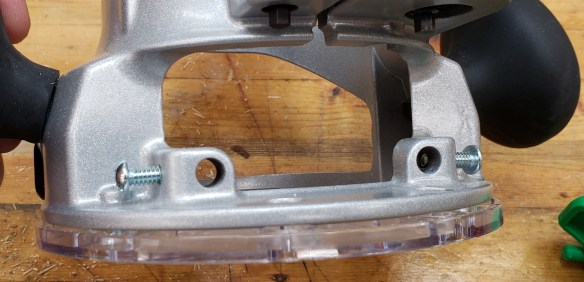
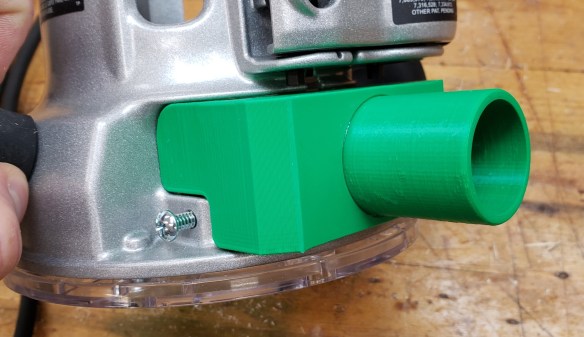
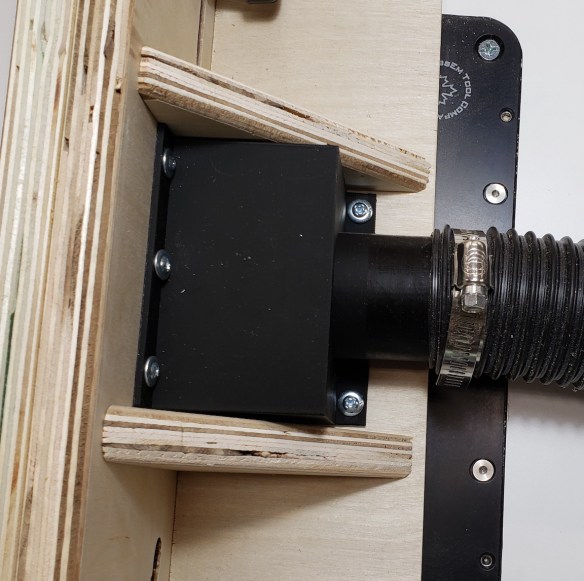
Next I wanted to add a number of t-tracks to the top for featherboads and to keep the fence in place. My router produces a ton of dust when doing a big cut and my fixed base porter cable 890 series doesn’t come with any collection port. A few iterations of printing got me this two piece design that I glued together. It goes in where the edge guide would normally plug in.
The start of the cut usually generates a lot of dust, but once the grooves got going the shroud did a good job picking up most of the dust. There probably aren’t any 100% solutions, but this does save a lot of mess. The grooves turned out well!
The top is nearly complete. I just need to do the final installation of the lift. First, I wanted to reinforce the places where the leveling set screws will land. The plywood is too soft, and I expect they will sink in with time. On my last top I used CA glue to shore up the area. This time I found some 1/16″ brass to line those areas. Once bonded, the leveling went quickly. All the effort I spent getting the table top level means the router lift plate can be perfectly flush all the way around. No catches or dips at the transitions.
The Fence
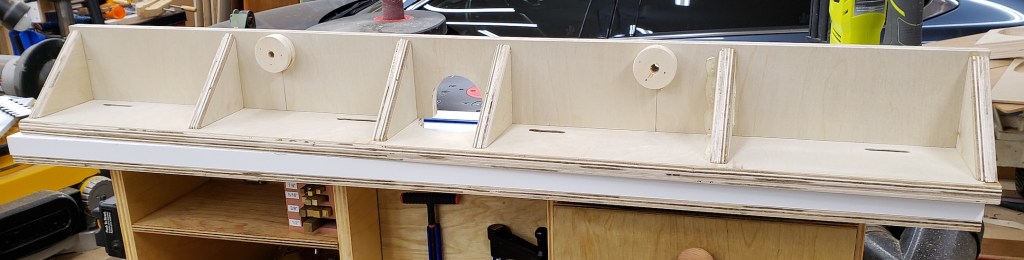
With the table top finished, I was ready to move on to the fence. Having it clamp at the edges worked in my last fence adaptation, but the center tended to flex. That is the most important place to keep still, so I added the t-track in closer to the center to keep the fence stable near the bit. I cut out some 3/4″ plywood to act as a base an front face for the fence.
I put in knobs to clamp the fence down, and added spacers to move the height of the knob up. The fence is tall enough it needs a little boost to make it easier to reach.
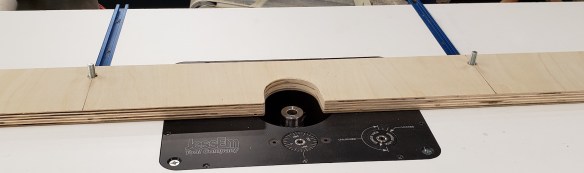
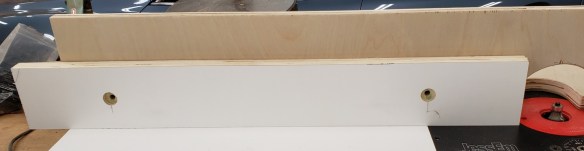
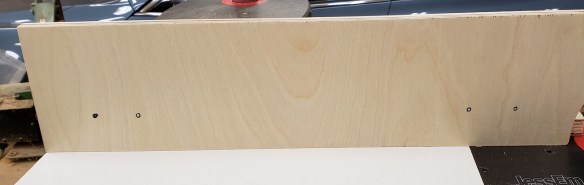
I cut out laminate plywood sections to make movable fence faces. I set them against the front of the fence and marked the spots where a slot would need to start and top. I should have drilled out the ends of the slot and routed the middle. The full depth cut got a little squirley in places. Oh well, the fence faces open and close easily.
Fence face test fit
Marked bolt locations
Routing slots
Not my best results
Face fully closed
Face fully open
Now that I know where my hands will be going to tighten the fence and faces, I know where there is free space to add ribs. These triangular ribs will stabilize the fence front and keep it stiff. I just glued and nailed them in place.
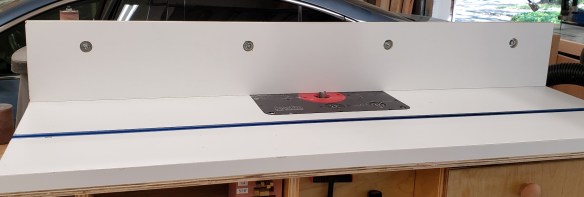
To finish off the fence I cut a strip of laminate to go across the top of the moveable faces. It makes the total height 5 inches and holds a t-track that goes the whole length of the fence.
The fence is done, but it still doesn’t have any dust collection. I printed a duct section to screw down just behind where the router bit will be. This combined with the dust collection built into the cabinet means that very little dust will escape this unit.
That puts the final touches on the fence. While I was at it, I cut a hand full of extra moveable faces and screwed them to the back of the table cabinet as spares. I also cut a full length extra tall fence that moves the total height up to 6 inches.
These upgrades should make the whole router setup really clean and fast to operate. Combined with the base I built earlier I am all set on the router front and am ready to tackle a lot of new future projects!
While building my baby bookcase I noticed the table top on my router was not flat. The joinery was poor enough I had to go to the table saw instead. 10+ years of Florida humidity and a heavy router finally did it in. The red arrow is pointing to all the light coming out from under the straight level.
I use my router table a lot, so I wanted something nice to replace it. A full professional router table setup can cost 1,000 bucks with all the bells and whistles. I want something of decent quality, but not for that much money. I did a ton of research and finally broke down to buying a really high quality lift, and building the rest. Say goodbye to my old friend! By the way, I took the mounting plate out and tried it on my tablesaw top. It had a very distinct rock, so it wasn’t flat either.
The Top
These days my building and blogging are badly out of sync. Some short projects get posted in a week or two, and bigger ones linger for months before getting posted. This one started right about the time we were all supposed to limit our trips out to essentials only. The hardware stores are open, but I can’t call this router table essential. A broken toilet or water heater, this is not.
I normally would have gone to pickup laminate faced plywood, but instead I looked around and decided to use this big piece of butcher block counter top. Some friends were having their kitchen redone and saved it for me.
I got to cutting off a nice hunk and my saw went a little nuts. It turns out the way they clamp everything together is with screws! Lots and lots of screws. If you look at the side, they even cut through some to make the counter top the right size, and just filled the void with putty. They must make these things in massive sheets, then cut down what they need.
Hello there little screw buddies
The side of the countertop as used
I took my number 5 to it and planed off all the old finish that was feeling a little gummy. It looks a lot nicer now. This is really soft pine and not as flat or as stable as I was hoping. There was some twist I couldn’t quite get out.
With the top mostly flat, I built up a set of guides to install my router lift. This part didn’t go quite as planned either. I tried to attach each piece together with pocket hole screws, but going into the plywood sideways with a screw caused it to de-laminate and bulge. I muddled through with double sticky tape and got to routing with a template bit.
Template in place
Recess routed
Once I had a recess routed that was the thickness of the router lift top, I went through and cut out the inside area. Those pesky screws came to bite me again, my jigsaw was not happy. When it was all cutout I marked the location of the leveling set screws and soaked the area with thin CA glue to stabilize the wood. I was worried the set screws would slowly sink into this soft pine otherwise.
Marked out leveling set screw locations
The top’s twist was a little evident in the fit of the router top, and the template bit’s radius was off. It turns out the lift has a corner radius of 3/4″ of an inch, and my bit is 3/4″ in diameter which yields a 3/8″ radius. I think we are going to call this a practice table top. I will eventually get a new material and make a better one. I put down a few coats of polyurethane to seal it up and give me a solid surface to wax.
Base
With the top basically finished I was able to move on to the base. Using the plywood I had available I made a 3 chambered base. The left was going to be for open storage, the center would house the router and collect most of the dust, and the right would have a set of drawers for bit storage.
I set the top down and the twist is even more evident. The bottom is really uneven, so I guess they only ever planed the top to flat-ish.
I thinned down some maple scraps and cut them up to make runners. I used a piece of hardboard as a template for the drawer side height, and it also served as a square and guide for installing the runners. I nailed and glued those in place, then hit everything with boiled linseed oil to finish.
Fence
I had some ideas about how I wanted to make a fence, but wasn’t quite sure which way to go. I was also running low on some materials, so to conserve, I just re-purposed the fence from my old router table. I added wings to make it reach out further. To hold it in place I made it go past the edges of the table, then used a little clamp paw to squeeze it down to the edge of the table.
To attach the wings I just screwed them down from underneath
Clamp system holds fence in place
It worked reasonably well, except that any time I pushed on the fence in the center, it seemed to bow outward. The system wasn’t rigid enough. I added a support across the back to help stiffen it up. That reduced the bow. Next time I will sink some tracks into the table top to facilitate more centralized clamping.
Drawers
Things were starting to come together. With the top in place and a working fence available I was able to employ it in making drawers. Nothing fancy, just some plywood sides with half lap joints and rabbeted bottoms. I added drawer fronts with rounded edges and finished everything with boiled linseed oil.
The top drawer holds my trim router and all 1/4″ shank bits. Only got this thing a month or two ago, but have found it to be an incredibly useful tool.
Next are all of my 1/2″ shank bits. They fit with plenty of space to spare. I 3D printed the holders for these because I didn’t have the right sized drill bits. A 1/2″ bit will leave a really snug fit. My next size up was a 5/8″ forstner bit. Too loose! Everything is kind of grouped and there is a lot of room left for new bits. The last drawer is empty believe it or not. Plenty of room to grow!
Finishing Touches
With the drawers set I was able to work on a few finishing touches. I moved the power switch over from the old table to the new one. This works great and will stay. There is a hole in the back for the router’s power cord to come through. I covered it with a custom 3D print cover. I put a cover over the front router cavity with magnets. It comes right off if I need to service something, but otherwise has gaps to pull air and dust through when in operation. On that cover I have two printed holders with magnets for the collet release and hex tool that runs the lift. Lastly I added a shelf to the left cavity. It holds common use accessories and a stack of different brass setup bars I cut from 12″ lengths of key stock.
I have been using this table for a few weeks and it has been working really well. The router lift was pricey, but is a dream to work with. It adjusts easily and locks down securely. The top is fine for now. The pine has already gotten dented and my install job has left some gaps. The fence clamps work well, but it flexes too much. I will take all these lessons learned and do a series of upgrades soon. For now, it is back to work on other projects.