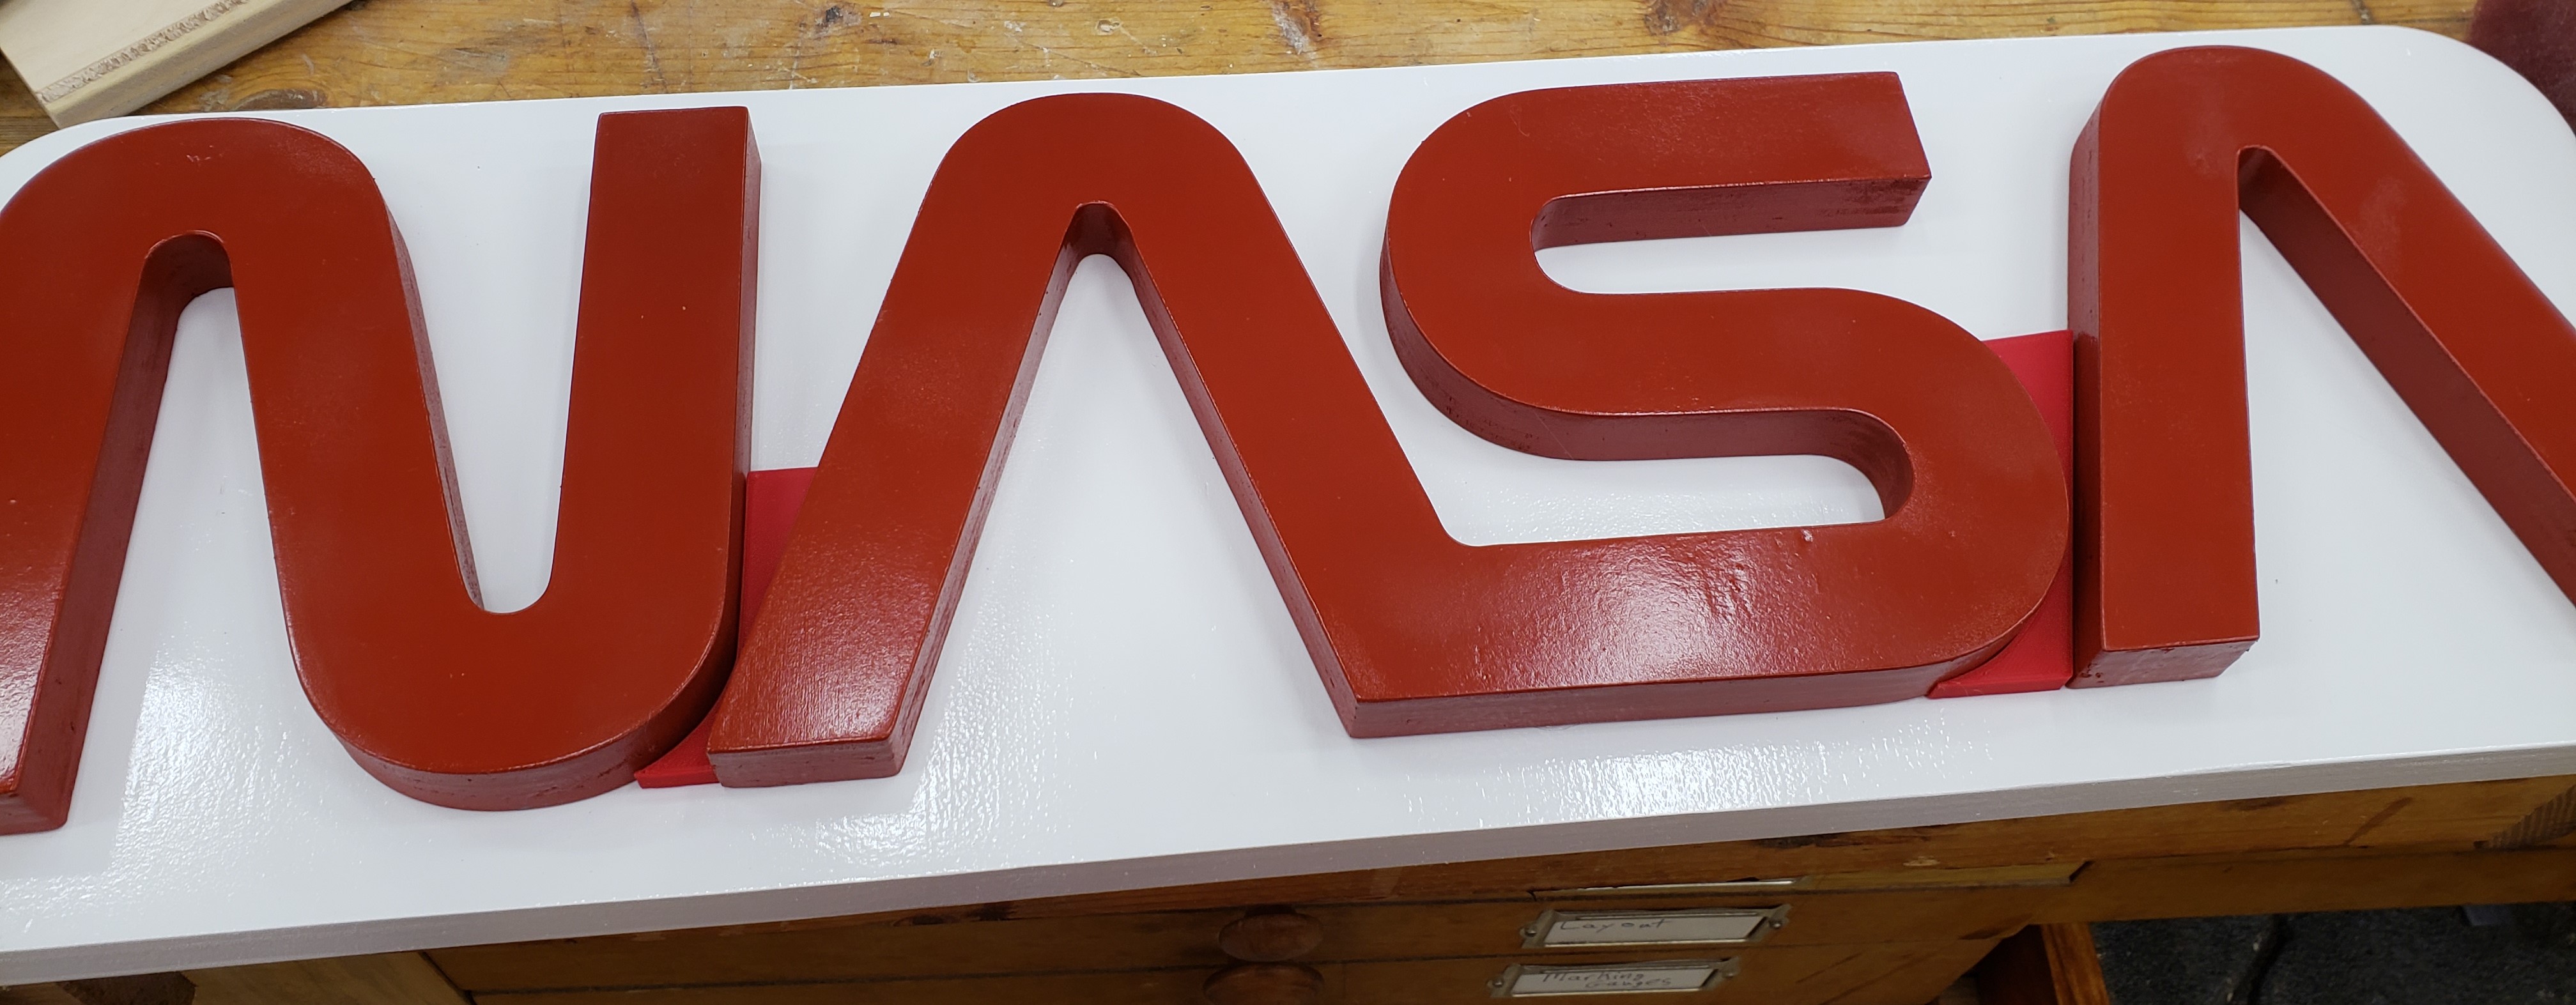
I have been watching this guy on youtube recently called Jigsaw Nation. He makes a lot of cool big signs out of plywood. Mostly car stuff, video games, and whatnot. I got inspired and decided to make a pair of NASA logos for my dad and I for Father’s day.
The jigsaw dude I follow projects onto the plywood and traces his designs out. I wanted to produce two of the same thing, so I opted to print a template and route instead. The AS was too big to print, so I cut it up into two parts with an alignment stitch between them. I doubled up the plywood and used my bandsaw to remove most of the waste. These letters are around 6 inches tall.
I went to the router table and ran into an issue. My pattern bit only has about an inch of cutting depth. Oops. I’ll have to split these up and do one set at a time.
I wanted these to look really clean and crisp, so I proceeded to use filler to make the edges solid and smooth. I tried mixing up goodfillas, plasticwood, and bondo spot filler. They each are kind of OK I guess. I didn’t end up taking pictures of that process because… can I still use the dad brain excuse? Same excuse for the background. It is a 2ft wide piece of plywood with the edges rounded and filled. For paint I did a number of coats of primer/filler to get it all as smooth as possible with sanding in between where needed.
I still need to work on my spray painting skills. I think I get going too thick and it leaves little puckers and attracts dust. When I go super light though I don’t see the gloss I want. Practice I suppose. To get the kerning right I printed the space between the N and A, and another between the S and A.
Once the glue was try I was all set. Dad was visiting at mother’s day and already has his hung up outside his rocket building control room. Mine is up high in my shop where the paint imperfections are hard to see!
I picked up a few extra cans of spray paint for different things I have in the works. Those added to my modest collection of paints meant I was way over capacity in my limited storage arrangement. I tossed out the old setup (which I forgot to take pictures of), and built myself a set of spray paint crates. This was a nice small project, but probably the biggest woodworking thing I have done since Ira came along. It is good to make sawdust again.
Every good shop project starts with some plywood. I had a lot of 1/2″ lying around from the toy and baby furniture days. The front, back and bottom are 1/2″ ply glued and nailed together with 1/4″ glued and nailed to the sides. It made for a pretty stout box without being too bulky or heavy. With 18 fullish cans, this thing was heavy enough.
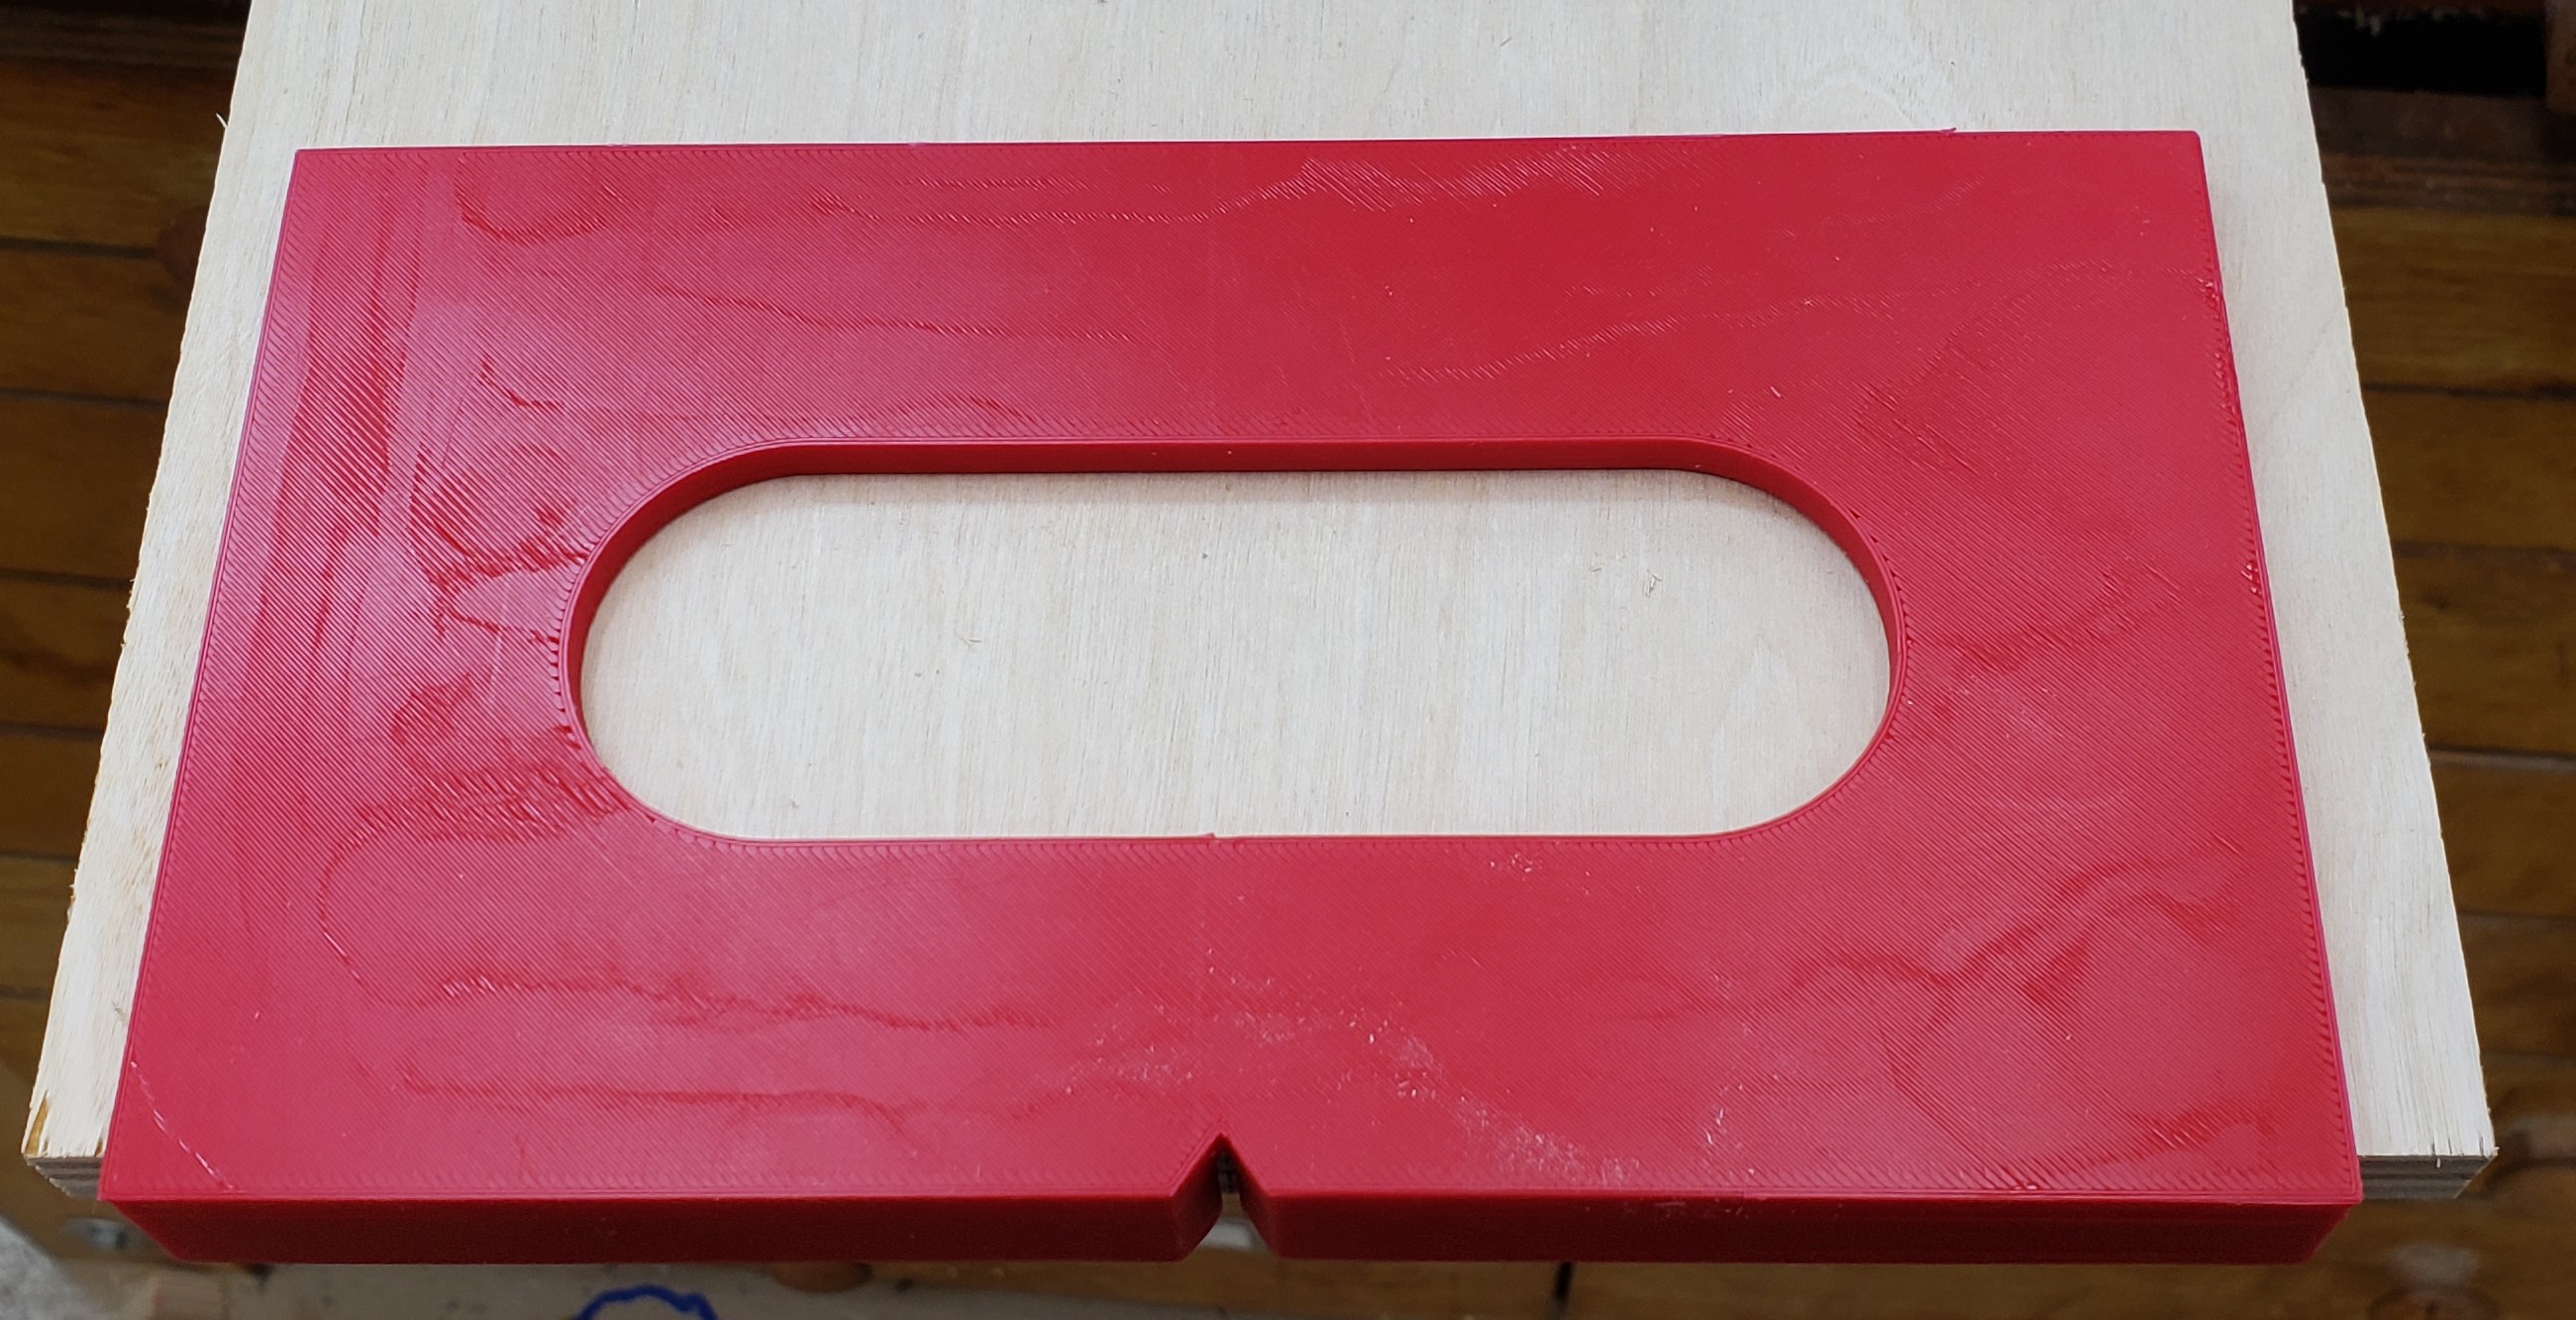
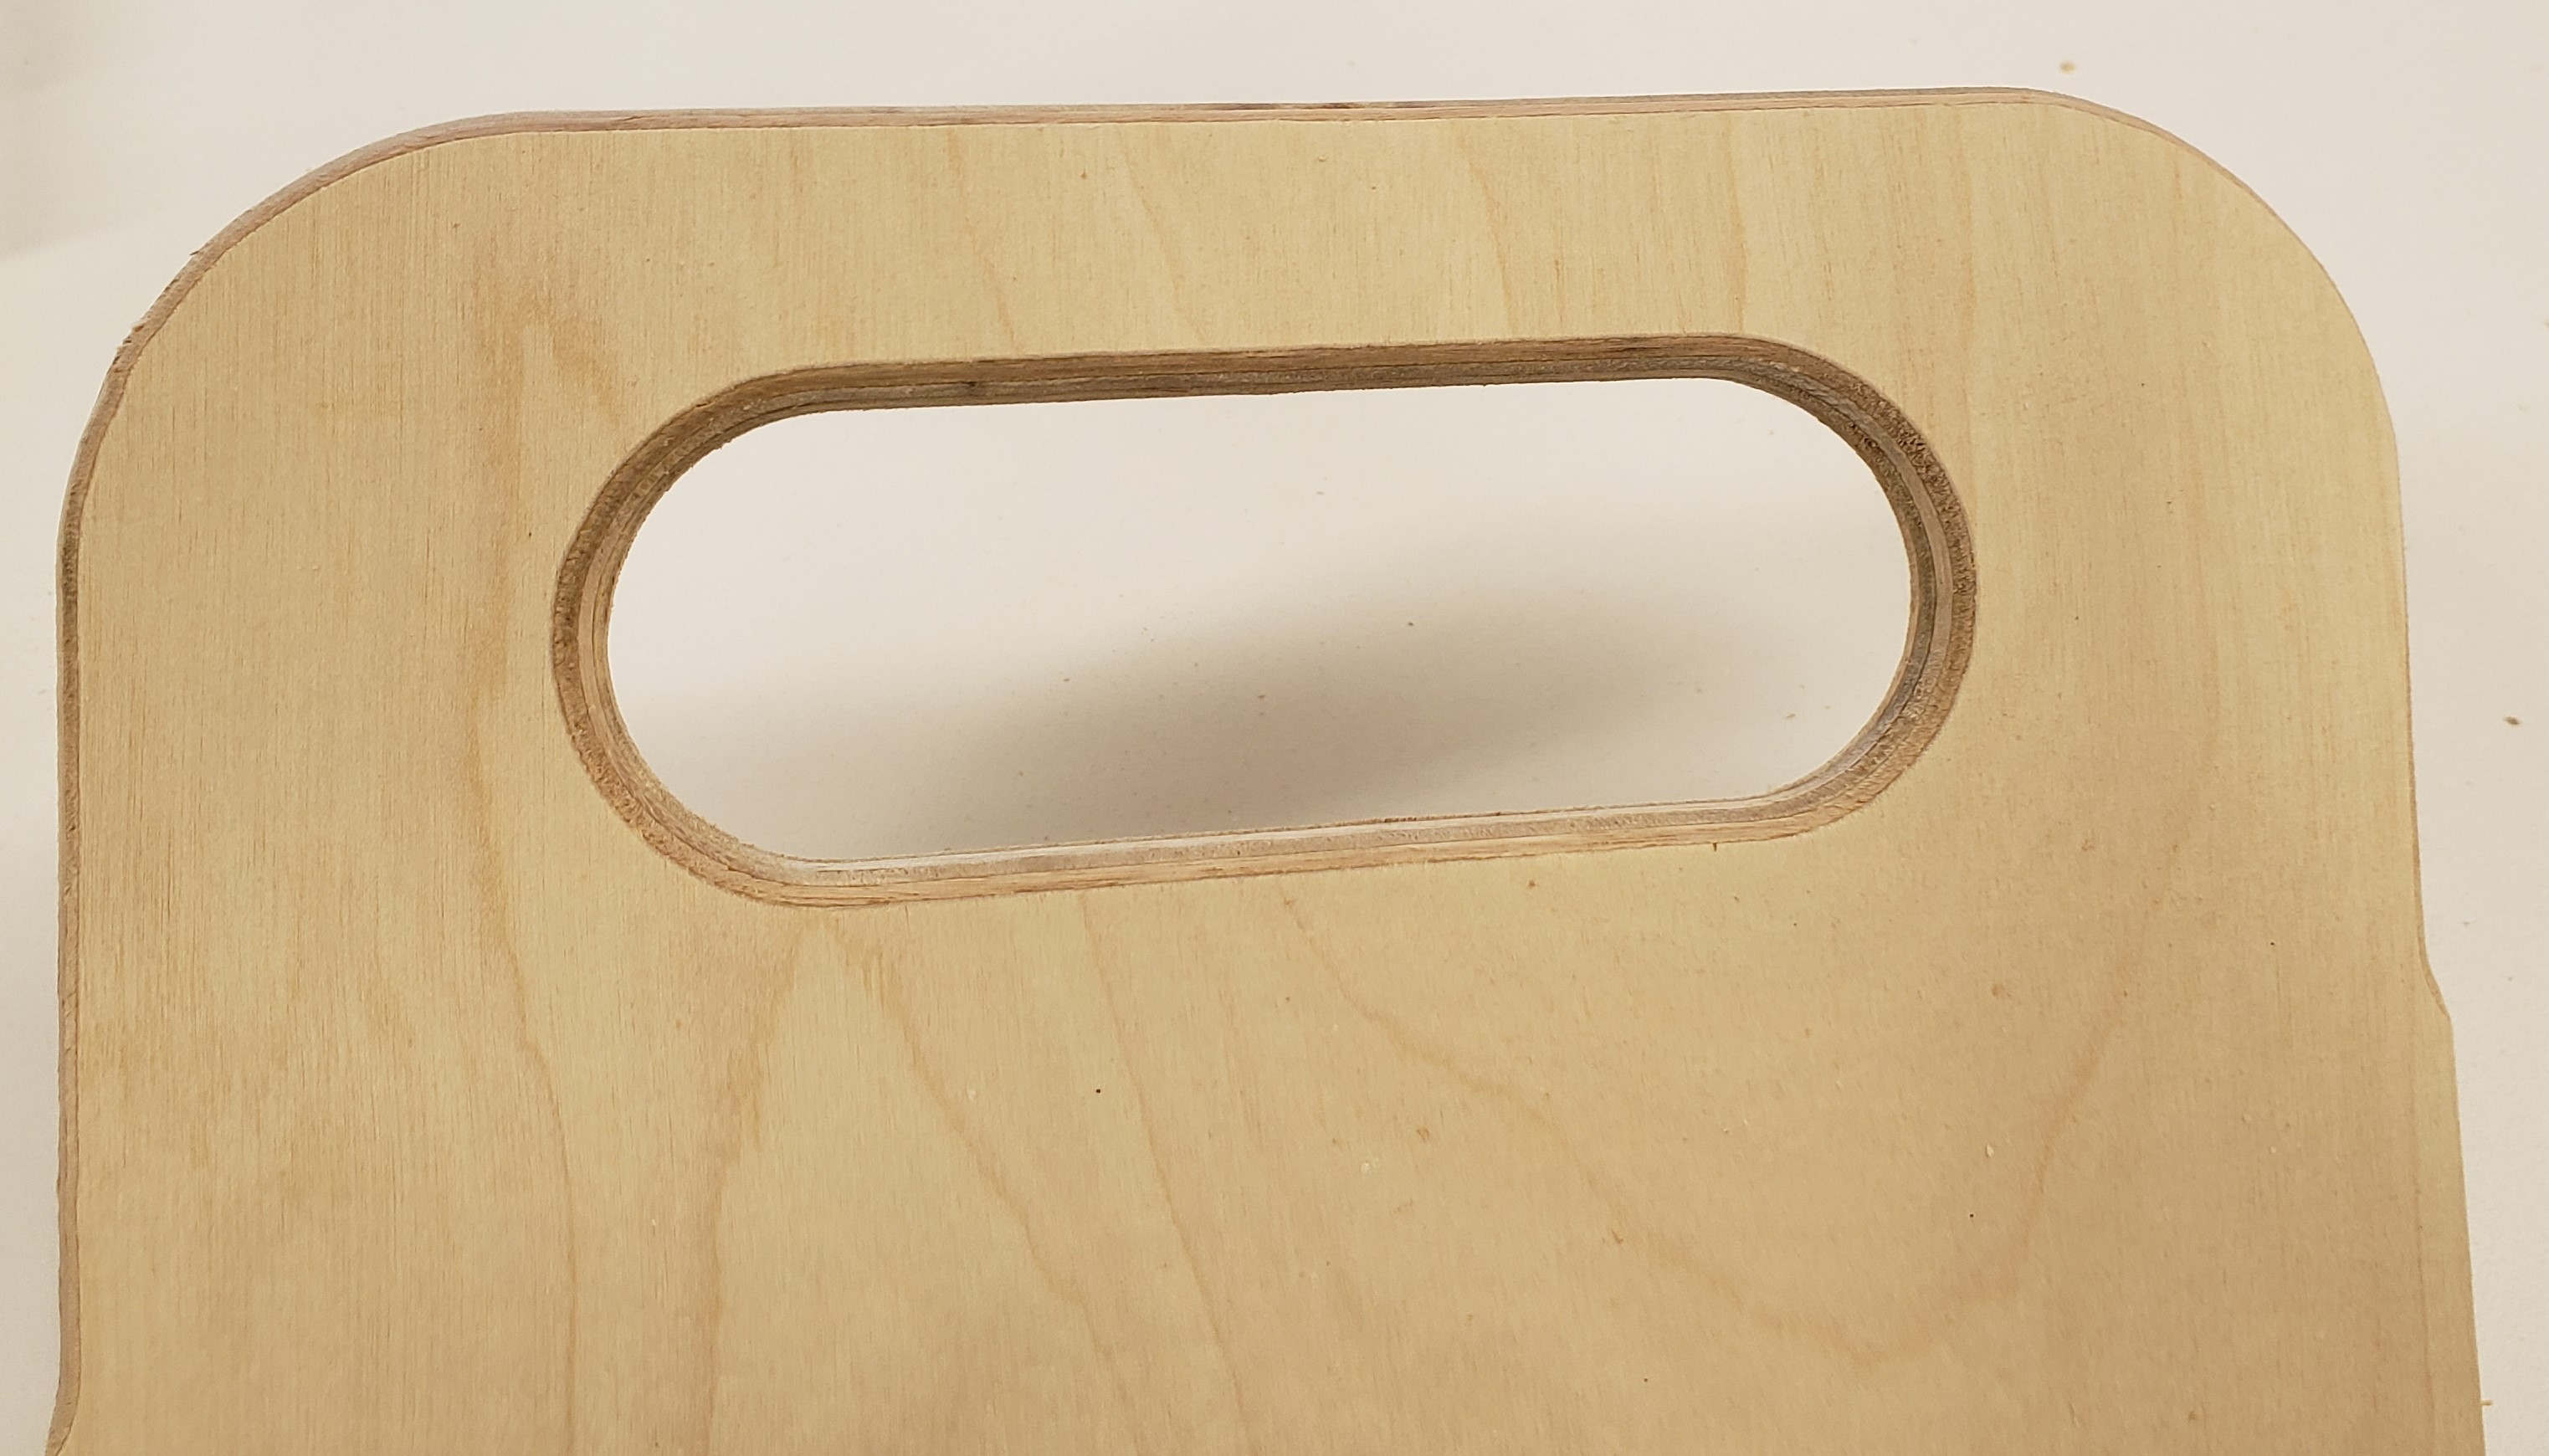
For the front and back handles, I could have just drilled out the sides and used a jigsaw, but I wanted something repeatable and re-usable. I 3D printed a jig with a sized cutout for my hand and with a reasonable offset. There is a notch in the center so I can line it up with a mark. Not sure how often I will use this jig, but it was cheap to print, worked like a charm, and should last a long time.
With the handle cut out I rounded the corners with my corner radius template and then used my trim router to round everything over. Some quick sanding later and the handle area was smooth and comfortable.
The assembly was as mentioned before. Glue and brad nails. I eventually let that dry and put a coat of boiled linseed oil on these to make sure they stay together for a long time. They are just the right size for fitting in the bottom shelf of my paints cabinet. It need more cleanup and rearranging to get the second one in there. That calls for more shop organization!
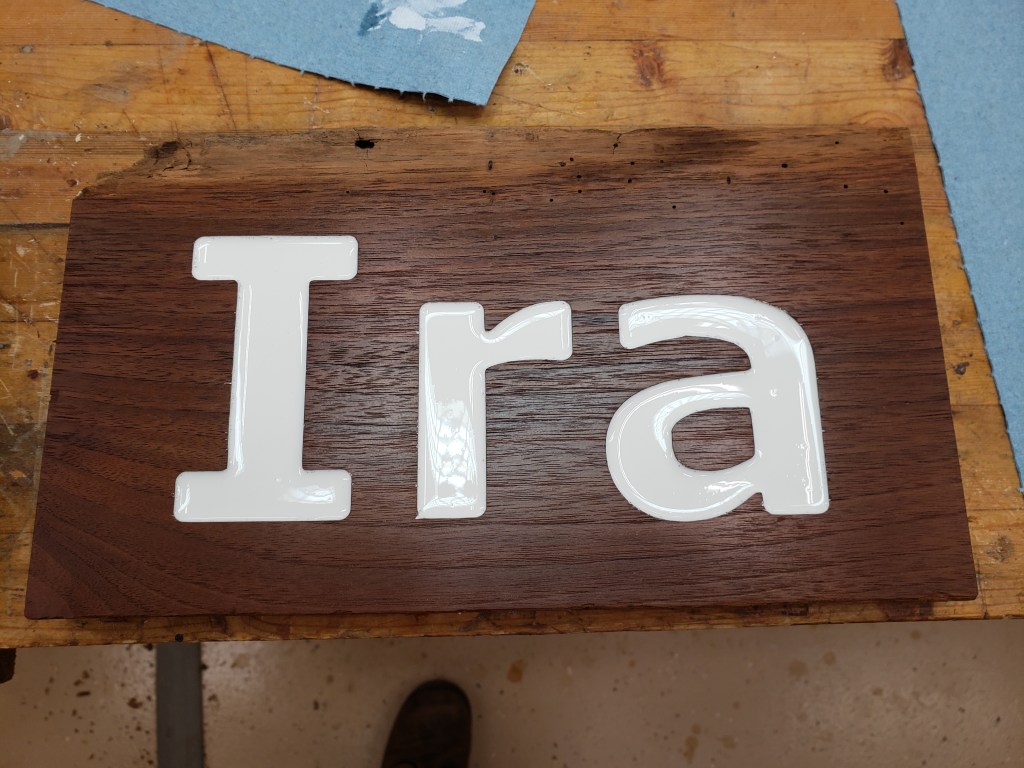
The big day finally came! It was nothing like how we planned and involved a long hard labor with a trip to the nicu. All of that is behind us now though and everyone is home safe and recovering. Right before he was born I took a piece of the family wood and engraved a name plate for above his room entrance.
He had a rough start, but is already gearing up to be a space commander some day! He is our biggest project yet. As such, there probably won’t be any posts for the next few months.
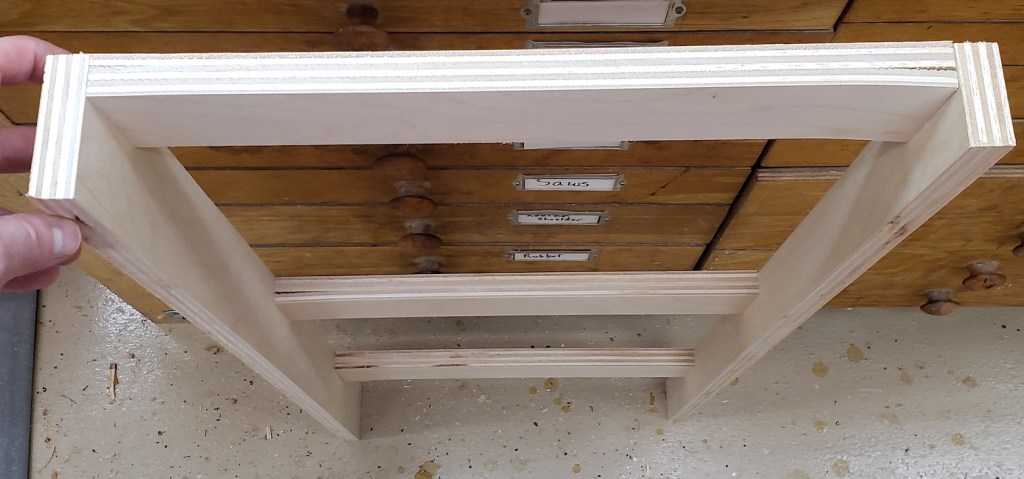
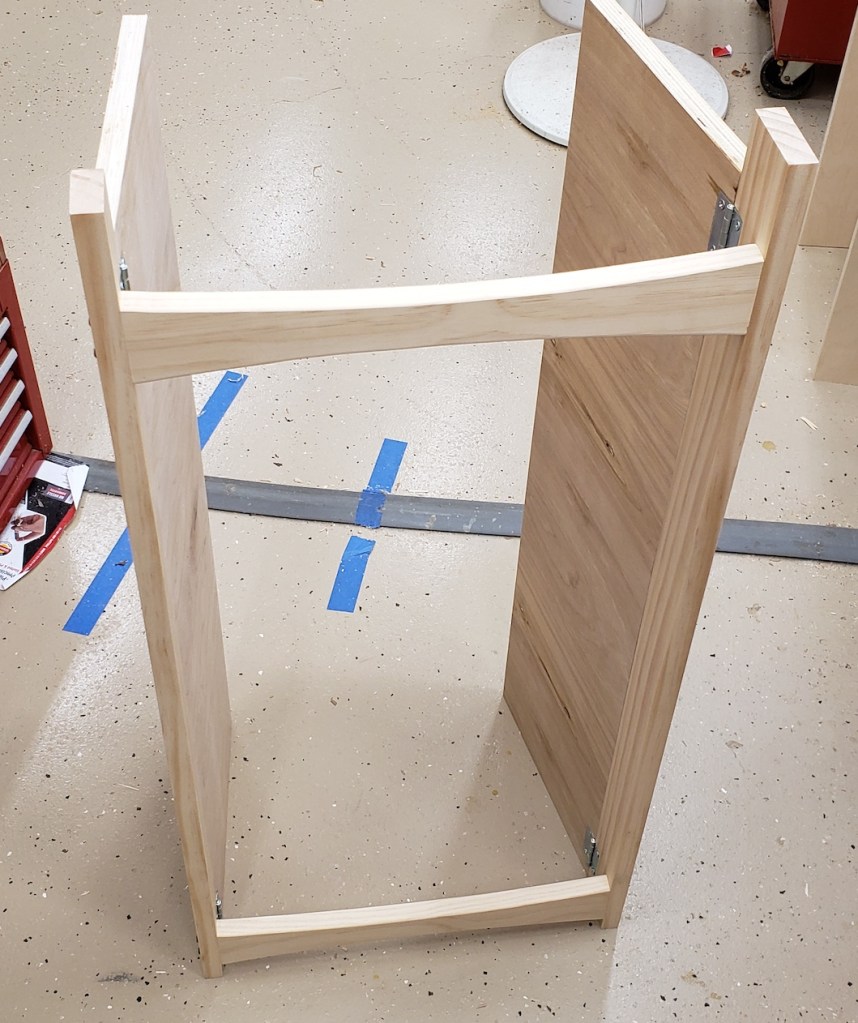
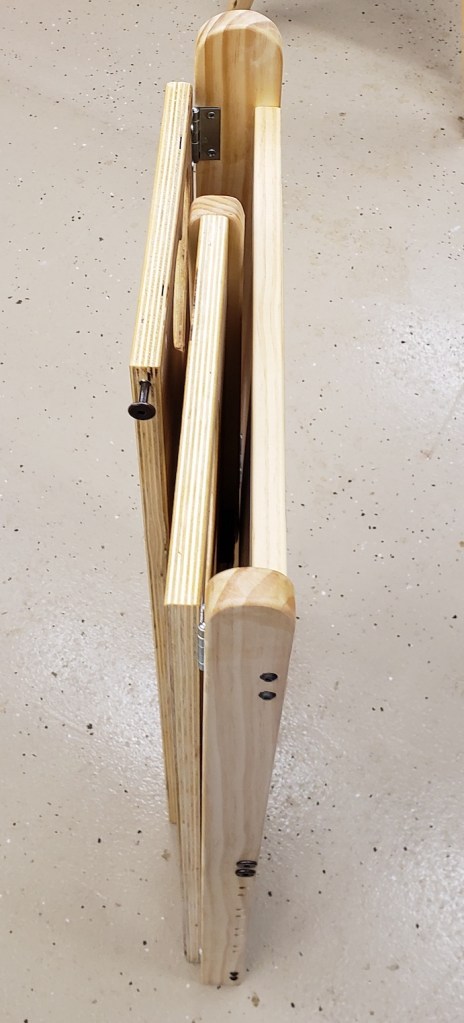
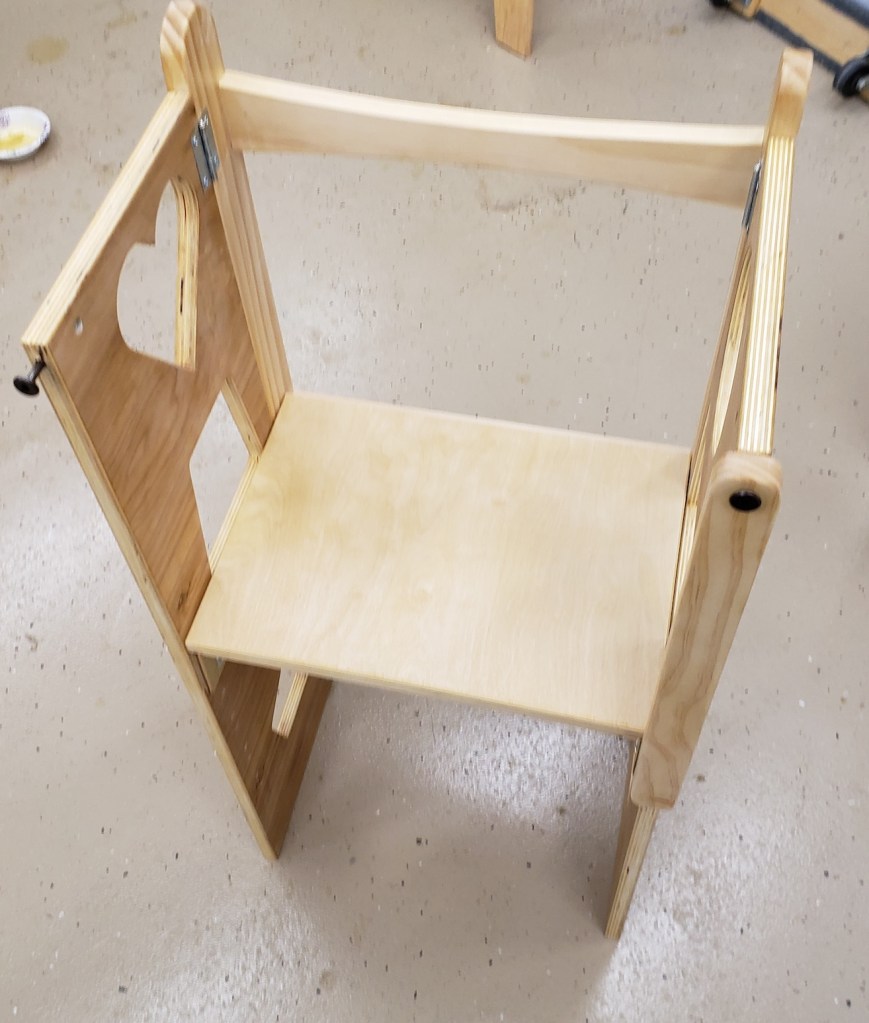
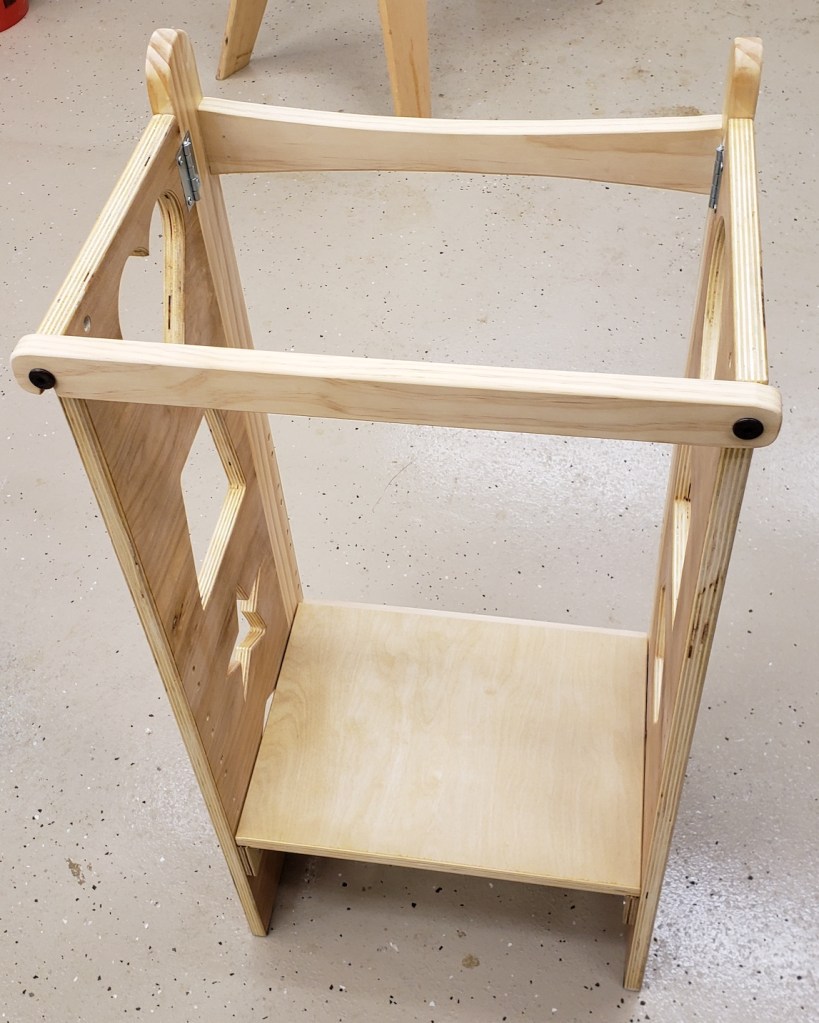
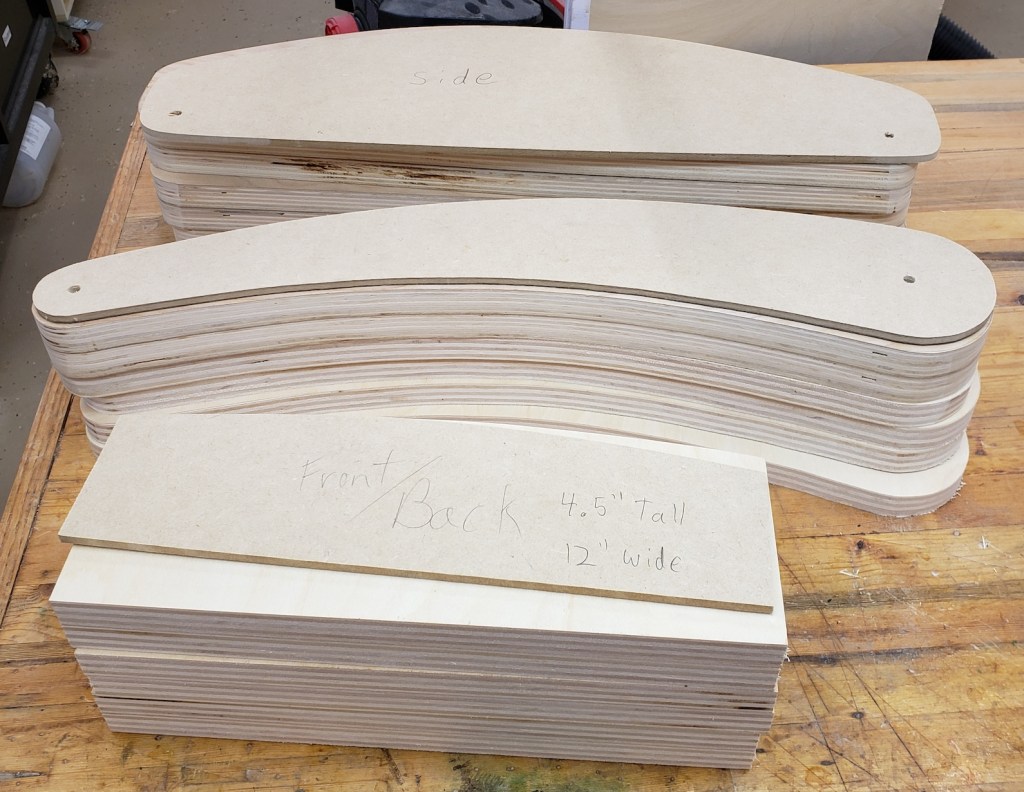
A helping tower is like a step stool you use in the kitchen with a child. It gets them up to a height to be able to help out with basic cooking tasks. Unlike a basic step stool, this has sides and a back so they can be kept in place, and not easily fall off. There are a million different examples online, but most all of them are bulky (by necessity) and end up being a bit of an albatross in the kitchen. I wanted a folding one that could be packed away easily. It took a lot of prototyping, but I did it.
I normally jump into projects, but this one was a very slow methodical trial and error build over nearly 2 months. A broken AC and baby tasks stretched that out a bit. The front frame of the device consists of two permanent uprights with an upper and lower stretcher. To those uprights, a set of folding sides are attached. The right upright is thinner so that the two fold over each other in an overlapping pattern.
The middle stretcher will hold the step and let it swing into place. I needed a strong stop that would support the step and draw the sides into the step. I used a dovetail bit on the bottom of the step to make a slightly angled groove. The stops had the same angle in reverse. Now, the more weight put on the step, the tighter it will draw the sides in.
The seat can fold up and the sides fold in. Everything is compact and easy to deploy. The stops are only 1/2″ thick and don’t interfere with the fold up.
It needed some kind of back to keep people from falling off backwards. A simple swing arm accomplished this task. It was narrow enough so as not to interfere with the unit’s ability to pack up. This had all the rough mechanics I wanted, but was narrower and not as deep as I felt it should be. Also I wanted the step portion to be adjustable as the child grows. On to the next prototypes.
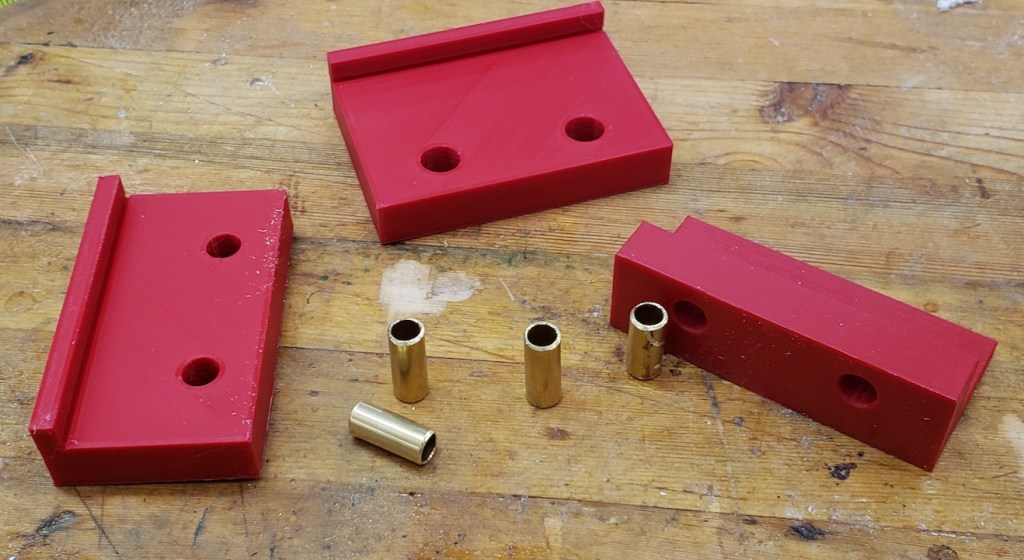
I am going to use dowel nuts and binding screws to make something that was strong, but could be removed and reassembled. It would take a number of holes drilled in the right places to make that work. I planned the sizes of the parts and printed out drill guides that would hold brass tubes to act as drill bushings. The brass won’t last forever, but is easy to cut and insert, and helps keep the hand drilling accurate.
First up I clamped the jig in place and used a transfer punch to mark the centers of where the barrel nuts will go. This makes drilling on the drill press easy.
Next to accommodate the bolts, I need to drill a long hole end-on to meetup with the cross holes. This can’t vary much and the parts are too long to use the drill press, thus the drill jig idea.
With both sets of holes accurately drilled, the nuts and bolts will meet up in the correct spots.
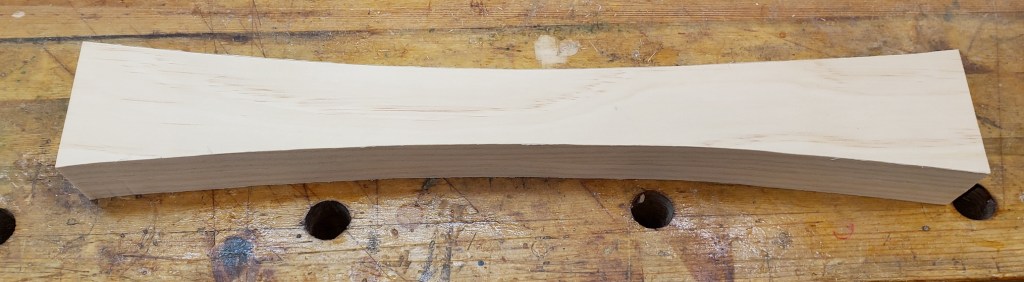
With the folding and adjusting mechanics worked out I could move on to the real thing. I selected 1×3 pine for the uprights and spreaders. The step spreader got its holes drilled with the above jigs, and the other two spreaders received a set of fair curves thanks to my new drawing bows.
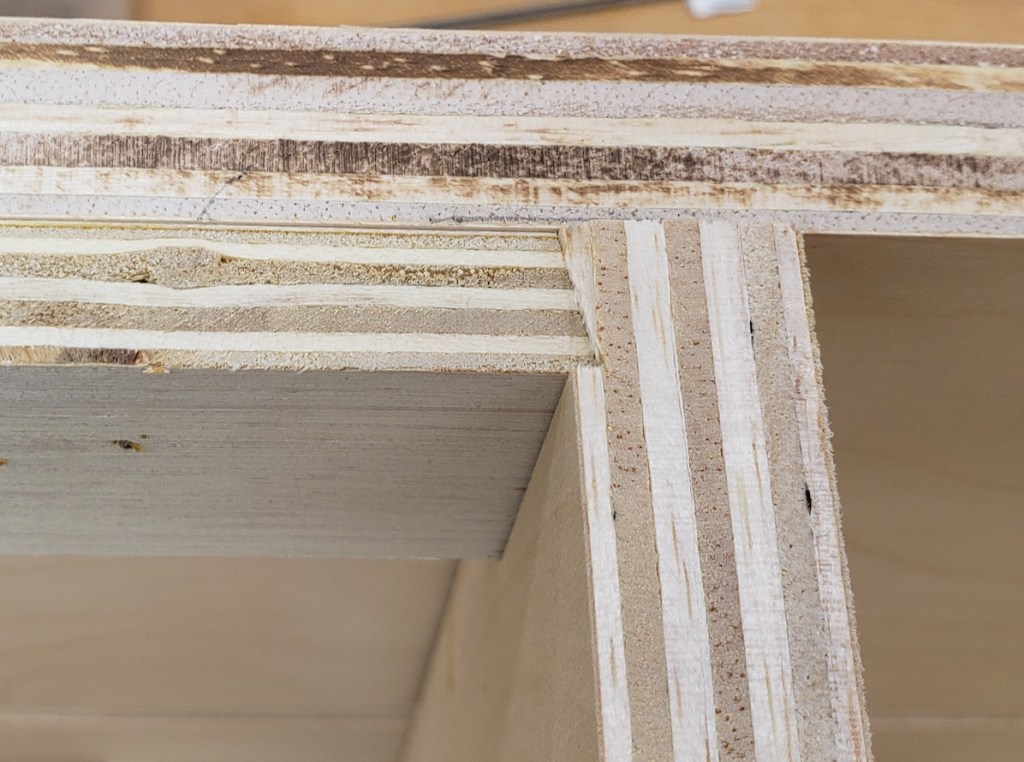
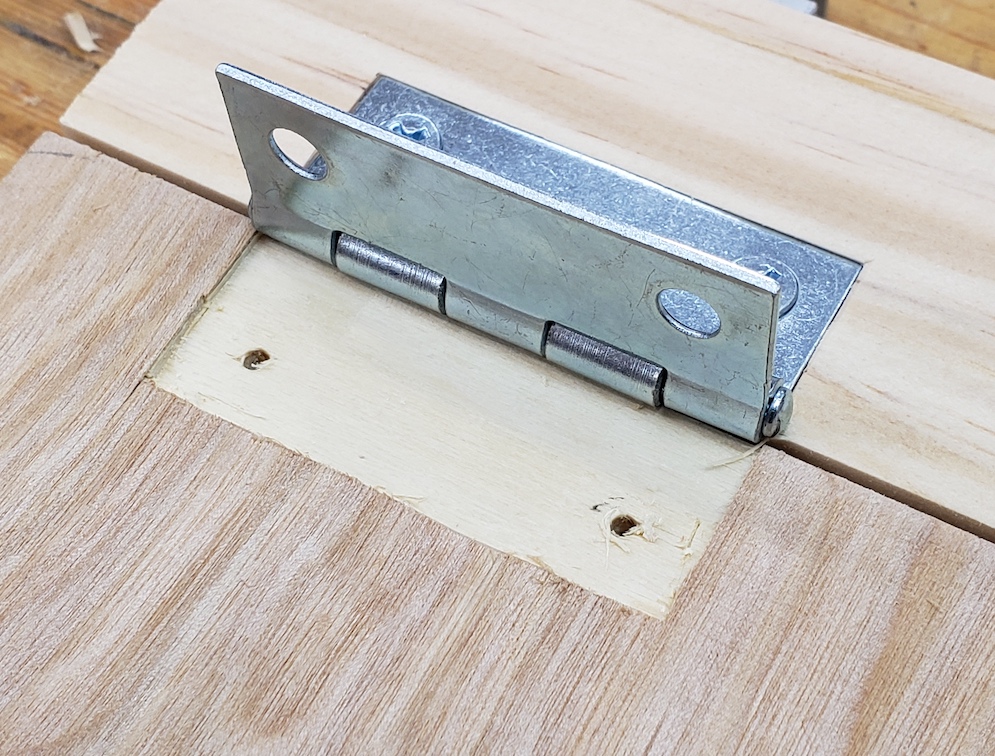
Part of the assembly folding out and being stable is having the sides only fold out 90 degrees. They must positively stop when they reach the right angle. I do this by firmly clamping the sides and uprights together and routing a small pocket for the hinges. This 3d print has a center-line mark on it and is perfectly spaced to make a tight mortise for the hinges. The result is a flush hinge and sides that do not swing out past where you need them.
I assembled the step and determined how high it could go when folded up. Too high and the step hits the top spreader. Marking those places I could make a row of holes that would allow the step assembly to adjust as needed. The sides and uprights got a set of holes placed every 2 inches.
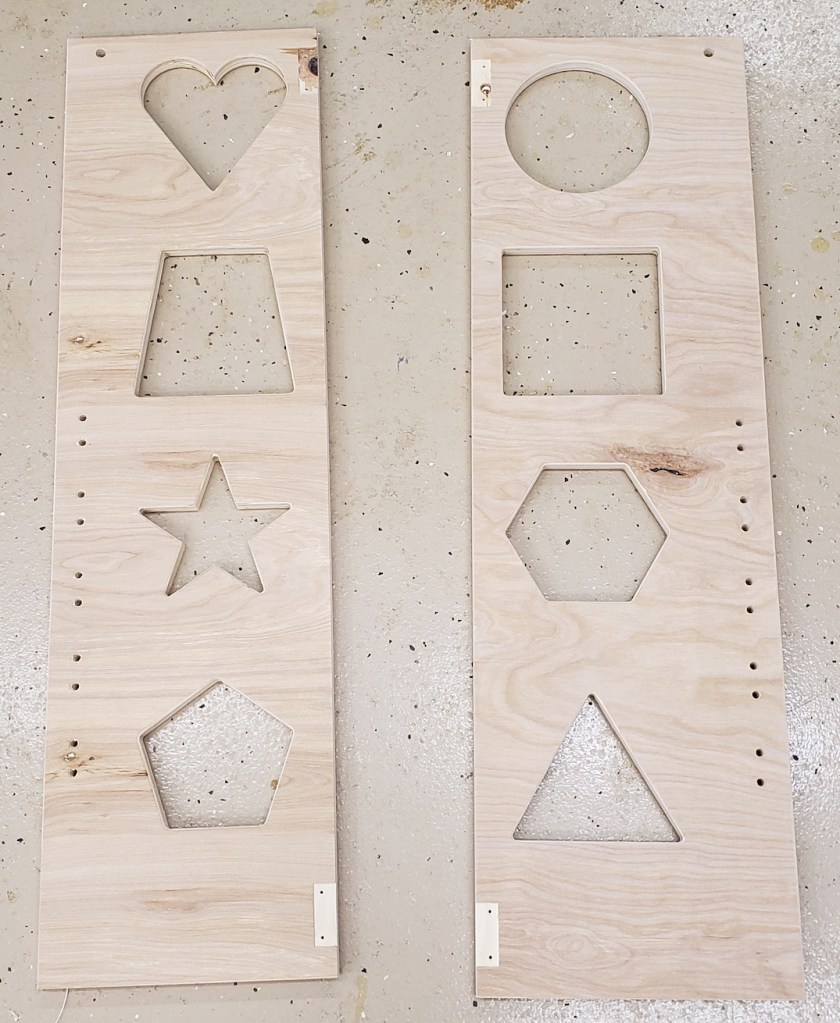
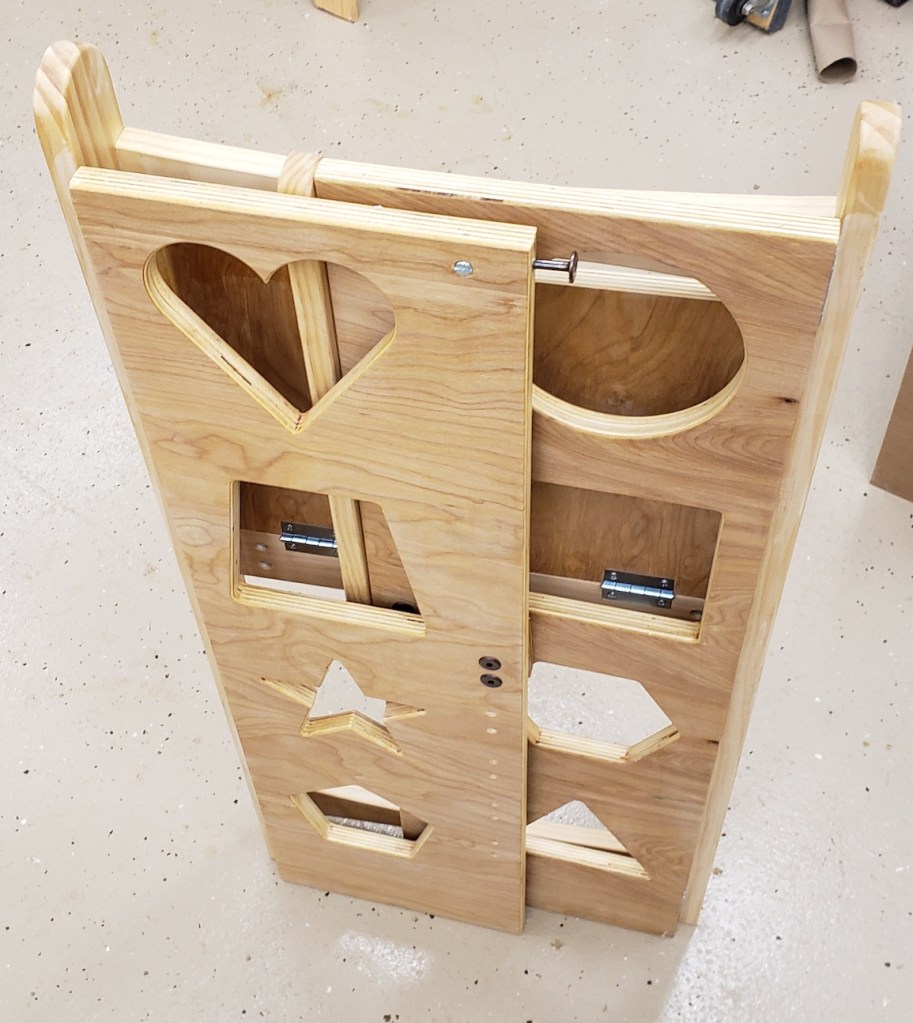
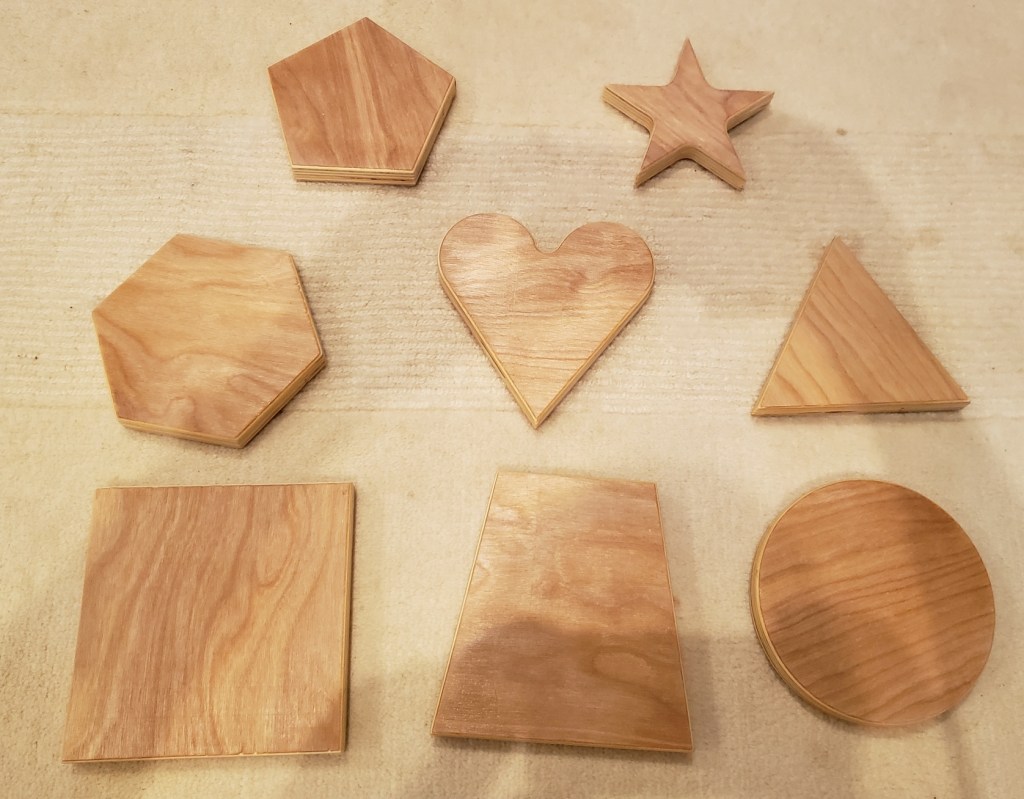
To lighten the structure and add something fun, I printed a series of shape templates. Double sticky tape holds them down, and a plunge router cuts them out quickly. I made 8 unique shapes and it really adds a lot.
Stop
Step Spreader
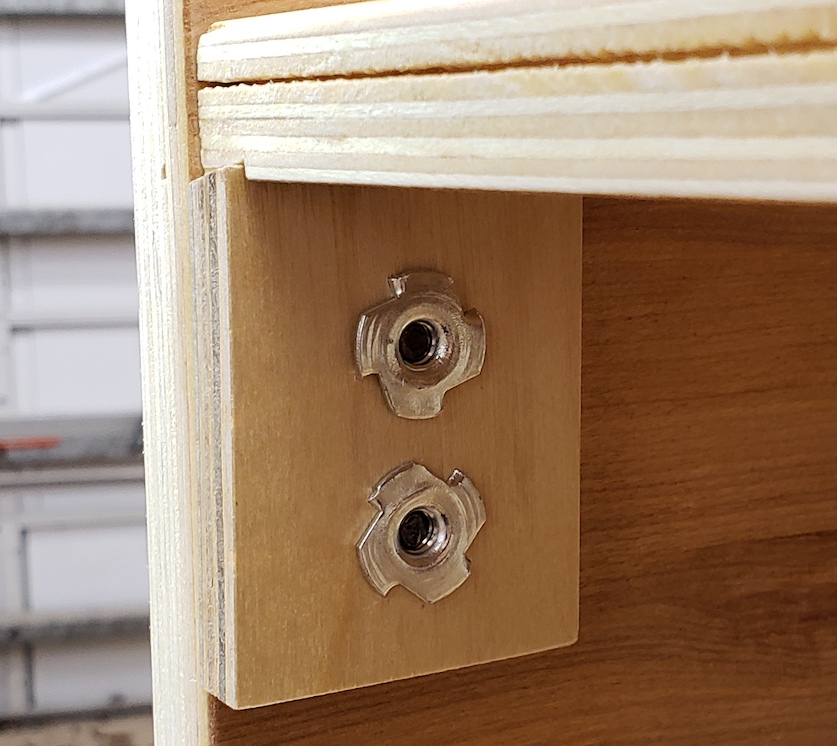
I put the center spreader in at the top most position and marked where the stops should be. Each one has two t-nuts hammered in place. Bolts go in from the outside to hold those securely. Now to adjust the height you have 8 bolts to remove. 4 from the stops, and 4 from the folding step. The final unit is light, compact when folded, looks decent (even though most of it is plywood), and should have enough room for any kid small enough to need it. The swinging back stop is made with another set of dowel nuts and binding screws. Everything got a coat of shellac as basic protection.
As a final bonus, I was able to cut the shapes out carefully enough that they all survived in tact. I rounded the edges and shellacked them as well.
I want to be able to re-create this again in the future. Here is a rough parts list with sizes. Dowel nuts and binding screws are both 1/4-20s.
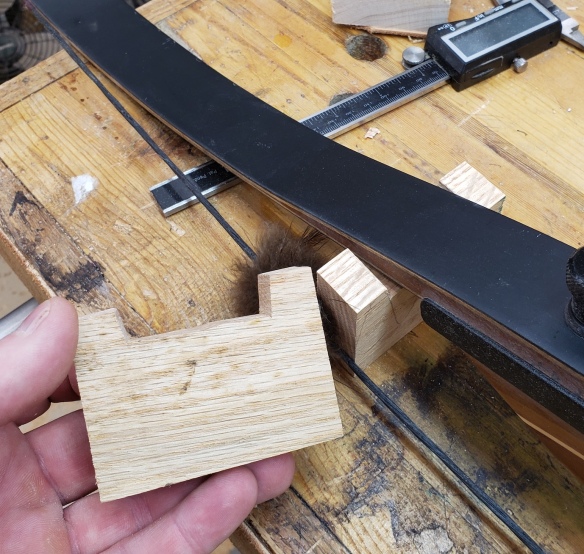
I have been using a lot more curves in my work and have been reaching for various devices to help draw those curves. I made a small drawing bow out of maple a while back and I use it pretty often. Lee Valley sent out an advertisement in one of their emails about a fiberglass drawing bow. They were good looking tools, but quite expensive. I thought I could do the same for cheaper.
I started with some fiberglass reinforced plastic. This can go by various names. G10, FR4, Garolite and others. A 1″ wide, 1/8″ thick, 4 foot long piece was 6 bucks from McMaster-Carr. Their shipping is aggressive and expensive, but if you buy a decent pile of stuff, it still comes out to be very affordable. I bought 3 of them.
Lee Valley uses nylon webbing to hold the shape. I had some, but it was 1″ wide also. Something narrower would be nice. I didn’t want to buy anything else, and I didn’t have a good way to attach the webbing to the G10. I went with paracord instead. Not exactly fancy, but it got the job done and I have scads of the stuff around. I drilled a hole and relieved the edge to make sure the paracord stays in place.
The paracord is really slippery and doesn’t like to hold well with typical adjustable knots like the taught line hitch. I printed this little 3 hole tensioner to help with adjusting the bow. Later ones I just used a single hole. It seems to hold well and allows for faster adjustment.
In all I made a 4, 3, and 2 foot drawing bow. This stuff is stiff enough you wouldn’t want to go much shorter, it just doesn’t offer enough curvature. The smallest bow could go tighter if you wanted to, but not a ton. I will need to find thinner or more flexible material if I want to do really tight curves. These make nice subtle shapes and will probably last a lifetime. Go make some!
My first wee walker was pretty popular with kids of the co-worker I gave it two and didn’t need any revisions after the second version. I wanted one for us, and I had two co-workers that were having kids soon. That calls for a batch run!
The MDF templates I made earlier came in handy. I could use them to do rough dimensioning of the plywood, and it let me efficiently nest parts together in some cases. I didn’t use them on the router table, but opted to free hand cut everything on the bandsaw. I was going to have to bandsaw the basic shape anyways, so all it took was a little extra care to cut up to the line. Power sanders took care of the rest. These aren’t very complex shapes.
Cutting wheels this big is kind of a pain. A 4 inch hole saw requires a lot of torque, and getting the sawdust out cleanly on 3/4″ plywood means constantly pulling the bit out and cleaning it. I might 3D print the wheels next time. 30% infill ought to be kid proof right?
I changed up the paint scheme a little from last time, adding black to the wheels and a stripe of black on the sides. I left the handles bare wood. This looks pretty nice on them, and isn’t too much work.
Everything is coming together with roundovers and pilot holes being drilled.
This round of building went well, with only a few minor errors. I made the holding area a lot deeper front to back, and that might be a mistake. It had the arms really close to the wheels, and might lead to kids kicking the back plate when walking. I don’t think it will be a major issue, but will want to have a shorter storage area in the next version. I’ll have to start calling myself kilted santa’s workshop.
A lot of folks have shown how to make an end grain cutting board. I am not going to add a whole documented build to the pile. I will add one flattening tip to help save time and make a better product. A friend of mine is getting married, so that calls for a wedding present. What better device to induce marital bliss and/or arguments than a cooking implement? I would make him a vacuum if I could.
Enter some cherry from previous wedding presents and maple from the stash. I always clamp my cutting boards down to a piece of flat plywood with wax paper below. That keeps the bottoms good and flat for the next phase. That oak beam in the center is my clamp caul.
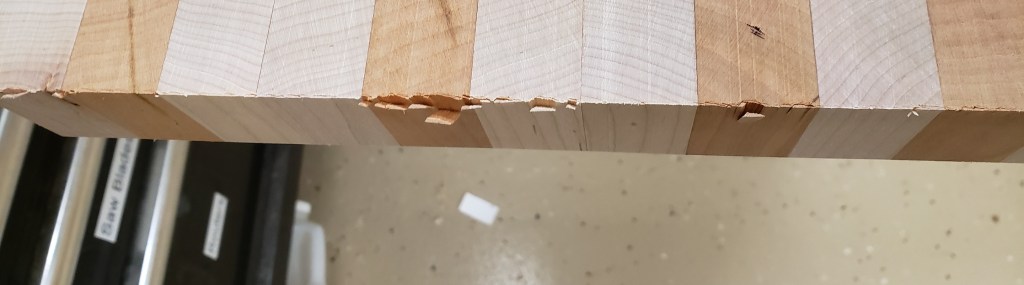
This one has a ton of squeezeout, but I put packing tape on my clamp cauls, so all is well. The problem: How to deal with all the squeezeout, and what do we do about the uneven top? Run it through the planer! That causes blowout at the back end. I selected the better looking sections for the gift, and used the spares to make a small board for myself. I ran it through the planer as-is to demonstrate the problem.
Lots of pieces of wood get chipped off at the end because the grain runs up and down and is unsupported. This is with a helical cutter head using very light passes. That is a best case scenario normally. It can often be much worse. Why do this at all? Well you get really fantastically flat tops in a hurry when you use the planer.
Tricky, so what do we do? Take a block plane and cut a little chamfer on the trailing edge that will be exiting the planer. Or both entrance and trailing edges so you don’t get mixed up. The cutter will be shearing off the last bits of fiber, but the chamfer will mean that happens a little ways back from the bitter edge. Here is the edge I put on the big board, it isn’t big. Just a 1/16″ chamfer. The results from heavy cuts are no blowout and a very clean flat top!
If you don’t have a block plane, I bet a sanding block would do it too. That means you can plane the top flat quickly and without risk of end blowout. Just make sure you don’t plane through your chamfer. I shipped the big one out fast enough I forgot to take a picture, but here is the little one after a number of uses in my kitchen.
I have a number of sharp and dangerous objects lying around my office. My intention was to eventually get them mounted up on the wall in nice displays. The prospect of tiny hands getting a hold of them moves that up in the priority list.
First up is my kukri. I rehabbed it many moons ago with a friend and have been sitting on it ever since. I found a thick piece of mahogany I bought years ago for a project idea, but never ended up executing on. This is my first time working with it, and a low risk project like this is a good place to start. It is really hard stuff, but look great when you get a good hand plane across it. I re-sawed the piece to save material because this stuff is quite expensive.
The back of the plaque was cut to size, had some shapes cut out at the corners, then got a round over to smooth everything out.
To hold the knife in place, I used some blocks of the mahogany and shaped notches with a hand saw, then rasp. When I was sure they would fit in place, I did a lot of sanding to round over the outside to make them look nice.
I experimented with dye to darken up the mahogany a little. Not too much, but I wanted it to be closer to the aged handle than any oil based finish would give. When I got the color I wanted I hit it with some shellac and called the project finished.
Next on the list was my bow and arrows. They had been sitting in a floor stand I made for quick access. I honestly hadn’t really done any shooting since we moved, so this could probably be put up on the wall without any inconvenience. Here is what the final piece looks like so you can see where we are going. I don’t use many stains anymore, but I think red oak stains wonderfully!
I had an image of this one in my head for a while and really wanted to do half lap joints to hold everything together, and have a lot of shape in the center. I laid out the curves and cut everything on the bandsaw.
The spear point tip was another thing I had a pretty strong vision of. It came off the saw a little lopsided, but I was able to sand it into a respectable shape.
For the half laps I tried something new. In the past I would just cut them by hand 100%. I decided to try and be a hybrid woodworker. I hogged away most of the waist with my little trim router, then use a chisel to take it up to the line. It does make for a very smooth straight cheek.
My experience doing this trick with the other half of the joint was less stellar. The bit would keep grabbing and bouncing around and I went through a lot of batteries. The top left slot in the left hand picture shows where I started with the router, then just ran out of batteries. I had already defined the edges with a saw. I took a chisel, and in about 20 seconds cleared out 80% of the waste. I then went back with a new battery and cleaned up the bottom (right hand picture). That was way easier. Trim routers can’t hog out a ton of material, but they do great at cleaning up the last little bit. lesson learned.
Here is the un-assembled shot of everything. I did a little trimming with a block and shoulder plane to make everything snug. The final joints look pretty tight on the outside, I am proud of them. I cut the tennon parts a little long and planed them flush when the glue was dried.
To hold the bow in place I did a little more carving and shaping on some oak blocks.
I didn’t do any edge rounding on this one. I wanted it to look reasonably refined, but still a little rustic. Like it might be something an old armory would use to hold a bow that was always needed at the ready.
Last but not least I made a big double bladed ax for my armor costume. This was probably back in 2010 or so. It has been moved around and mostly lived in closets. Now, it gets to live next to my shield on the wall. Putting this one together was so fast I got it up on the wall before I remembered to take the first picture. Oops!
Our Little Bushey South sign has been sitting proudly on the mantle since we moved in. I got something to add to it recently. My wife’s family had a small cutting of a fence post from the Little Bushey farm. It isn’t in great shape, but it is a family wood from her side.
I wanted to use this in a way that was special. My idea was to drill out some plugs from the post wood and inlay it into the sign. I cut a chunk off to make it easier to clamp, drilled the plugs, then diced them out on the bandsaw.
I thought 3 plugs to represent the 3 of us living in the house would be a good way to go. I kept an extra plug in case any more little Hansels come along. The walnut sign was really hard, and the post wood is really soft and porous. It made planing everything flush very hard. There is a little bit of crushing in the end grain of the plugs, but that was the best I could do.
Everything got a few coats of spray lacquer to blend the finish back together. The post wood is a lot darker than I expected once the finish went down. It is a subtle accent when viewed from afar, but I can always see it and know what it means. I saved the rest of the post wood in case another idea comes to mind.
A woodworking magazine of mine had a good article on making your own awls. You start with O1 hardenable steel rod, grind to shape, fire and quench. The handles are made on a lathe. This sounds like a mini knife making project and something I would benefit from. I am always using awls to mark wood for screwing or drilling and was looking into buying more. At 10 bucks for a 3ft rod of the steel, these are super cheap and easy to make.
I started with 1/8″ O1 drill rod. This was fine, but in the future I would go with a 3/16″ or maybe 1/4″. I chucked them up in the drill and freehanded a point with the bench grinder. A mapp gas torch was potent enough to get them past a magnetic point (hot enough to quench properly) and into a small jar of canola oil they went. I threw them in to an oven at 400F for an hour to temper, then eventually sanded and buffed off the scale.
I like working on the lathe, but often find that order of operations is absolutely critical. If I go in just doing the first thing that comes to mind, I wind up in a place where I can’t clamp something properly or the part is out of center. My first attempt or two painted me into a corner.
I settled on this order of operations. Mark center (wouldn’t an awl be nice right about now?) for the tail stock to hold, then chuck up a square blank at the head. Drill the 1/8″ hole for the awl to fit in (picture missing). Put a center point in that hole, and round everything down and make the shape as close to final as possible while leaving a little attached towards the head stock. Now is a good time to do all the sanding. Once that is done you can part the last bit off and it will be free. There is always a little nub that needs sanding at the butt end.
With the metal and handles done I used structural epoxy to bond them and then a series of dips in home made shellac to finish the handles. Many coats later and they were ready to give out. I now have one at my lathe, another at the drill press, and a few more for my bench. Don’t leave home without these beauties!