Pinball in Cube

This goes nicely with my nail in the block “puzzle” as a way to confound coworkers.  Once again it takes advantage of wood’s ability to swell along the grain when wet.  I started with a 3″ block of maple and drilled centered holes all the way through.  I had a 3/4″ pinball, so 5/8″ was the drill diameter

After looking at it for a bit, I felt like the holes were too small for the total block size.  I needed bigger pinballs or a smaller block.  The install was pretty easy.  I dunked the block in a bucket for a day, and then pushed the ball in on my wood vice with the help of a small 1/4″ deep socket.  The hole still looked ok, but I threw it back in the bucket for a few hours to make sure it returned to its original shape and size.

With the ball installed and everything dry, I took it back to the table saw for a diet.  All the edges came down till the proportions seemed right.  I liked the look of the chamfer, but my crummy chamfer bit chewed up a few edges.  Still, overall it looks nice and should leave some heads scratching.

Raised Bed Clover

The variety of flowering plants we have been putting down over the last six months has started to bare pollinator fruit.  There have seen a number of bumble bees in our yard, and of course our own honey bees have something close to snack on.  I thought adding some clover would help out.  I picked up a pound of white and yellow clover and got going on a raised bed garden.

I considered tilling up some of the back yard and trying to plant where the grass had been.  I might give that a shot sometime, but doing a raised bed garden seems to be more of a guarantee of success.  I picked out enough cedar to make two joined 4ft x 8ft raised sections.

DSC_0249

12 foot board cut nicely down to 8 and 4 foot sections.  The corners and centers that tie everything together were made up of 4×4 pieces.  I went with galvanized lag bolts with washers with the hope that it will last longer than screws.  Time will tell.  Once assembled the thing was bigger than my garage, and almost too big to carry to the back yard.

DSC_0250

Before putting it in place I gave everything a coat of waterseal to add a little extra life to the cedar.  Once in the backyard weed screening was stapled to the inside to form a sealed area.  This meant I didn’t have to tear up the grass or worry about it growing up into the bed.  In all a serious time saver.

DSC_0253

A million trips wheelbarrow trips of dirt later and the beds were full.  I sprinkled down a few hands full of seed and mixed it into the top inch or so of dirt.  The picture below is about a week old with a few little sprouts start to poke through.

DSC_0261

Nailed It

This is kind of a puzzle in multiple ways.  It is supposed to be presented to people as an impossible puzzle.  How did the nail get there, how do you get it out?  In reality, it was kind of a puzzle figuring out how to make it properly.

DSC_0244

I have seen it described a number of times.  Cut the shape out of a block of wood, boil the one end for a while, clamp it down in a vise till it dries, put the nail in, and reboil to (mostly) return the wood to its original form.  The finished product pictured above is my 3rd attempt.  The first two times had an issue

DSC_0228

Something that isn’t stated, at least not in the articles I read, is that grain orientation matters a lot.  The first two blocks of wood were flat sawn, and rolled badly under compression.  See the picture below.  The successful piece is a core cut and compressed evenly during the clamp.  I don’t know if core woods work better than stuff near the edge, but my guess is you want something that is mostly quarter sawn for this trick.

DSC_0230

See how it keeps rolling over in the vice.  I couldn’t stop it, and reboiling the wood never straightened out very well.  Another lesson was to use a brace and long bit instead of a power drill.  The chuck kept getting in the way till I switched to the trusty old family heirloom.

DSC_0231

To summarize a few lessons in case anyone else wants to do this:

  • Be sure to get a really good boil, my first attempt wasn’t boiled enough and didn’t compress well
  • Use quarter sawn wood, or a core piece, flat cuts roll with the grain
  • Make sure you have a long enough bit
  • Try doing two at once.  It shouldn’t be any harder and gives better odds of success
  • Be careful when sanding everything flush later, I broke one tab clean off trying to rescue it with heavy sanding the second block

Tree Revenge Kit

I love trees!  The whole oxygen-necessary-to-life thing is neat and all, but their dead dried carcasses are where it is really at!  Aged cherry, bright maple, dark smooth walnut.  Every once and a while these trees get their revenge.  Splinters don’t happen often, but when they do… OUCH!  Thus, my Tree Revenge Kit was born.

The kit sits right next to the entry to my shop and contains a single set of tweezers.  I like the ridiculous idea of a monster kit that has all kinds of fancy locks, and when you open it up there is only a small simple thing inside.  This isn’t that extreme, but the box certainly could be a lot smaller.  Or I could just put the tweezers in a drawer.


The Build

This is another mix of woodworking and CNC milling.  The lid is walnut and the base is poplar.  I started by making the top, and milling out the text and tree all in one go.  Each color got masked off and hit with spray paint.  I think this might be my new preferred method of inlaying color into wood.  It is quick and easy, and goes down well over a quick coat of spray lacquer.  Having done a number of color inlay projects at this point, nothing is faster or cleaner than hand planing off the excess paint on top.

Once the lid was cut out and finished I could cut the poplar base to match.  Nothing special was done to it aside from milling out a slot for the tweezers to go in, and some relief cuts for a set of big fingers to pull the tweezers out.

A really funny project would have been to cut the slit, but not the finger relief.  Then, make a tool (with magnets?) to extract the tweezers.  Maybe that tool would get its own box.  It should have a lock to keep people from stealing it.  I digress.

DSC_0214

A set of simple hinges hold the two halves together, and that about wraps it up.

Wooden Comb

My goatee is getting pretty long and is need of some combing.  I could buy a regular comb for a few bucks, or I could spend hours making my own.  Is it even really a choice?!

Looking at what others have done, the table saw seems to be a popular choice for making the tines.  I figured a 1/8″ mill bit would do a pretty decent job, so lets mill this puppy.

I created a basic low profile pick that fit on some thinner scrap walnut I had available.  I really like how it looks with the lighter sapwood on the one edge.  A relief of half the thickness let me easily inlay some maple.  The grain runs counter to the walnut for strength and is proud a bit to help with holding.  It took a pile of sanding to point the ends of the tines.  A power sander made it pretty quick, but manual sanding is completely possible.  After glue-up and sanding I gave it all a coating of spray lacquer.

So far my goatee is happy with it.  A little oil and a comb post-shower seems to make it lot more manageable.  After all, there is nothing worse than a bad beard day!

DSC_0148


Home Built Saw Tools

Saw Jointer

One of the steps of saw sharpening is getting all the tops of the teeth even.  If one tooth is taller than the others, it will catch.  Shorter teeth will not do anything cutting at all.  This job is accomplished by running a file across the tops of the teeth until you have hit them all.  Not too hard to do by hand, but a jig helps.  Many were sold back in the day, but they are pricey now on ebay.  No matter, I will build one.  Here is my file and wood of choice.

DSC_0112

I cut a section off, and carefully cut a wedge shape about 3/8″ into the maple.  The waste was zipped out with a narrow chisel.  Now the file will fit inside nicely leaving room for a wedge to firmly hold it in place.

I had a thin piece of walnut that would work perfectly.  The only trick is that tapering such a small piece will be difficult.  I found that my scrub plane worked really well across the grain.  I held it just a little proud of the vice and slowly carved away till I had the desired shape.

To use, simple wedge the file in gently with the walnut, and then run along the top of the saw teeth.

A perfect scrap creation for an everyday woodworking problem.  Now to buckle down and actually do all that sharpening.  But first


Saw Nut Driver

Most saws use split nuts that standard screwdrivers make a mess of.  The slot is very narrow.  I have seen people convert old spade bits into split nut drivers.  That sounds like a good plan, but requires oodles of grinding and the sacrifice of a bit.  Instead, I took a recently reclaimed piece of saw blade and made a driver bit.  The blade is thin and hard, but too flexible to make a long driver.  Short and stubby should be just fine for this task.

I used a hack saw to cut the part out.  It took two blades to finish.  I would recommend using some kind of cutoff wheel for anyone looking to make something out of saw blades.  At any rate, the bit works like a charm.  Some of these nuts were damaged and difficult to turn even with a good flat ground screwdriver.  The homemade bit works great.

Now it needs a nice handle.  I did a quick run on the lathe and came up with this handle.  The tenon had a slit sawn down the length to help seat the metal bit.  The brass made everything so tight that I couldn’t pound the bit in as far as I had wanted.  Oh well it is very suck now.  Not quite centered either, but nothing I can do about it.

Saw Renovation Wrap-Up

I finished my last round of saw renovations, and have ended up with a serious collection of panel saws.  Some were dropped some where chopped, but most made it through in decent condition.

DSC_0107

In all I did a major restoration on 3 sets of saws for a total of 9.  Some of the ones pictured above were purchased in pretty good shape, and didn’t need any serious restoration work.  Sanding all those saws was messy work and left my fingers stained black.  Luckily I put down a sheet of particle board to protect my bench.  I guess gloves are in order next time.  After 9 saws, the rust remover bath looks like used motor oil.

DSC_0105I like to think that after all the neglect these saws are happy to be back on the job and free of decades of rust.  Look, they have even taken up synchronized swimming!

DSC_0111


The last set of saws came from a really cheap lot purchase.  Any buy from ebay can be a crap shoot.  It is hard to tell quality from the pictures and sellers rarely take a picture down the length of the saw blade to show bends.  Still, for 15 bucks for the three, I am willing to take my chances.

Unfortunately the top most saw, in the left hand picture, was beyond saving.  I couldn’t get past the heavy pitting and bends in the blade.  I disassembled it and will keep the parts for potential future repairs of other saws.  If I could find another medium sized backsaw or two and a good miter box/saw my collection would be complete… yeah right!

Saw Renovations (Part 2)

The Summer Saw Stravaganza continues.  I took another set of three sad looking saws and gave them a run through the bath.

DSC_0094

The saw in the middle is a real mixed bag.  It is very old and has a nicely carved handle.  On the other hand it is badly rusted and pitted in places.  Looking at a close up of the blade you can see two neat features.  First, that carved dip of the handle as it comes around your little finger to meet the plate again.  That is called a lamb’s tongue.  Totally for decoration.  It needed some gluing back together.

DSC_0099

The other is that number 10 near the teeth of the blade (left side of picture).  You can barely see the 1.  They would typically stamp the number of teeth per inch there on the blade.  The trick is it was usually 3/8″ or further from the teeth.  This saw has seen a lot of use and resharpening.

Like last time the saw plate got a bath in Evapo-Rust, the handles got sanded and a coating of boiled linseed oil.  The middle saw needed a little banging on my anvil to straighten out, but it looks quite true now.  The transformation was quite stunning.

DSC_0103

The only thing that has me worried about these saws is the heavy pitting on some.  A saw should be tapered, wider at the bottom than top, and will have the teeth flare out (called set).  This means that only the business end should really be touching the wood.  That having been said, the plate is going to do a lot of sliding in the cut, and a smooth plate will slide better than a pitted one.  I really hope they work out, these saws are gorgeous, even with all the pits and stains.

Saw Renovations

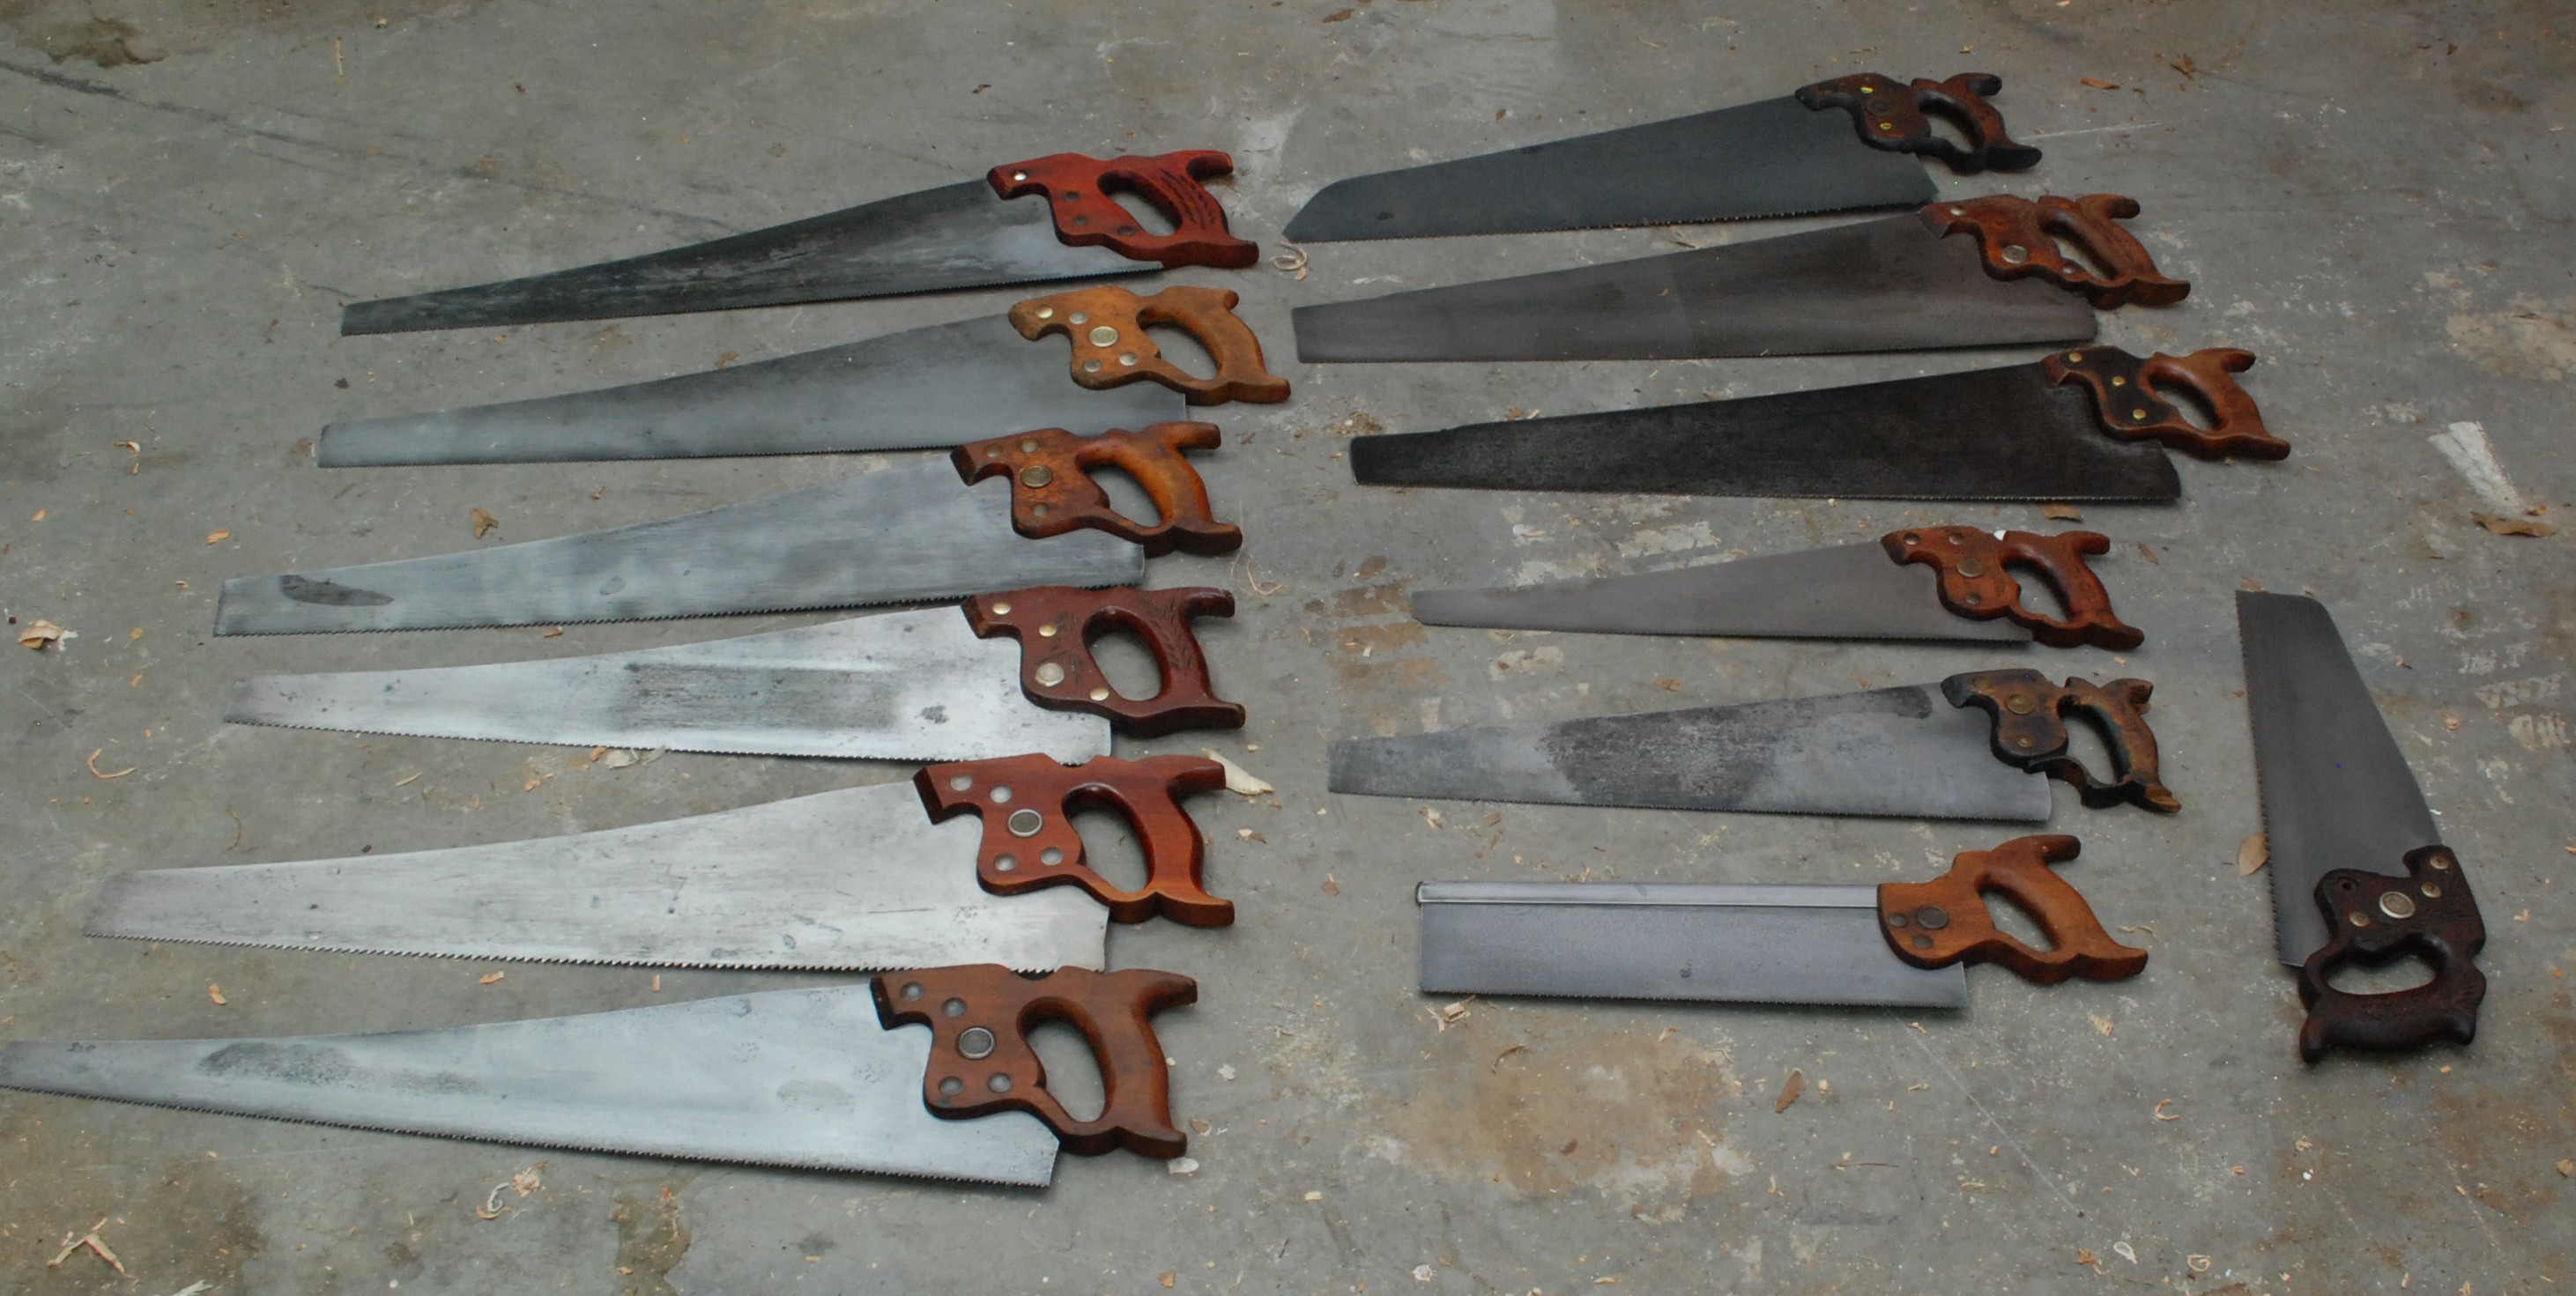
I have been collecting old panel saws for a while.  Some are in decent shape and only need a sharpen, some have bad rust and hard bends in the saw plate.  In this endeavor, no saw will go untreated.  I tried to straighten when possible, but a shortening happens.  Check out these work horses of american history.

DSC_0079

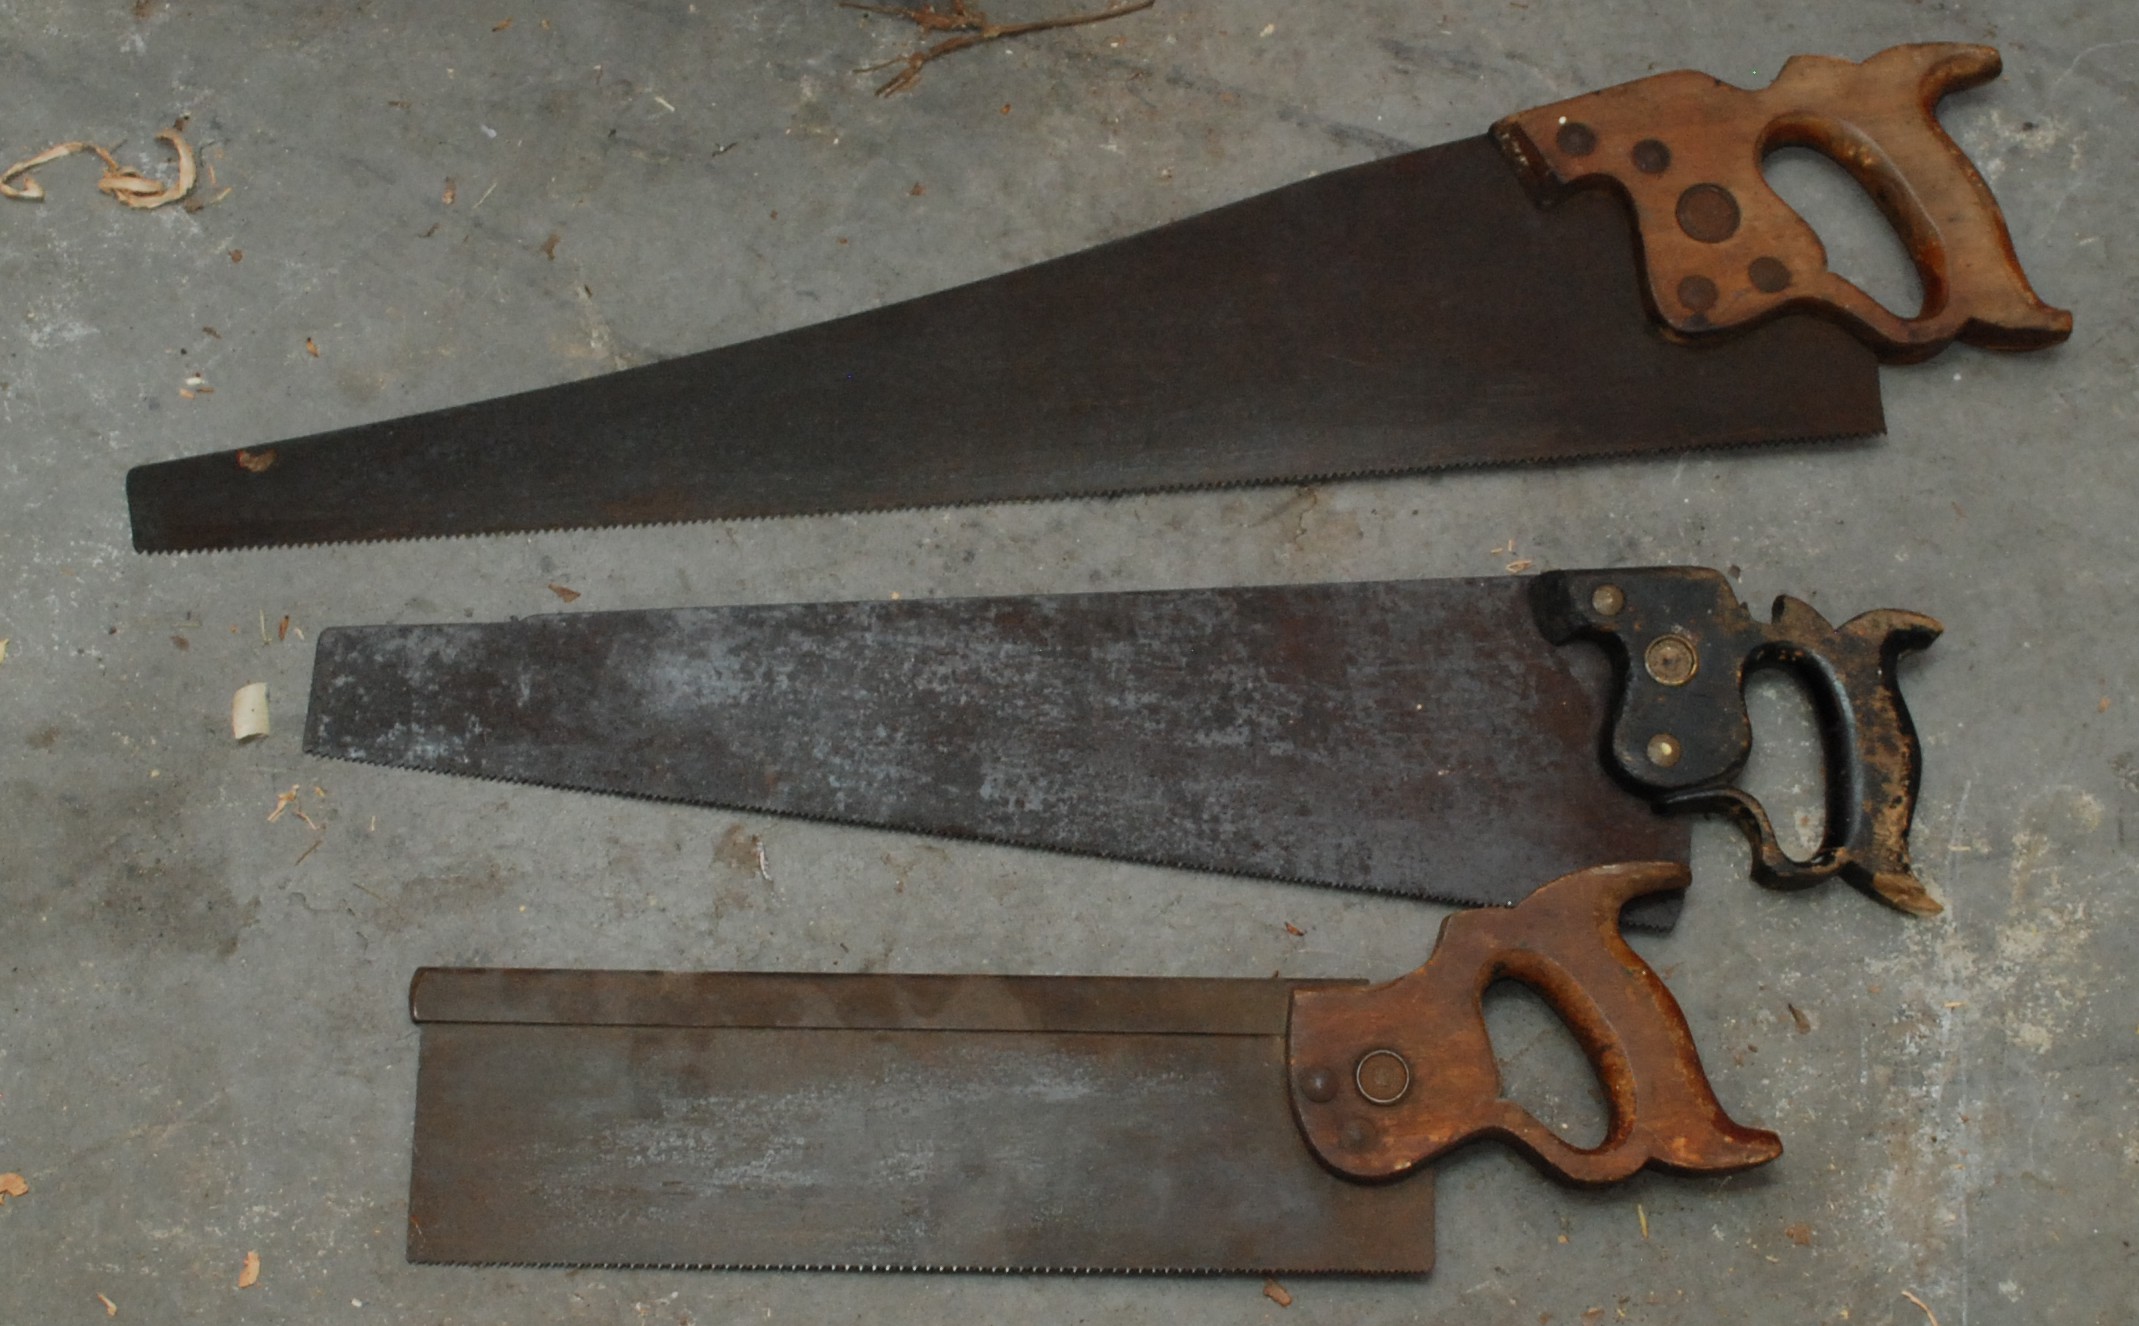
They have seen better days, and the one in the middle has some serious bend to it.  Still, all indications are that the age of these saws is pre-WW2.  That was a golden era of saws where you probably can’t go wrong with anything you find.  I started by removing the handles and ran into my first serious snag.

DSC_0081

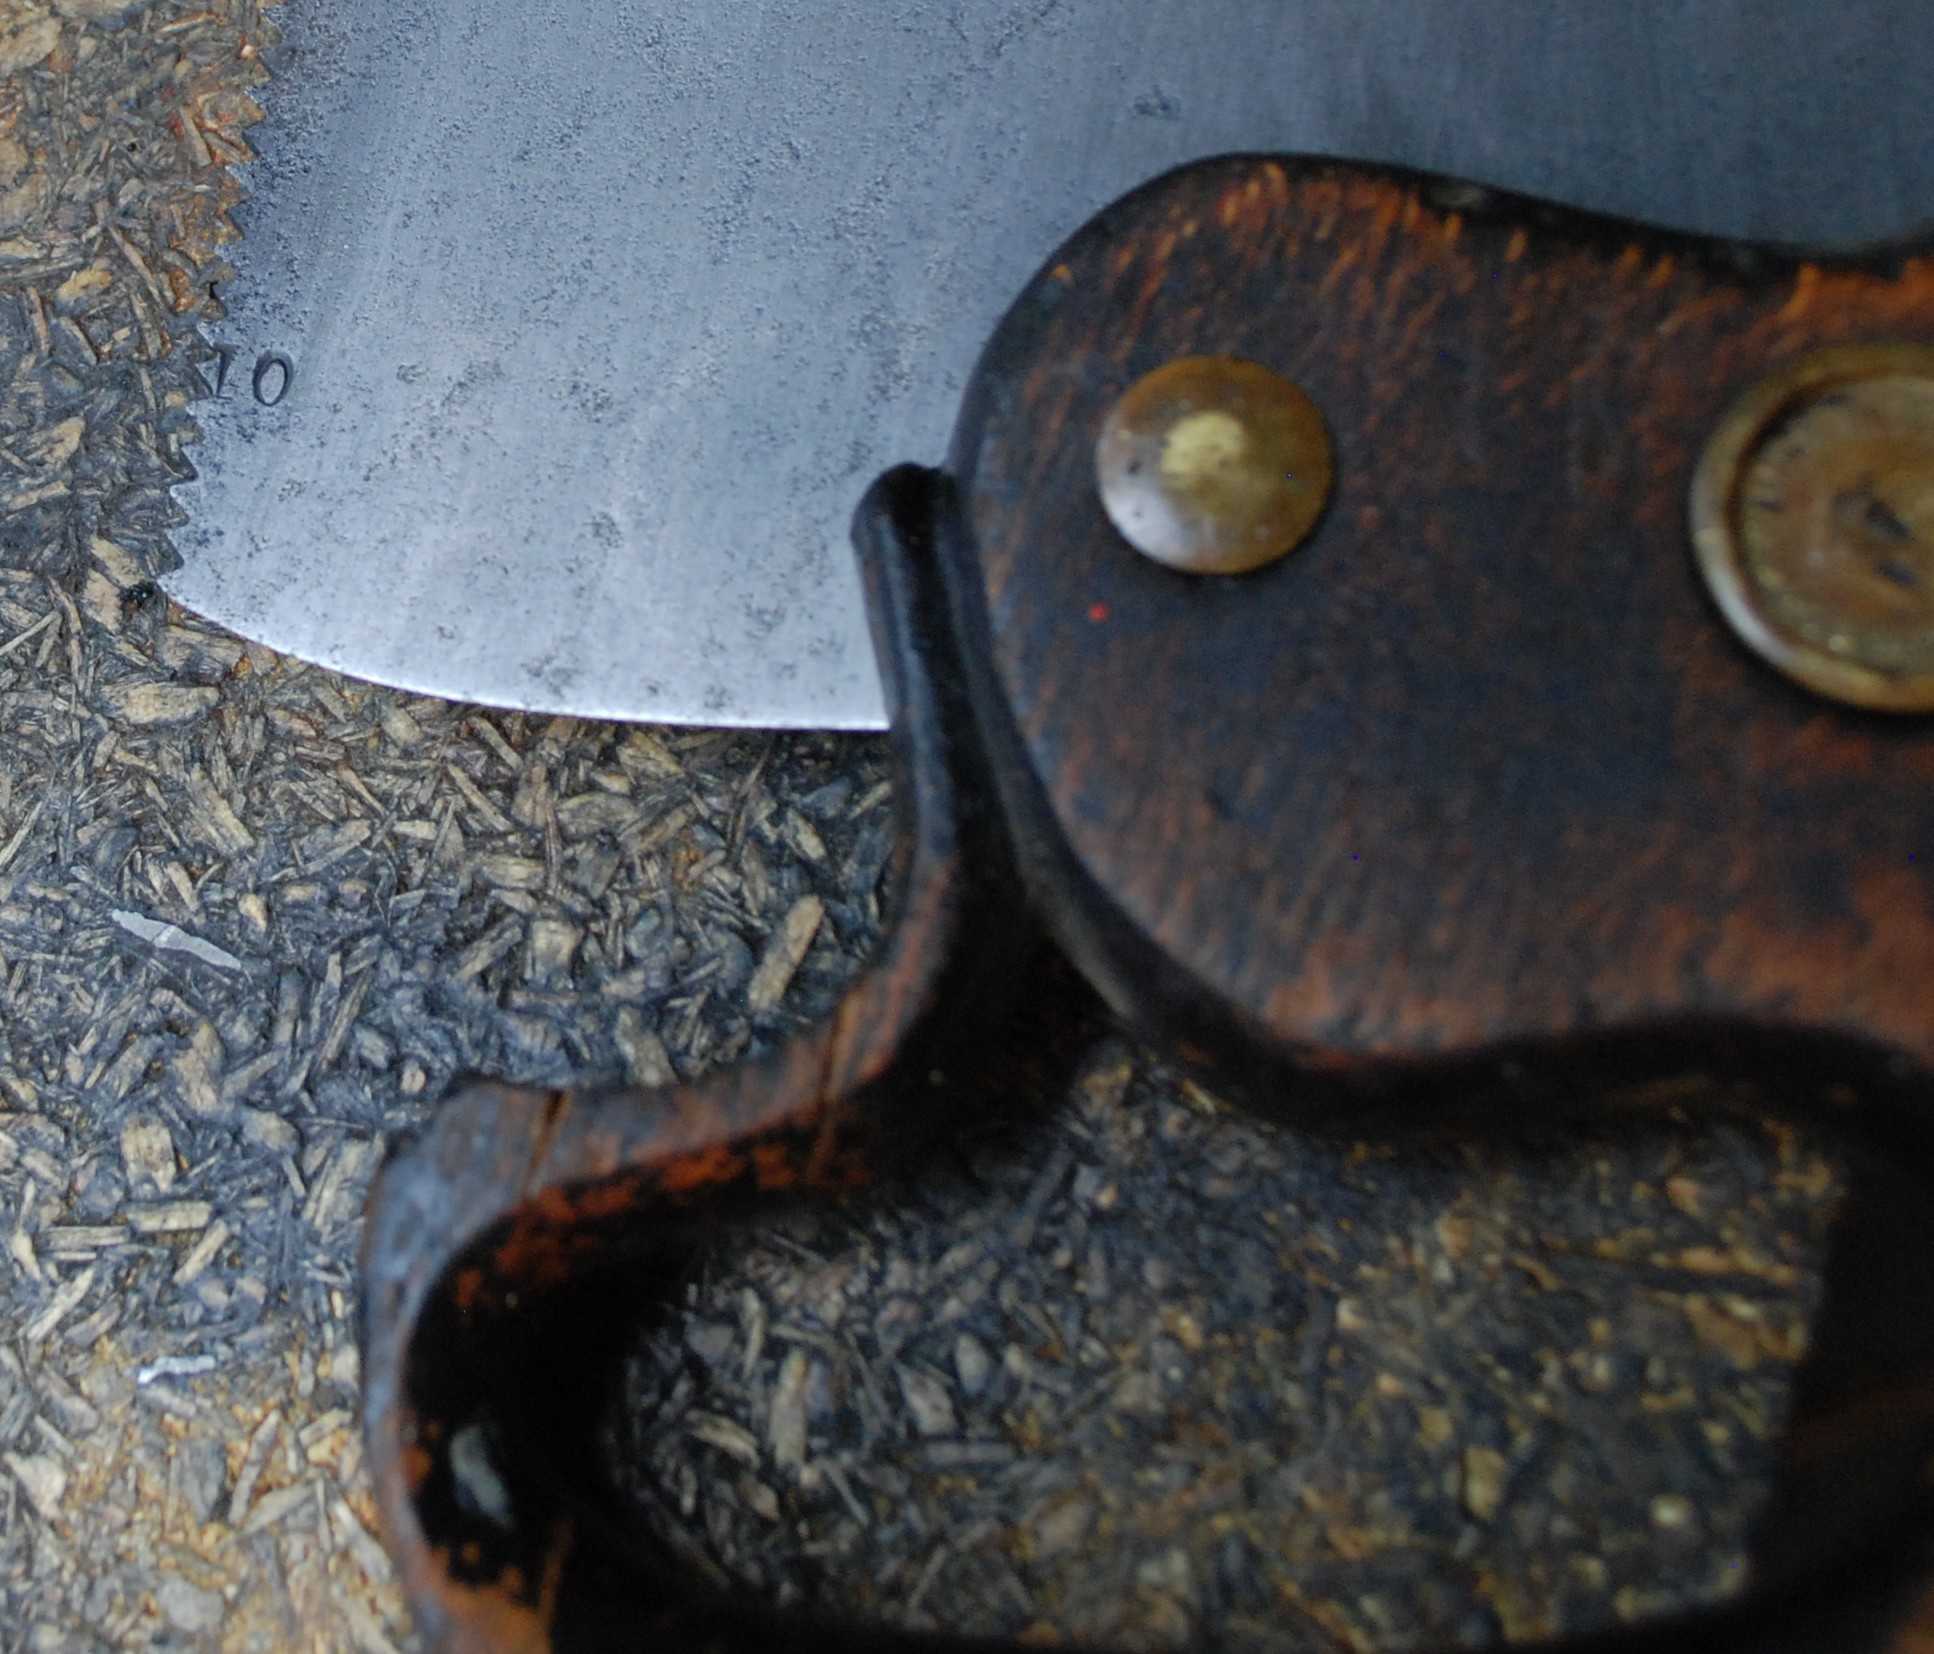
Someone had lost all the split nuts and decided to replace them with wood screws.  Based on the screws it was probably a number of decades ago.  They were screwed or pounded in, then had the tips bent over.  After a lot of messing around with pliers and cutters I eventually grabbed a hack saw and sawed the screw off between the plate and handle.

DSC_0084

Next the saw plates went into a shallow tub with Evapo-Rust.  I found that one of those under-bed storage containers was perfect.  Once again this stuff is amazing.  It works pretty well over night, but there appear to be no ill effects from leaving it longer.

After their bath they look almost black.  I tried a few different techniques and found spraying down the blade with WD-40, then scrubbing with a sanding sponge did the best.  A 220 grit 3M sandblaster sanding sponge did a fantastic job.  It holds together really well under wet conditions, even with the saw teeth raking it, it doesn’t get loaded, and it cut through the grime quickly.  Each side took less than a minute to clean.  I have never used sanding sponges, but I can see why they are popular.  This poor plate had to get cut down a bit, but I saved the cutoff for use as scratch stock and tools.

The handles were mostly in decent shape.  Lots of scratches, and small breaks from getting dropped.  The finish was stripped off with a corse sanding sponge.  Again these sanding sponges surprise me.  They do a really great job of adapting to all the handle contours.  Once smoothed and cleaned up I rubbed a coat of boiled linseed oil on each one and let it dry.  Everything went back together quickly.  The tall saw had to get a new set of hardware.  Luckily my local Ace had brass plated binding post hardware.  Not exactly authentic, but it is a huge improvement over the wood screws the last guy used.

DSC_0092

Sharpening is the next step.  I have everything I need, but my table is covered in saw rebuilding stuff.  I will keep the refurb train going until they are all done, then convert over to sharpening.  In the mean time I need to come up with a good measure for saw sharpness.  Maybe some time trials are in order.

Saw Sharpening Vise

My Summer Saw Stravaganza! began with a lovely saw bench pair, and will continue with this saw vice.  It is used to clamp a saw very near its teeth during sharpening.  The design is similar to a number of others out there, but with dimensions that matched the scraps I had around.

DSC_0063

The long pieces will contact the saw.  I wanted them proud of the side plates to allow for more clearance for sharpening files, and depth for big saws.  To align them during clamping I used my rabbet plane to make a shallow alignment recess.

Once both halves were glued up I took a rough plane and did some shaping.  The bottom cleat was relieved at the top so I could get a taller saw in, and to make sure it pivots at the bottom.  The top got a lot of rounding and relief to help the files have clearance.  Lastly, the inside of the top jaws was sloped to make sure that the clamp engages at the very top, right below where the teeth will be.

DSC_0074

I love hand tools for doing stuff like this.  This is a rough jig and doesn’t require everything to look perfect.  I can grab a plane and shave a little here and a little there.  To help support saw teeth close to the handle I had to cut a number of notches out of the one side.  It was mostly setup for by biggest rip saw, but should help accommodate all my saws.

I am happy with the results.  This could operate as is, but I have seen people nail a strip of leather across the bottom to help act as a hinge.  I used really light leather, so it doesn’t help much, but it should improve alignment while clamping.  Before the leather went on I hit it with a coating of boiled linseed oil.  Up next I will take some of my saws and attempt to refurbish them.

DSC_0078