Sander Cabinet

DSC_0350

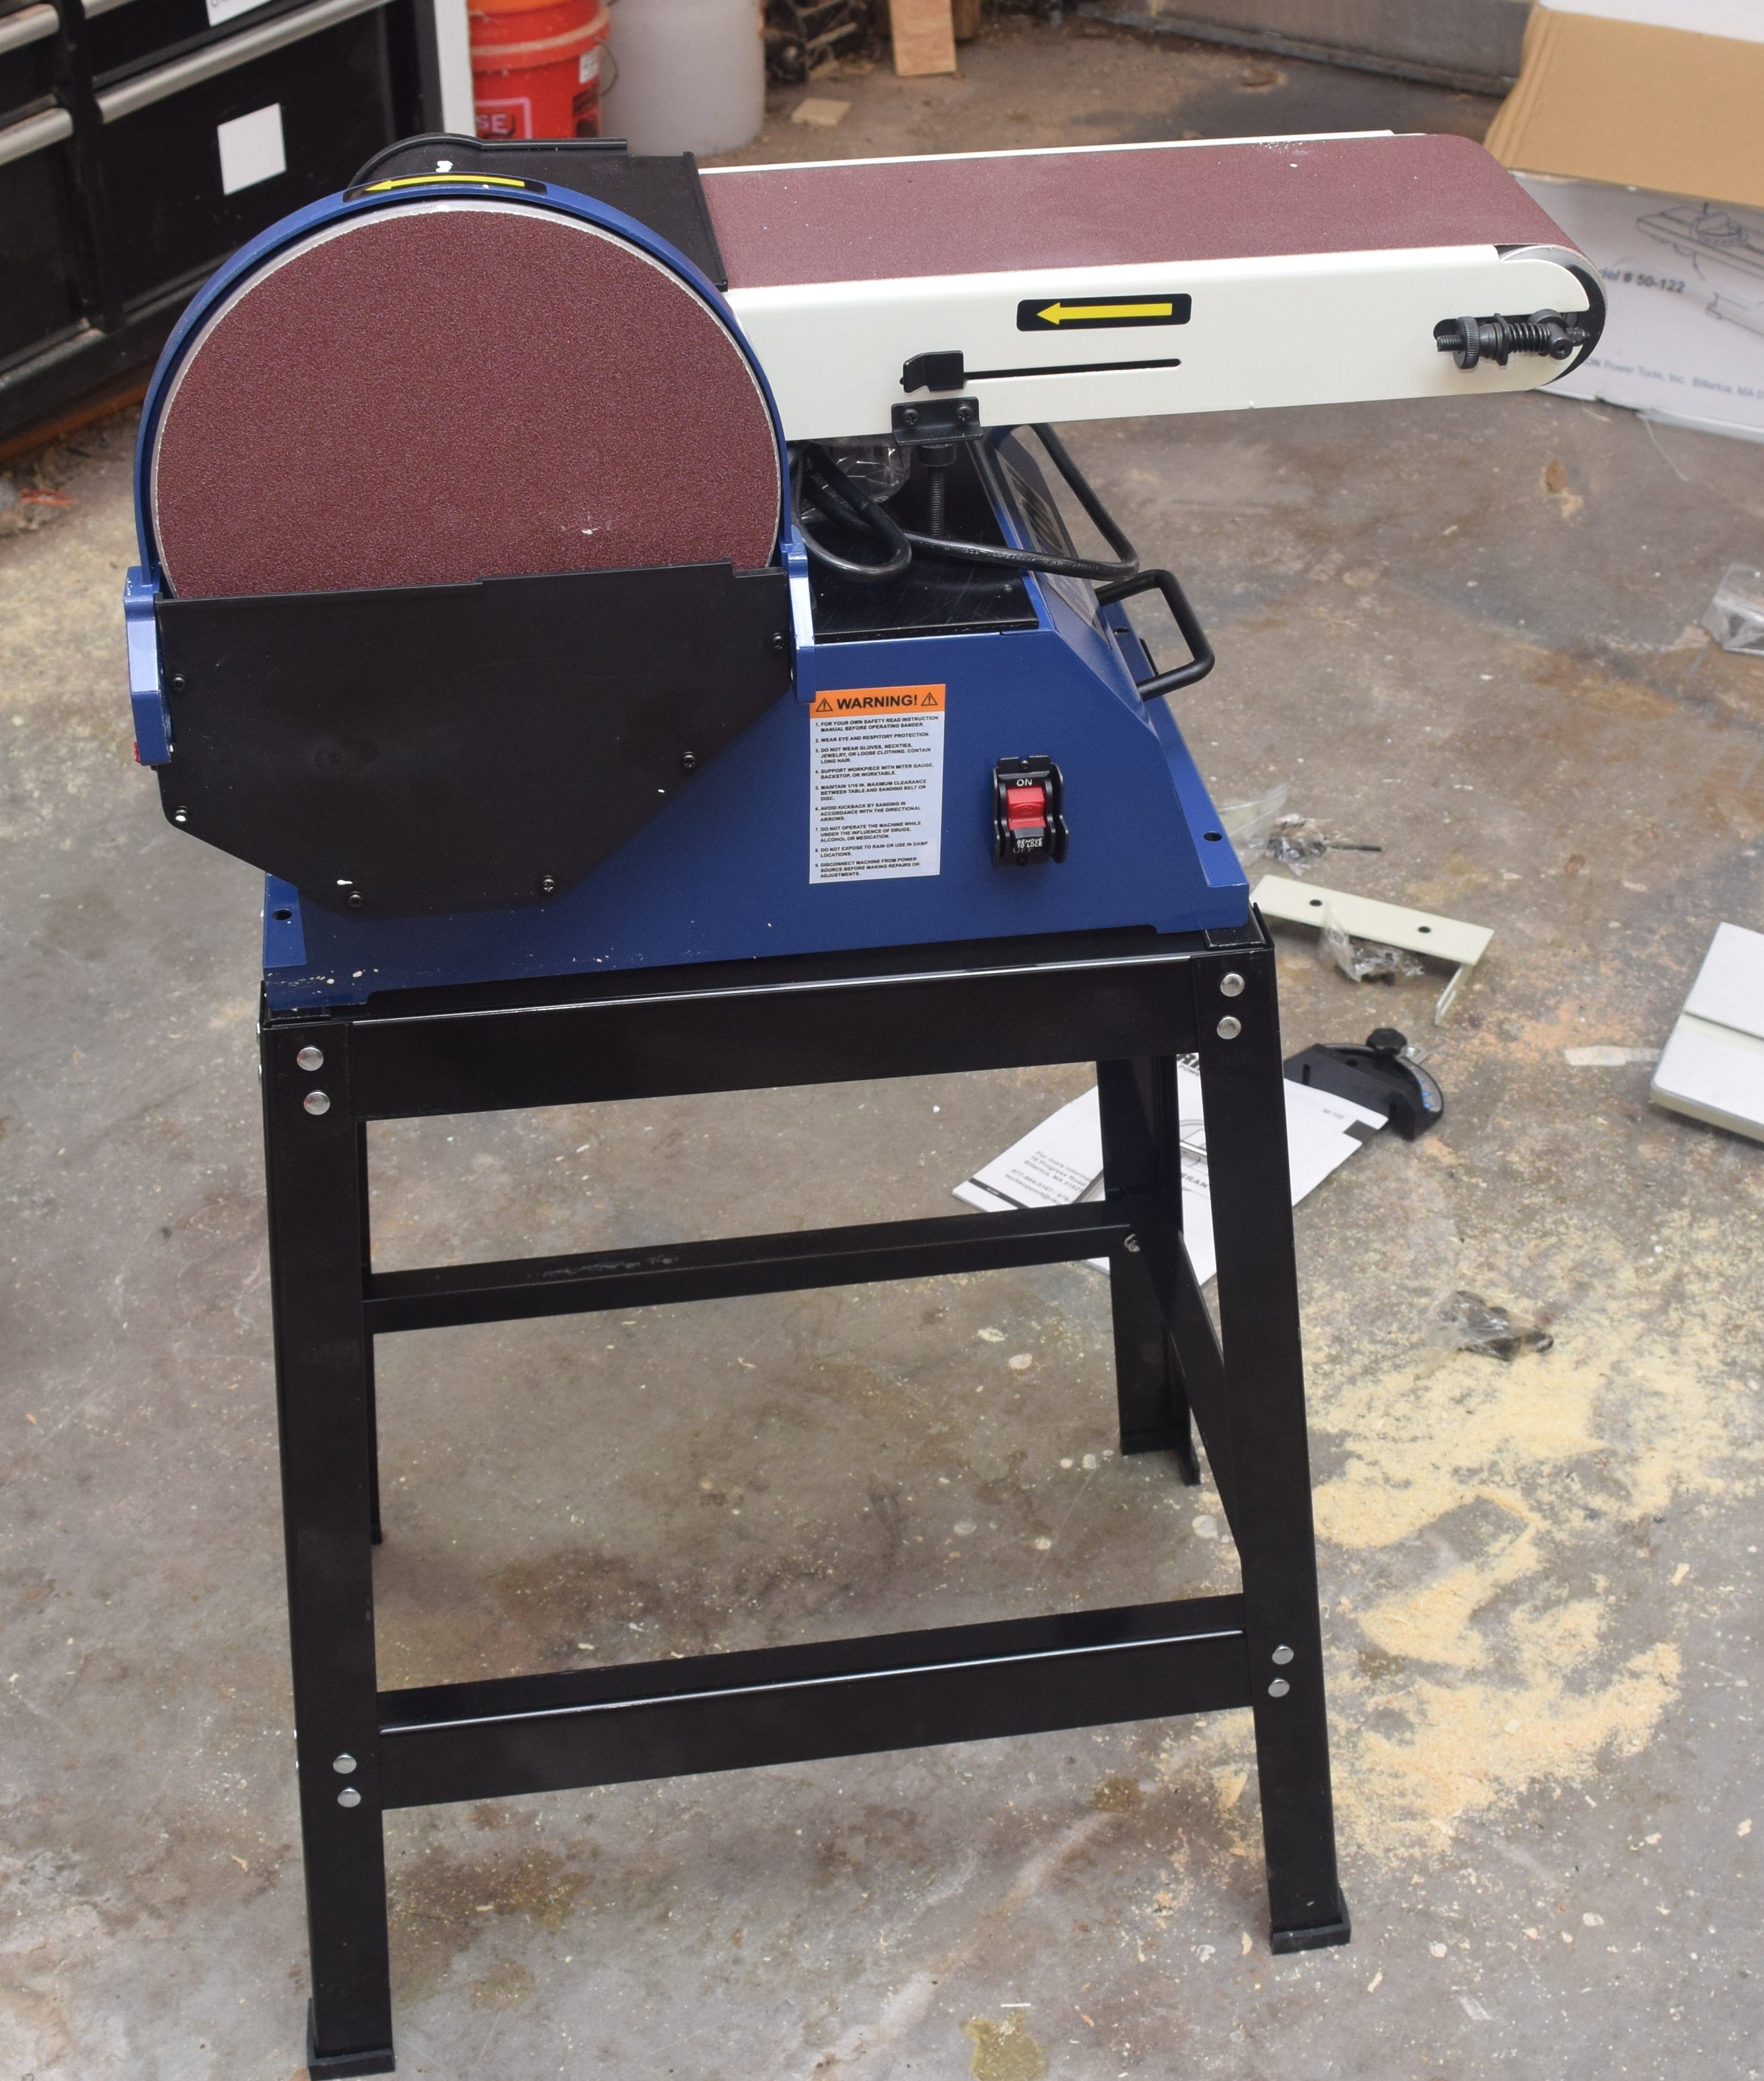
This is my new beast.  I posted about it a few weeks back and have been really happy with it since.  Happy with the machine, but not the stand.  It is too low, and my little shop vac doesn’t really fit under it.  Time for a new cabinet.

I designed this to work with a single sheet of 3/4″ plywood.  The doors, drawer, and back could have easily been made with 1/2″ plywood, but I didn’t have any, and buying one sheet of each didn’t make sense to me considering I can’t really store half sheets.  Besides, the price difference is minimal.

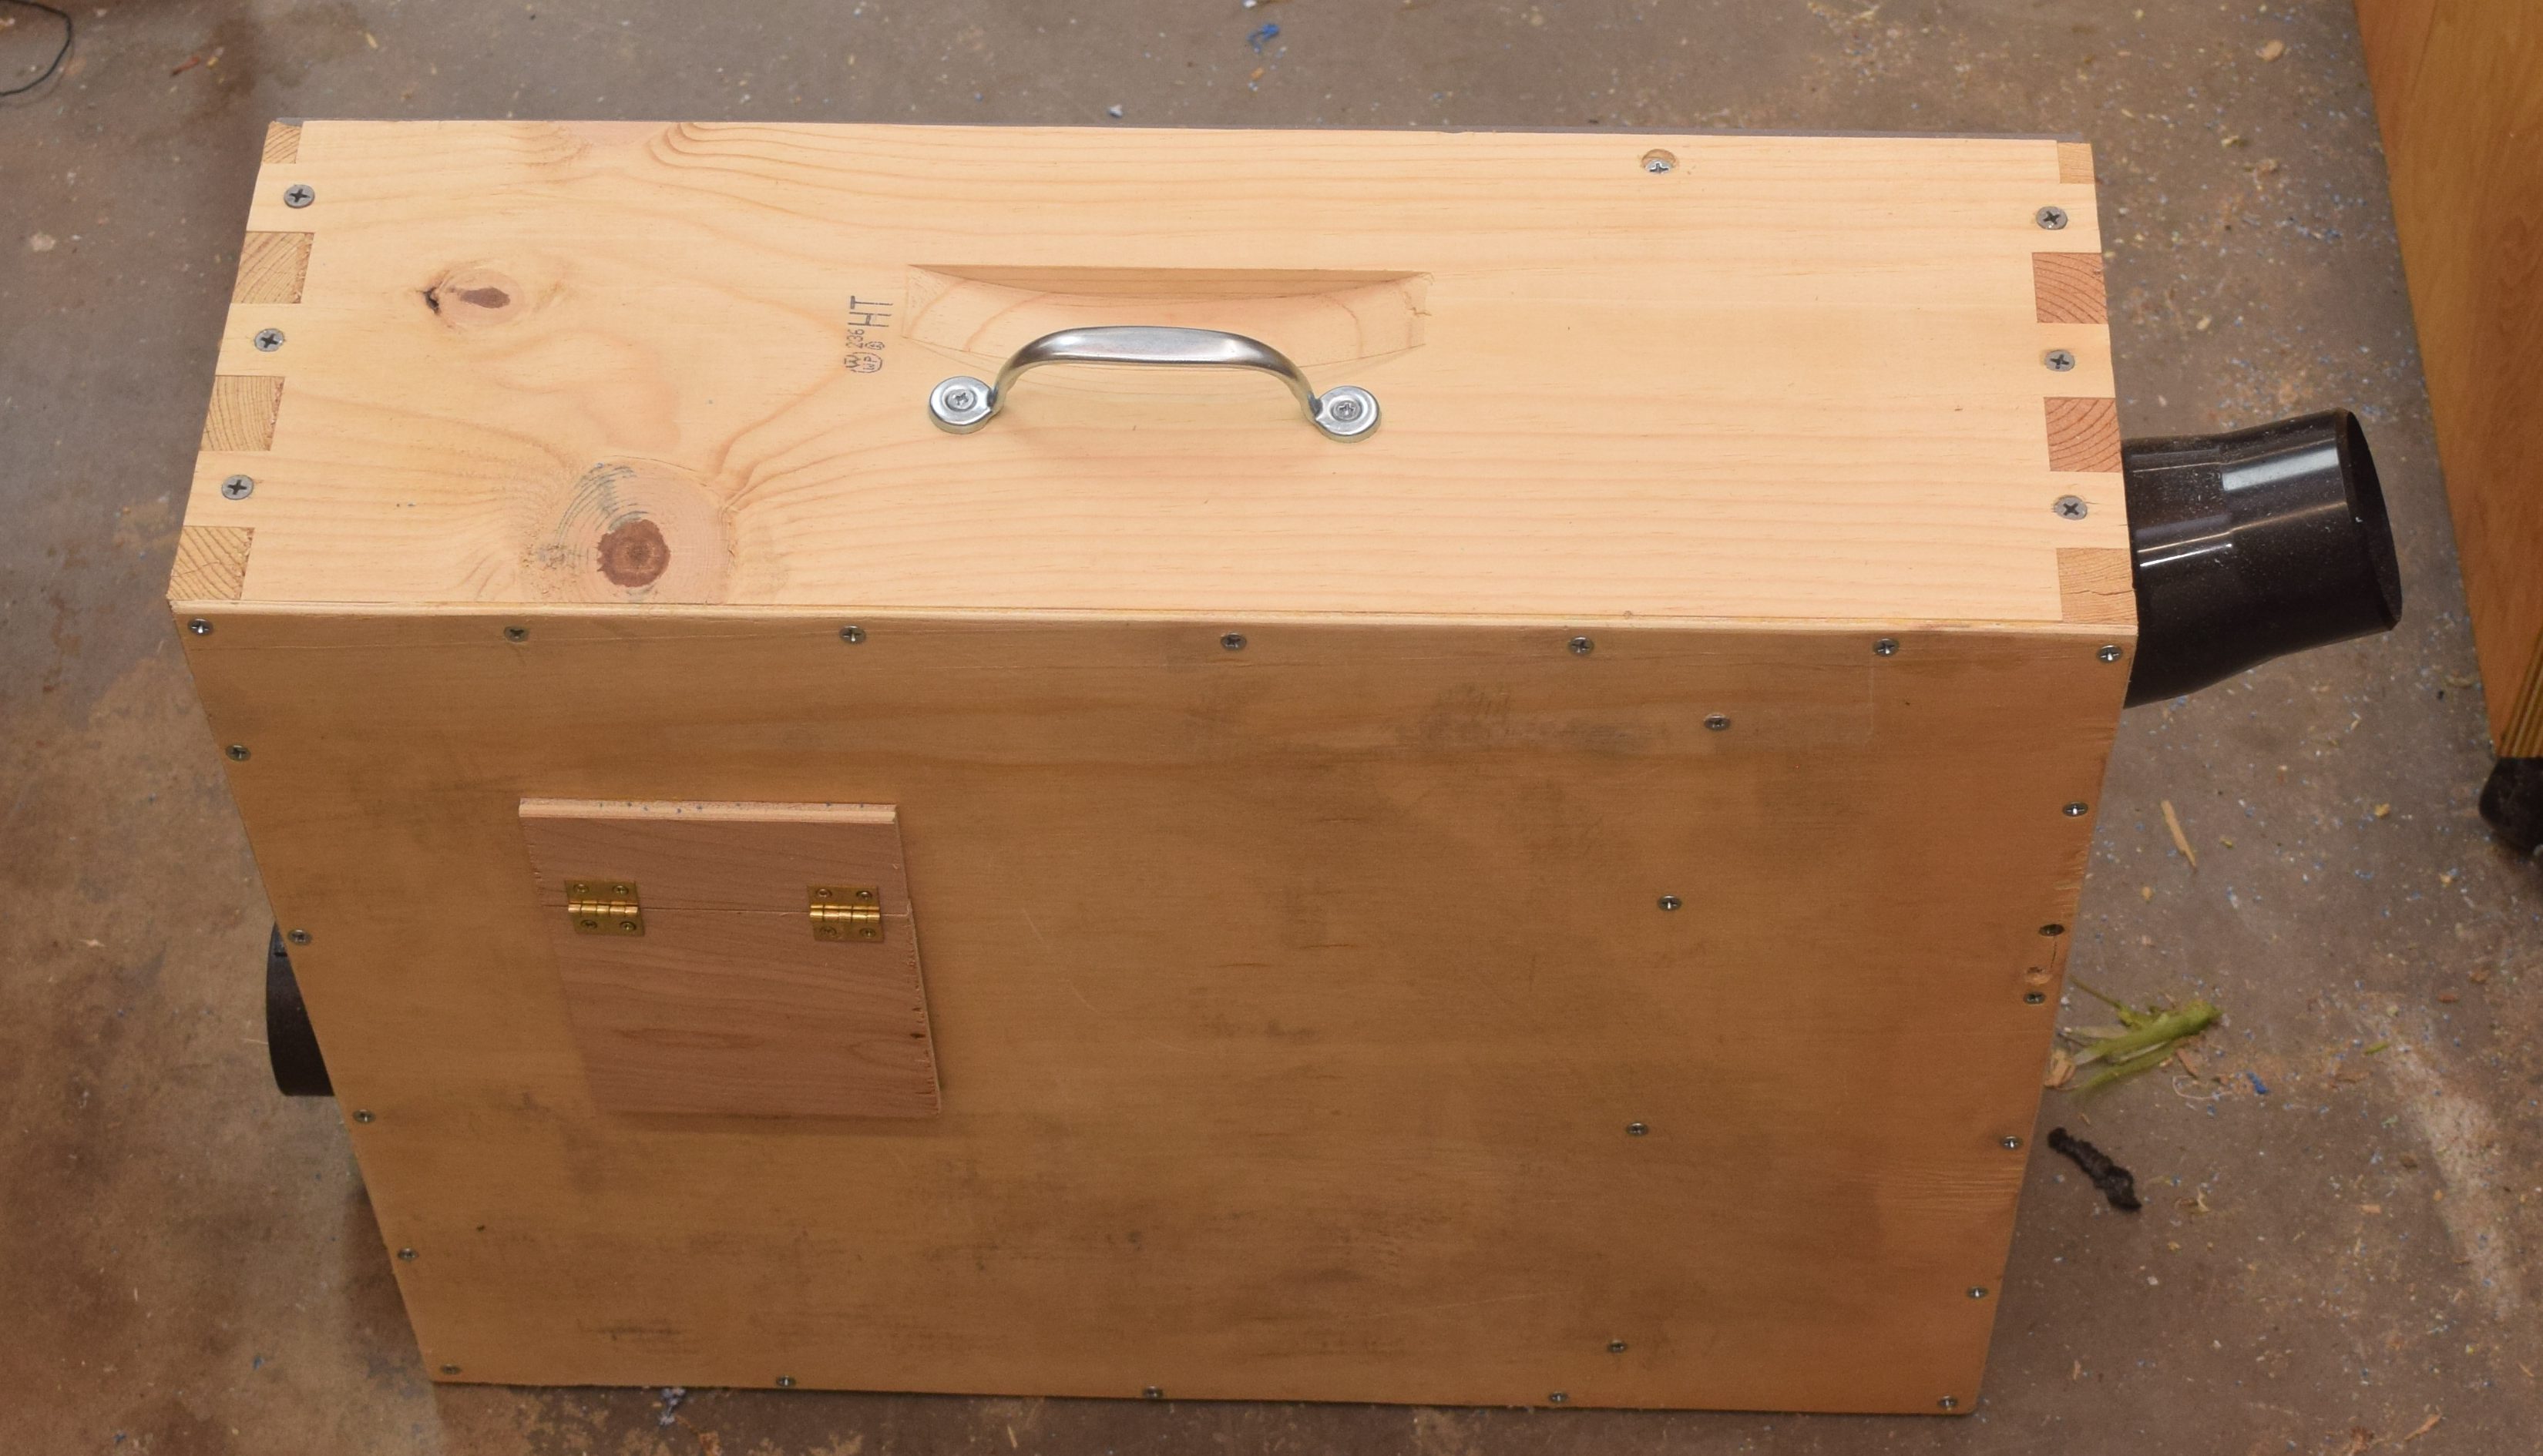
Started with an open box that would house the dust collection, and raise the tool up high enough when castors are installed.

With a shelf added I had room for a drawer in the bottom, and was able to cut holes for the intake and exhaust hose.

DSC_0356

The drawer is a simple box like I have been making for other cabinets and drawer organizers recently.  No handle on the front, just a finger cutout.  This is big and deep enough to hold all the sander’s spare belts and disks as well as some random miter saw parts that needed a good home.

At this point it was assembled enough to apply the boiled linseed oil finish and castors.


Accessory Holders

The sander has two different allen keys to make adjustments and remove guide plates.  Additionally it has a small miter guide for use on the disk sander.  I milled two pine blocks to make custom holders for the keys and guide.  Both sets of tool holders screwed to the inside of the doors.


The BestDSC_0364

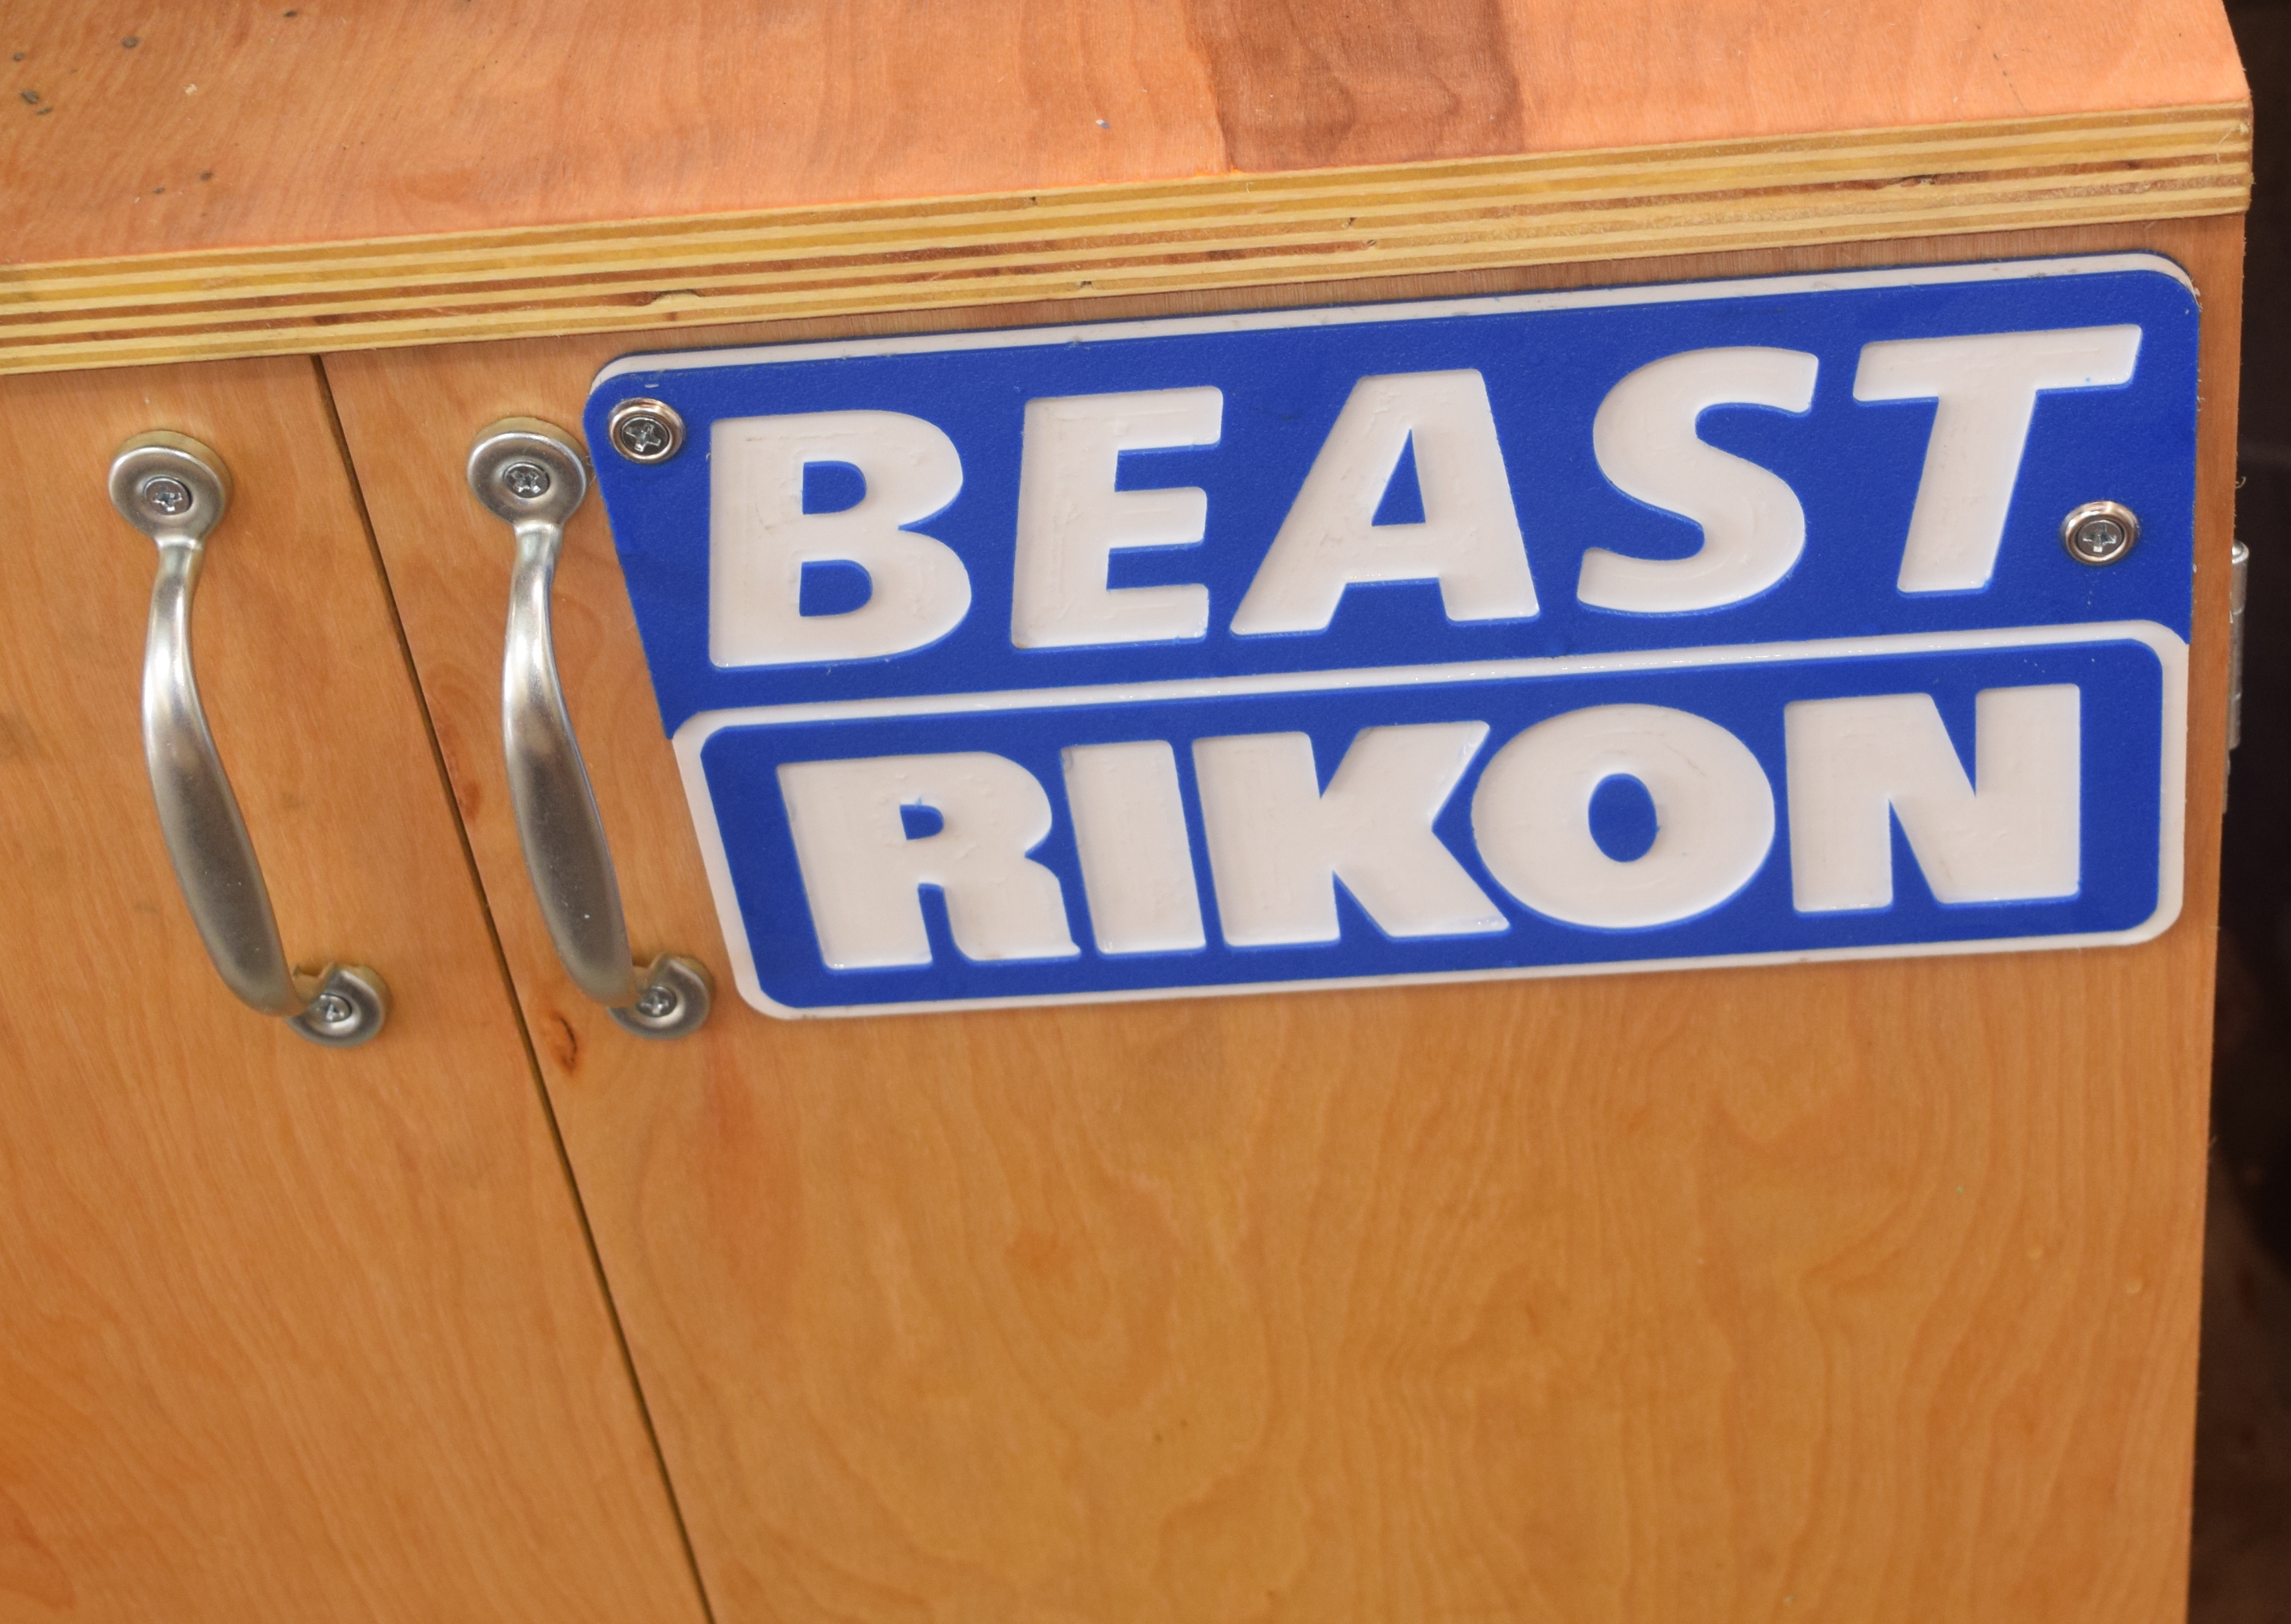
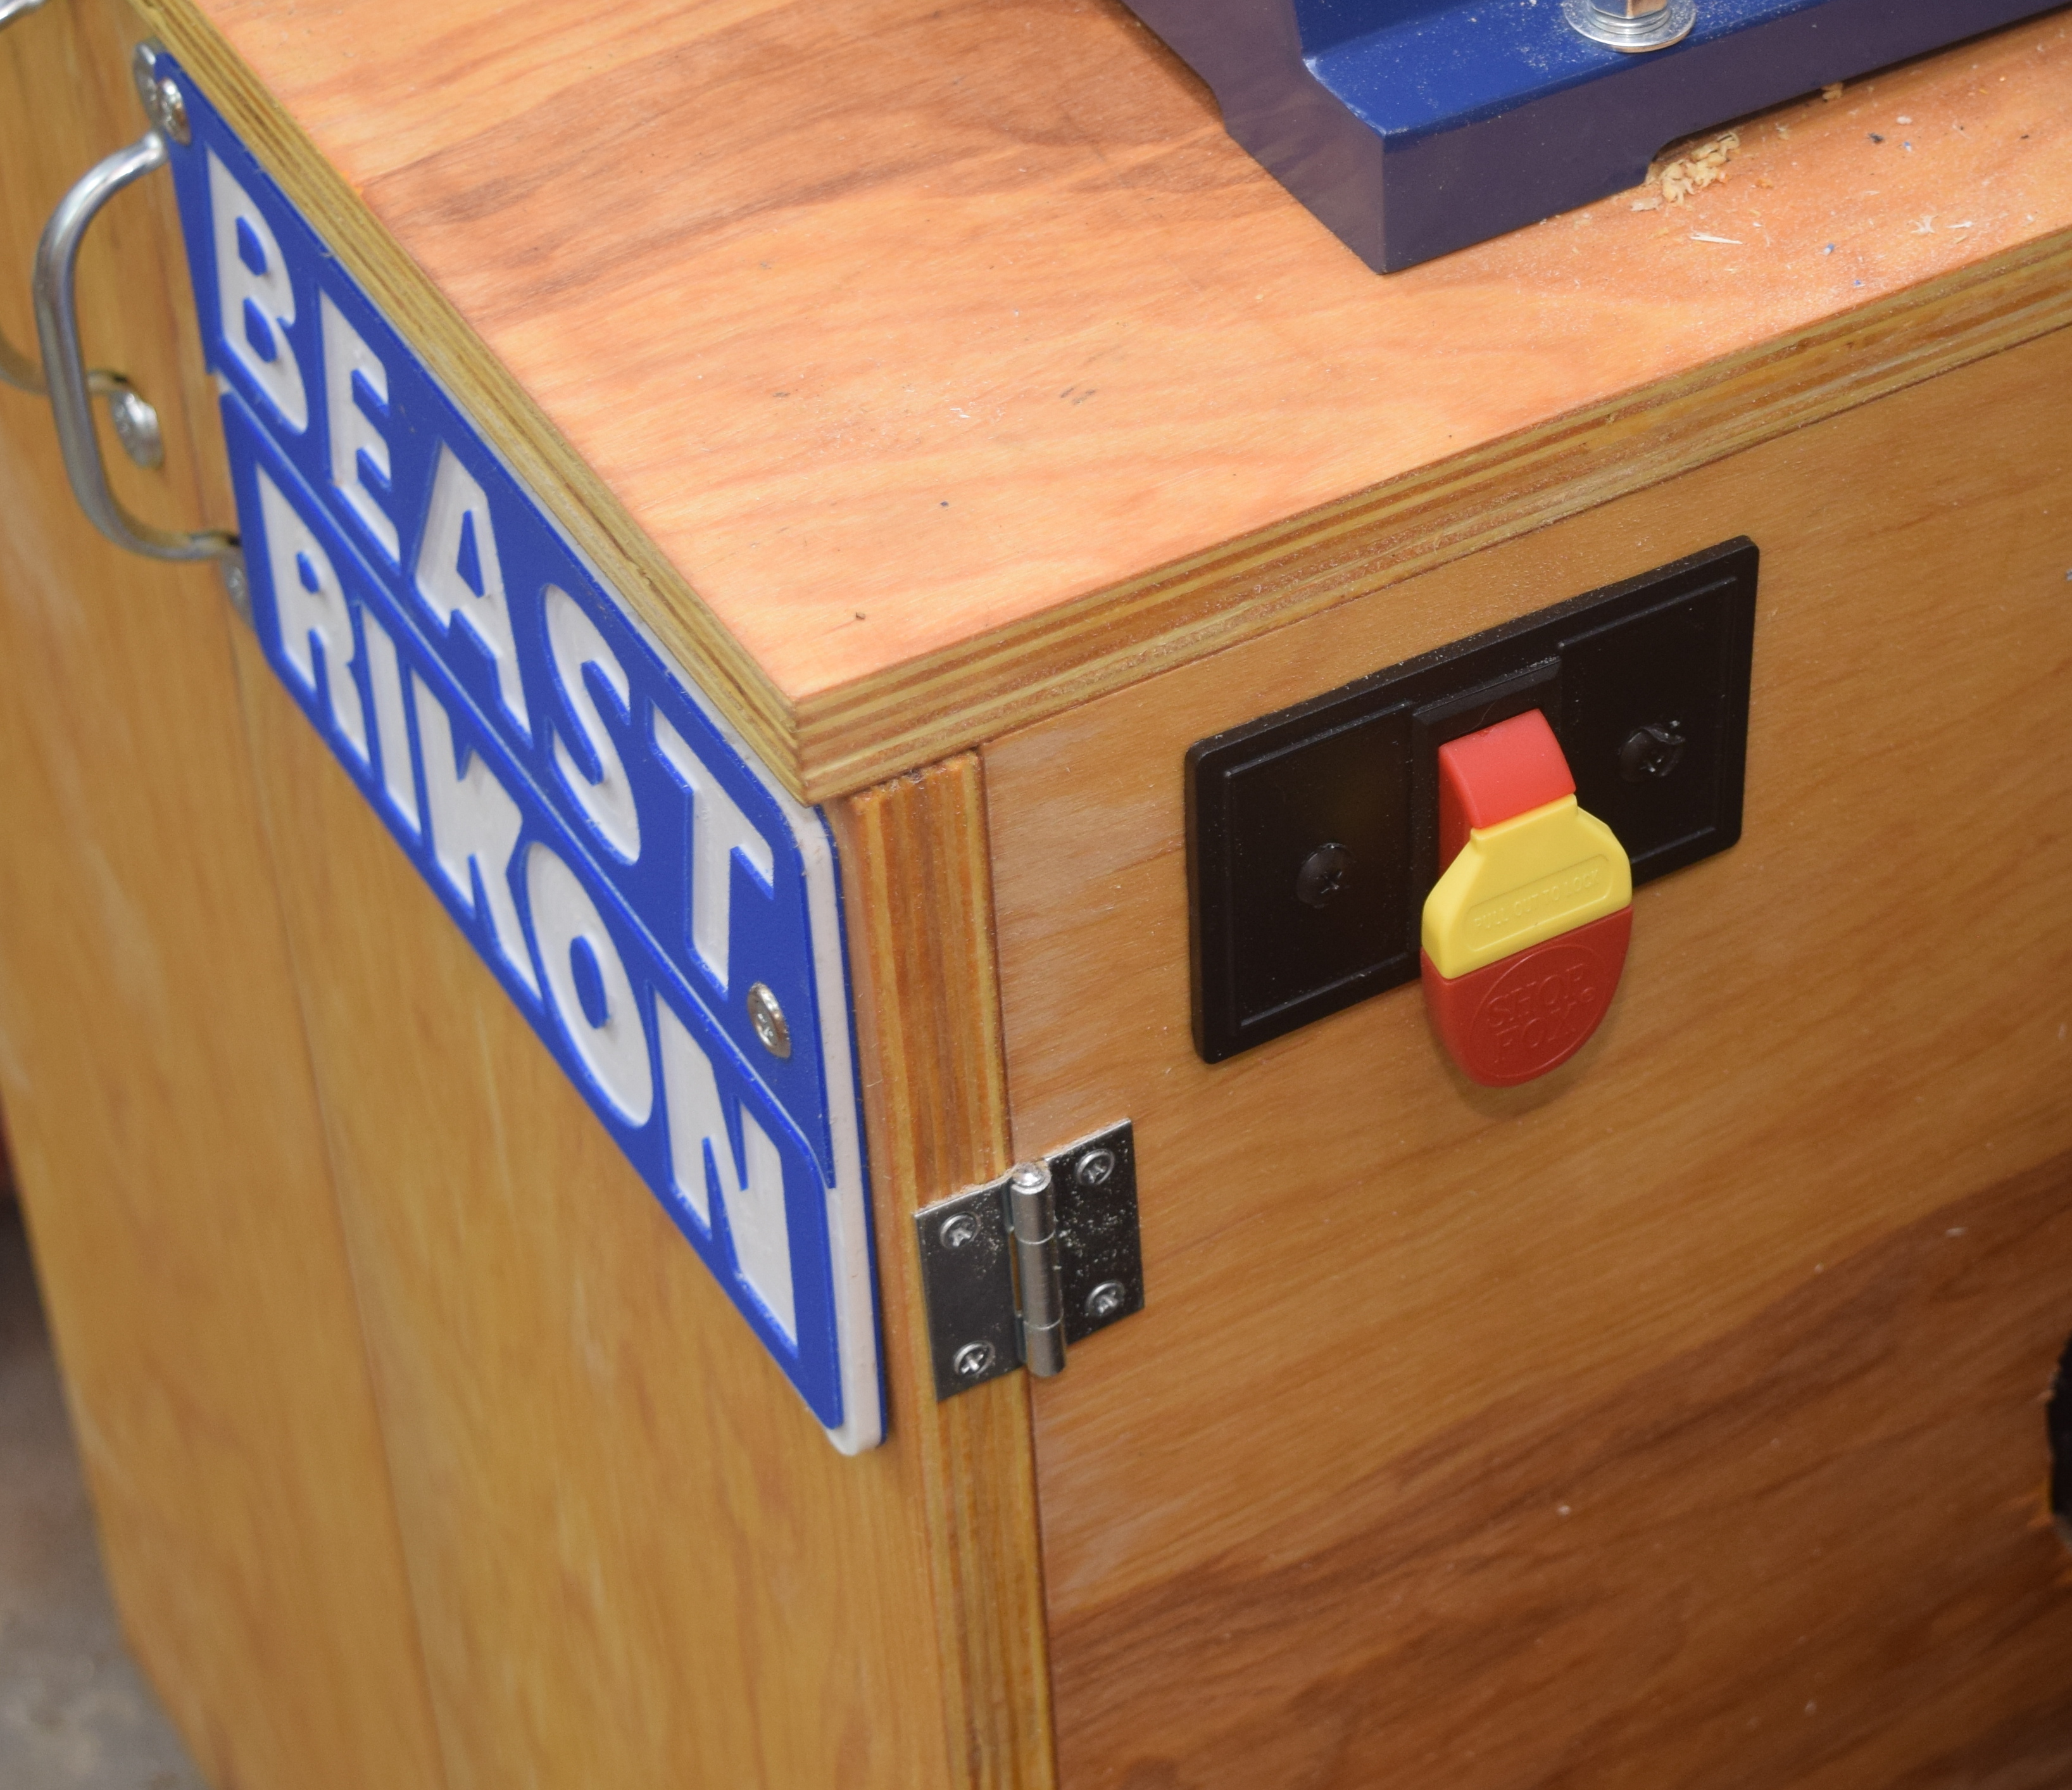
Speaking of my CNC mill, I employed it a bit more for this job.  I think calling this thing a beast is really fitting.  I took some two color HPDE and milled out a BEAST Rikon logo.


Dust Switch

It won’t do to fumble around inside the box every time I need the vacuum on.  I found safety tool switches online that come with a split up power cord.  You can plug it into the wall, and plug your tool into the cord.  It took some trimming of the flange to make it sit flush on the cabinet side.  Once trimmed and screwed in place though, it looks and works wonderfully.

DSC_0406


Storage, integral dust collection with an easy switch, and a perfect working height.  What more could you ask for in a beast?

20160820_183040.jpg

Drill Press Lighting

I love my drill press.  It is a 1980s era craftsman floor standing drill press.  The table I made for it is honestly not my best idea, but that isn’t the drill press’ fault.  The lighting scheme is a little lacking.  It has a single bulb tucked behind the spindle, and it does ok, but LEDs will make it better!

DSC_0417

I found these things called “angel eyes” for cars.  They are used to make cars look like they have fancy rings around their headlights.  You can get a two pack of different diameters for around 10 bucks.  They are perfectly suited for ring lights.

DSC_0416

I took the ring and bonded it down to a bit of plywood cut with an inner diameter that just presses onto the un-moving part of my drill press.  To add additional lighting I found these patches of packaged LEDs used to replace in-car dome lights.  They can be found in 4 packs for around 10 bucks.  All of these parts already have resistors built in because they are designed to be hooked up to a car’s 12V line.

The plywood square will go over the area that previously had the drill’s light bulb.  I used recessed magnets to hold them in place.  The wires got wrapped around to the back, and soldered together along with the ring light.  Hot glue helped with all the cable management.


I connectorized the lighting half and the power supply so I could separate the two if need be.  Speaking of power supply, the ring light and each light patch take a few hundred mili-amps each.  Get a 12V supply with at least an amp output.  I used an adapter that screws into a regular bulb socket and gives a plug outlet.

DSC_0424

The power supply is screwed into where the bulb used to be, wires are routed, and lights installed.  Lets see how it looks with no light, with the old bulb, and with my new lighting system.

DSC_0427

No Lights

DSC_0428

Old Bulb

DSC_0429

New LEDs

Very bright!  I guess for the 30-40 bucks I spent on parts I could have bought an off the shelf drill press ring light.  Maybe it would provide more light, but I kind of doubt it.  I know it wouldn’t be as compact or fit as snugly as this thing does.  The last thing to keep in mind when doing this is free slack on the ring light.  The section I attached the light to moves when the drill press comes down.  Provide enough slack to allow free movement.

New Business Card Holder

After a lot of sketching and scratching my head, I have come up with a new symbol for myself and the website.

SquareLogo

It is a multi-quadrant circle.  Each quadrant symbolizes something about myself and the work I do.  The top left is for my beekeeping and running of the local Space Coast Beekeepers.  The bottom left is part of a gear and symbolizes my background in mechanical engineering, and the invention work I do.  The bottom right is my attempt at a log segment for all my woodworking adventures.  The top right is kind of a mixed bag.  It is a divider laying out a 3-4-5 triangle.  It involves mathematics and measurement, which are at the core of a lot of what I do professionally and in my hobbies.

A 3-4-5 triangle is relatively easy to make if you have anything like a divider to set as a starting unit.  The initial length is arbitrary, but once picked if you make segments of the prescribed lengths, you can form a right angle of any size.  I like working to the thousandth of an inch on my CNC mill, and with ratios and body part lengths in my woodworking.


My art skills are pretty poor, so I went with a vector graphic program what would provide cartoony results that look good small or large.  They also look good on a business card.

DSC_0389

It has my symbol, basic contact information, and a small list of things I do.  The back has two of my favorite sayings that really describe how I operate.  It also has 3 lines to help aid in writing notes.  Business cards are super useful things to have on hand.  Beyond basic contact information you often need to give someone other information.  Websites, product info, funny youtube videos to watch, you know the stuff!  My field notes always have the last 10 pages ripped out to pass off information to people.  It would be nice if everyone carried a pen and paper with them.

Carrying the cards around every day is the obvious goal, but the corners get bent up in my wallet over time.  I want to turn the back cover of my field notes into a business card holder.  I started by wrapping up a small stack of cards in packing tape to prevent glue sticking.  Card stock got folded up into a kind of pouch, and all overlapping areas were trimmed.

I glued all the tabs down to the back my field notes with the cards inside to help keep the shape right.  Wax paper keeps the glue from bonding the last page down to the inner cover.  Stone coasters make handy clamps.

DSC_0394

I cut a notch in the center of the holder so that fishing them out would be easier. The card stock and business cards make a small bulge that could interfere with writing on the last few pages.  Time will tell.

DSC_0399


Resonator Uke Upgrade

My resonator ukulele sounds really neat, but has horrible tuning pegs.  They are friction posts and get whacked out of tune every time I put them in the case.  After a lot of months of regular playing and re-tuning I decided to upgrade to geared tuners.  The old tuners are shown below and only required very small holes.

DSC_0368

DSC_0371

The holes on the top side are large enough for my new tuner to go in, but the bottom side is way too small.  The new tuner (below) has a large shoulder that must be accommodated.

DSC_0375

I carefully drilled out the backside and made sure not to break through to the front.  There was a little chip-out of the back paint.  Maybe not paint, I don’t know what it is.

DSC_0373

The chips and hole edges are easily covered by the tuner flange.  I didn’t have a drill bit small enough to pre-drill the screws included.  Instead I used an awl to push a good starting hole, and employed some screw wax to help them go in.  Everything went in smoothly with no damage to the screw heads.  After a few days the strings relaxed and everything stays nicely tuned.  Thinking about upgrading from friction to geared tuners?  Do it!

DSC_0377

DSC_0378

Bee Vacuum Box

It is time to kick up our bee rescues to another level.  We typically use a shop vac to suck up as many bees as we can.  Sometimes it works out well, sometimes we end up with a canister of pulverized bees.  I think the swirling action of most of those vacuums breaks the bees up eventually.  Enter, the bee vacuum box.

DSC_0366

DSC_0365

This tool goes in-between the vacuum and the hose sucking up the bees.  It catches them in a screened section that should hold them and prevent damage.


The Build

I started with an assembled medium super.  It is a good size to hold bees, and I built a lot of them a while back.  A thin scrap of plywood forms a sealed bottom of the box.  I made a small frame out of 1×2 and stapled on some 1/8th inch metal screening.  I used a lot of staples because I figured the force of thousands of bees pushing on the screen could be high.

I wanted to be able to see how many bees we had and how healthy they were.  A piece of clear acrylic sheeting across the top will be strong and allow viewing.

DSC_0341

I used a 2-1/2″ dust collection gate on the front entrance.  This should accept a standard shop vacuum hose, and can be shut once full to keep the bees from escaping.  I attached it with a lot of silicon caulking.  A standard port was screwed to the other end.  This side will go towards the vacuum.  It doesn’t need to be shut because the screen will keep the bees from getting out this way.

Once you have the bees captured you will need to let them out in their new hive.  I used more thin plywood to make a small trap door.  Tape will keep it from popping open in transport.  Once at the hive, you can just pull the tape off and let it open as you put the vacuum box down on top of the hive.  You could even completely seal the hive entrance with this method and leave the vacuum box on top for a day or two.  This will encourage them to stay and setup shop before opening the hive entrance.

All of this sounds great in theory, but has yet to be put to practice.  There is supposedly a tree that needs some bees removed from it, so we might be able to put this to the test soon.

New Sanding Monster

I had an old harbor freight sander with a 4″ belt and a 6″ disk.  It was super useful and a rambling wreck.  Thankfully, Woodcraft was having a bit of a sale on Rikon sanders.  I have been wanting an upgrade for ages.  I was able to call them and get the only unit they had coming in for the sale.  It has been on backorder for months.  SQUEEE!

DSC_0346

Pull everything out and enjoy the smell of new tool.  It smells like productivity.  Also grease.

DSC_0347

I assembled the base and sat the sander on top to attach all the remaining tables and guards.

DSC_0348

Once everything was in place I moved it over to the side of the shop where my other sanders sit.  The base assembled easily enough, and feels really well built, but has some flaws.   It felt too low even after using some scrap to raise it up a bit.  Another issue, my sanding dust collection system (aka cheap shop vac) doesn’t fit at all in the base.

DSC_0350

I love this tool, but the base is really asking to be tossed in place of a custom built cabinet.  Something that holds the shop vac nicely, and maybe has a little built in storage for good measure.  On the plus side, it is a beast, and it even performs magic tricks.  Expect to see this thing again soon with a new custom cabinet.

Flexing Flashlight Helper

My name is Chase and I have a flashlight problem.  OK, not really, but I love flashlights.  The modern surface mount LEDs can be really efficient and have gorgeous color rendering.  Gone are the days of blueish sterile white light.  I have a small fleet of flashlights that run on 18650 lithium ion batteries.  The lights run a long time, are rechargeable, and have a variety of light settings from stun to kill.

Most of them come in some form of all black tactical form factor.  That is great for clipping to a belt, or holding in the backyard.  What they aren’t always the best for is home projects.  They tail stand ok, but are easy to tip over.  I need something that will give me a stable base and let me point the flashlight where I want.  Enter loc-line.

I started with a finished shot because it is a little convoluted if you aren’t familiar with some of the components.  I had left over loc-line from a CNC mill vacuum project.  This is 3/4″ line, and can be found in kits for reasonable prices from amazon and elsewhere.  I started by prepping a base from some 3/4″ plywood, painting it a zazzy orange, and attaching a screw down base.

The loc-line will snap onto that orange base, and provide flexibility to point the flashlight.  To hold the flashlight I found this snap on 1/2″ PVC fitting.  It came with the cutout, and a threaded female fitting.  Most of my flashlights fit nicely in the opening and their clips help keep everything in place.

DSC_0327

A threaded 1/2″ PVC fitting went on some 1/2″ pipe.  This will all fit inside the open end of the loc-line.  I thought about using epoxy to bond the two together, but I don’t know how well glue sticks to the blue plastic and there is a huge gap to fill.  Small screws in pre-drilled holes did a really good job of fixing both halves together.

Once fixed I spray painted the PVC holder section to match the blue loc-line as much as possible.  In retrospect it would have been easier to paint before I attached.  Live and learn.  Now I can have blinding light pointed in any direction when I am under the sink, changing outlets, or anywhere else.

Paper Organizer with Milk Paint

Summer roars in Central Florida, but I am still in a spring cleaning and organizing mood.  I have kind of a two for one.  My office closet is a mess and needs something to organize printer paper and materials, and I want to try something with milk paint.  I don’t know if shabby chic is still a thing, or if it includes cabinet grade plywood, but here we go.

I cut the height to specifically fit the height of a shelf in my closet, and the width of a sheet of paper plus a bit.  I made as many shelves as I could with the scrap I had left over from previous projects.

A shallow drawer goes in the small bottom cavity.  This will hold ink cartridges and other small printer related items.

DSC_0316

I am 100% new when it comes to milk paint.  I followed the directions and thought I was doing it right.  I could have been making a complete hack of it though.  The final product was really freaking rough, even with some buffing with a maroon finishing pad.

The first coat looked really streaky and terrible, while the second coat evened things out a bit.  It was still lighter than expected and a bit rough.  I hit everything with a coat of BLO to help seal the paint and unpainted sections.  In retrospect a project with lots of internal cubbies and tight spaces was not the best way to try out milk paint for the first time.  I will have to give it another shot later, but am not currently impressed with the results

DSC_0326

The office closet still has a long ways to go, but at least the paper isn’t getting spilled or bent up any more.

Hardware and Sanding Drawers

I built a set of cabinets a little while back to help out the organization of my shop.  I initially built both with pilaster strips and intended them to be mostly shelving.  The one on the left would be best served with a few small drawers for sandpaper related items, but otherwise all shelves.

DSC_0285

It all started innocently.  Just a few shallow drawers for sandpaper and sanding blocks etc.  Then after those I figured I could store all the powered sanding sheets and belts.

Then a few boxes of nails needed a nice cozy home, my jig hardware would fit well there, and then before you know it, the entire cabinet is full of drawers.  It took me a few weeks to slowly build the drawers as I found items to fill them with.  The problem is that when I finally went to add finish to the drawers they were already half full!

For the drawers, I cut 1/2″ plywood for the drawer bottom, and then stacked more 1/2″ ply for the 4 sides of the drawer.  The sides got glue and brad nails through the bottom.  An oversized front was added later.  It could have saved space and probably been strong enough with 1/4″ ply on the bottom, but I had a lot of 1/2″ left over from the cabinet project, so I just kept going with that.  I rip 1×2″ pine in half to make runners.  The runners and sides got a rubdown of paste wax once the finish has had plenty of time to cure.

In retrospect I wish I had planned this all out from the beginning.  The drawer bottoms could have been thinner, and the layout could have been better.  Given that I slowly added drawers as I found a need for them, it is a hodge podge mix of sanding/finishing supplies and fasteners.  Preplanning would have had finishing on top, and hardware on the bottom.

Regardless of the haphazard nature of its creation, the final results look good.  It holds all my sanding supplies and the remainder of my hardware with plenty of room for future expansion.  Bronze card holders let you label everything cleanly.  A must for this many seemingly identical drawers.

Building your own drawers in this fashion can be quick and efficient.  And at 35 dollars a piece, a 1/2″ sheet of cabinet grade plywood can produce probably 8 drawers at this size.

A Finishing Haiku

I was doing some finishing this afternoon and ended up using Boiled Linseed Oil (BLO).  I really admire BLO in the shop.  I use it a lot on shop furniture, jigs and tools.  It is cheap, easy to work with, and dries in a reasonable amount of time.  It adds a lot of color to lighter woods like pine, and I really like how it darkens and changes over time.  The only trick is that wadded up oily rags can self combust.  This is important because I tend to wipe it on with blue shop towels on a lot of my smaller projects.

All of this inspired me get a little poetic.  I sat down and wrote a haiku for my favorite shop finish.

I am B L O
I imbue a golden protection
My rags can combust