
There comes a time in every beekeeper’s life where he or she will want to harvest some honey. This is usually done with a centrifuge extractor. These start at a few hundred dollars for a very cheap unit, and the price goes astronomical from there. I spent quite a bit of time and money building test articles and doing mini test extractions, but ended up with a really good design that can be had for 50 dollars and a minimal set of tools.
VIDEO UPDATE
Due to the attention on this post I felt a video was needed to help with some of the questions. Enjoy and thank you for watching.
This spinner is specifically designed to hold medium super frames. Slight adjustments will be needed to make this work for shallow super frames. Does NOT work for large frames. The 5 gallon buckets are too small. Maybe find a larger trash can if that is your preferred frame size.


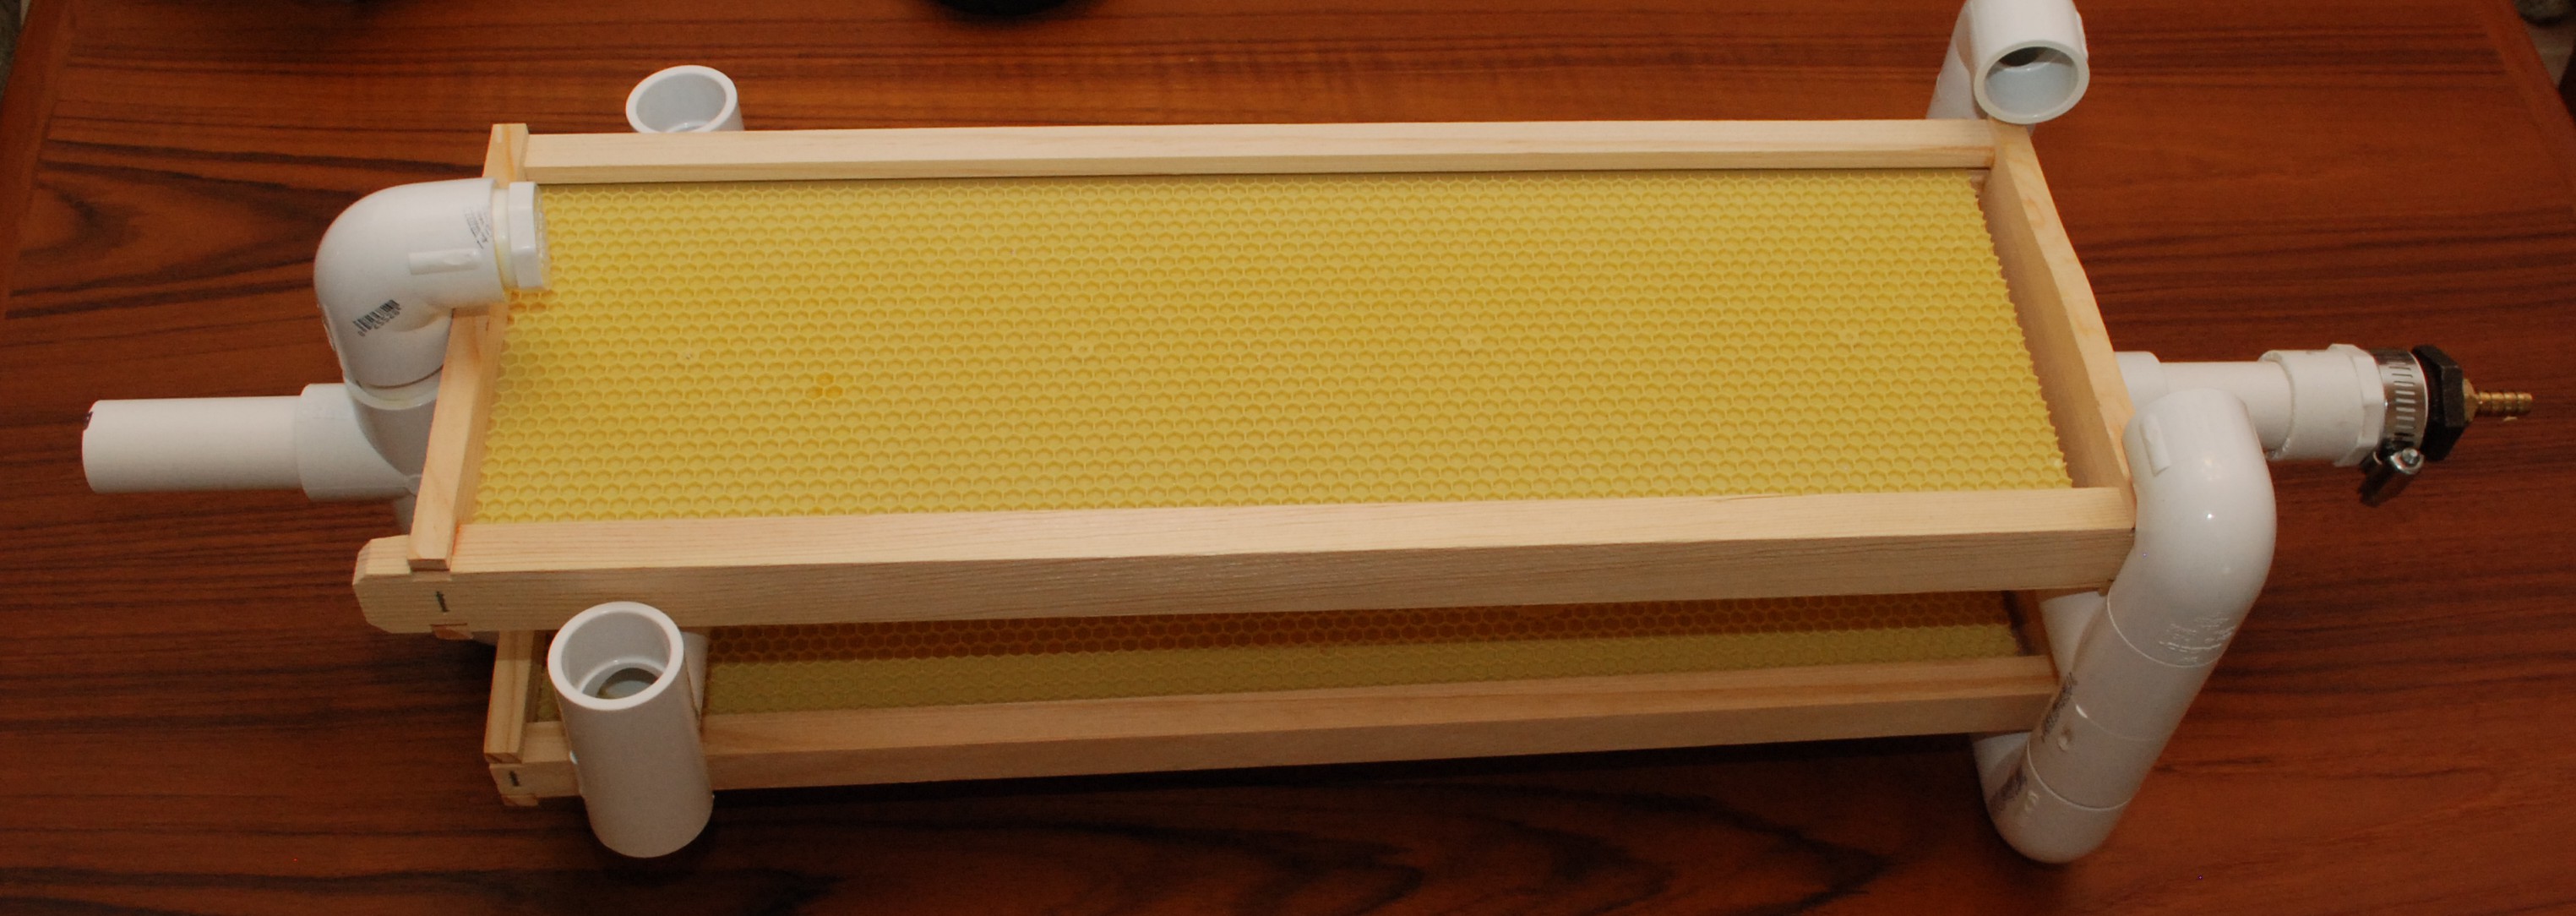
The above images show what a loaded out spinner looks like. The spinner now needs a container to catch all the honey. I really wanted to use 5 gallon buckets for their price and size. One bucket isn’t deep enough, so I cut the bottoms out to use them as height extenders.

I used a mix of firehouse pickle buckets and white food grade buckets I bought at the hardware store. I cut the bottoms off of two buckets to stack them inside each other to increase the height and allow for a good spin without messing up your kitchen.
The bucket with all the holes in the bottom holds the bottom shaft from the spinner and keeps it stable during a spin. The center hole is just big enough for the 3/4″ PVC pipe. The others are there to help the honey drip down into the white bucket with the honey gate.


The stack up is: White bucket with honey gate, red bucket with holes, and two bottomless buckets for height. It is a very small setup that will quickly process two frames at a time. I just did 20 frames with this tool and had a really good time with it. Best of all it doesn’t take up much space in the house.
The Spinner Build
You will need the following items for the spinner. I included the prices I paid for everything, though your prices may vary. Not included in the list below is the buckets and the honey gate. The white food buckets can be had for 4-5 dollars each at lowes. The firehouse pickle buckets can be had for 2 bucks each! They do require a bit of soaking to get rid of the vinegar smell though. Honey gates can be had for 5-10 dollars.

In total you will spend about 50 dollars on the whole setup. Filters, a capping knife, honey bears, and others will cost you more, but a whole extraction and bottling setup for under 100 dollars is very attainable.
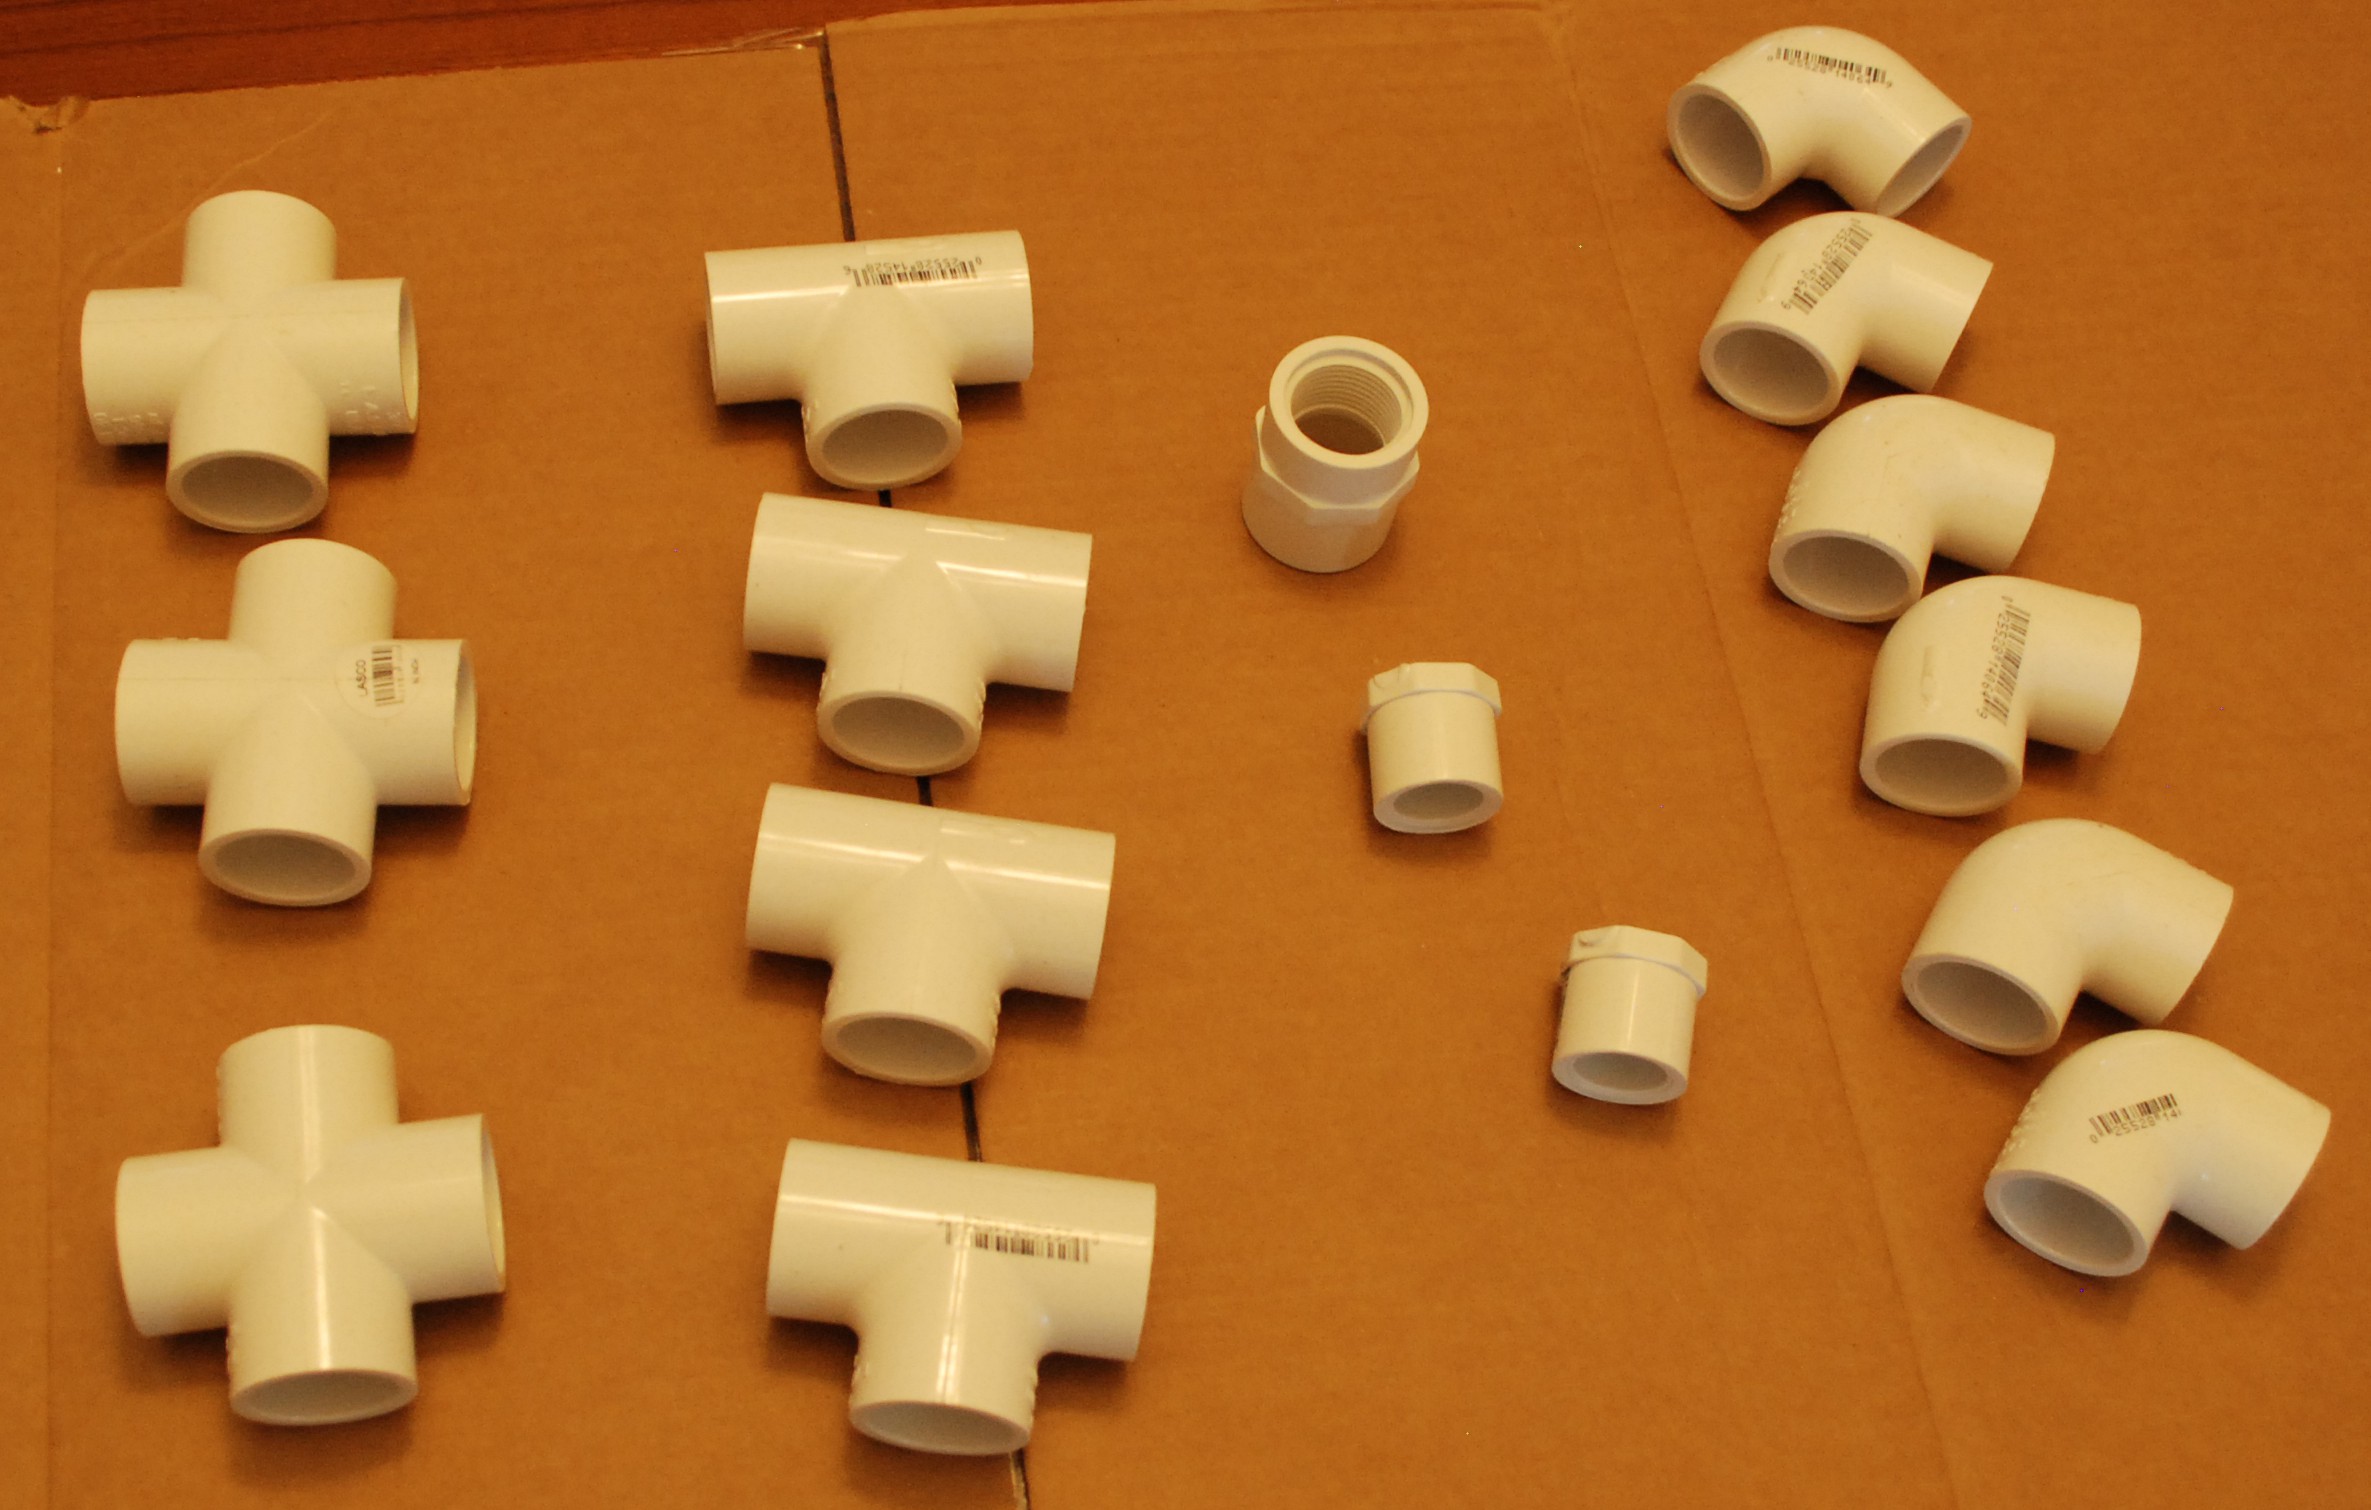
From a tools standpoint you will need PVC pipe cement, a saw or PVC pipe cutter, tape measure, and a marker. The pipe parts should look like those shown below.
UPDATE: Fresh PVC cement can be helpful. Fresh glue allows longer open working time than old glue. You only have a few seconds to get it right, so if your glue is old, get a new one.
While assembling the sections be mindful of how much cement you use. Too much will drip on your work surface, and will drip down inside to the sections you want to glue in the future. Work slowly and purposefully. Once you put two segments together, they are permanent in just a few seconds. Dry fit everything beforehand to make sure it all fits with your frame hardware.
UPDATE: Dry fitting is really important! Some stores may sell fittings with different sizes and depths. Dry fit every stage and check it often with your frames and bucket. Use multiple frames, as there can be variation in their construction as well.
Bottom Hooks
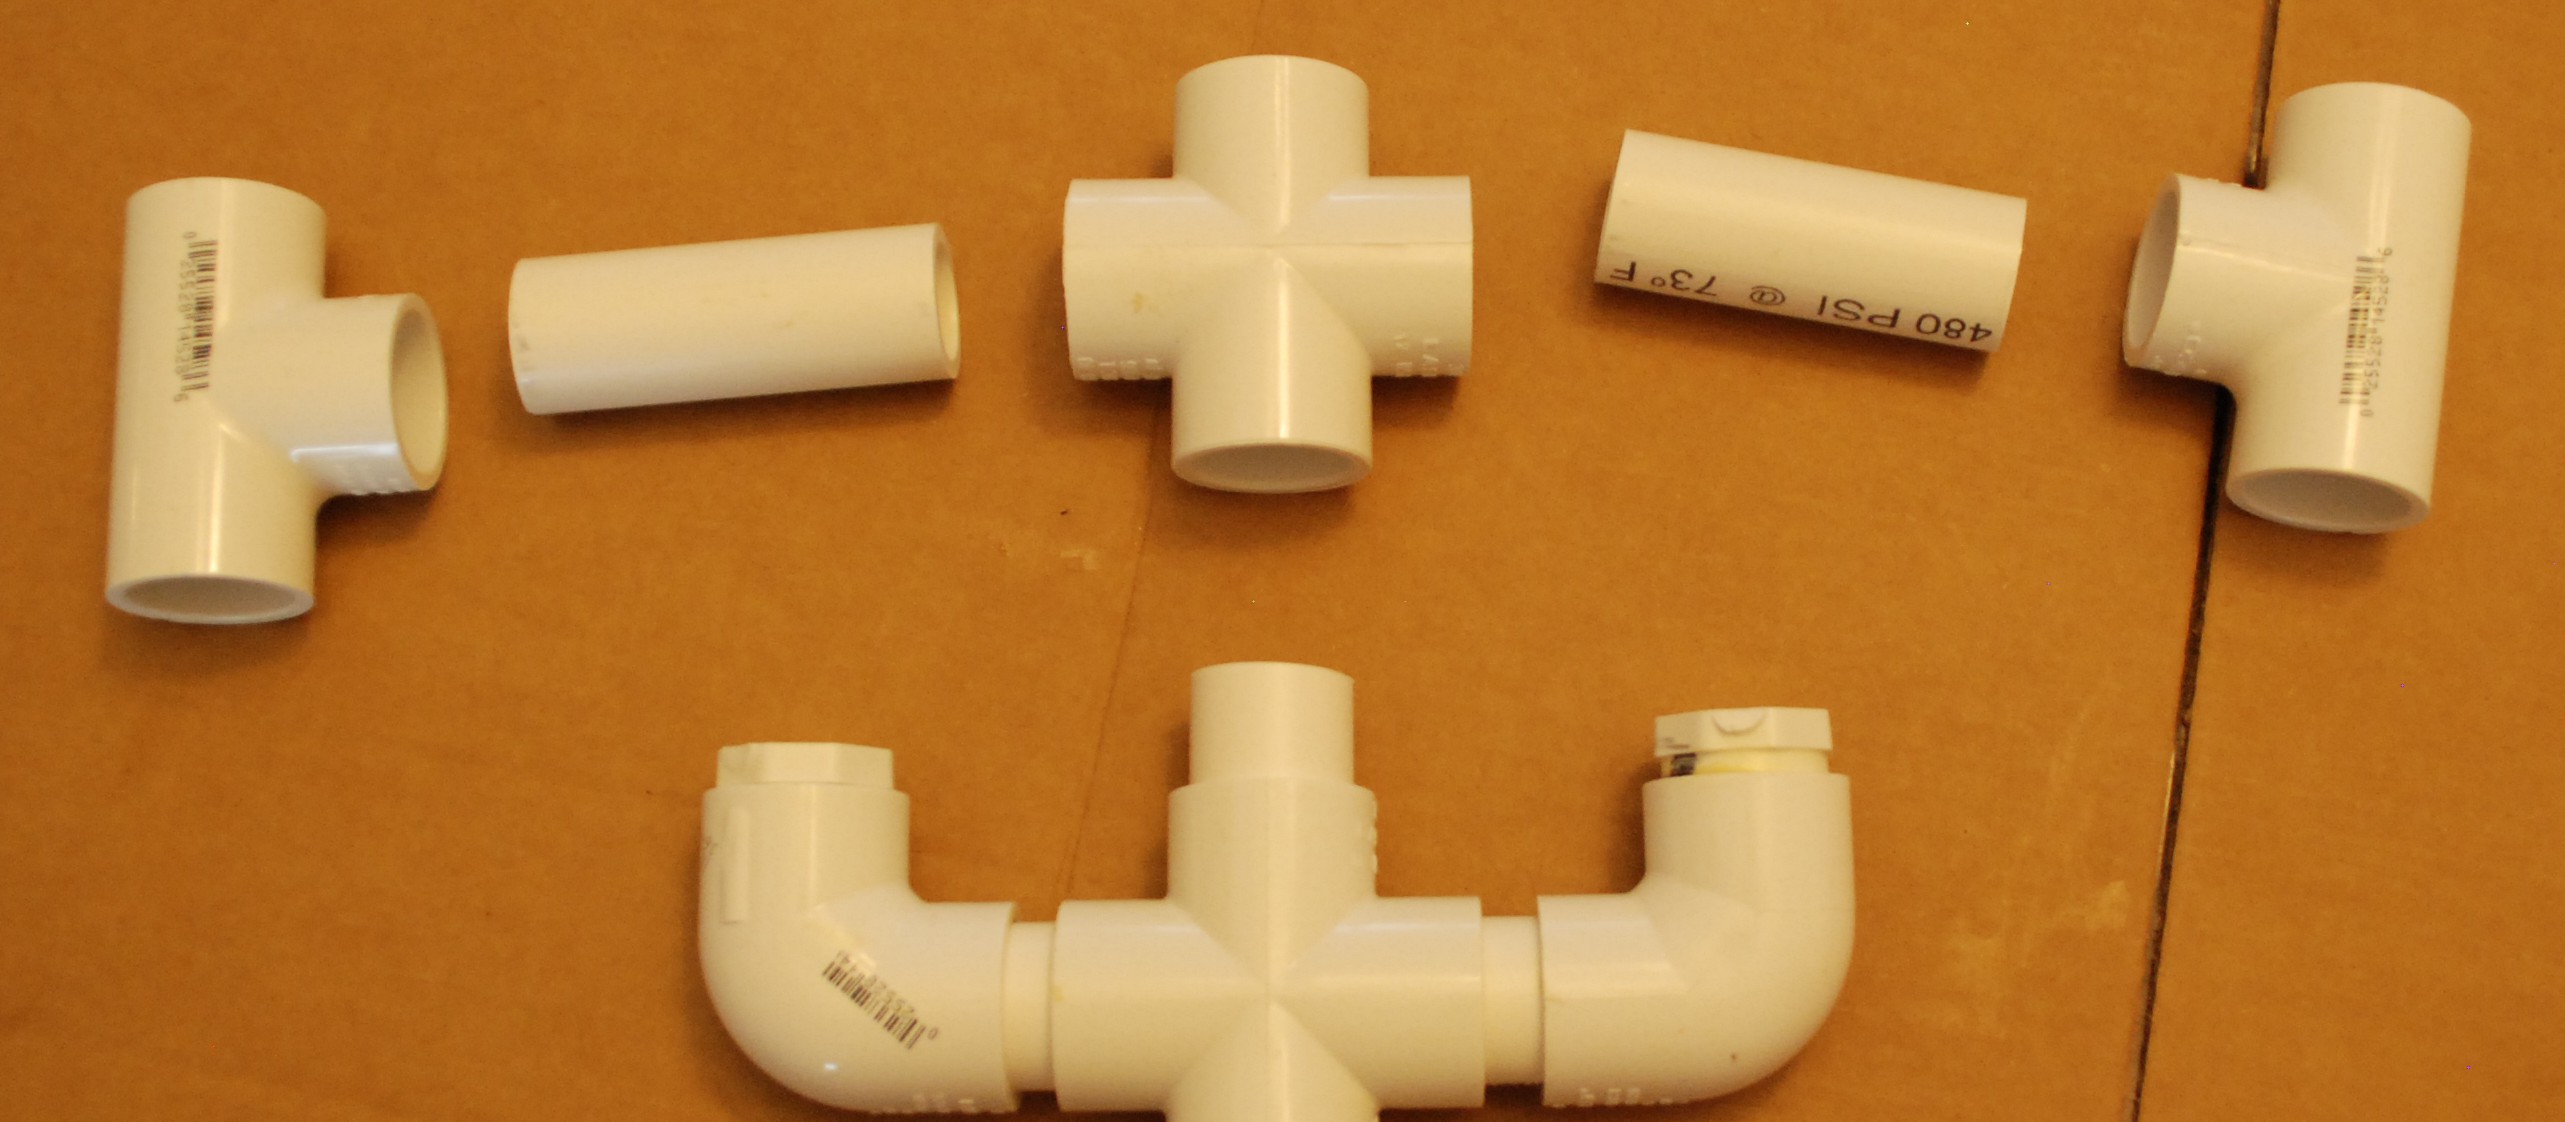
These features are the depth stops for the frames. Gather a cross, two elbows, two plugs, and cut 2x 1.75″, 1x 1.5″, and 1x 3″ sections of pipe.

The 1.5″ section of pipe will connect to the bottom guide, the two 1.75″ pieces will hold in the bottom hooks that keep the frames from sliding down any further. I used plugs to keep honey out of the lower section of the spinner. This is what the finished part should look like

Bottom Guide
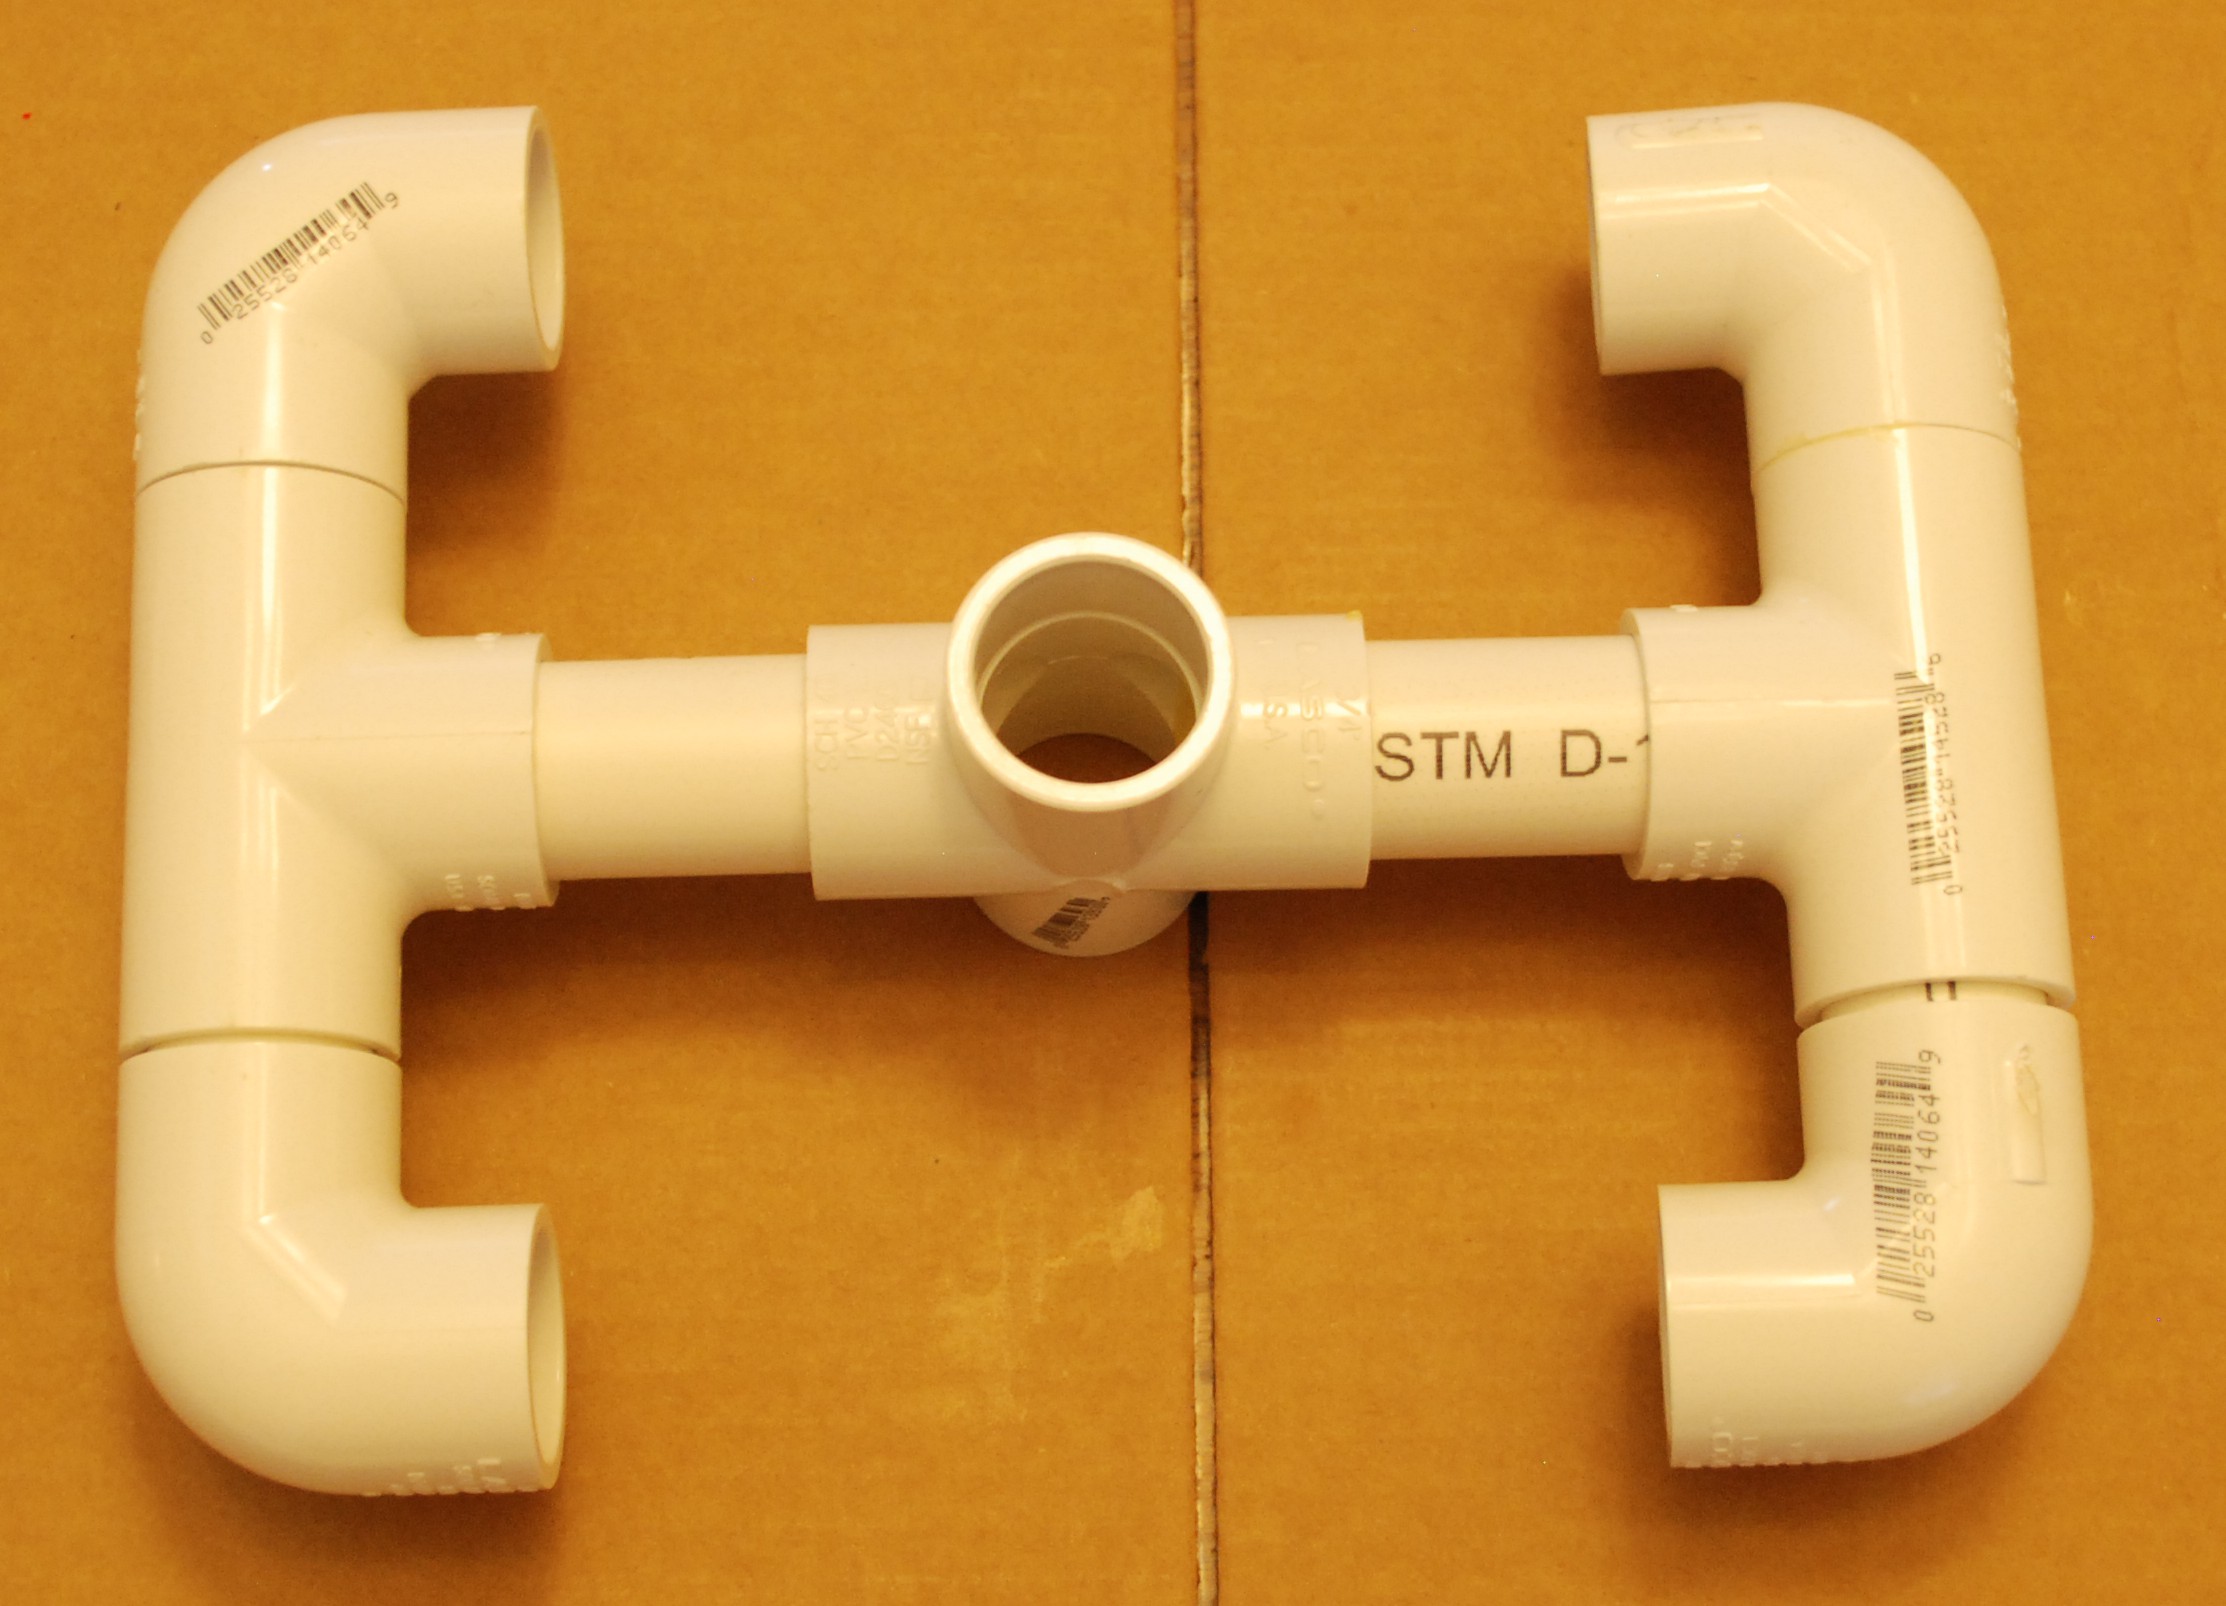
Next comes a bottom guide to keep the frames from sliding left and right. This step requires a cross, two tees, and two 2.75″ pipe sections. Be careful with this step. Too narrow and your frame will not fit, too wide and it will not fit in the bucket.
Assemble the sections and attach it to the bottom hook as shown below. Now the frame will come down into the hook and be held from sliding left and right.

Top Guide
The top guide will hold the top end of the frame and prevent it from going out during the spin, and from going left or right. Gather a cross, two tees, four elbows, 2x 2.75″ pipes and 4x 1.5″ pipes.

It is probably best to assemble the two outer arms first, then attach them to the central cross.

Drill Post
A short 3 inch section of pipe and the threaded pipe fitting goes on top to allow for the drill to be attached. I chose 3inches for that length, but it could honestly be longer or shorter.


Central Post
A single 14.5″ piece of PVC attaches the top and bottom half. Dry fit this piece to make sure it holds your frames correctly. The two sets of guides should line up so that a frame can be slid down through the top guides into the bottom hook.
Drill Barb
A threaded coupling was installed at the top of the spinner earlier. Now comes the final piece of the puzzle. An iron pipe threaded adapter takes the size from 3/4″ to, I think, a 3/8″ female thread. That allows a brass barbed fitting to thread in. The brass fitting is small enough to fit into my drill. Most drills can chuck onto anything smaller than 3/8″ in outer diameter. I used a hose clamp around the PVC threaded fitting to help reinforce it. My dewalt drill runs it pretty well on the lower speed setting. Just accelerate slowly, and stop slowly and everything will be ok!
Update: A good alternative is to cut the barb off and use the remaining brass hex portion as a nut. Get an adapter for your drill and put the appropriate socket on there. Now you don’t have to tighten your chuck every time, just slip on the socket and drive!


So very clever! 🙂
LikeLike
Pingback: Honey Harvest 2015 | Kilted Craft Works
Pingback: DIY Drill Powered Honey Spinner | Kilted Craft Works | WORLD ORGANIC NEWS
This is amazing! Thank you for sharing in such wonderful detail with great photos for confirmation. I will give this a try. I very excited.
LikeLike
Great, let me know if you run into a snag and need help.
LikeLike
how would you go about making this for deep frames
LikeLike
That is a tough one. The deep frames barely fit in a 5 gallon bucket! I don’t use deeps because they are super heavy when full and don’t fit in my spinner. You could copy the pvc design and just make it a bit wider. Instead of 5 gallon buckets you would have to use a single small round trash can. Not sure what to use as a bottom bearing. Maybe a 25lb barbell weight. The hole in the center ought to be about right, and it shouldn’t shift around. Just make sure it is painted, and you wash it well first!
LikeLike
This is a great idea for the backyard beek! Cheap and easy, no special tools, anyone could build and use this. Thanks for doing the work on this and sharing with the rest of us.
LikeLiked by 1 person
How does the main hole hold up? Have you tried some lubrication or some sort of bearing to stop it from wearing. Thesent plans are very interesting, thank you for sharing.
LikeLike
It might ware over time, but it is a plastic on plastic interface. I only use this once or twice a year. If it wears out the bottom bucket I will replace it. I doubt that will happen for a long time. The honey flows all over that interface, and probably acts as a sort of lubricant. Thanks for looking and let me know if you have any other questions.
LikeLiked by 1 person
Any videos while operating?
LikeLike
None with honey yet. We had a lot going on with our first harvest and didn’t remember to take video till after we cleaned up. There is a short video I shot of me using the test article when I was first testing the concept at the end of this post: https://kiltedcraftworks.com/2015/06/01/honey-extractor-test-article/
LikeLike
This is a great idea.. My husband is a pipe fitter and can do anything with pipe.. Put a hammer or saw in his hands and you get nothing .. This he can do…
LikeLike
Great, I spent a lot of time trying to make it as easy as possible to assemble. He should be in great shape.
LikeLike
this is really ool i am gonna have to try it out lol thanks for the share
LikeLike
I would like to share this with my bee club (246 members). Do you have pictures showing how the buckets go together, or a video? I understand stacking the two red buckets but don’t fully understand the need to extend the white bucket. Is it to create a larger space so the honey bucket can get filled to a higher level? Thanks for sharing this. It’s really nice and simple
LikeLike
Great, please do share it. Referencing the 4th picture from the top, there are 4 buckets. Start with the top right bucket. It is unmodified except for the orange honey gate. All the honey will collect in this bucket. Next insert the red bucket at the top left with all the holes. The center hole holds the spinner and acts like a bearing. The remaining holes just let the honey drip through to the white bucket for collection. If that is all you used, the frames and spinner would be taller than the sides of the bucket. You would be painting your kitchen with honey! The bottom two buckets in that picture have the bottoms cut out. Stack those last, and they should be tall enough to catch all the honey. Does that make sense? I might shoot a short cell phone video of me putting it together and sticking frames in to help. It is going to be a few months before we get another honey harvest.
LikeLike
Thanks for sharing your design. Great instructions. The only thing I added was to plug all the elbows to keep the honey out. Fun to make.
LikeLike
Thanks, good suggestion! I was trying to make it as cheap as possible for people. That would probably be worth the less than ($0.86 x 8) seven bucks though.
LikeLike
How does the red bucket stay elevated in the white bucket to give honey room to settle?? Also how do you keep the buckets with the cut out in bottom from sliding down the red bucket??
Thank you for your great idea.
Todd
LikeLike
Same answer to both questions. Stack 5 gallon buckets inside each other and you will see that the ringed lip at the top mean that each new bucket stacks 5 or 6 inches higher. Compare that with a paper fast food cup. The cup has a very small lip, so each one only adds another 1/4″ to the stack. Play with a few buckets on your next trip to the hardware store and you will see. The bottoms don’t play any part in their stack height.
LikeLike
Did you ever get around to posting your updated version of the extractor? I see how you support the frames but what are you using to keep the frames from falling down? Let me know if you posted your measurements somewhere.
LikeLike
This is the only version I have built. It works fine. The first 3 pictures show how the frame is captured. It holds the frame well enough for all the spins I did in my first harvest. I think that was about 20 frames. The dimensions for all the PVC cuts are available in the build instructions. You should be careful though, not everyone’s frames are exactly the same size.
LikeLike
I changed it a bit…..three buckets and a lid with a hole cut in it to fit the top bucket. Great design, thanks!
LikeLike
Thanks for the great idea, please tell me how long did you spin each pair of frames?
LikeLike
I never timed it, but it was less than 30 seconds before you had all the honey out and were ready to flip. It really doesn’t take much to get the honey going if it is a warm day.
LikeLike
Curious if you could place a strainer on top of white bucket with the honey gate, then set the red bucket with the holes on top of the strainer, then spin. Would be great to get the straining process completed! Just bottle it up then! Might make it too wobbly….
LikeLike
That would be nice, but I think the wobble would get ya. Straining after the fact required another bucket, but didn’t take too long.
LikeLike
Can you be more precise on the threaded coupling and the iron pipe threader adapter. What are the specific names/sizes and where did you purchase them?
Thank you.
LikeLike
Sure. The pvc I used was 3/4″ pipe. I found a PVC adapter that would solvent on to the top and give me a 3/4″ threaded female end. Into that I threaded an iron reducer. It has outside threads that are 3/4″, and an inside hole that is 3/8″ female threads. Lastly, I bought a brass barbed fitting to thread into that 3/8″ hole. I found all of it at the plumbing section of my local hardware store. What you have available might be different. I would just go in and see what you can use to go from PVC, to threaded pipe, to a small barbed fitting in as few steps as possible. Carry your drill in with you so you know the barb is small enough for your drill to chuck up on.
LikeLike
After all was said and done, what was the total monetary price to build the extractor?
LikeLike
As I said in the post it can be had for about 50 dollars. The pvc spinner part tabulated to about 25 bucks, that seems pretty fixed. The buckets can vary. If you have a firehouse subs near you, then they are 2 dollars a piece! Otherwise you have to go to the hardware store and pay 5 bucks each. A honey gate is nice to have, but not 100% needed. They can vary in price from 5 bucks to much higher. If you left the honey gate out, and got the pickle buckets you could make it for <35 dollars.
LikeLike
I built this and used it this weekend. It worked really well. I did enhance your design a little bit. I use foundationless frames so I made cages out of hardware cloth to slide the frames into and it keeps the comb from blowing out of the frames. Thanks for your post.
LikeLike
That is great, I am glad it worked for you. I hadn’t considered foundation-less frames, seems how I don’t have any. Hardware cloth sounds like a good solution.
LikeLike
Pingback: Drill Powered Honey Spinner Demonstration | Kilted Craft Works
What kind of frames are-they ? Langstroth or Dadant ?
LikeLike
Wow, I didn’t even realize there was a dadant size. These dimensions are for a Langstroth medium frame.
LikeLike
I’ve had a bit of trouble building this. Let me state the reasons so others may learn from my mistakes. I’m mechanically inclined, have a workshop, and I’ve done some light plumbing in the past. I’ve got piles of loose pvc fittings sitting around, so I thought this would be easy. 🙂
First, the 3/4 fittings from Lowes are different sizes than those from Home Depot. The HD ones have 1″ deep holes where the 3/4″ pvc is inserted, while the Lowes versions have 3/4″ deep holes. I have learned the hard way that these plans were built assuming the holes will be 3/4″ deep. If you use the HD parts, you will end up with a beautiful pvc tree that will not fit in the 5 gallon bucket.
Second, I used some wet/dry pvc cement that I had sitting around. That was a mistake! The parts were drying hard in 1/2 of a second and I got nearly none of them inserted fully. On my second attempt, I used fresh, regular pvc cement, and it allowed me to work with the parts for a few seconds before hardening, which is sufficient. If you don’t get the parts inserted fully, you will either end up with a contraption that won’t fit in the bucket or a contraption that won’t hold the frame securely while spinning.
I’ll start my third try tomorrow. I think I’ve got it figured out this time. 🙂
Regards,
-John
LikeLike
OUCH! Poor guy, you have had a rough time. I didn’t even consider that the different manufacturers of PVC piping would have different standards. I assumed they would all be the same. I mention that you should dry fit everything just to make sure all the cuts came out correct. It would have helped in this situation, but it was a single sentence in a huge post. I will highlight that as a potential issue. The cement is another issue. I always end up having to buy a new can of glue every time, the old one is always a ball of gel.
Thanks for sharing, I will update the post with your discoveries and hopefully we can keep others out of the woods. Good luck on your next build!
LikeLike
Try a drywall paddle with stop block, drill, bungee cord, 6 gallon bucket from bakery.
LikeLike
So, it appears form your design (and from what I have built) that there is only about 4 inches of honey space in the bottom bucket. Is this true or have I made an error?
And, if so, how would you suggest o increase the space for the honey to drain from the frames.
Jeff
LikeLike
No, you have it about right. I used a honey gate in the bottom bucket, so you stop every few sets of frames and drain. That does slow things down, but doesn’t take long to drain a majority of the contents and move on. You could increase that space by using something like a 7 gallon bucket. They are hard to find, but are essentially taller 5 gallon buckets. I believe the rest should be compatible.
LikeLike
Buy one of the lids for the 5-gallon buckets and cut the center out so that you only have the ring left that connects to the bucket. This makes the hole smaller so that the bucket does not fall as far. I was able to extract an entire, 10-frame, medium super into it before draining.
LikeLike
Like this idea! Very clever. Being a painter, I do have some experience with 5-gallon buckets! 🙂 However, since I am planning to build your spinner to accommodate deep frames, I’ll have to use something larger for a container. I need to spin deep frames if/when I have a honey bound brood chamber. For those using 5 gallon bucket’s, you might be able to eliminate the top spacer using this trick (I’ve created a similar container for spinning out paint brushes):
1. Cut the top off of your bucket just below the rings.
2. Cut the bottom out of your bucket an inch or so from the bottom.
3. Flip this bucket upside down, sliding the wide end into the bucket with holes drilled in it.
Assuming the circumference of the bottom of this bucket is larger than the circumference required to insert your spinner, this should work!? Otherwise, you might need to cut more than 1″ up from the bottom. Hopefully, this will create at least the 8″-10″ of space the rings of 2 buckets would give.
LikeLike
That will buy you some space, but not a lot. Maybe if you did that, and switched to 1/2″ pvc. Still though, put a deep frame into a 5 gallon buck and it becomes obvious there isn’t a lot of space. Definitely worth messing around with though!
LikeLike
I built a spinner using your idea and it has worked great. Thank you! I did make a couple of modifications, however. I added plugs to the ends of all open tubes, except the bottom to try to keep honey out of them, I used a 1″ washer at the bottom of the drain bucket because the 4-way cross piece started shaving plastic off the bottom of the bucket when it spun, and I also would recommend using a socket on the brass fitting at the top instead of trying to chuck the barb in your drill. Two reasons: 1. The chuck has a hard time grabbing the barb. and 2. The chuck when spinning on the barb left shavings (a lot of them) in the bucket. A socket won’t leave brass shavings. Luckily I tested this a couple times before actually using it.
LikeLike
A socket on the brass fitting is genius! I love this idea, it is great. Thank you so much for that improvement. I didn’t have issues with the plastic shavings, but it might come up in the future. The plugs are a good idea to make cleanup a little easier without too much cost. I considered it, but was looking to make mine as budget as possible.
LikeLike
Thanks for the great info! I built the extractor and used it to extract 22 frames.
LikeLike
Built and used this today! What a great backyard bee extractor! You plans were simple to follow and it worked great! Loved all the comments on the thread perfecting the model. One question though, when finished the honew spun is a creamy color, is this just airation from spinning? Will it settle over night?
LikeLike
Sorry for delayed response, just got power back from Matthew. Has the honey cleared up? Did you filter it any after extraction?
LikeLike
Just found this on PINTREST, excellent idea, down to the hardware store and start fettling it!
LikeLike
why not put a 3/8 barb at both ends to make it spin better with no shavings of plastic?
LikeLike
Right now the bottom is plastic on plastic which is pretty safe. I haven’t noticed any plastic shavings down below. If I used metal it would be much harder than the bottom plastic and probably would cause heavy wear.
LikeLike
I am a little concerned to see the inner buckets being set on the floor, rather than into a working tray of some kind, since we’re dealing with a food product.
However, I am grateful for the video, and the numerous photographs along with the parts inventory and assembly details!
Thank You.
LikeLike
Yeah, good catch. I should probably treat all this stuff a little better as it does touch food. If it makes you feel any better I start off a spin session by washing the insides and outsides of everything really well.
LikeLike
Built this extractor today. What a great idea. I used food grade buckets but I am concerned about the smell from the pvc glue. Is there something to use to clean it before extracting. I am concerned that I don’t contaminate the honey with any kind of chemical.
LikeLike
That smells is the solvents in the glue (largely acetone). It melts the two pieces of pipe together, then flashes off quickly. It should dissipate on its own, maybe wait a day before using. You should wash everything in hot soapy water before extraction as if you were going to eat off of it. FYI, this is how a lot of water supply plumbing is done in houses, so I wouldn’t worry about it from a food safety standpoint once the solvent is all gone.
LikeLike
Very thoughtful and clever design. As a mechanical designer of 45 years, I feel qualified to judge this way. I also appreciate all the helpful suggestions and comments.I am investigating beekeeping since retiring. I live in suburban southern Ohio and am just beginning to look into this. I’m glad I found your post. Thanks!
LikeLike
I made your extractor today and it worked great thank you for the idea
LikeLike
Dude that is awesome! Thanks for sharing!
LikeLike
I’m concerned that it might wear out the drill motor over time, though. Isn’t it heavy?
LikeLike
I suppose it might. I ramp up the power slowly and ramp it down slowly. The only thing that could really cook the motor is heat. This runs for short periods of time with long rests between. I don’t think that makes it much harder than drilling with a decent sized spade bit.
LikeLike
I exclusively use my electric drill which has a gradual stop and start. I’m not at all concerned about the load on it. The load is appropriate for the power of the electrical device. I do not use my battery powered units which have instant start/stop. The instant part adds to the wear and tear on the whole system. The gradual stop/start of the electrical system is the right solution for me.
LikeLike
Thanks for posting this. I’m planning on making one this weekend.While unnecessary for video purposes, I would recommend adding a lid with a center hole like the bottom of your red bucket. This would keep your rig centered in the bucket on top and prevent some of the wobbles and banging against the sides of the buckets.
I’m also looking to go bigger, because I use a lot of deep frames. I contacted the local vape shop. They get glycerin in 55-gallon food grade plastic barrels and they give them away. (I even offered to buy the barrels, they said no.)
Thanks again.
Jay
LikeLike
Cool. Neat idea for the lid, thanks! I found a lot of 55 gallon drum and trash can designs when I was researching for this one. I couldn’t find anything that wouldn’t take up tons of space, so I designed this one. Good luck with your harvest!
LikeLike
I cut the base hole too big, but the remedy (I think) is better than the original idea. Here it is… a 1 inch cap under the hole and a plug on top that has a 1/2 inch female thread in it. The two pieces glue together and lightly hug the center hole and spin. Then get a 2 or 3 inch sprinkler riser that screws into that plug. The main pvc frame holder just slips over the riser and spins easier and with less friction.
Also I saw some bits of metal come off from the brass barb and wonder if anyone had seen this and has a solution. I’ll let you know if I find something. I LOVE THE DESIGN THOUGH. Thanks for sharing it with us. I just used it for my first ever harvest. 11 quarts. First year hive. Very happy. ALSO yes, your comment on dry fitting first would have helped me if I listened. 😉
LikeLike
I thought about a number of different ways to do the center bearing. All of them were a touch complicated and cost extra money. In the end, a simple hole worked for me. Feel free to upgrade, I was trying to make this as simple and as cheap as possible.
As for the brass barb, I updated the notes to say that you can just use a socket driver on the hexagonal portion of that brass insert. I basically cut the barb off mine and use a socket adapted into my drill. Makes connection easier and no metal shavings. I meant to add that a while back, but forgot. Sorry!
LikeLike
Chase,
I made this for shallow frames and got to try it out today. I pulled 4 frames and was able to get 6lbs of honey. I wanted to get more, but it’s late in the year for that. The spinner worked great! The only measurement I had to change was for the guide width. I used 2.25″ sections instead of the 2.75″ on the top and the bottom guides. I used the socket driver option to spin with my drill. Thank you for sharing!
David
LikeLike
What tool did you use to cut holes in the buckets?
LikeLike
I used a large drill bit and a drill. You could do that, or maybe something like a dremel.
LikeLike
so cool. thanks for the info. know I’m ready yo make one.
LikeLike
Did anyone try with 1/2″ pipe. I think that may work too. I will make this extractor a winter project.
LikeLike
Hi, Nice tutorial, appreciate the sharing. As I live in Australia, we do not use gallon buckets. I would like to double check please the bottom and upper diameter of your bucket to confirm (either inch or mm/cm).
I have tried to work out an off the shelf bucket from the frame width and standard pipe section but It looks tight. Thanks.
LikeLike
Good luck, you should be able to find something that works. I lucked out with the dimensions of what was cheaply available to me. I measured the ID of the top to be 11.25 inches and the bottom ID to be 10 inches. Hope that helps!
LikeLike
Pingback: DIY Drill Powered Honey Spinner | The Homestead Survival
Thank you so much for this tutorial. I made this extractor a week ago (with the added end caps suggested in the comments). It only cost me $58, and it worked like a dream.
It was my first time harvesting honey, and I was able to extract 1.5 gallons of honey from five medium frames by myself in a couple of hours.
Sorry to hear your hive got Africanized. Hope you’ve been able to start over with better luck.
LikeLike
So glad it worked out for you. Thanks you for the nice note.
LikeLike
Awesome thanks for sharing!
LikeLike
The smell of the glue is terrible. Will it affect the taste of the honey? How long will it take to get rid of and is there a way to get rid of the smell faster!
Thanks
LikeLike
It should dissipate pretty quickly. That pvc pipe and solvent is how a lot of homes receive their water supply, so it should be safe. Maybe sit it outside for a day, then give it all a good wash with dish soap and hot water.
LikeLike
Pingback: Organize Under Your Sink With PVC – Repair Water Damage
Is there any way to provide a cutting list for the 3/4″ pvc pipe
LikeLike
I am a little confused. I list out what the length of each part should be as you go through and build. Do you want a single table with all the cuts needed? I could assemble that, but I think that would be confusing. You have a pile of short PVC parts that all look about the same. The chance for grabbing the wrong one is high.
LikeLike
Pingback: Beekeeping 101 - What every beginning beekeeper needs to know | Rootsy Network
Great idea. Looks simple, inexpensive and workable for a beginner.
Thanks for posting
LikeLike
appreciate the write up. I built one. Works great
LikeLike