
There comes a time in every beekeeper’s life where he or she will want to harvest some honey. This is usually done with a centrifuge extractor. These start at a few hundred dollars for a very cheap unit, and the price goes astronomical from there. I spent quite a bit of time and money building test articles and doing mini test extractions, but ended up with a really good design that can be had for 50 dollars and a minimal set of tools.
VIDEO UPDATE
Due to the attention on this post I felt a video was needed to help with some of the questions. Enjoy and thank you for watching.
This spinner is specifically designed to hold medium super frames. Slight adjustments will be needed to make this work for shallow super frames. Does NOT work for large frames. The 5 gallon buckets are too small. Maybe find a larger trash can if that is your preferred frame size.


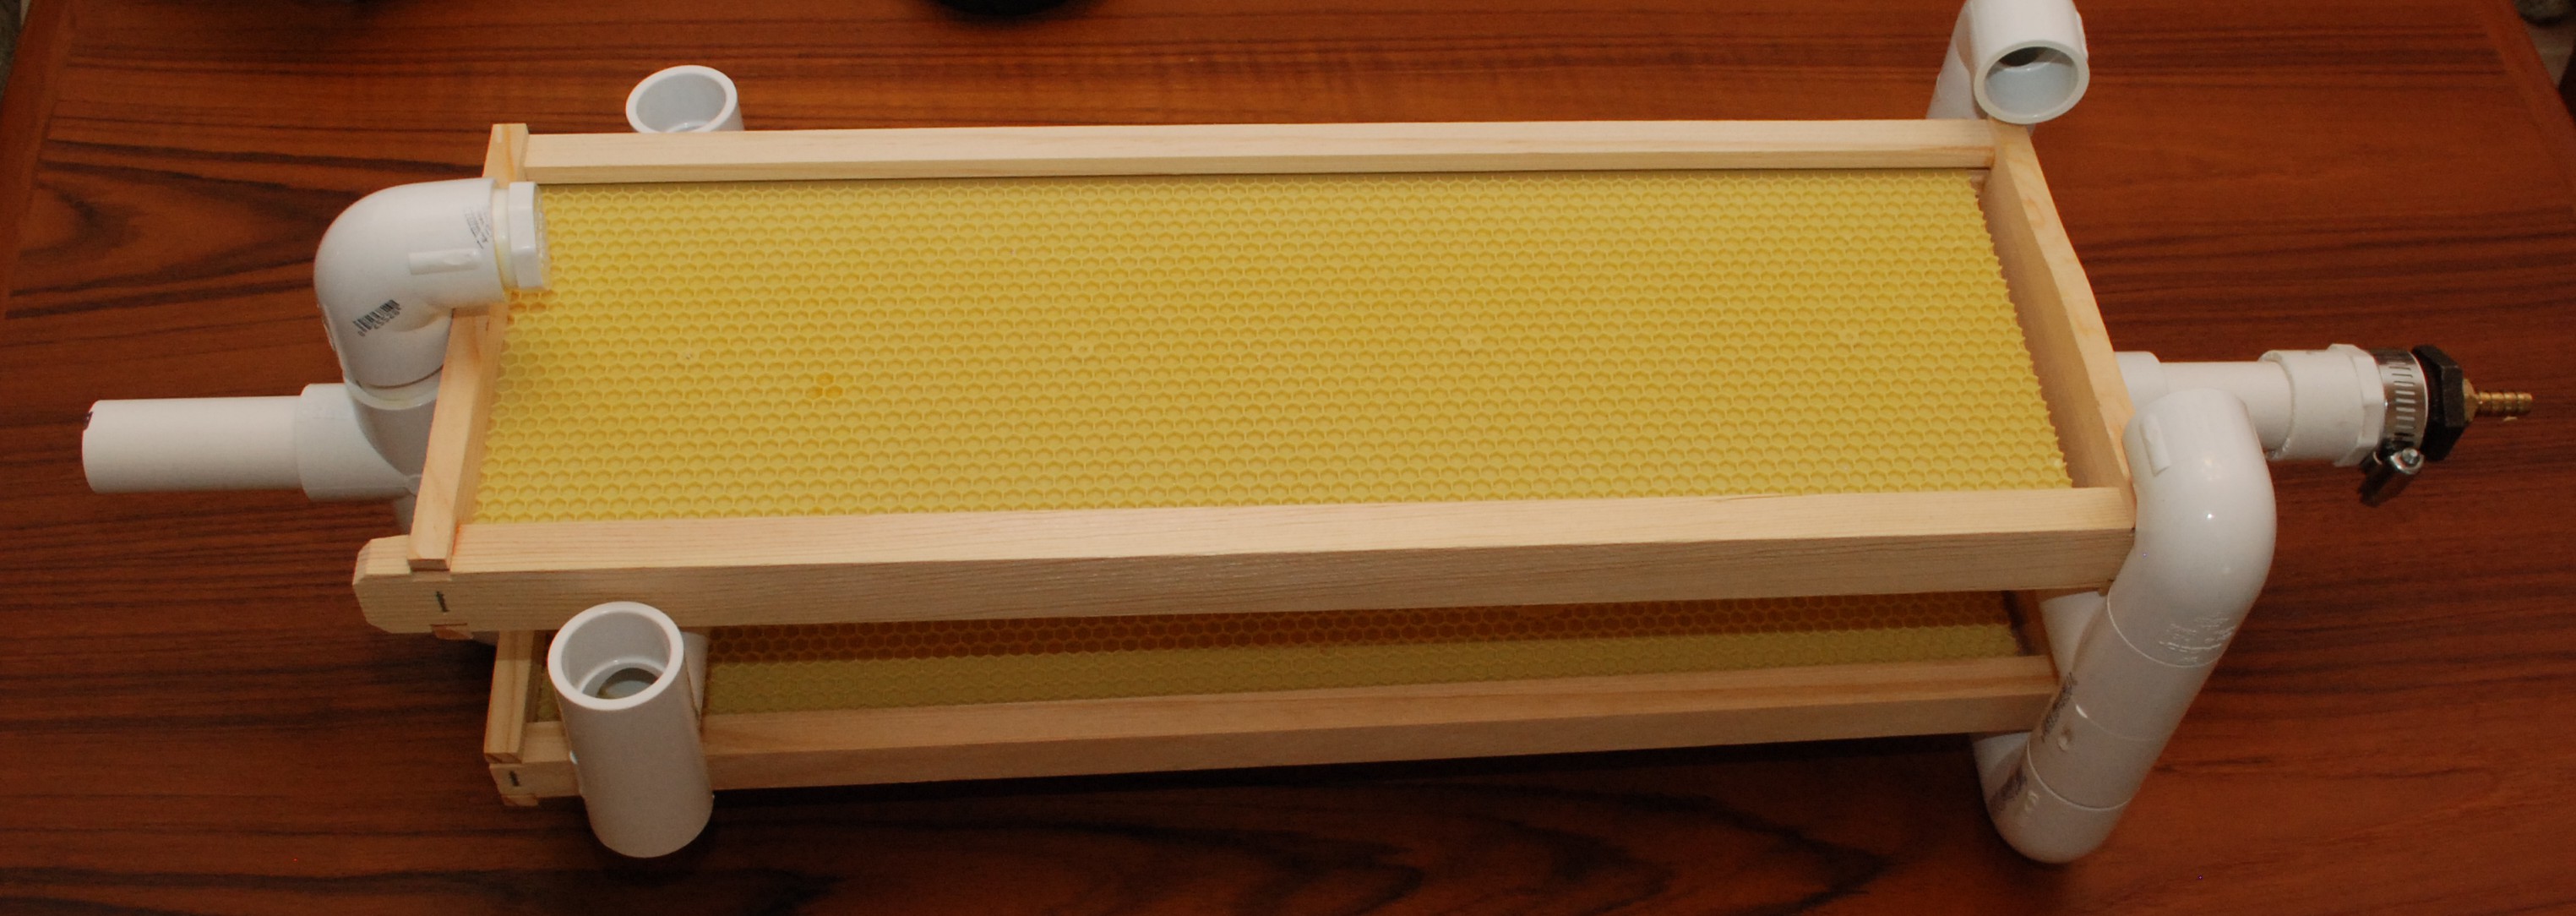
The above images show what a loaded out spinner looks like. The spinner now needs a container to catch all the honey. I really wanted to use 5 gallon buckets for their price and size. One bucket isn’t deep enough, so I cut the bottoms out to use them as height extenders.

I used a mix of firehouse pickle buckets and white food grade buckets I bought at the hardware store. I cut the bottoms off of two buckets to stack them inside each other to increase the height and allow for a good spin without messing up your kitchen.
The bucket with all the holes in the bottom holds the bottom shaft from the spinner and keeps it stable during a spin. The center hole is just big enough for the 3/4″ PVC pipe. The others are there to help the honey drip down into the white bucket with the honey gate.


The stack up is: White bucket with honey gate, red bucket with holes, and two bottomless buckets for height. It is a very small setup that will quickly process two frames at a time. I just did 20 frames with this tool and had a really good time with it. Best of all it doesn’t take up much space in the house.
The Spinner Build
You will need the following items for the spinner. I included the prices I paid for everything, though your prices may vary. Not included in the list below is the buckets and the honey gate. The white food buckets can be had for 4-5 dollars each at lowes. The firehouse pickle buckets can be had for 2 bucks each! They do require a bit of soaking to get rid of the vinegar smell though. Honey gates can be had for 5-10 dollars.

In total you will spend about 50 dollars on the whole setup. Filters, a capping knife, honey bears, and others will cost you more, but a whole extraction and bottling setup for under 100 dollars is very attainable.
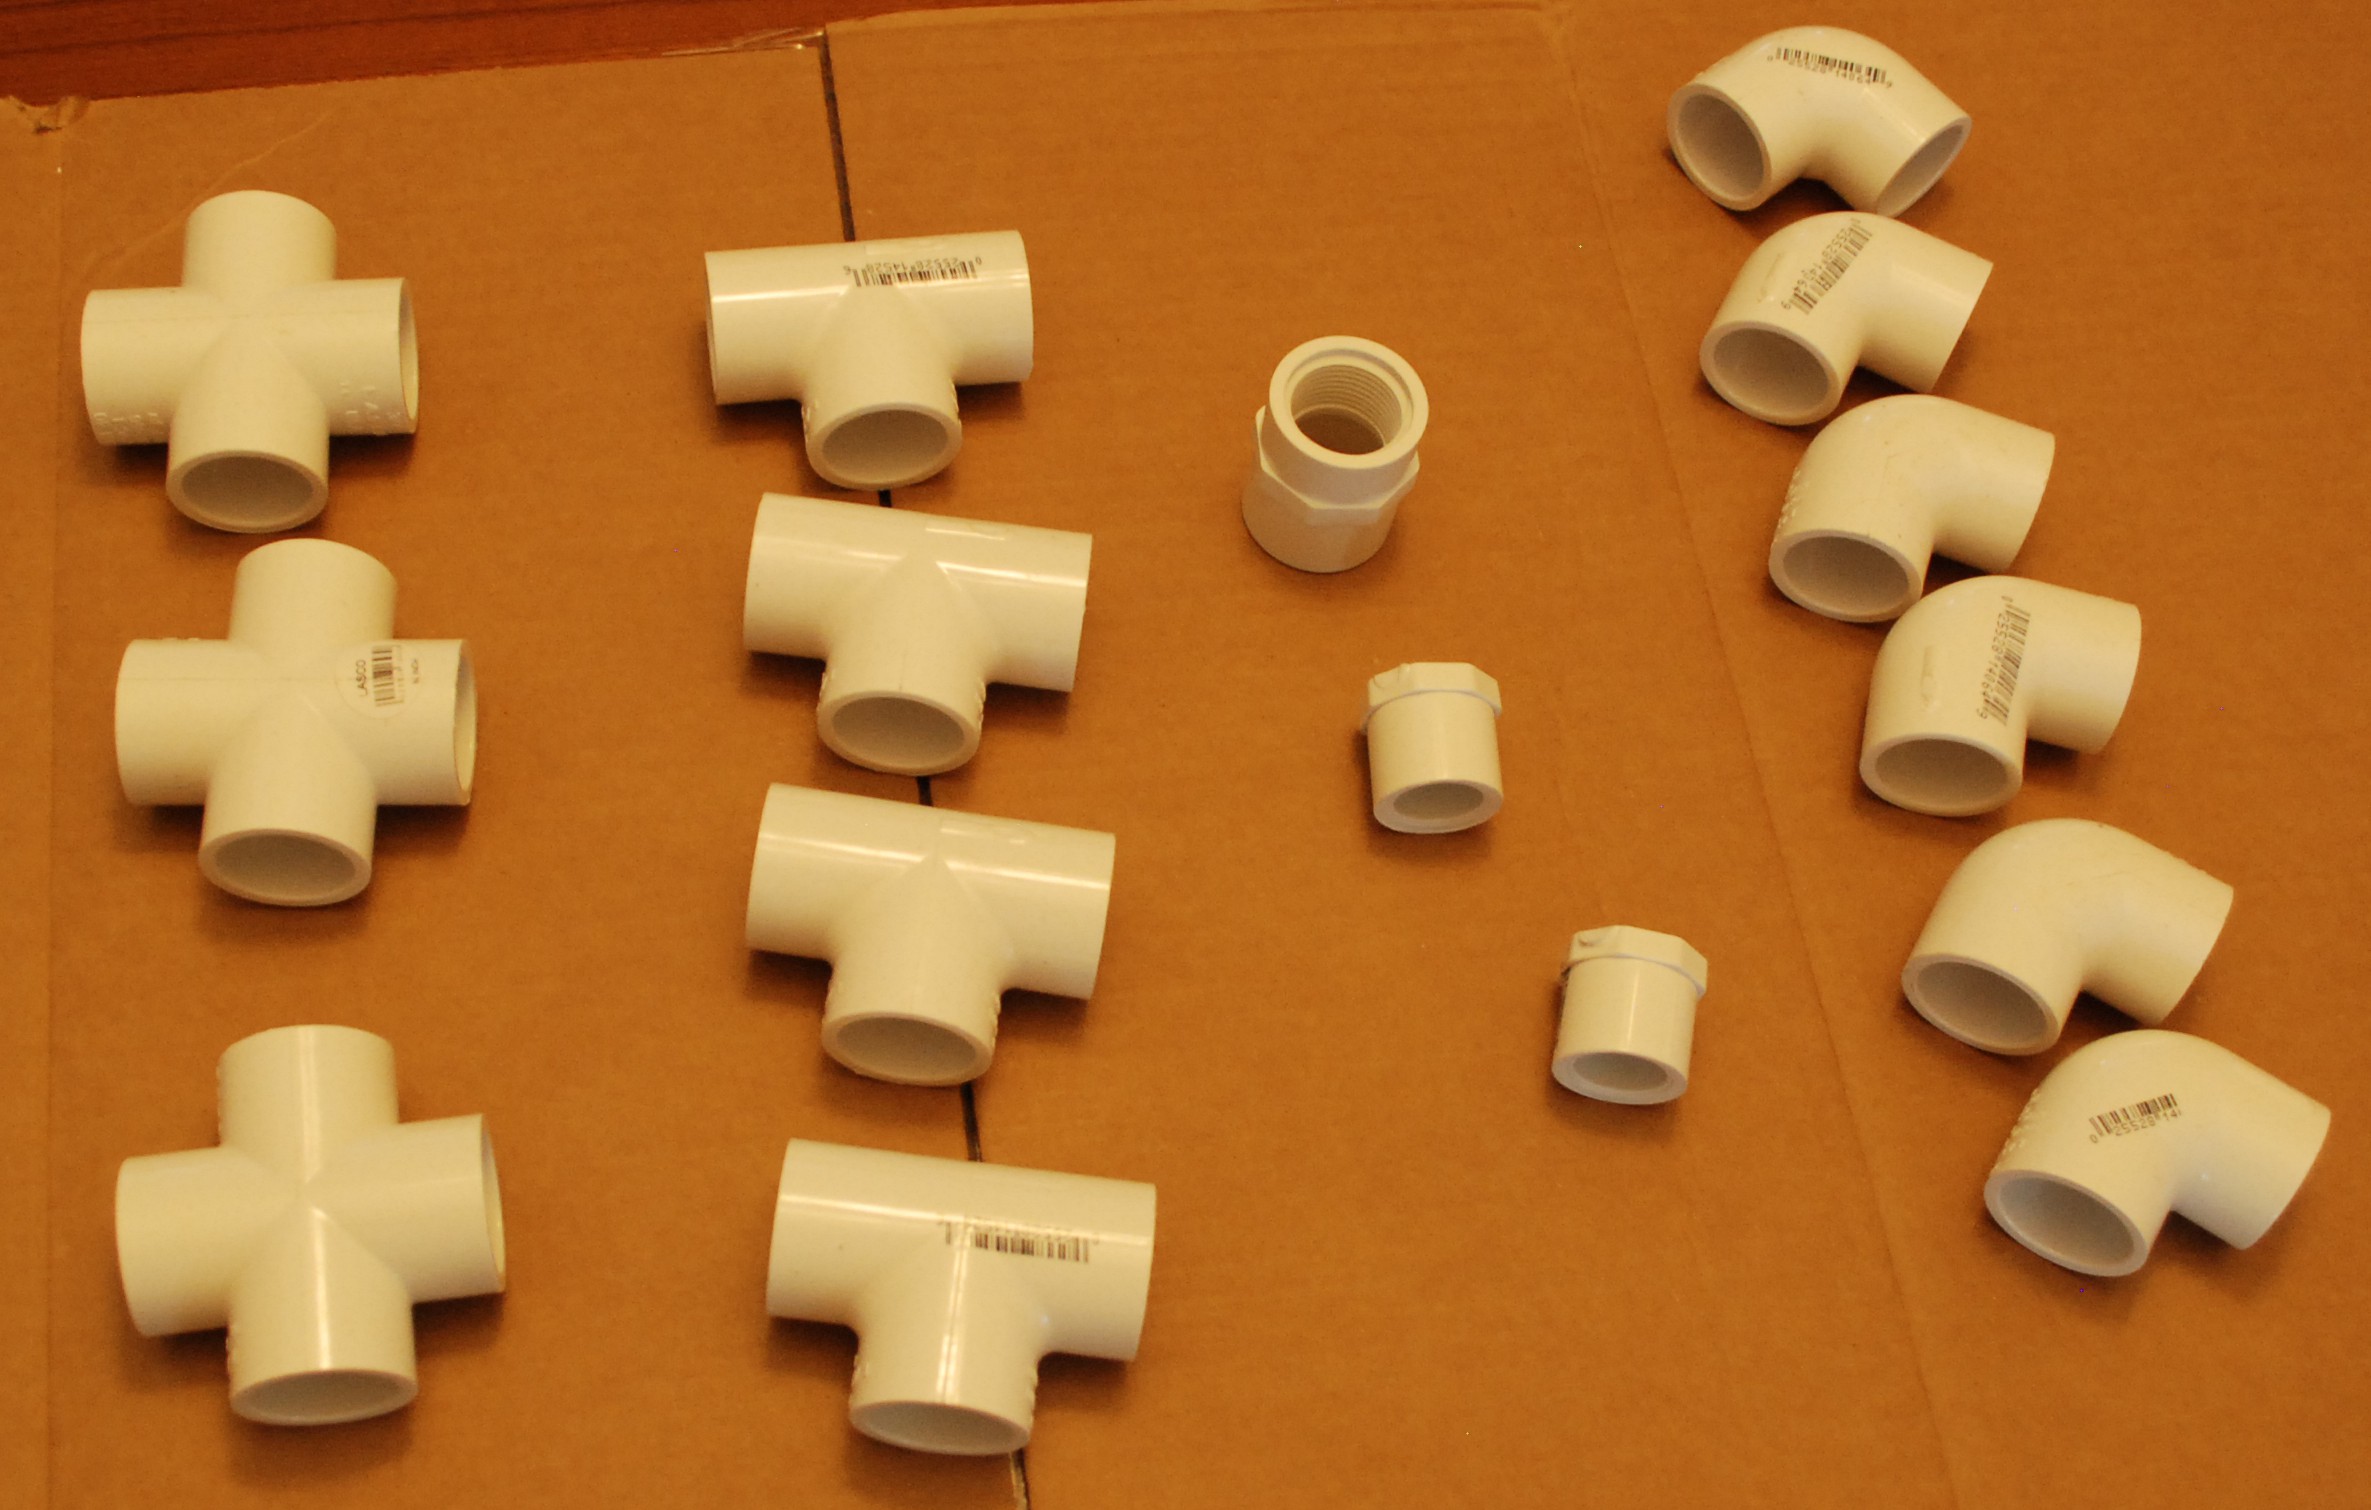
From a tools standpoint you will need PVC pipe cement, a saw or PVC pipe cutter, tape measure, and a marker. The pipe parts should look like those shown below.
UPDATE: Fresh PVC cement can be helpful. Fresh glue allows longer open working time than old glue. You only have a few seconds to get it right, so if your glue is old, get a new one.
While assembling the sections be mindful of how much cement you use. Too much will drip on your work surface, and will drip down inside to the sections you want to glue in the future. Work slowly and purposefully. Once you put two segments together, they are permanent in just a few seconds. Dry fit everything beforehand to make sure it all fits with your frame hardware.
UPDATE: Dry fitting is really important! Some stores may sell fittings with different sizes and depths. Dry fit every stage and check it often with your frames and bucket. Use multiple frames, as there can be variation in their construction as well.
Bottom Hooks
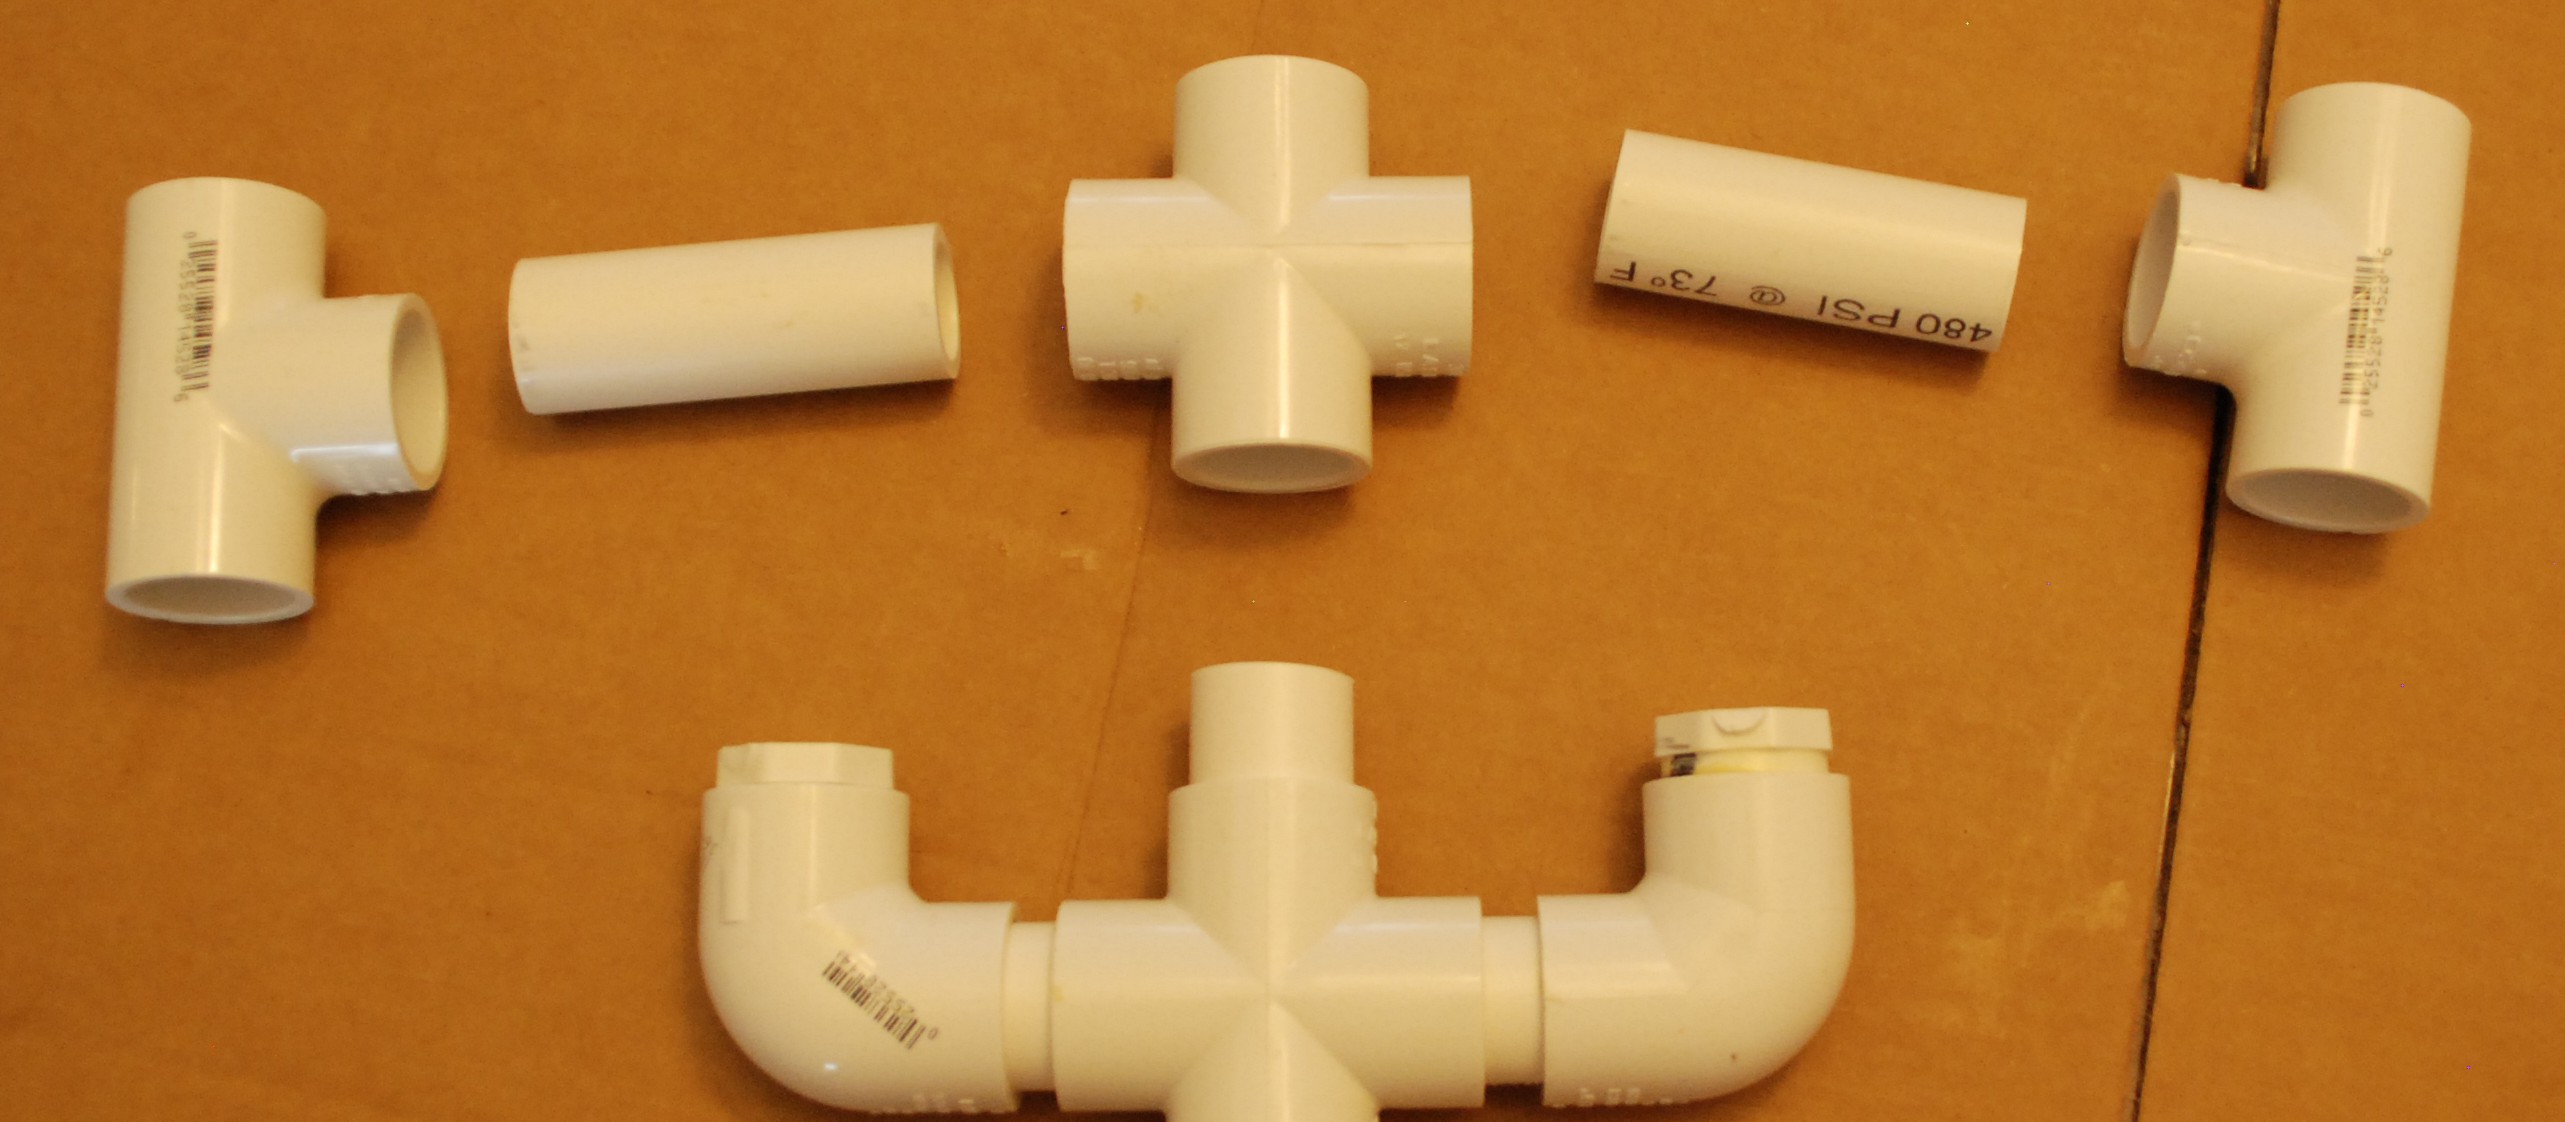
These features are the depth stops for the frames. Gather a cross, two elbows, two plugs, and cut 2x 1.75″, 1x 1.5″, and 1x 3″ sections of pipe.

The 1.5″ section of pipe will connect to the bottom guide, the two 1.75″ pieces will hold in the bottom hooks that keep the frames from sliding down any further. I used plugs to keep honey out of the lower section of the spinner. This is what the finished part should look like

Bottom Guide
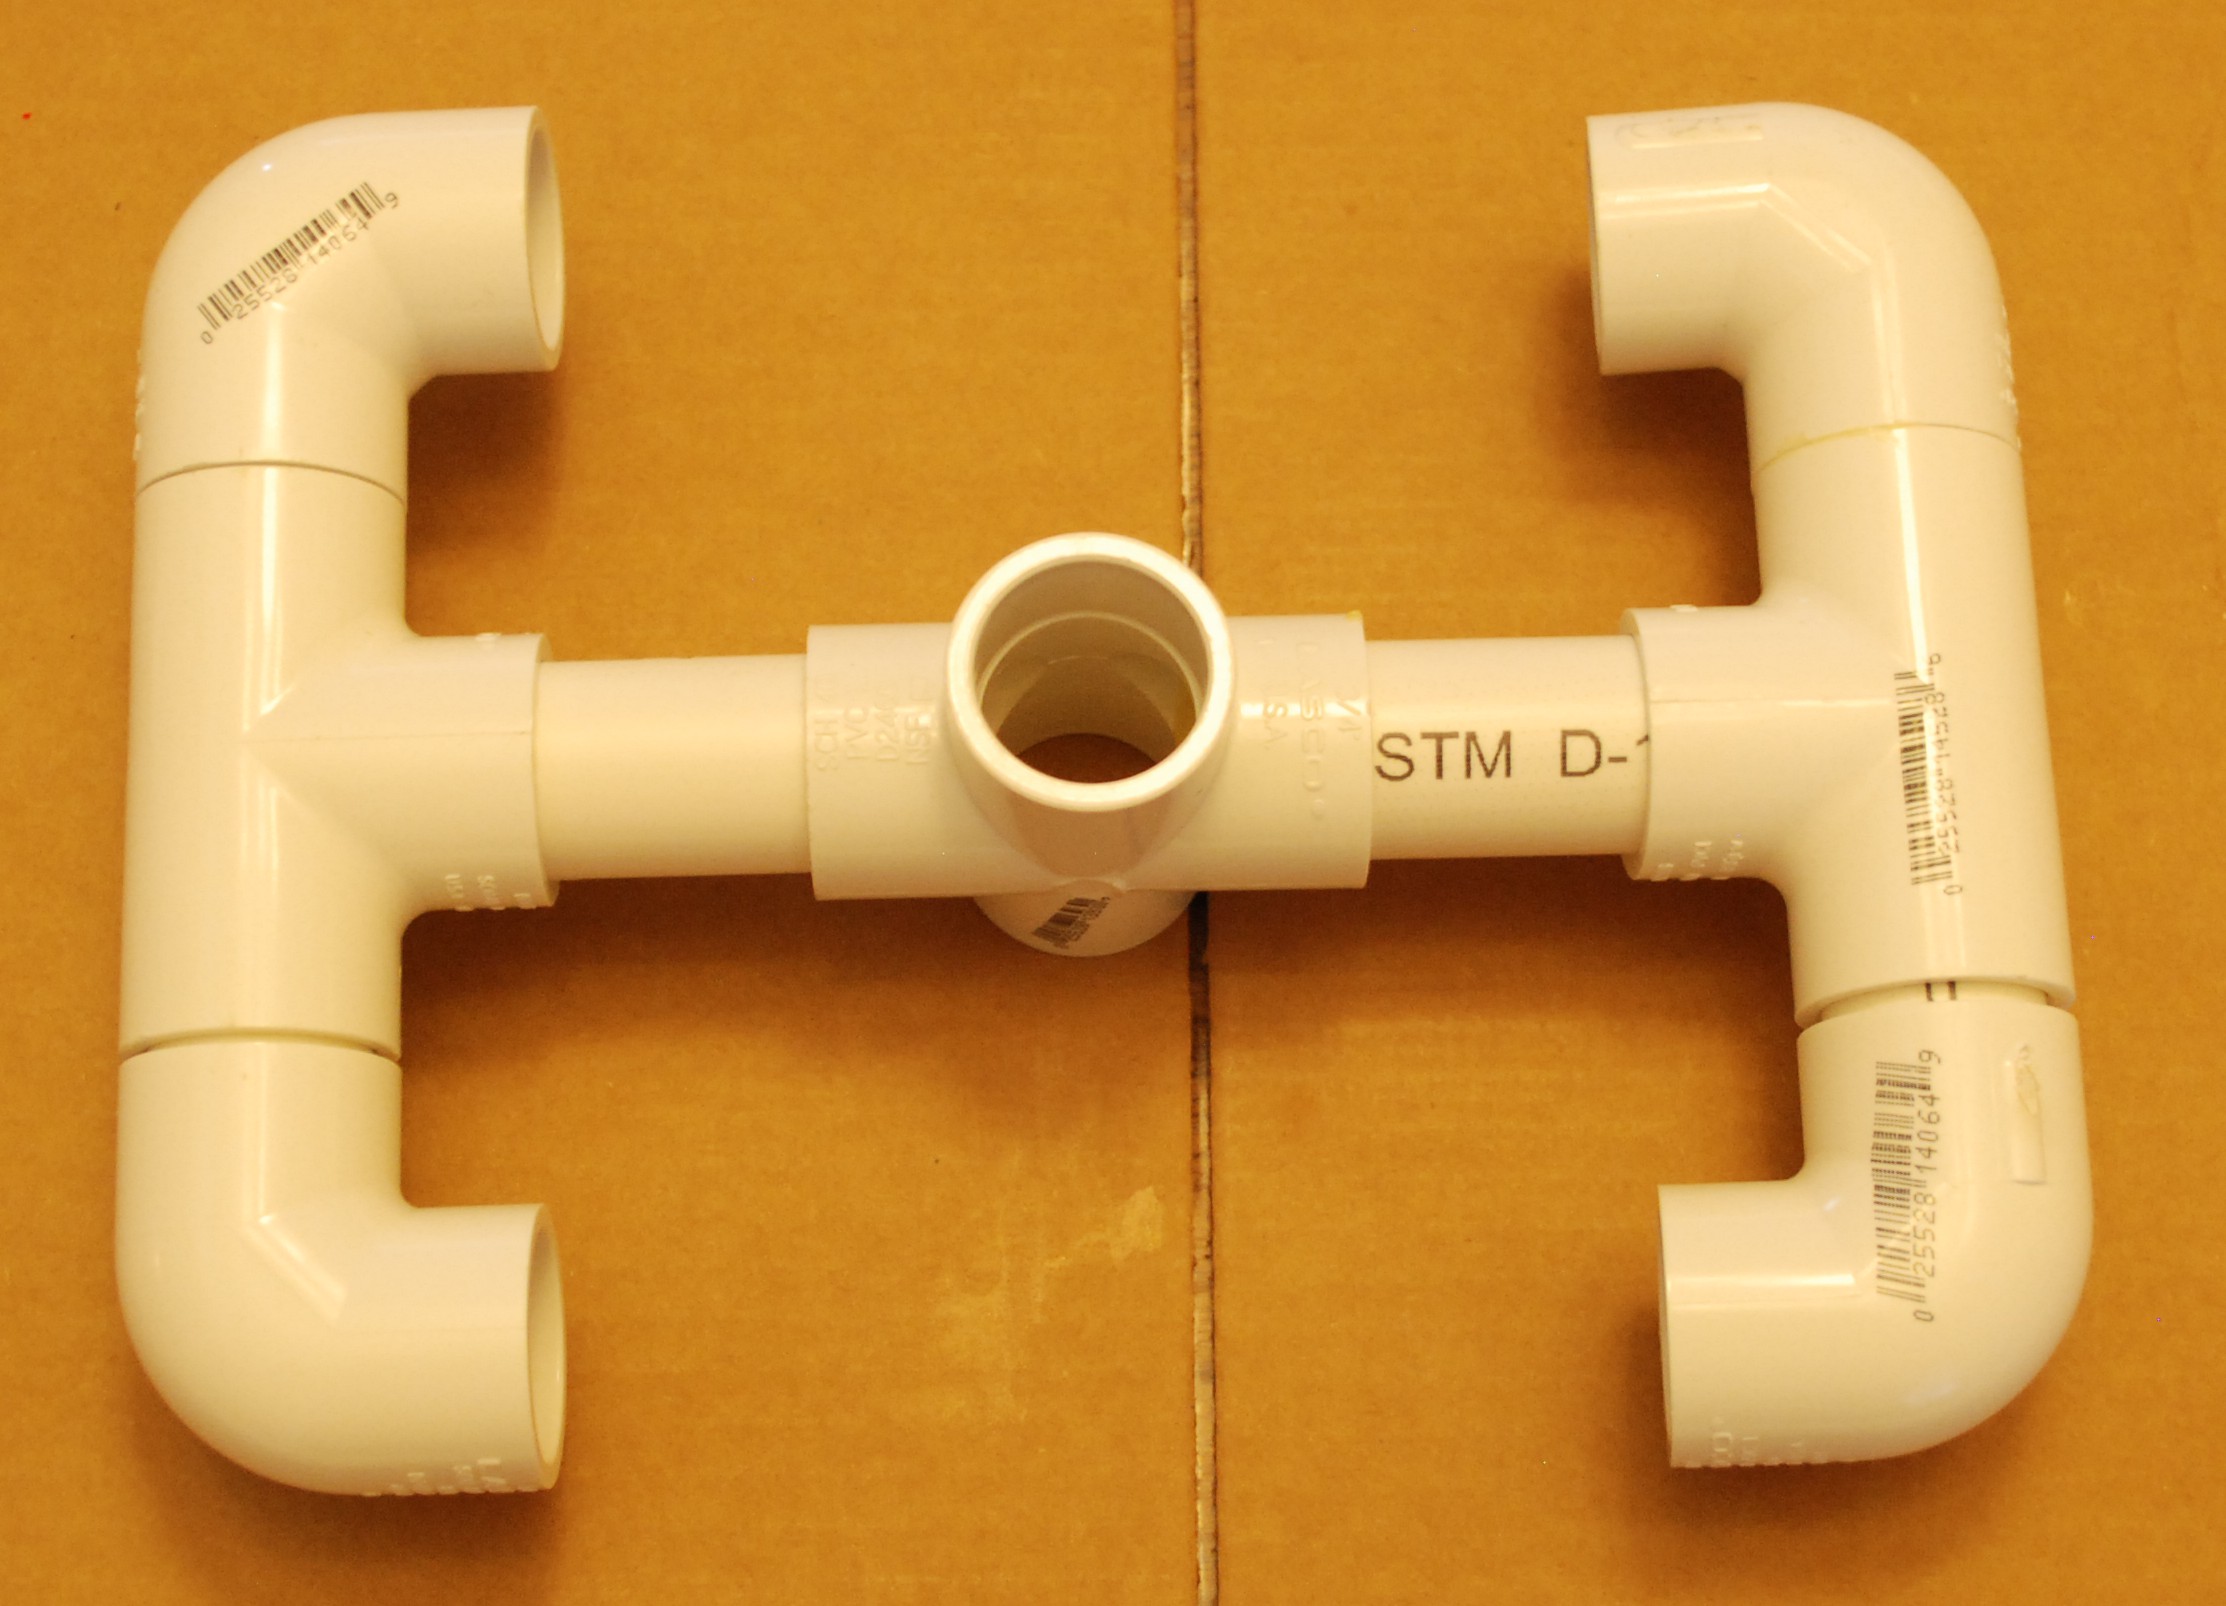
Next comes a bottom guide to keep the frames from sliding left and right. This step requires a cross, two tees, and two 2.75″ pipe sections. Be careful with this step. Too narrow and your frame will not fit, too wide and it will not fit in the bucket.
Assemble the sections and attach it to the bottom hook as shown below. Now the frame will come down into the hook and be held from sliding left and right.

Top Guide
The top guide will hold the top end of the frame and prevent it from going out during the spin, and from going left or right. Gather a cross, two tees, four elbows, 2x 2.75″ pipes and 4x 1.5″ pipes.

It is probably best to assemble the two outer arms first, then attach them to the central cross.

Drill Post
A short 3 inch section of pipe and the threaded pipe fitting goes on top to allow for the drill to be attached. I chose 3inches for that length, but it could honestly be longer or shorter.


Central Post
A single 14.5″ piece of PVC attaches the top and bottom half. Dry fit this piece to make sure it holds your frames correctly. The two sets of guides should line up so that a frame can be slid down through the top guides into the bottom hook.
Drill Barb
A threaded coupling was installed at the top of the spinner earlier. Now comes the final piece of the puzzle. An iron pipe threaded adapter takes the size from 3/4″ to, I think, a 3/8″ female thread. That allows a brass barbed fitting to thread in. The brass fitting is small enough to fit into my drill. Most drills can chuck onto anything smaller than 3/8″ in outer diameter. I used a hose clamp around the PVC threaded fitting to help reinforce it. My dewalt drill runs it pretty well on the lower speed setting. Just accelerate slowly, and stop slowly and everything will be ok!
Update: A good alternative is to cut the barb off and use the remaining brass hex portion as a nut. Get an adapter for your drill and put the appropriate socket on there. Now you don’t have to tighten your chuck every time, just slip on the socket and drive!


Pingback: Honey Spinner Spins with Drill Power DIY Project | The Homestead Survival
I like the design but I have a question that doesn’t seem to be a concern with everyone else. My spindle rotates, heats up and melts the plastic bucket. I’ve tried using different material that is harder, but plastic, but the material still melts. I haven’t tested it on honey yet, just dry test. Have you seen issues with this? I just feel uncomfortable about the shavings left behind. I thought about using bees wax as a lubricant…? Any suggestions. Thank you
LikeLike
I never had that issue, but I don’t run it much without frames. It won’t go that fast when loaded, and honey will fly around everywhere. Maybe that is the accidental lubricant!
LikeLike
Suggest try fixing a steel coin under the spindle’s end, to avoid contact with plastic…
LikeLike
The honey keeps it lubricated I spins better with it on it
LikeLike
Dude: That video rocks. If it sucked, I’d say so. Compact and dense. Succint. Comprehensive.
Casual delivery, but perfectly approopriate and not at all counterproductive. Effective.
Pictures? And one very short video?
Almost could have skipped entire written instructions! Great work.
This is what instructional/demonstrational videos shoud be—to the point.
No noise, all signal.
Time is precious. THANKS!
LikeLike
Thanks. I never made many videos, but I quickly tried to trend towards brevity.
LikeLike
I was ready to shell out almost $250 bucks for one. After seeing this I will build it.
LikeLike
I think it is a great idea. If I did not have friends who own 1 I would make one.
LikeLike
Is there any way to use a bucket top on this spinner
LikeLike
I suppose you could. You could drill a hole in the center of the bucket top and put it on before you attach the drill. I never had issues with the honey flying out, it was always low enough in the bucket to stay in.
LikeLike
Reblogged this on Domowe jest lepsze and commented:
Domowe pszczelarstwo
LikeLike
Thank you, this is awesome. I will post pics when I get it set up. You should sell them too.
LikeLike
I built this extruder it works like a charm!!! Made a few modifications for the chuck and plugged all the open pipe its awesome!
LikeLike
Be careful, this extractor is only suitable for small frames, I bought all the hardware plus four honey buckets and proceed to build the extractor to use with full size Landstroth Frames and without gluing the pvc pieces. It is too large to fit into a honey bucket, I have spent nearly A$100 and can’t use it.
LikeLike
I wrote up at the top that it is designed for medium frames and could be made to fit small frames with a little modification. I’ll add to that the note that it explicitly excludes large frames. You can use the same concept, but you will need a wider bucket. Small round trash can of some sort? Don’t throw out your parts, get a bigger container!
LikeLike
Thank you Chase, just looked at my print out of your instructions.
I have just noted your quote on the bottom of page one stating for use on medium size frames or smaller frames with slight adjustments.
I missed this small paragraph and was taken away with the photos.
In Australia most bee keepers use full size frames
LikeLike
There are 20 and 30 gallon barrels that might be the right size.
LikeLike
Like wise Paul, I also bought all the materials, cut all the tubing to length and started glueing before I noticed it was too small for the full size Langstroth Frames. I also spent close to $100 and now it’s in the landfill dump. Do hope others read our post and not get caught as us.
LikeLike
I’m a home brewer and the home brew suppliers sell a 6 or 7 gallon bucket that is larger diameter than a normal 5 gallon bucket (make sure and ask if they don’t specify diameter because there are also same diameter taller buckets that would not work either).
LikeLike
excellent video can’t wait to get parts and start building
LikeLike
How do you clean it. Should u put plugs in the other 8 holes in pipes. Sorry new to this
LikeLike
I found honey never found its way in, you are spinning this thing around a lot. Cap it if you want. I cleaned everything with hot soapy water right before use. It will probably have spent a while in the closet between uses.
LikeLike